How to Overcome Apple’s Face ID Lockouts
 If you’re an Apple iPhone user, your phone likely utilizes Face ID biometrics to authenticate you and unlock your phone’s features. While this authentication system seems fine when it works, what happens when it fails? Not what you’d expect. Clearly, Apple didn’t think the failure design through. Let’s explore.
What is Face ID?
Face ID uses a series of hardware technologies including infrared, lidar and front facing cameras to scan your face and recognize you. It was touted by Apple as a better alternative to Touch ID, a fingerprint scanner, which was available on earlier iPhone models (and some current models too). Let’s just say that I prefer Touch ID over Face ID for various reasons, but I digress.
Face ID works fine under most circumstances, but there are conditions where Face ID could fail and prevent you from getting into your phone to perform critical diagnostic and/or troubleshooting features (or even backing it up onto your computer).
When you hold your phone to your face, the camera(s) scan your face for a number of key features which are then used to identify you no matter what angle or lighting (more or less) your face may be in. The reliability of this scanning technology is all dependent on the scanning hardware functioning 100% properly. We all know that hardware is prone to failure, either hard failure in the hardware itself or even soft failure by such things as poor lighting conditions, blocking the sensors or interference. Whatever the failure reason, Face ID has some important concerns and bugs that Apple needs to address.
Face ID Failure
This is the crux issue in Face ID that leads to all other related problems. Let’s begin with some relevant context. When you log into your favorite website or app, you’ll need credentials. Often, these consist of a username and password combination. There may be extended ways you can get authenticated beyond these two pieces of data, such as sending a one time SMS code, using an authenticator app, prompting you to press ‘accept’ in an app on another device or even using your voice, when calling into certain phone systems.
Typically, when one authentication type fails, developers offer one or more backup redundant authentication systems to help you get logged in. For example, if you’ve lost your password, sites allow you to reset your password. Resetting your password has you walk through various steps to identify that you own that account, usually by asking key questions like Name, Birth Date, Home Address or any other information that only you may know. You can often even call the support team at a website and ask them to help you get your password reset or cleared. These redundant designs prevent users from landing in dead end failures, as long as you have various other identifying data on hand to prove that you are you.
Not with Face ID… :(
Apple’s Bad Face ID Implementation
Apple created Face ID so that should Face ID fail to authenticate, it leads to a true dead end failure condition. There’s no additional way to authenticate with Face ID beyond that Face ID failure. When Face ID fails, it fails hard and it fails done. Even though the iPhone has the ability to access and request alternative identifying information, such a passcode, requesting and using your Apple ID credentials, requesting identity on other Apple devices and/or using an SMS code, NONE of these other authentication systems are used or available when Face ID fails! Nope. Apple just dead ends Face ID failures into nothingness. Face ID works or it doesn’t. When it doesn’t… yeah, here we open…
Pandora’s Box (aka Stolen Device Protection)
Apple Developers, in their infinite wisdom, have chosen to lock many critical troubleshooting and corrective features behind a successful Face ID verification. One might be thinking, “Well, that seems secure enough. So, what’s the problem?” Let me tell you.
One such feature locked behind Face ID verification is Device Protection under Face ID settings. If the Device Protection feature is toggled on, there are a number of things that Device Protection controls, including the ability (or not) to toggle Device Protection off. Another feature locked by Device Protection is the ability to use the Face ID Reset Data function, which becomes restricted and unusable when Face ID fails to verify.
This leads to a circular problem. Can’t verify with Face ID. Can’t reset Face ID’s biometric verification data to attempt to fix Face ID. Because the Reset Data function remains greyed out without a successful Face ID verification, you’re essentially locked out of the feature you need most to try to FIX Face ID. Not even Apple Support or the Apple Store can help you solve this dilemma.
Other critical features like a local Device Reset or a local Device Wipe are also locked behind Face ID when Device Protection is enabled. Once again, critical troubleshooting and corrective steps are eliminated simply because Face ID fails to verify.
How might this impact you?
There are a number of scenarios where Face ID failing to authenticate your face may affect you:
- You cannot attempt to fix Face ID if Device Protection is enabled and Face ID fails to authenticate.
- You cannot reset the device locally because Face ID fails to authenticate.
- You cannot wipe the device to factory settings because Face ID fails to authenticate.
- You can’t use many apps that rely on Face ID to authenticate you when Face ID fails.
And no, the passcode doesn’t help you here and neither does your Apple ID password. If you receive a used iPhone from a family member (or even from a used phone seller) and you want to wipe it and set it up new for yourself, you cannot do this. When Face ID was originally enabled, that means the phone will need to see the original owner’s face to unlock Face ID to enable a local factory reset and wipe options in settings.
This is particularly problematic when the device is shipped cross country and the Face ID person is not in close proximity. To solve, this means shipping the device back to the person, having them perform the wipe and then having the device shipped back. Let me just say here that SHIPPING IS EXPENSIVE! Best to avoid this back and forth shipping.
The unnecessary shipping can be avoided in used phone purchases if the seller fully wipes the device to factory defaults before shipping. However with family members, they often simply turn old phones off and forget about them. Then hand them over just as they are to other family members, leaving situations like the above.
But Wait, There’s More!!!
Apple does offer a feature that’s fairly sledge-hammery, but this feature will let you at least get the phone out of your Apple ID account as long as you own more than one iOS or MacOS device and the device exists in the “Find My” app OR you have a computer with a browser and can log into the iCloud.com website. The “Find My” app offers a critical security feature that allows you to remotely wipe your Apple devices to factory defaults, even if the device is not currently in your possession. The device will, however, need to be connected to the Internet to receive and perform the request. If the device is in your possession, there’s no problem at all. If it’s lost or stolen, it all depends on timing. If you can see the device is active and pinging in the “Find My” app, then you can wipe it.
When you buy a new iPhone, the first time you connect it to your Apple ID, this action automatically enrolls the device in the “Find My” app for tracking. You don’t need to manually add devices to this app. Apple often makes these things simple and easy for new users. This is one of those apps that “just works.”
The good thing about the “Find My” app wipe is that because it’s a remote wipe using another device on your Apple ID (usually performed because a device is lost or stolen, but can be used for other purposes), this remote wipe works around all security on the device itself, including Face ID. Meaning, no matter what security settings you have set up on the device, the remote wipe will do its thing without needing to touch the device at all.
There are some important things to consider about using “Find My” app to wipe your device, though. This wipe does as it sounds. It wipes all settings, data and information from the specific device. If you have photos or videos on the device, these will be wiped. The wipe feature erases everything back to factory defaults with the exception of ONE critical thing.
The wiped device will be placed into an Activation Lock (Cloud Locked) status. This means that in order to reactivate and use the device again, the original owner must type in their Apple ID credentials (login and password) to unlock the device for reuse. Once that’s done, the device is basically as if it’s brand new and is available to be set up again as though it were a new phone.
There are a few downsides, though. The wipe is just wee bit sledge-hammery when all you’re needing to do is something simple, like clearing out Face ID data. Because the “Find My” app lists ALL of your devices in a single convenient location, you will need to make absolutely sure that you have selected the correct device BEFORE sending out the wipe instruction. Don’t make a mistake here! Choosing the wrong device name means it will wipe that device instead. Make sure you name your devices properly for easy identification and double check that you’ve selected the correct device! You don’t want to wipe you or your spouse’s current phone accidentally. Caution is in order here.
However, the “Find My” wiping feature does mean that you can at least get your iPhone back into a workable state to begin setting it up again. If your phone has been backed up recently, then you won’t really lose all that much other than the time it takes wipe and restore the phone from your most recent backup, assuming you can get the phone back or you have it in your possession. You are backing up your phone’s data regularly, right?
How to Send a Remote Wipe Request to an iPhone
 To wipe a device remotely using “Find My”, you will need to log into the “Find My” app on a different device under the Apple ID where that device is associated. You can do this on an iPad, iPhone, MacBook or via iCloud.com in a web browser. You don’t necessarily need to have another Apple device, but you will need access to a computer or phone with Internet access and a web browser to log into iCloud.com using the Apple ID credentials associated with the iPhone. For this purposes of this article, iCloud.com is used to show how to find and use the “Find My” feature. These options are also available in the “Find My” app on iOS devices.
Since iCloud.com is a website, it’s possible Apple may redesign this website from time to time. That means that the image shown here in this article may change. The “Find My” feature may remain available, but may be located in a different place and/or may present with a different user interface. If the user interface is different from what’s shown here, you will need to look for the “Find My” app in iCloud, open it and then determine how to get to and use the described features.
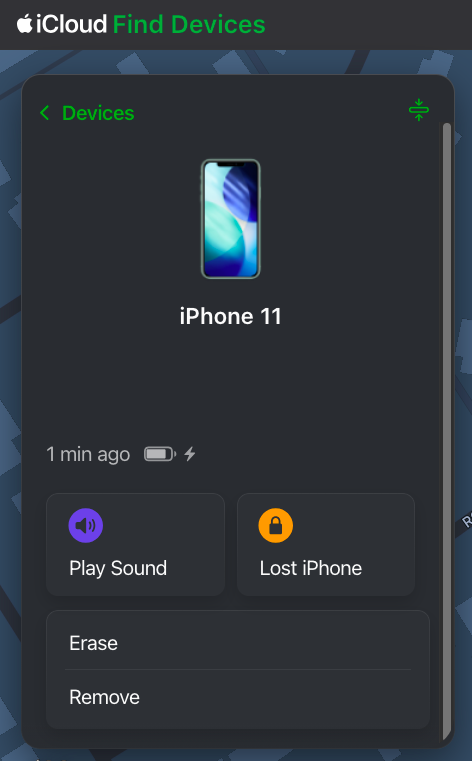
After logging into iCloud.com using the correct credentials, scroll down to the bottom of the page and you will see an array of available apps. One of the apps is “Find My”. Click it to open up the “Find My” app.
Once you have opened the “Find My” app, you will be given a number of options for each device when selected, including Play Sound, Lost Phone, Erase and Remove, at least for an iPhone. Different devices may be given more or less options, depending on the device type. The “Find My” web app may update a bit more slowly than the app available on an iPhone, iPad or Mac. You may need to wait a few minutes for the “Find My” web version to refresh fully for all of your devices to show active and online. You will be unable to send any remote commands to a device until that device is shown as online.
Once you have selected the device and opened it up, it will show you a control panel like the one shown above. The Erase option is the option you will need to remotely wipe the device. Again, make sure you have selected the correct device. I’d suggest playing a tone on the device using the “Find My” app to ensure that the correct device is chosen. However, if you’re erasing a device that is not in your possession (i.e., it’s stolen), don’t play a tone. You don’t want to alert the thieves that you’re looking at the device. In a stolen device case, check to see where the device is in the world on the map. If it’s not where you expect it to be, then you’ve selected the correct device for a wipe.
If you’re trying to solve the issue presented above and you have the device in your hand (or another person has it in their hand while you talk to them), play a tone to confirm the correct device. Once confirmed, send the erase command to the phone. If another person has the device in their hand, make sure they are talking to you on a separate device from the one that is about to be wiped. Once you send the wipe command, the phone will stop functioning. They will need to be on a different device talking to you for the duration of the wipe.
Remote Erasure — How does it work?
Once the Erase command is successfully sent to the device, the phone will immediately begin requesting to enter passwords with various popups. These popups indicate the command has been received by the phone. Ignore the popups and do nothing about them, though. At this point, the phone will need to be turned off and turned back on. Once the phone has been rebooted, the wipe will begin. The iPhone screen will turn black, a white Apple logo will appear and a small progress bar will appear just below the Apple logo.
The phone may reboot a couple of times during this wipe process, each with progress bars. Once the wipe process has completed, the device will go into Activation Lock (Cloud Locked) mode. When the phone is powered on after the wipe has completed, the phone may require setting up WiFi access before moving forward. However, at some point, you will be prompted to enter the Apple ID and Password of the person who originally owned the phone. This is a Cloud Lock. Entering these credentials will remove the Cloud Lock status and put the phone into a factory default setup mode to begin setting the phone up as if it were brand new. Once the Cloud Lock status has been removed, the phone is no longer associated with the Cloud Locked Apple credentials in any way.
Stolen Device Protection vs Cloud Locking
Here’s just a little bit of commentary about the Stolen Device Protection feature itself. I’m not exactly sure what Face ID’s Device Protection feature is actually trying to solve, honestly. Apple has already previously developed Cloud Locking. The Cloud Lock system is an effective deterrent for theft or loss. Should someone manage to get past the passcode and into your iPhone, they can’t wipe your device because the wipe process requires logging out of iCloud using the user’s Apple ID credentials and password. The wipe will stop and fail if the correct credentials are not input during the wipe process.
Unfortunately, Apple has taken this wiping problem one step further with Face ID’s Stolen Device Protection. With Device Protection enabled, not only do you still need to enter your Apple ID credentials during portions of the wipe to take it out of iCloud, but Face ID must function to even begin the wiping process.
Again, because Face ID dead end fails, this can lead to the possibility of never being able to actually remove a device from your Apple account in the expected way, by wiping the phone on the phone. Maybe you bought a new iPhone because your Face ID system stopped recognizing you. That’s fine and all, but now you cannot remove that device from your Apple ID because Face ID prevents wiping the device from the device itself. Yeah, this is Apple not thinking things through.
That is, until or unless you realize that the “Find My” app allows for remote wiping your device(s), which does solve the above Face ID dilemma. Just be cautious when selecting a device to wipe. Don’t pick the wrong one.
Conclusion
So, yes, there you have it. There is definitely a bug in Apple’s Face ID authentication system that can prevent you from locally wiping or locally fixing your Apple device. An authentication bug that should be considered oversight by Apple’s developers. However, all it is not lost. Apple has provided us with a sledgehammer approach in the “Find My” app to workaround this bug, as long as you have other devices that can initiate the wipe inside of “Find My” and assuming that the “Find My” feature is working correctly on the remote device. Lots of things need to line up properly for the “Find My” device wipe to function.
If you have run into similar issues regarding Face ID failures, please sound off in the comments. If this article was helpful to you, please follow, like and leave a comment below.
↩︎
Fediverse Reactions
Apple and Law Enforcement
 Apple always seems to refuse law enforcement requests. Let’s understand why this is bad for Apple… and for Silicon Valley as a whole. Let’s see how this can be resolved.
Stubbornness
While Apple and other “Silicon Valley” companies may be stubborn in reducing encryption strength on phones, reduction of encryption strength isn’t strictly necessary for law enforcement to get what they need out of a phone device. In fact, it doesn’t really make sense to reduce encryption across all phone devices simply so law enforcement can gain access to a small number of computer devices in a small set of criminal cases.
That’s like using a sledgehammer to open a pea. Sure, it works, but not very well. Worse, these legal cases might not even be impacted by what’s found on the device. Making all phones vulnerable to potentially even worse crimes, such as identity theft and stealing money in order to prosecute a smaller number of crimes which might not be impacted by unlocking a phone doesn’t make sense.
There Are Solutions
Apple (and other phone manufacturers) should be required to partner with law enforcement to create a one-use unlocking system for law enforcement use. Federal law could even mandate that any non-law enforcement personnel who attempts to access the law enforcement mode of a phone would be in violation of federal law. Though, policing this might be somewhat difficult. It should be relatively easy to build and implement such one-use system. Such a system will be relatively easy to use (with the correct information) and be equally difficult to hack (without the correct information).
How this enforcement system would work is that Apple (or any phone vendor) would be required to build both law enforcement support web site and a law enforcement mode on the phone for law enforcement use only. This LE support server is naturally authentication protected. A verified law enforcement agent logs into Apple’s LE system and enters key information from/about a specific device along with their own Apple issued law enforcement ID number. Apple could even require law enforcement officers to have access to an iPhone themselves to use FaceID to verify their identity before access.
The device information from an evidence phone may include the iPhone’s IMEI (available on the SIMM tray), ICCID (if available), SEID (if available), serial number, phone number (if available) and then finally a valid federally issued warrant number. Apple’s validation system would then log in to a federal system and validate the warrant number. Once the warrant is validated and provided the required input data specific to the phone all match to the device (along with the Apple’s law enforcement ID), Apple will issue a one-time use unlocking code to the law enforcement agent. This code can then be used one time to unlock the device in Law Enforcement Mode (LEM).
To unlock an evidence device, the agent then boots the phone into LEM (needs to be built by Apple) and then manually enters an Apple-generated code into the phone’s interface along with their law enforcement ID. The law enforcement mode then allows setup and connection to a local WiFi network (if no data network is available), but only after entering a valid code. The code will then be verified by Apple’s servers and then the phone will be temporarily unlocked. Valid entry of a law enforcement code unlocks the device for a period of 24 hours for law enforcement use. There is no “lock out” when entering the wrong code when the phone is in “law enforcement mode” because these codes are far too complex to implement such a system. Though, the phone can reboot out of LEM after a number of wrong attempts. You simply can’t randomly guess these codes by trial and error. They are too complex and lengthy for this.
This specific one-use code allows unlocking the device one time only and only for a period of 24 hours. This means that phone will accept that specific code only once and never accept that specific code again. If law enforcement needs to unlock the phone again, they will have to go through the law enforcement process of having Apple generate a new code using the same input data which would then generate a new code, again, valid for only 24 hours.
A successfully used LE code will suspend all phone screen lock security for a period of 24 hours. This means that the only action need to get into a phone for up to 24 hours (even after having been powered off and back on) is by pressing the home key or swiping up. No touch ID or Face ID is needed when the phone is unlocked during this 24 hour period. This allows for use of this phone by multiple people for gathering evidence, downloading information or as needed by law enforcement. This mode also suspends all security around connecting and trusting iTunes. iTunes will also allow downloading data from the phone without going through its “trust” security. After 24 hours, the phone reboots, deletes LE configuration parameters (such as WiFi networks) and reverts back to its original locked and secured state.
The iPhone will also leave a notification for the owner of the phone that the phone has been unlocked and accessed by law enforcement (much the same as the note left in luggage by the TSA after it has been searched). If the phone still has Internet access, it will contact Apple and inform the Apple ID that the phone has been unlocked and accessed by law enforcement. This Internet notification can be suspended for up to 30 days to allow law enforcement time enough to get what they need before the system notifies the Apple ID owner of access to that device. Though, I’d recommend that Apple notify the owner right away of any access by law enforcement.
How to use the code
When a valid generated Apple law enforcement code is entered into the phone in LEM, the phone calculates the validity of the code based on an internal process that runs on the phone continuously. While the phone is validly being used by its owner, this process will periodically sync with Apple’s LE servers to ensure that an iPhone’s LEM process will work properly should the phone fall into the possession of law enforcement. This information will have to be spelled out and agreed to in Apple’s terms and conditions. Apple’s servers and the phone remain synchronized in the same way as RSA one-time keys remain synchronized (within a small calculable margin of error). Thus, it won’t need to synchronize often.
How to use Law Enforcement Mode
This mode can be brought up by anyone, but to unlock this mode fully, a valid Apple issued law enforcement ID and one-use code must be entered into an iPhone for the mode to unlock and allow setup of a WiFi network. Without entry of an Apple issued law enforcement ID number or because of successive incorrect entries, the phone will reboot out of LEM after a short period time.
Law Enforcement ID
A law enforcement ID must be generated by Apple and these IDs will synchronize to all Apple devices prior to falling under law enforcement possession. To keep this list small, it will remain compressed on the device until LEM successfully activates, at which time the file is decompressed for offline validation use. This means that a nefarious someone can’t simply get into this mode and start mucking about easily to gain entry to a random phone. It also means someone can’t request Apple issue a brand new ID on the spot. Even if Apple were to create a new ID, the phone would take up to 24 hours to synchronize… and that assumes that the phone still has data service (which it probably doesn’t). Without data service, the phone cannot synchronize new IDs. This is the importance of creating these IDs in advance.
Apple will also need to go through a validation process to ensure the law enforcement officer requesting an ID is a valid officer working for a legitimate law enforcement organization. This in-advance validation may require a PDF of the officer’s badge and number, an agency issued ID card and any other agency relevant information to ensure the officer is a valid LE officer or an officer of the court. This requires some effort on the part of Apple.
To get an Apple law enforcement ID, the department needing access must apply for such access with Apple under its law enforcement support site (to be created). Once an Apple law enforcement ID has been issued, within 24 hours the ID will sync to phones, thus activating the use of this ID with the phone’s LEM. These IDs should not be shared outside of any law enforcement department. IDs must be renewed periodically through a simple validation process, otherwise they will expire and fall off of the list. Manufacturers shouldn’t have to manage this list manually.
Such a system is relatively simple to build, but may take time to implement. Apple, however, may not be cool with developing such a law enforcement system on its own time and dime. This is where the government may need to step in and mandate such a law enforcement support system be built by phone manufacturers who insist on using overly strong encryption. While government(s) can legislate that companies reduce their encryption strength on their devices to avoid building a law enforcement system as described, instead I’d strongly recommend that companies be required to build a law enforcement support and unlocking system into their devices should they wish to continue using ever stronger encryption. Why compromise the security of all devices simply for a small number of law enforcement cases? Apple must meet law enforcement somewhere in the middle via technological means.
There is also no reason why Apple and other device manufacturers are denying access to law enforcement agents for phone devices when there are software and technical solutions that can see Apple and other manufacturers cooperate with law enforcement, but yet not “give away the farm”.
I don’t even work for Apple and I designed this functional system in under 30 minutes. There may be other considerations of which I am not aware within iOS or Android, but none of these considerations are insurmountable in this design. Every device that Apple has built can support such a mode. Google should also be required to build a similar system for its Android phones and devices.
Apple is simply not trying.
↩︎
Can I use my Xbox One or PS4 controller on my iPhone?
 This is a common question regarding the two most popular game controllers to have ever existed. Let’s explore.
MFi Certification
Let’s start with a little history behind why game controllers have been a continual problem for Apple’s iOS devices. The difficulty comes down to Apple’s MFi controller certification program. Since MFi’s developer specification release, not many controller developers have chosen to adopt it. The one notable exception is the SteelSeries Nimbus controller. It’s a fair controller, it holds well enough in the hand, has an okay battery life, but it’s not that well made. It does sport a lightning port so you can charge it with your iPhone’s charger, however. That’s of little concession, though, when you actually want to use an Xbox One or PS4 controller instead.
Because Apple chose to rely on its own MFi specification and certification system, manufacturers would need to build a controller that satisfies that MFi certification. Satisfying the requirements of MFi and getting certified likely requires licensing technology built by Apple. As we know, licenses typically cost money paid to Apple for the privilege of using that technology. That’s great for Apple, not so great for the consumer.
Even though the SteelSeries Nimbus is by no means perfect, it really has become the de facto MFi controller simply because no other manufacturers have chosen to adopt Apple’s MFi system. And why would they?
Sony and Microsoft
Both Sony and Microsoft have held (and continue to hold) the market as the dominant game controllers. While the SteelSeries Nimbus may have become the de facto controller for Apple’s devices, simply because there is nothing else really available, the DualShock and the Xbox One controllers are far and away better controllers for gaming. Apple hasn’t yet been able to break into the console market, even as much as they have tried with the Apple TV. Game developers just haven’t embraced the Apple TV in the same way they have of the Xbox One and the PS4. That’s obvious as to why. The Apple TV, while reasonable for some games, simply does not offer the same level of graphics and game power as an Xbox One or PS4. It also doesn’t have a controller built by Apple.
Until Apple gets its head into the game properly with a more suitably named game system actually intended for gaming, rather than general purpose entertainment, Apple simply can’t become a third console. Apple seems to try these roundabout methods of introducing hardware to try and usurp, or at least insert itself into certain markets. Because of this subtle roundabout method Apple chooses, it just never works out. In the case of MFi, that hasn’t worked out too well for Apple.
Without a controller that Apple has built themselves, few people see the Apple TV as anything more than a TV entertainment system with built-in apps… even if it can run limited games. The Apple TV is simply not seen as a gaming console. It doesn’t ship with a controller. It isn’t named appropriately. Thus, it is simply not seen as a gaming console.
With that said, the PS4 and the Xbox One are fully seen as gaming consoles and prove that with every new game release. Sony and Microsoft also chose to design and build their own controllers based on their own specifications; specifications that are intended for use on their consoles. Neither Sony, nor will Microsoft go down the path to MFi certification. That’s just not in the cards. Again, why would they? These controllers are intended to be used on devices Sony and Microsoft make. They aren’t intended to be used with Apple devices. Hence, there is absolutely zero incentive for Microsoft or Sony to retool their respective game controllers to cater to Apple’s MFi certification whims. To date, this has yet to happen… and it likely never will.
Apple is (or was) too caught up in itself to understand this fundamental problem. If Apple wanted Sony or Microsoft to bend to the will of Apple, Apple would have to pay Sony and Microsoft to spend their time, effort and engineering to retool their console controllers to fit within the MFi certification. In other words, not only would Apple have to entice Sony and Microsoft to retool their controllers, they’d likely have to pay them for that privilege. And so, here we are… neither the DualShock nor does the Xbox One controller support iOS via MFi certification.
iOS 12 and Below
To answer the above question, we have to observe Apple’s stance on iOS. As of iOS 12 and below, Apple chose to rely solely on its MFi certification system to certify controllers for use with iOS. That left few consumer choices. I’m guessing that Apple somehow thought that Microsoft and Sony would cave to their so-called MFi pressure and release updated controllers to satisfy Apple’s whims.
Again, why would either Sony or Microsoft choose to do this? Would they do it out of the goodness of their own heart? Doubtful. Sony and Microsoft would ask the question, “What’s in it for me?” Clearly, for iOS, not much. Sony doesn’t release games on iOS and neither does Microsoft. There’s no incentive to produce MFi certified controllers. In fact, Sony and Microsoft both have enough on their plates supporting their own consoles, let alone spending extra time screwing around with Apple’s problems.
That Apple chose to deny the use of the DualShock 4 and the Xbox One controllers on iOS was clearly an Apple problem. Sony and Microsoft couldn’t care less about Apple’s dilemmas. Additionally, because both of these controllers dominate the gaming market, even on PCs, Apple has simply lost out when sticking to their well-intentioned, but misguided MFi certification program. The handwriting was on the wall when they built the MFi developer system, but Apple is always blinded by its own arrogance. I could see that MFi would create more problems than it would solve for iOS when I first heard about it several years ago.
And so we come to…
iOS 13 and iPhone 11
With the release of iOS 13, it seems Apple has finally seen the light. They have also realized both Sony and Microsoft’s positions in gaming. There is simply no way that the two most dominant game controllers on the market will bow to Apple’s pressures. If Apple wants these controllers certified under its MFi program, it will need to take steps to make that a reality… OR, they’ll need to relax this requirement and allow these two controllers to “just work”… and the latter is exactly what Apple has done.
As of the release of iOS 13, you will be able to use both the Xbox One (bluetooth version) and the PS4’s DualShock 4 controller on iOS. Apple has realized its certification system was simply a pipe dream, one that never got realized. Sure, MFi still exists. Sure, iOS will likely support it for several more releases, but eventually Apple will obsolete it entirely or morph it into something that includes Sony and Microsoft’s controllers.
What that means for the consumer is great news. As of iOS 13, you can now grab your PS4 or Xbox One controller, pair it to iOS and begin gaming. However, it is uncertain exactly how compatible this will be for iOS. It could be that some games may not recognize these controllers until they are updated for iOS 13. This could mean that older games that only supported MFi may not work until they are updated for iOS 13. The problem here is that many projects have become abandoned over the years and their respective developers are no longer updating apps. That means that you could find your favorite game doesn’t work with the PS4 or Xbox One controller if it is now abandoned.
Even though iOS 13 will support the controllers, it doesn’t mean that older games will. There’s still that problem to be solved. Apple could solve that by folding the controllers under the MFi certification system internally to make them appear as though they are MFi certified. I’m pretty sure Apple won’t do that. Instead, they’ll likely offer a separate system that identifies “third party” controllers separately from MFi certified controllers. This means that developers will likely have to go out of their way to recognize and use Sony and Microsoft’s controllers. Though, we’ll have to wait and see how this all plays out in practice.
Great News
Even still, this change is welcome news to iOS and tvOS users. This means that you don’t have to go out and buy some lesser controller and hope it will feel and work right. Instead, you can now grab a familiar controller that’s sitting right next to you, pair it up and begin playing on your iPad.
This news is actually more than welcome, it’s a necessity. I think Apple finally realizes this. There is no way Sony or Microsoft would ever cave to Apple’s pressures. In fact, there was no pressure at all really. Ultimately, Apple shot themselves in the foot by not supporting these two controllers. Worse, by not supporting these controllers, it kept the Apple TV from becoming the hopeful gaming system that Apple had wanted. Instead, it’s simply a set-top box that provides movies, music and limited live streaming services. Without an adequate controller, it simply couldn’t become a gaming system.
Even the iPad and iPhone have been suffering without good solid controllers. Though, I’m still surprised that Apple itself hasn’t jumped in and built their own Apple game controller. You’d think that if they set out to create an MFi certification system that they’d have taken it to the next step and actually built a controller themselves. Nope.
Because Apple relied on third parties to fulfill its controller needs, it only really ever got one controller out of the deal. A controller that’s fair, but not great. It’s expensive, but not that well made. As I said above, it’s the SteelSeries Nimbus. It’s a mid-grade controller that works fine in most cases, but cannot hold a candle to the PS4’s or the Xbox One’s controller for usability. Personally, I always thought of the Nimbus controller as a “tide me over” controller until something better came along. That never happened. Unfortunately, it has taken Apple years to own up to this mistake. A mistake that they’ve finally decided to rectify in iOS 13.
A little late, yes, but well done Apple!
↩︎
What does Reset Network Settings in iOS do?
 If you’ve experienced networking issues with your iPad or iPhone, you may have called Apple for support. Many times they recommend that you “Reset Network Settings.” But, what exactly does this operation do? Let’s explore.
What’s included in this Reset Network Settings process?
This is a complicated answer and how it affects you depends on several factors. What this process does, in addition to resetting a bunch of locally stored device settings on the iOS device itself, it also deletes network settings stored in your iCloud Keychain. If you have only an iPhone and own no other devices (i.e., no iPads, no Macs, no iPods, no Apple Watches, no Apple TVs, nothing else), resetting these settings will likely work just fine for you.
However, if you own or use multiple Apple devices and these devices participate in iCloud Keychain, things can get complicated… very, very complicated. The “or use” statement is the one that makes this process much more complicated. If you have a work Mac computer that’s hooked up to your Apple ID and is participating in iCloud Keychain, performing “Reset Network Settings” on an iPhone can become problematic for your work computer. How? First, let’s find out more about iCloud Keychain.
iCloud Keychain
What is iCloud Keychain? This is an iCloud network service that stores sensitive passwords and credit card information in a secure way. This iCloud service also lets multiple iOS, MacOS, tvOS and WatchOS devices participate and use this data as part of your Apple ID. If you own multiple Apple devices, they can all share and use this same set of sensitive data without having to enter it individually on each device (convenience).
Your iCloud Keychain is specific to your Apple ID which is protected by your Apple ID login and password. The iCloud Keychain was created as both a convenience (all devices can share data), but also secure in that this data is protected behind your Apple ID credentials.
When you “Reset Network Settings” on any iOS (or possibly even MacOS, tvOS or even WatchOS) device and your devices participate in iCloud Keychain synchronization, a “Reset Network Settings” can cause networking issues for all of your devices. Why?
The iCloud Keychain stores WiFi access point names (SSIDs) and passwords. Not only that, it also stores credit cards that you might use with Apple Pay (this becomes important later). When you run “Reset Network Settings” on any iOS device, it will wipe all access point SSIDs and Passwords from your iCloud Keychain.
You might be asking, “Why is this a problem?” This will become a problem for all devices participating in iCloud Keychain. All of your Apple devices share in using this SSID and password data from your iCloud Keychain. This important to understand. Because of this level of sharing, it only takes one device to learn of an access point for all Apple devices to use that network when in range. For example, if you bring your Mac to a convention and log it into an access point at the convention, your Mac logs this access point data to the iCloud Keychain. Your phone will immediately pick up on this new access point addition and also connect to that access point using the newly stored password as soon as it finds it… automagically.
Likewise, it only takes one device to wipe an access point and all devices lose access to it. It’s a single shared location for this networking data. One device adds it, all can use it. One device deletes it, all devices forget about it. Is this a good idea? You decide.
Reset Network Settings and Multiple Devices
Here’s where things get complicated with iCloud Keychain. If you are having network troubles with your iPhone, you might be requested by Apple Support to “Reset Network Settings”.
If all of your MacOS, tvOS, iOS and WatchOS devices participate in iCloud Keychain and you actually perform “Reset Network Settings” on your iPhone, it will wipe not only the current access point, but every access point that every device is aware of. It returns your network settings on iOS (and in iCloud Keychain) to a clean slate to start it over. It does this to try and clear out any problematic network settings. It also deletes known access points from the iCloud Keychain. This wipes access to this data for ALL of your Apple devices, not just the one you performed “Reset Network Settings” on.
What this means is that every device participating in iCloud Keychain will lose access to ALL access points that had previously been known because they have been deleted as part of “Reset Network Settings”. If your iOS device knew of all access points, they will ALL be wiped from iCloud Keychain. This means that every device will immediately lose access to its current access point. It also means that every Apple device you own must now be touched to reselect a new access point requiring you to reenter the password for that access point… On. Every. Apple. Device!
For example, I own two Macs, two iPads, three iPhones and two iPod Touches. A “Reset Network Settings” from a single device means I will need to go and manually touch 9 different devices to reconnect them to WiFi after a single iOS device performs a “Reset Network Settings” operation. It requires this because every device has lost access to even its home network which means no access to iCloud Keychain… which means, touching every device to get them back onto a WiFi network.
For me, it was even more complicated than the mere hassle of setting up WiFi on every device. It wiped known access points created by my employer on my Mac which were put into my iCloud Keychain… access points where I didn’t know the name or passwords. Thankfully, I was able to recover this data from another co-worker’s Mac and get back onto my corporate network. Otherwise, I’d have been down at my IT team’s desk asking for them to fix my Mac… and all as a result of performing “Reset Network Settings” on my iPhone.
Horrible, horrible design.
Avoiding This Problem
Can this problem be avoided? Possibly. If you turn off iCloud Keychain on your iOS device BEFORE you perform “Reset Network Settings”, it may avoid wiping the data in the iCloud Keychain. I say “may” because after you take the device out of iCloud Keychain, then reset the network settings and then rejoin it to iCloud Keychain, it may propagate the differences at the time the device rejoins. Hopefully, not. Hopefully, the newly reset device will ONLY download the existing data in the iCloud Keychain without making any modifications to it. With Apple, you never know.
The secondary issue is that removing your iPhone from iCloud Keychain may remove stored credit cards. This may mean reentry of all of your credit cards after you have “Reset Network Settings” and after you have rejoined your device to the iCloud Keychain. This may also depend on iOS version. I just tried removing iCloud Keychain, then performed “Reset Network Settings”, then rejoined iCloud Keychain and all my cards are still intact on the device. If you’re on iOS 11 or iOS 10, your results may vary.
Why is this a problem?
First off, I don’t want to have to go touch many devices after a single device reset. That’s just stupid. Second, removing the device from iCloud Keychain to perform “Reset Network Settings” will wipe all of your current credit card data from the device and likely from the iCloud Keychain. Third, Apple needs to fix their shit to allow more granularity in what it wipes with “Reset Network Settings”. In fact, it shouldn’t even touch iCloud Keychain data. It should wipe only locally stored information on the device and then see if that works. If that doesn’t work, then wipe the data on iCloud Keychain, but only as a LAST RESORT!
I understand that Apple seems to think that wiping all network data (including what’s in iCloud Keychain) might solve “whatever the problem is”, but that’s just a sledgehammer. If what’s stored in iCloud Keychain were a problem, my 8 other devices should be experiencing the same issue as well. It’s basically, stupid Apple troubleshooting logic.
As I mentioned, disabling iCloud Keychain may unregister your credit cards from your device (and from the Keychain). I know this was the case in iOS 11, but in iOS 12 it seems to not require this any longer. I definitely don’t want to have to rescan all of my credit cards again onto my iOS device to restore them. It takes at least 30 minutes to do this with the number of cards I have to input. With the Apple Watch, this process is horribly unreliable and lengthy. It can sometimes take over an hour diddling with Bluetooth timeouts and silly unreliability problems to finally get all of my cards back onto the Watch (in addition to the iPhone).
Such time wasting problems over a single troubleshooting thing that should be extremely straightforward and easy. Horrible, horrible design.
Representatives and Suggestions
If you’re talking to an Apple representative over the phone about a networking problem and they suggest for you to “Reset Network Settings”, you should refer them to this article so they can better understand what it is they are asking you to do.
Neither Apple Support, nor will any of your phone carrier support teams warn you of this iCloud Keychain problem when requesting “Reset Network Settings.” They will ask you to perform this step as though it’s some simple little step. It’s not!
Whenever Apple asks me to perform the “Reset Network Settings” troubleshooting step, I always decline citing this exact problem. Perhaps someone at Apple will finally wake up and fix this issue once and for all. Until then, you should always question Apple’s troubleshooting methods before blindly following them.
How to disable iCloud Keychain
To disable the iCloud Keychain on your iOS device, go to …
Settings=>Your Name=>iCloud=>Keychain
… and toggle it off. Your Name is actually your name. It is located at the very top of settings. Once toggled off, it will likely unregister your credit cards stored on your iOS device, but I guess it’s a small price to pay if you really need to reset these network settings to your restore networking to 100% functionality. Of course, there’s no guarantee that “Reset Network Settings” or jumping through any of these hoops will solve this problem. There’s also the possibility that “Reset Network Settings” could still screw with your iCloud Keychain even if you disable it before performing “Reset Network Settings”.
With Apple, your mileage may vary.
How to Reset Network Settings
Settings=>General=>Reset=>Reset Network Settings
If you own multiple Apple devices and they are using iCloud Keychain, don’t perform this step first. Instead, disable iCloud Keychain first (above), then perform this step. If you only own one Apple device, there is no need to disable iCloud Keychain.
Network Problems and Quick Fixes
In my most recent case of being prompted to “Reset Network Settings”, my phone’s Wi-Fi calling feature simply stopped working. I first called T-Mobile and they referred me to “Reset Network Settings” (based on Apple’s documentation) and they also referred me to Apple Support. Because I already knew about the iCloud Keychain problem from a previous inadvertent wipe of all of my network access points, this time I opted to turn off iCloud Keychain before attempting “Reset Network Settings.” Suffice it to say that “Reset Network Settings” didn’t do a damned thing, as I full well expected.
In fact, I tried many options prior to “Reset Network Settings”. These included:
- Disabling and enabling Wi-Fi calling
- Joining a different access point
- Restarting my Comcast modem
- Restarting my network router
- Restarting my Apple Airport
- Restarting my phone
- Hard restarting my phone
- Disabling and enabling Wi-Fi
- Dumping Sysdiagnose logs and digging through them
- Killing and restarting the Phone app
I tried all of the above and nothing resolved the issue. No, not even “Reset Network Settings”.
Then it dawned on me. I had recalled reading a year or two back that sometimes Airplane Mode can resolve many network connectivity issues. I’m not sure exactly what Airplane Mode actually does under the hood in detail, but it seems to modify and/or reset a bunch of config files after disabling all networking including Cellular, Wi-Fi, Bluetooth and anything else that performs networking.
Once Airplane Mode is enabled, allow the phone to sit for 30 seconds to make sure all components recognized Airplane Mode. Then, disable Airplane Mode. Almost immediately, the phone’s menu bar now shows ‘T-Mobile Wi-Fi’. Wow, it actually works.
If you’re having networking problems on your iPhone, I strongly suggest enabling then disabling Airplane Mode instead of using the very sledgehammery “Reset Network Settings”. At least, it’s worth a try before resorting to disabling iCloud Keychain followed by “Reset Network Settings”.
If you’re having a specific problem with Bluetooth or WiFi, then I suggest taking a step back and trying this next idea. For example, if Bluetooth is having troubles, turn off Bluetooth, reboot the phone, then turn it back on after a reboot. This troubleshooting step is somewhat less reliable than using Airplane mode. Airplane mode doesn’t necessarily require a reboot also and works more often than this single device troubleshooting.
iOS 11 vs 12
The first time I experienced my issue with the iCloud Keychain and “Reset Network Settings”, I was using iOS 11. I’m firmly of, “Once Bitten, Twice Shy.” This means, I haven’t tested this on iOS 12 to see if Apple has changed their ways. It’s very doubtful they have and very likely this problem still persists even in the most current version of iOS.
iCloud Keychain and Passwords
One last caveat about the iCloud Keychain. Ever more and more credentials and passwords are being stored in the iCloud keychain, including Safari’s credentials, possibly even other browsers and even app credentials. As we become more and more dependent on using TouchID or FaceID to unlock access to our favorite apps and sites, the credentials behind these unlocks are stored in the iCloud Keychain. If you use ‘Reset Network Settings’ without first removing the phone from the iCloud Keychain, you may find all of your browser and app passwords have also been deleted.
This then means having to go into all of your favorite websites in Safari and phone apps and reentering usernames and passwords all over again. If you don’t remember these passwords, you may end up having to reset a bunch of them. Be very careful when using ‘Reset Network Settings’. This feature doesn’t yet warn you of these dangers and it also doesn’t offer to remove the device from the iCloud Keychain before proceeding.
This may go even deeper. As stated above, iOS apps also store their user credentials in the iCloud Keychain. These apps may also require reentering credentials after performing ‘Reset Network Settings’.
In fact, even Apple phone reps don’t fully understand the dangers here. They tell you that you need to ‘Reset Network Settings’, but then fail to warn you of the consequences of not removing your device from the iCloud Keychain first. Since this is a critical step, Apple needs to not only warn you of the dangers of not disabling iCloud Keychain, the ‘Reset Network Settings’ mechanism needs to suggest the user disable the iCloud keychain before proceeding.
Beware!
Design Rant Mode On
Apple seems to be under the delusion that we’re still living in a one-device-ownership-world. We’re not. We now own Macs, Apple TVs, Watches, iPhones and iPads that all rely on their multi-device services, such as iCloud Keychain. To design a feature that can wipe the entire data shared by multiple devices is not only the very definition of shit software, it’s also the very definition of a shit company that hasn’t the first clue of what the hell they’ve actually built.
If this article is helpful to you, please leave a comment below.
↩︎
How to iCloud unlock an iPad or iPhone?
A lot of people seem to be asking this question. So, let’s explore if there are any solutions to the iCloud unlock problem.
Apple’s iCloud Lock: What is it?
Let’s examine what exactly is an iCloud lock. When you use an iPhone or iPad, a big part of that experience is using iCloud. You may not even know it. You may not know how much iCloud you are actually using (which is how Apple likes it) as it is heavily integrated into every Apple device. The iCloud service uses your Apple ID to gain access. Your Apple ID consists of your username (an email address) and a password. You can enable extended security features like two factor authentication, but for simplicity, I will discuss devices using only a standard login ID and password… nothing fancy.
iCloud is Apple’s cloud network services layer that support service synchronization between devices like calendaring, email contacts, phone data, iMessage, iCloud Drive, Apple Music, iTunes Playlists, etc. As long as your Apple ID remains logged into these services, you will have access to the same data across all of your devices. Note, your devices don’t have to use iCloud at all. You can disable it and not use any of it. However, Apple makes it terribly convenient to use iCloud’s services including such features as Find my iPhone, which allows you to lock or erase your iPhone if it’s ever lost or stolen.
One feature that automatically comes along for the ride when using iCloud services is an iCloud lock. If you have ever logged your iPhone or iPad into iCloud, your device is now locked to your Apple ID. This means that if it’s ever lost or stolen, no one can use your device because it is locked to your iCloud Apple ID and locked to Find my iPhone for that user (which I believe is now enabled by default upon logging into iCloud).
This also means that any recipient of such an iCloud locked device cannot use that device as their own without first disassociating that device from the previous Apple ID. This lock type is known as an iCloud lock. This type of Apple lock is separate from a phone carrier lock which limits with which carriers a phone can be used. Don’t confuse or conflate the two.
I should further qualify what “use your device” actually means after an iCloud lock is in place. A thief cannot clean off your device and then log it into their own Apple ID and use the phone for themselves. Because the phone is iCloud locked to your account, it’s locked to your account forever (or until you manually disassociate it). This means that unless you explicitly remove the association between your Apple ID and that specific device, no one can use that device again on Apple’s network. The best a would-be thief can do with your stolen phone is open it up and break it down for limited parts. Or, they can sell the iCloud locked device to an unsuspecting buyer before the buyer has a chance to notice that it’s iCloud locked.
Buying Used Devices
If you’re thinking of buying a used iPhone from an individual or any online business who is not Apple and because the iCloud lock is an implicit and automatic feature enabled simply by using iCloud services, you will always need to ask any seller if the device is iCloud unlocked before you pay. Or, more specifically, you will need to ask if the previous owner of the device has logged out and removed the device from Find my iPhone services and all other iCloud and Apple ID services. If this action has not been performed, then the device will remain iCloud locked to that specific Apple ID. You should also avoid the purchase and look for a reputable seller.
What this means to you as a would-be buyer of used Apple product is that you need to check for this problem immediately before you walk away from the seller. If the battery on the device is dead, walk away from the sale. If you’re buying a device sight unseen over the Internet, you should be extremely wary before clicking ‘Submit’. In fact, I’d recommend not buying used Apple equipment from eBay or Craigslist because of how easy it is to buy bricked equipment and lose your money. Anything you buy from Apple shouldn’t be a problem. Anything you buy from a random third party, particularly if they’re in China, might be a scam.
Can iCloud Lock be Removed?
Technically yes, but none of the solutions are terribly easy or in some cases practical. Here is a possible list of solutions:
1) This one requires technical skills, equipment and repair of the device. With this solution, you must take the device apart, unsolder a flash RAM chip, reflash it with a new serial number, then reassemble the unit.
Pros: This will fix the iPad or iPhone and allow it to work
Cons: May not work forever if Apple notices the faked and changed serial number. If the soldering job was performed poorly, the device hardware could fail.
Let’s watch a video of this one in action:
2) Ask the original owner of the device, if you know who they are, to disassociate the iDevice from their account. This will unlock it.
Pros: Makes the device 100% functional. No soldering.
Cons: Requires knowing the original owner and asking them to disassociate the device.
3) Contact Apple with your original purchase receipt and give Apple all of the necessary information from the device. Ask them to remove the iCloud lock. They can iCloud unlock the device if they so choose and if they deem your device purchase as valid.
Pros: Makes the device 100% functional.
Cons: Unlocking Apple devices through Apple Support can be difficult, if not impossible. Your mileage may vary.
4) Replace the logic board in the iPad / iPhone with one from another. Again, this one requires repair knowledge, tools, experience and necessary parts.
Pros: May restore most functionality to the device.
Cons: Certain features, like the touch ID button and other internal systems may not work 100% after a logic board replacement.
As you can see, none of these are particularly easy, but none are all that impossible either. If you’re not comfortable cracking open your gear, you might need to ask a repair center if they can do any of this for you. However, reflashing a new serial number might raise eyebrows at some repair centers with the assumption that your device is stolen. Be careful when asking a repair center to perform #1 above for you.
iCloud Locking
It seems that the reason the iCloud Lock came into existence is to thwart thieves. Unfortunately, it doesn’t actually solve that problem. Instead, it creates a whole new set of consumer problems. Now, not only are would-be thieves stealing iPads still, they’re selling these devices iCloud locked to unsuspecting buyers and scamming them out of their money. The thieves don’t care. The only thing this feature does is screw used device consumers out of their money.
Thieves
That Apple thought they could stop thievery by implementing the iCloud lock shows just how idealistically naïve Apple’s technical team really is. Instead, they created a whole new scamming market for iCloud locked Apple devices. In fact, the whole reason this article exists is to explain this problem.
For the former owner of an iPad which was stolen, there’s likely no hope of ever getting it back. The iCloud lock feature does nothing to identify the thief or return stolen property to its rightful owner. The iCloud lock simply makes it a tiny nuisance to the thief and would-be scammer. As long as they can get $100 or $200 for selling an iCloud locked iPad, they don’t care if it’s iCloud locked. In fact, the fact that this feature exists makes no difference at all to a thief.
It may reduce the “value” of the stolen property some, but not enough to worry about. If it was five finger discounted, then any money had is money gained, even if it’s a smaller amount than anticipated. For thieves, the iCloud lock does absolutely nothing to stop thievery.
Buyers
Here’s the place where the iCloud lock technology hurts the most. Instead of thwarting would-be thieves, it ends up placing the burden of the iCloud lock squarely on the consumer. If you are considering buying a used device, which should be a simple straightforward transaction, you now have to worry about whether the device is iCloud locked.
It also means that buying an iPhone or iPad used could scam you out of your money if you’re not careful. It’s very easy to buy these used devices sight unseen from online sellers. Yet, when you get the box open, you may find the device is iCloud locked to an existing Apple ID. At that point, unless you’re willing to jump through one of the four hoops listed above, you may have just been scammed.
If you can’t return the device, then you’re out money. The only organization that stands to benefit from the iCloud lock is Apple and that’s only because they’ll claim you should have bought your device new from them. If this is Apple’s attempt at thwarting or reducing used hardware sales, it doesn’t seem to be working. For the consumer, the iCloud lock seems intent on harming consumer satisfaction for device purchases of used Apple equipment… a market that Apple should want to exist because it helps them sell more software product (their highest grossing product).
Sellers
For actually honest sellers, an iCloud lock makes selling used iPad and iPhone devices a small problem. For unscrupulous sellers, then there is no problem here at all. An honest seller must make sure that the device has been disassociated from its former Apple ID before putting the item up for sale. If an honest seller doesn’t know the original owner and the device is locked, it should not be sold. For the unscrupulous sellers, the situation then becomes the scammer selling locked gear and potentially trafficking stolen goods.
It should be said that it is naturally assumed that an iCloud locked device is stolen. It makes sense. If the owner had really wanted the item sold as used, they would have removed the device from iCloud services… except that Apple doesn’t make this process at all easy to understand.
Here’s where Apple fails would-be sellers. Apple doesn’t make it perfectly clear that selling the device requires removing the Apple ID information fully and completely from the device. Even wiping the device doesn’t always do this as there are many silent errors in the reset process. Many owners think that doing a wipe and reset of the device is enough to iCloud unlock the device. It isn’t.
As a would-be seller and before wiping it, you must go into your iPad or iPhone and manually remove the device from Find my iPhone and log the phone out of all Apple ID services. This includes not only logging it out of iCloud, but also logging out out of iTunes and Email and every other place where Apple requires you to enter your Apple ID credentials. Because iOS requires logging in multiple times separately to each of these services, you must log out of these services separately on the device. Then, wipe the device. Even after all of that, you should double check Find my iPhone from another device to make sure the old device no longer shows up there. In fact, you should walk through the setup process once to the point where it asks you for your Apple ID to confirm the device is not locked to your Apple ID.
This is where it’s easy to sell a device thinking you’ve cleared it all out, but you actually haven’t. It also means that this device was legitimately sold as used, but wasn’t properly removed from iCloud implying that it’s now stolen. Instead, Apple needs to offer a ‘Prep for Resell’ setting in Settings. This means this setting will not only wipe the device in the end, but it will also 100% ensure an iCloud unlock of the device and log it out of all logged Apple ID services. This setting will truly wipe the device clean as though it were an unregistered, brand new device. If it’s phone device, it should also carrier unlock the phone so that it can accept a SIM card from any carrier.
Apple makes it very easy to set up brand new devices, but Apple makes it equally difficult to properly clear off a device for resale. Apple should make this part a whole lot easier for would-be sellers. If need be, maybe Apple needs to sell a reseller toolkit to scan and ensure devices are not only iCloud unlocked, but run diagnostic checks to ensure they are worthy of being sold.
If you like what you’ve read, please leave a comment below and give me your feedback.
↩︎
How to fix Touch ID purchasing after Apple ID unlock
 Touch ID App store purchasing no longer works after your Apple ID is unlocked? How do you get it working again? Let’s explore.
Apple ID Locked
I’ve recently begun having problems with Apple locking my Apple ID account about every 3 weeks with no explanation. After I’ve unlocked my account, I find that the App store app refuses to use Touch ID and forces entry of my password to download an app. Hey Apple, I set up Touch ID so I don’t have to type in a password.
I’ve called Apple twice about this problem and they are of no help. I had to figure this one out on my own. Thanks Apple… not!
Not only does Apple have no logs to determine why the account is locked, they simply don’t care about this problem. Their login system has become shit in the last few months beginning in June of 2018. I have no explanation for this lockout problem except that Apple needs to get their shit together. I’ve never had this problem before this point. Anyway, once an Apple ID is locked, you’ll need to unlock it to proceed cleaning up the mess Apple leaves behind.
Note, I have no problems unlocking my account. In fact, it takes about 5 minutes or less. However, there’s a bunch of crap to do to clean up Apple’s mess.
Unlocking an Apple ID
To unlock your account, go to appleid.apple.com. Note, I have chosen not to linkify in the address in this article for security reasons. This is why it’s not clickable in this paragraph.
Instead, simply select the text => appleid.apple.com . Then copy and paste it into your browser’s address bar. Or better, type it into your browser’s address bar manually. Next, browse to this destination. Because this is Apple’s security site which manages your Apple ID security settings, I urge you to make sure you type it in exactly and carefully. If you mistype this address, it’s possible that you could land on a malicious web site that looks identical to Apple’s site and which could collect your Apple ID and password. Alway be cautious, alert and careful when visiting sites which manage the security of your account(s). Here are the steps to get you started:
- Once you’re on the Apple ID site, under the ‘Manage your Apple account’ text, enter your Apple ID username and click the arrow pointing right →
- Now enter your current password and click the arrow →
- It will tell you your account is locked
- At this point, follow the prompts to unlock your account
You’ll need to need to know the following info (as of 2018) to unlock your account:
- Birthdate
- Answers to the security questions you set up previously
This section assumes you have not set up two-factor authentication. You can choose to unlock by email or by answering security questions. It’s up to you which path to follow. Whichever path you choose, complete the process to unlock your Apple ID. After unlocking, here’s where the fun begins. /sarc
If you can’t remember your security questions or birthdate, you’ll need to contact Apple Support and request for them to help you with unlocking your Apple ID. If you have set up two-factor authentication (2FA), you will need to know your recovery key. If you’ve lost you recovery key and access to your trusted device after setting up 2FA, you’re out of luck. If you have access to your trusted device, Apple can send you a text to finish the unlocking process. You cannot recover your Apple ID when using 2FA if you have lost the recovery key and lost access to your trusted device. For this reason alone, I cannot recommend setting up 2FA on your Apple ID. Stick with a strong password and avoid 2FA.
Note, I strongly recommend unlocking your account via this web browser method only. Even if your iPhone or iPad prompts to unlock your account directly on your device, don’t. Do not rely on the methods built into iOS devices as I have found them to be problematic and unreliable. Using the browser method, you will have no troubles.
Account Unlocked / Touch ID problems
Once your account is unlocked, you’ll find that all devices that were formerly logged into this account will have been force logged out. This force logout method is different than the method you would use to logout on the device. If you log out of the device, you will be prompted for both the account name and the password. With Apple’s force logout due to a lock, you are only required to reenter your password. Your login ID will be remembered and cached.
An account lockout wreaks havoc on certain features in iOS like Touch ID. Because the account was force logged out, then unlocked, Touch ID will fail to work on both the Music and the App store app. As I said above, you’ll find that the App store now prompts you to enter your password rather than using Touch ID.
Worse, you can go to settings and clearly see that Touch ID is still enabled for the App store app, but it is not working. This is demonstrably a bug that Apple simply won’t fix. How do we resolve this? Let’s continue.
Fixing Touch ID in the iTunes and App store app after a lockout
Here are the steps to fix this problem:
- Kill the Music and App store apps on your iOS device. DON’T SKIP THIS STEP. You do this by double clicking the home button. Then scroll through the apps running, then drag the app up to the top of the screen with your finger until it disappears from the list. This will kill that app. It’s always a good idea to periodically kill all running apps on your phone to improve performance. Be sure to kill the App store app before proceeding. If you have many apps in the list to scroll through, you can bring the app to the front of the list easily by launching the app before trying to kill it.
- Once the apps are killed, proceed to the Home screen and touch the Settings app
- Scroll down to Touch ID & Passcode and touch it
- Enter your pincode (if requested)
- This is the screen you’ll see next

- On this screen, you’ll see the iTunes & App store is already enabled (green). This setting is a lie. After a force lock and unlock, Apple automatically disables this feature internally even though the button shows green and enabled. That this button remains enabled is a bug and is the reason Touch ID doesn’t work.
- Click the green slider button next to iTunes & App Store to disable this setting.
- Wait for a moment for this to register and turn grey, like so

- Now, click it a second time to re-enable it. This time, it will prompt you for your Apple ID password.
- Enter your current Apple ID password in the password prompt
- Wait for the button to do a little jig before leaving this screen. The jig is described like so: the button starts off green, then turns grey for a moment, then slides back to green. This jig confirms that Touch ID for the App store is now truly enabled
- Exit to the home screen and launch the App store app
- Browse to any free app in the store and click ‘Get’. Touch ID should now prompt you for your fingerprint instead of prompting for your password.
If you skip killing the apps where I asked you to do that, you’ll find that the App store app still prompts for a password. The reason for this is that the App has cached the forced logout. To break that cache, you perform all of the steps described above. Following the order of these steps is important.
If you leave the App store app running when you reset the Touch ID settings, you’ll find that the password prompt problem remains. You may find that killing and relaunching the app even after resetting the Touch ID after-the-fact also won’t work. That’s why the order the steps is important.
Stupid Problems, Debugging and Network Settings
Problems this stupid shouldn’t exist on iOS devices, but here we are. I’ve already discussed this issue with Apple Support, but they simply won’t do anything about it. In fact, because this problem was formerly a rare occurrence, Apple Support isn’t even aware of this workaround.
In fact, while on the phone, Apple Support “recommended” that I reset my network settings. Never reset network settings as a first step. Resetting network settings should be the absolute last step and only when nothing else resolves a problem. The difficulty with resetting network settings is that it wipes all iCloud stored network passwords and access point information, like WiFi passwords. Not only does it wipe all WiFi networks and passwords on iCloud for the device where you wiped network settings, it wipes it for every device also using iCloud. This means if your Apple ID is being used on a MacBook, an iPhone, an iPad, an iPod or any combination of several of these devices, you’ll have to reinter the password on every device manually. It will also have forgotten all of the access points that iCloud formerly knew. Each new device will need to relearn them all.
You can somewhat solve this problem by first signing your device out of iCloud before wiping network settings. However, when you log your device back into iCloud, it might still wipe some settings from iCloud once logged back in and synced with iCloud. Be cautious with doing this.
I’ve been there and done that. This is a pain-in-the-ass. If Apple Support ever requests you to wipe network settings, tell them politely but firmly, “No.” Then state, “I only wipe network settings as a last ditch effort. Let’s exhaust all other workarounds and possibilities first.”
Wiping network settings usually only resolves actual networking problems, such as the phone refusing to connect to a WiFi access point. Touch ID has nothing to do with networking. Be wary of Support Team members requesting you to wipe network settings to help resolve non-network problems. The last thing you want to do is spend hours fixing all of your other devices in addition to not resolving the original problem. The Apple Support team is very good at causing more problems without actually solving the original problem. It is up to you to always exercise your best judgement to prevent Apple Support slip ups.
I really wish that Apple would just fix these stupid bugs. I also wish that they would tell me why my account keeps getting locked out.
↩︎
Rant Time: Don’t ever wipe your network settings in iOS
I’ve been recently trying to solve a problem with T-Mobile which ended up a bust because of the absolute sheer uselessness of T-Mobile staff about the iPhone and Apple Watch features. I will write a separate rant about that entire disaster, but let me lead with this rant that’s a little more critical. Let’s explore.
Apple’s iCloud
What is this thing? It’s a way to store settings and various data in Apple’s network cloud storage. This seems like a great idea until you realize what Apple keeps ganging up into this storage area. Then, you might actually think twice about using this feature.
While you might realize that Apple iCloud service will backup your photos and other data stored on your iPhone, it also stores other things you might not realize, like your WiFi network passwords, your Safari logins and passwords and various other sensitive data. What that means is that if Apple’s iCloud is ever compromised, your passwords could be completely captured by a hacker. Depending on whether Apple has stored this data encrypted strongly or not (probably not), you may end up having to change every password you have ever typed and stored on your iPhone.
Now, while that is a security problem, that’s not the problem that this article is intended to address. Let’s continue.
Apple Geniuses Are Anything But
I was recently talking to an AppleCare staffer who, when trying to solve my T-Mobile problem, requested that I wipe my network settings on my iPhone. I explicitly asked this staffer if it would also wipe my iCloud passwords. She, of anyone on this planet, should have known the answer to this question working for Apple. Unfortunately, I have very quickly learned that Apple is now hiring the lowest grunts of the grunts who simply don’t give a shit nor do they even understand the technology they are hawking. Apple, train your staff. Which leads to …
Never, Ever EVER wipe your network settings on any iOS iCloud device
No matter how much anyone begs or pleads you to do this, tell them, “NO”. And, if anyone ever tries to do this to one of your devices sharing a single iCloud login, you need to grab the device back from them PRONTO and stop them.
The answer to my question I asked Apple is that wiping network settings on your phone does, in fact, indeed wipe all of your network settings in iCloud! Why is this important? If you have multiple devices sharing your iCloud ID and settings, after wiping a single device, all of your WiFi passwords are also wiped for ALL other iCloud devices. This means that every single iCloud device suddenly and explicitly drops its WiFi connection.
This also means you will need to go back to each device and manually re-type your WiFi password into each and every device. This is the only way for the device to log back into iCloud and relearn all of its knowledge of all newly recreated settings.
This is an absolute PAIN IN THE ASS, Apple! So, if anyone ever asks you to wipe your network settings on your iPhone or iPad participating in iCloud, don’t do it! Note that even signing out of iCloud and wiping may cause the same problem once you log it back in. So, I wouldn’t even try this knowing Apple’s crappy network designs. Simply tell the person asking, “Not only no, but hell no” and have them figure out another way to resolve whatever the problem is.
So, there you have it.
Rant Time: iOS 9.1 and iCloud Backup == Fail
![]() This rant will be relatively short and sweet. I recently upgraded my iPhone to iOS 9.1. Not only were there some stupid issues around their new and improved upgrade process, iCloud backup is entirely broken. Let’s explore.
This rant will be relatively short and sweet. I recently upgraded my iPhone to iOS 9.1. Not only were there some stupid issues around their new and improved upgrade process, iCloud backup is entirely broken. Let’s explore.
Pre-upgrade problems
Apple has introduced an upgrade after-hours process. What that means is that you need to agree to some terms and then the iPhone will upgrade between 2AM and 4AM as long as your phone is plugged in. I thought, “yay” until I got the agreement screen at which time I promptly yelled, “what the hell?”. Let me explain…
Apple forces on top of all else this automated upgrade agreement screen. It even disables the home button so you can’t get out of that screen by accidentally pressing the home button (like that would ever happen). That means you’re firmly planted on that screen (or so it seems). Anyway, on the agreement screen, you have to type in your Apple login credentials to verify you and to help you with that process, the iPhone conveniently pops up an on-screen keyboard like it typically does. Except, the Apple developers forgot one crucial detail. They forgot to give you a way to get rid of the keyboard when you’re done. Pressing the Enter button at the bottom right of the keyboard does absolutely nothing. The keyboard remains firmly planted on top of, you guessed it, the submit button. This means you cannot press the submit button… and, you can’t press the home button… and, you can’t do anything else.
So, now you’re literally stuck. You can’t press the submit button to complete the action and you can’t get out of this screen, or so it seems. I decided to take matters into my own hands. I pressed and held the power button until the Slide to Power Off slider appeared. Lo and behold, doing this actually made that screen go away. This entire debacle should have been my warning. But noooo. I didn’t listen to that little voice saying not to upgrade now.
Can’t use Automated Update
So now that I forced my way out of that screen with the power button, there is no way to go back in and resume the process. You’re probably wondering why I might want to do that? I had planned on hooking up a bluetooth keyboard to the phone so that on screen keyboard would not present. This would allow me to enter the data and then have access to the submit button, but noooo. Can’t make it that easy now can we Apple? So, I performed the upgrade in the normal way, by going into Settings=>General=>Software Update and used the standard method.
iCloud backup and 9.1 fail
 To a lesser degree, I had this same problem in 9.0.4 (or whatever the last 9.0 version was). When I attempted to backup my phone to iCloud, for whatever reason the iPhone decides to back up every app on your phone by default. Mind you, I have several gigs worth of apps on my phone on top of the 15G or so of images/videos in my library. I spent a good day working on getting my iCloud backup working on 9.0.x. It took me the better part of several hours working through stupid Settings app bugs just to get all of my apps excluded from backups. Let’s understand that Apple requires you to manually disable each and every app separately from being backed up. Let’s also understand that in order to do so, each time you click to green slider to the OFF position, you have confirm a popup that asks ‘Turn Off and Delete’ for every single app separately. Let’s consider that my phone has hundreds of apps installed. So many apps, in fact, that Settings crashes about 1/4 of the way through the ‘Turn Off and Delete’ confirmation banners. It’s an arduous task at best and it’s frustrating and aggravating at worst.
 Yet, rolling into 9.1, Apple promptly reverts everything I spent 1-2 hours doing and now defaults back to turning every app ON (see left image) for backup yet again. How do I know? I get that very annoying ‘Not Enough Storage’ notification on my lock screen. I spent valuable time setting all of that up and Apple promptly forgets my settings. The very definition of bad user experience (UX). Instead, this time I can’t even stop the backups of any apps. Apple only gives 5GB of data storage for free. I had all of my devices comfortably making backups on iCloud using maybe 3.1GB total (4 devices), after the excruciatingly aggravating task of finally excluding all of the unnecessary crap that Apple insists on including. Perfect… until 9.1.
Now, I’m in a catch 22. I can’t make a successful backup because iOS continually resets all of my apps and forces me to back up everything to the iCloud the first time. Yet, iOS won’t allow me to change settings to deselect the apps because it must have a successful backup first. FAIL. You can go try to deselect apps, but that’s all for show. It doesn’t actually work. Oh sure, the green ON buttons turn OFF, but it’s not as if that actually works. It doesn’t respect that those apps are now OFF and the backup fails. Once it fails, all of those buttons you’ve spent tons of times clicking to OFF will all be automatically reenabled after the backup failure.
I have no idea what Apple was thinking here, but they clearly had their heads in the iClouds. This problem has gotten progressively worse with each release and has culminated in iCloud backup being entirely unusable unless you feel the urge to spend at least $1/mo for 50GB of storage so you can work around Apple’s stupid bugs. I have no intention of working around any developers bugs by spending money. Either provide workable functionality or don’t. But, there is no way I will ever spend money to a company to work around bugs in software. Apple, if you really want to force us to pay you to get more than 5GB, then just charge us up front for any space issued. Don’t beat around the bush by introducing bugs that make the freebie you’ve given become worthless. Let’s just be honest here.
If this is about spending yet more money with you to get people to buy into your iCloud storage, then just tell us that’s what you want. Don’t force us to go buy more because you want to force everything on our phones to back up. That’s not how you do it. Just change the terms and send everyone a notice that the 5GB storage you’ve issued us is no longer free and at the end of the month you lose it or you pay for it. Just tell the consumers what you want. You don’t need to do it by introduction of bugs that forces phone owners to backup everything on their phone.
Seriously… 5GB?
In this day and age when Google is giving practically terabytes of storage for free, Apple can only afford 5GB a month? Really? How much money does Apple make off of their products and they’re going to be that stingy with storage? On top of that, they force you to backup your entire 16/32/64GB phone over to iCloud. Not only is that stupid from the 5GB free perspective, it’s just asinine that I can’t control my bandwidth to this service. Seriously, I don’t want to send over 10-20GB of data across my network bandwidth. I want to control what I send and how much I send. Since I can no longer do that…
Buh Bye iCloud Backup.. it was nice knowing ya!
I’m done with iCloud backup. Not only is it stupidly designed, what real purpose does it serve at 5GB? I can backup my entire phone’s contents on iTunes on my local machine(s) as many times as I wish. There are no bandwidth constraints or disk space issues. Yet, I can barely backup my contacts on iCloud at 5GB. I have no intention of dropping $1/mo to get to 50GB, which is still only a pittance, let alone $10/mo for 1TB. Who knows how secure the data really is in iCloud? One breach and Apple will be run out of town on a rail.
I’m tired of dealing with Apple’s stupid developers who can no longer code their way out of a paper bag. I’m tired of dealing with bugs that shouldn’t even exist on a device that used to be the most intuitive device built. Now it’s a device that is merely following behind Android’s, ahem, innovation. So, I’ll happily head back to the time before iCloud existed. I’m done with that service for backups. I prefer to keep my backups local anyway. Buh Bye iCloud backups.
Apple, figure it out !
Tingle or vibration from the back of the iPad while charging
You may or may not have noticed, but if you run your hand along the back of the iPad (or even an iPod touch) while it’s charging, especially when using a wall power adapter, you may notice a vibration or tingle sensation on your hand. You might be wondering what it is. This article is short and sweet, so let’s explore.
Charging your iPad
When you plug your iPad into a wall outlet (or any charger for that matter), you would think the current should go into the device alone. Well, it doesn’t. Some of the charge is dispersed along the metal case by design. Here is a comment on Apple’s forum quoted from Apple’s support team regarding this issue:
There is measurable AC voltage across the external metal parts when an iPad charges. The measured voltage is within the SELV (Separated Extra-Low Voltage) limit, which means that the iPad is safe to touch. Additionally, the touch current is within the safety limit according to UL/IEC 60950 (Safety of Information Technology Equipment).[1]
So, there you have it. This is by design and nothing to be concerned over. Although, what Apple should have done is take that current being dispersed onto the case surface and run it to an LED to soak it up so you feel nothing. Of course, that means the iPad would need an external LED, but it wouldn’t be a bad thing to know when the device is charging without having to turn it on.
Checking your iPad with Apple
Note, if you get anything more than a mild sensation from the back of the iPad, then you should take it back to Apple. The current you feel from the back should be minuscule. If you see any sparks or feel anything more than a slight vibration, your iPad might be electrically defective. If you’re unsure, take it to Apple and have them check it out.
So, there you go.
[1] Apple’s Discussion Forum Comentary on this issue


1 comment