No Man’s Sky: Guide to Galaxy Collecting


There are 255 galaxies in No Man’s Sky as of this article. Hello Games, however, could unlock more galaxies in the future. There are various ways to unlock each of the current 255 galaxies within No Man’s Sky. Let’s explore all of the ways and see which one is best.
Galaxy Center
The primary way that has been designed by Hello Games to unlock new galaxies within No Man’s Sky is to reach the center of each galaxy using a series of quests. Once you reach the center, your ship will be catapulted to the next galaxy in numerical order. From 1 through 255. If you’re in galaxy 1, then the next galaxy unlocked should be galaxy 2, then galaxy 3 and so on.
To unlock each galaxy, you will need to follow a very long, convoluted and involved Atlas quest line along with using black holes to hyperjump ever closer to the galaxy center. Performing this method to reach the galaxy center could take literal months to unlock just one galaxy. Attempting to get through all 255 galaxies in this way could take you years, assuming you follow Hello Games’s designed path.
Once your ship reaches the new galaxy, some of your ship’s technology will be broken and in need of resources to repair along with some of the technology in your Multitool. If you’re planning to use this (as designed) approach to unlock galaxies, it is strongly recommended to pick up a throw-away ship right before reaching the center. It also recommend to equip a throw-away Multitool. Then, when in the new galaxy on the other side, switch ships and then sell that broken ship and free up that slot. Then, switch back to your primary unbroken Multitool. This means you don’t have to worry about repairing any of that broken ship junk or a broken Multitool.
If you know you’re going to be doing this often to unlock many galaxies, then you’ll need to buy a super low priced functional ship each time and also equip that broken Multitool before proceeding to each galaxy center. You just need to make sure the ship you buy has enough hyperdrive distance to get to the center, which might mean buying and equipping distance mods.
However, thankfully there are much easier and faster methods to unlock galaxies that avoid this whole long tail quest and broken technology problem, but these involved using multiplayer.
Friends
After multiplayer was added to the game, Hello Games allowed you to follow your friends or a group out of the Anomaly station and into their system. This allows you to follow a friend into their system and their galaxy.
If you have a friend who has already unlocked a number of galaxies, you can unlock each of those same galaxies by using the Anomaly to follow a friend into them.
This method requires friends who already have galaxies unlocked. If you don’t have any friends like this, there is the another method below.
To use the friend method, you will need to have Internet and, if using a console, access to PlayStation Plus or Xbox Live to connect with your friends using multiplayer. The Nintendo Switch version of No Man’s Sky does not currently offer multiplayer, so this method is presently not available for those playing on the Nintendo Switch.
Anomaly Terminus
This is the fastest and recommended method to unlock galaxies, but again this doesn’t work on the Nintendo Switch. It also doesn’t require broken ships or spending months traveling to the galaxy center. However, it does take time to collect the galaxies in this way. When you do, it’s way faster, easier and doesn’t require having any friends online. In fact, this method doesn’t involve friends at all. It does, however, require multiplayer, so you will need to have multiplayer and crossplay enabled to unlock this method and offer you the best chances at finding galaxies to unlock.
As stated, if you’re playing on the Switch, this method is unavailable. This means when playing on the Switch, you’ll need to rely on the first method (galaxy center) described above to unlock galaxies. It is presently the only method for those playing on the Switch or for others who are playing the game in offline mode. If you are playing on a platform that supports multiplayer, then the Anomaly Terminus method works exceptionally well.
On the second floor of the Anomaly station is a giant Terminus that allows you to warp to your bases, other space stations and even to bases of people who are currently visiting the Anomaly at that moment. It is this latter part that is how you find galaxies to unlock.
Method
- After visiting the Anomaly station, head up to the giant Terminus
- On the Terminus, select ‘Space Anomaly’. This isolates the screen to only bases by other players actively visiting the Anomaly at that moment.
- Click on each base listing to see if the base is in a galaxy other than Euclid (or whatever galaxy you are presently in). Note that bases that don’t list a galaxy in the base information means that it is in the same galaxy where you presently are. If you’re in Euclid, it means that that base is also in Euclid. If you’re in Eissentam, then it means the base is also in Eissentam.
- If the base information doesn’t list a galaxy name, then move onto the next. Keep clicking on each base listing until you find one that contains a galaxy other than the one you’re in. If you don’t see any bases with a new galaxy, jump to step 8.
- Once you find a base that is in a different galaxy, you may be forced to wait while it downloads. If it fails to download, back out and click on the base name again. It sometimes takes 2 or even 3 attempts to load before it allows you to warp to that base.
- When ‘Warp to [Base Name]’ appears, click it and warp to that base.
- Now you’re in that new galaxy. All you need to do is establish a base in that galaxy and you can visit it at any time. If you’re really lazy, you can visit the space station in that system and that will allow you to return to that galaxy through the space station. I don’t recommend the space station collection as a method because space stations have chances of dropping off of the list. Built bases never disappear from your list.
- If you fail to find any galaxies in the Anomaly Terminus list, don’t fret. You have two options: 1) wait for more players to show up (could take a while) or 2) (faster method) Go to your ship, fly out of the Anomaly, turn around and fly back in. Flying out and back in will put you into a brand new lobby with brand new players. At this point, rinse and repeat beginning at step 1. It could take as many as 3 fly-out-and-in attempts to find a player with a base in a new galaxy. If you try more than 5 times without success, take a break and try later.
There are some tricks here. There are times where in step 5 the game simply refuses to download the base. This either means the player has left the game entirely for that session or there’s a connectivity problem. You’ll simply need to skip that base and try to find a different base to that same (or a different) galaxy. I’ve lost several possible galaxy collects as a result of failing to download the base. Don’t be discouraged as there are plenty of players and plenty of chances to find it again or even new galaxies to add to your collection. After all, there are 255 of them.
You’ll also need a relatively good memory to see and recognize galaxies you have already collected. Once you collect about 20 or more, you may not recall all of the galaxies you presently have collected. If you see a base in a galaxy you don’t recognize, warp to that base anyway. It’s better to be there and not need it, than skip and and find that you do. Once you reach the new galaxy, you can spend the time to dig through your own bases in a Terminus to find out if you already have base there. If you already have it, then fly into space and call the Anomaly and start over at Step 1.
Mix and Match [Updated: 5/30/2023]
I’ve decided to add a few more thoughts about galaxy collecting. There’s no need to constrain yourself to one type of collecting. If you like the idea of using the galaxy center at times, then by all means use that. If you like the thought of being able to find galaxies using other player bases, then use that.
One thing I didn’t mention is that you can use glyphs as a shortcut to reach the galaxy center of each universe, assuming that you want to use the galaxy center approach. This will help players on systems without multiplayer, like the Nintendo Switch. If you’re constrained to using the galaxy center approach, then you’ll need to search Google to find shortcut glyphs that will lead you to the galaxy’s center.
You’ll first need to know all of the names of the galaxies to search Google for the galaxy center glyphs. Know that there are a few legacy galaxies that appear to not be collectable using the galaxy center approach. These are galaxies 256 (Odyalutai) and 257 (Yilsrussimil). Once you reach the center of galaxy 255 (Iousongola), you will be taken back to galaxy 1 (Euclid).
If you are using the galaxy center approach and after reaching a brand new galaxy, you’ll further need to find a portal in that new galaxy with which to use glyphs. This will take some time to locate a portal. For this reason, the Anomaly approach can be faster, assuming you have access to multiplayer.
Future Expansion?
Note that there is at least one special numbered galaxy named Hacolulusu. It is numbered both +MAX32INT+1 and -MAX32INT+1 at the same time… or, in number, +2147483648 AND -2147483648 simultaneously. It is likely that Hello Games reserved this galaxy endcap placeholder to prevent accidentally assigning it. The bigger tell with using this 32 bit sized integer is that it suggests that 255 isn’t the maximum number of galaxies possible. In fact, it seems Hello Games may have reserved the possibility of at least 2,147,483,647 (2.1 billion) galaxies (unsigned) or up to 4,294,967,294 (4.2 billion) galaxies (signed), while artificially constraining the number to 255 at this moment.
The fact that the galaxies Odyalutai (256), Yilsrussimil (257) and Hacolulusu (+/-MAX32INT+1) exist strongly suggests the possibility of offering more galaxies than 255. Further, it suggests the game is artificially constraining itself into using an 8 bit integer value when No Man’s Sky is very likely using a 32 bit signed integer to store the galaxy ID values.
What this all means is that Hello Games could open up more galaxies in the future, possibly expanding it to 512 or 1024 or some similarly lower and more manageable value. It’s unlikely Hello Games would open up the full 4.2 billion galaxies, though.
Etiquette Suggestion
If performing the Anomaly Terminus method (using strangers) for collecting galaxies, I recommend leaving the system to finding your own system for setting up your first base in that new galaxy. However, if you find a planet that is so overwhelmingly good in that player’s system that you can’t pass it up, then by all means establish a base there. For example, were I to find a spot on a planet with 20 Mold Balls, I’d have no problem establishing a base around that.
However, as a matter of etiquette and courtesy, I recommend establishing bases in systems that you have unlocked yourself rather than encroaching onto that person’s system that you leeched from the Anomaly.
If you happen to land in a galaxy and system with hundreds of bases already, then it won’t matter if you establish a base there. There are a number of these out there that have been used for both Expeditions and for Weekend events.
Good Luck and Happy Galaxy Hunting!
↩︎
Fallout 76: Map locations of Wood Piles

Many players are wondering where to find Wood Resource Piles (aka Wood Piles) throughout Fallout 76. While there are websites showing map locations leading the way to gold, concrete, steel, lead, waste oil and acid deposits, none yet show where to find wood resource piles for your camp. Yes, there are a number of these wood piles in Appalachia. Let’s explore.
Wood Pile Sites
Starter List
Wood Pile Update #1
Wood Pile Update #2
Wood Pile Update #3
Wood Pile Update #4
Legacy Removals and Wood Piles Update #5
The links above lead to the list of wood piles that have been found. Unfortunately, as many others have found, there are no maps to find these resources easily via Google. Well, now there is. The research for this article is time consuming as it requires searching all over the map for these wood piles. That’s where this article comes in. I’ve done this work for you and now the article is closed.
For ease of writing this article, I will abbreviate C.A.M.P. to simply the word ‘camp’ except when I’m referring to the device itself. There are a number of workshops that have wood resource piles. This article does not include wood resource piles located in workshops. If you wish to know which workshops have wood piles… then from the Fallout 76 map, hover over the workshop icon and the game will display resources available at each workshop.
Wood Resource Deposits
What are these deposits and why are they special? Like iron deposits that produce steel scrap and crystal deposits that produce crystal scrap, wood deposits produce wood scrap when equipped with a proper resource extractor in your camp. Some of these deposits exist inside of workshops, but you cannot build a camp in a workshop. Many players want to build their camp on top of a wood resource deposit so they can extract wood scraps at their camp.
Yes, these deposits do exist separately throughout the Forest and even into the Cranberry Bog. Wherever there are forests and wood, these wood pile deposits exist. That I’ve also discovered while scouting, these wood deposits seem to exist near, but outside of workshops and usually aren’t far off of a road. Though, they don’t always appear near workshops and they are not always near a road. These wood piles can be claimed using your C.A.M.P. device and used within your own camp with a wood resource extractor.
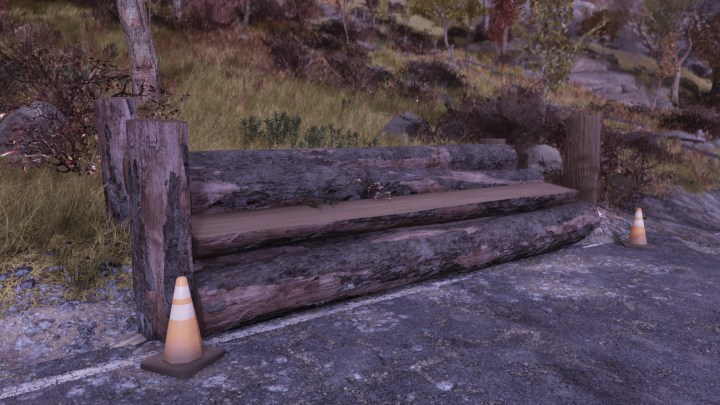
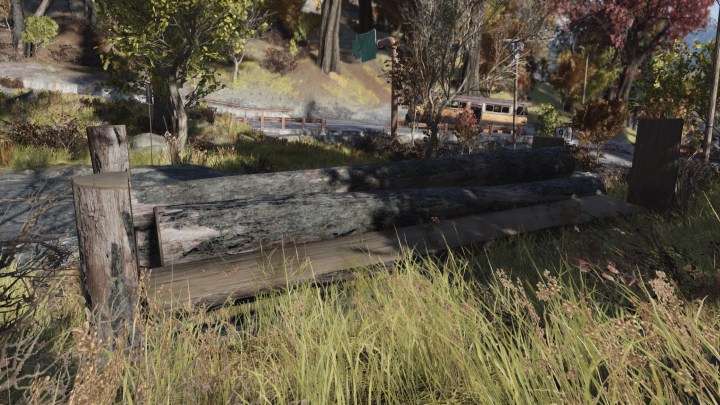
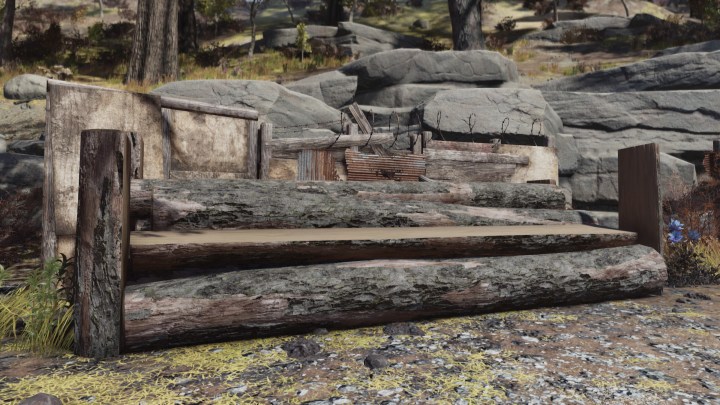
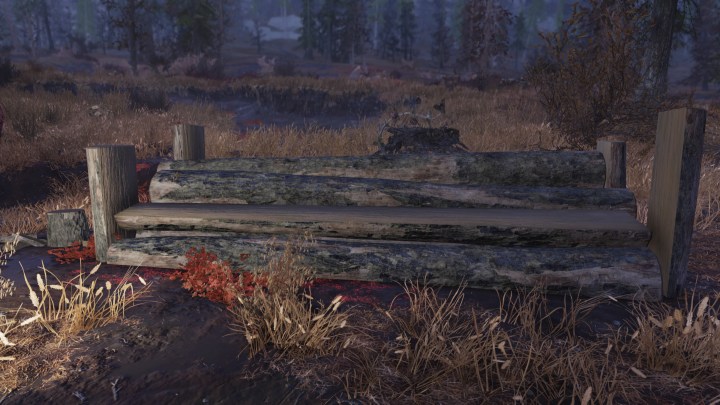
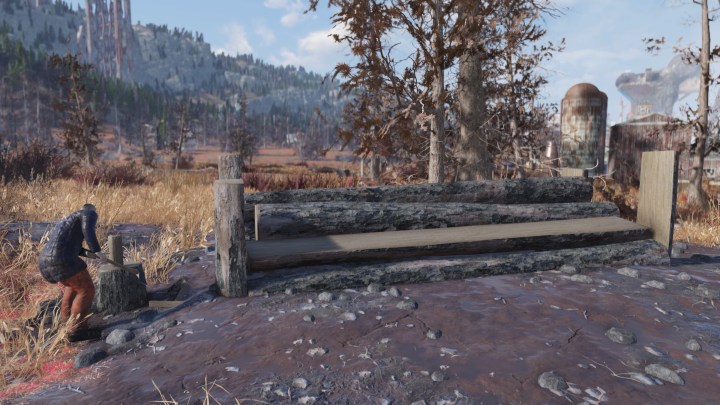
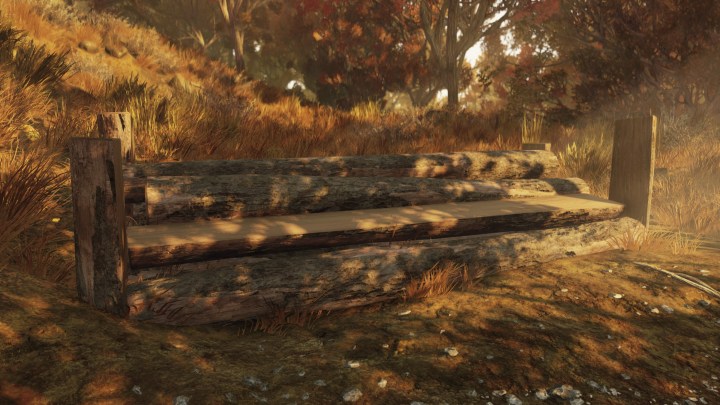
Wood resource piles have a distinctive look and shape from regular logs of wood in the landscape. Here’s an example:

Note that the cones on this pile are only for this specific pile. All other wood piles I’ve found do not have these orange cones. Additionally, note the four posts that constrain the wood pile. These wood resource piles always look like this (with the exception of the cones).

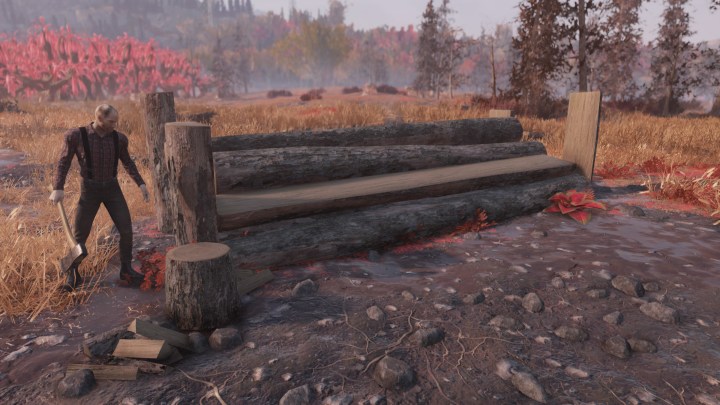
If you see one of these wood piles in the wild AND which is not located in a workshop, you can use it in your camp to extract wood by placing down a wood resource extractor. The extractor will produce wood scraps for you. The above is how a wood pile looks when a resource extractor is placed down. Resource extractors require power to operate, hence the reason for the two solar panels to power it. While you can use any generator of sufficient power, I prefer using two solar panels which can be placed right on top.
Settlers and Wood
Since the introduction of Wastelanders, the game now offers random NPC settlers living in the wasteland. These settlers can sometimes point the way to finding such wood pile resources. For example, if you hear the sound of wood being chopped, there’s a high probability that locating the sound will lead you to a settler and a wood pile. Settlers don’t spawn all of the time, but they do occur the vast majority of the time. This means that some wood piles must be found by stumbling onto them. By following the sound of wood being chopped, it is likely to lead you to a wood pile.
Again, these wood pile deposits are available to use as resources in your camp, just like ground copper, silver or iron deposits.
Wood Resource Deposit Locations
Let’s get right to the heart of this article and the reason why you are here. These are all of the wood pile resources I’ve found. Every single resource I’ve scouted is available for use in a camp, allowing for a wood extractor resource to be placed. The vast majority of these piles are located in The Forest. However, a few do exist in the Cranberry Bog and other locations around the map. As I find more, this article will be updated.
I’ve also tested all of these locations to ensure that a C.A.M.P. device can be placed which will include the wood pile. Though, placement on some may not work if placed directly in front of the pile. These piles may require you to walk around a little to find a suitable location where the device turns green and allows placement while still including the wood pile.
Let’s start with this first set of wood pile locations …
![]()
Location #1 — Gilman Lumber Mill (Forest)

This wood resource deposit is located near the Gilman Lumber Mill just below Vault 76. The arrow marker points to the spot. This location actually contains two wood deposits. Unfortunately, the deposit closest to Gilman (next to a fence) cannot be claimed for use in a camp. This second one which is farther away and not sitting against a fence (see the arrow marker) is usable in your camp. It looks like so…

This wood pile below, unfortunately, is NOT usable in a camp. It is shown to prevent confusion from the above pile, which can be used in a camp. Again, this pile just below placed next to the chain link fence cannot be used as a camp resource, but it can be harvested for wood by your character. Yes, it would be nice to have two wood extractors in the same camp, but alas it’s not to be. Thanks Bethesda.

Location #2 — Back end of Wixon Homestead (Forest)
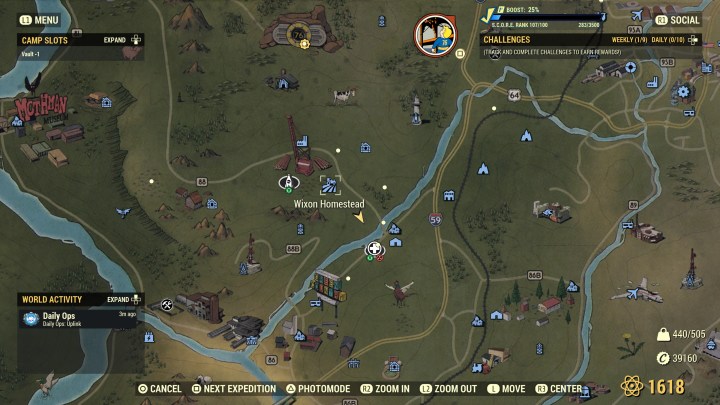
This wood deposit exists not far from the Wayward, but sits at the very back end of the Wixon Homestead’s farmland, not far off the nearby road leading to the Wayward.

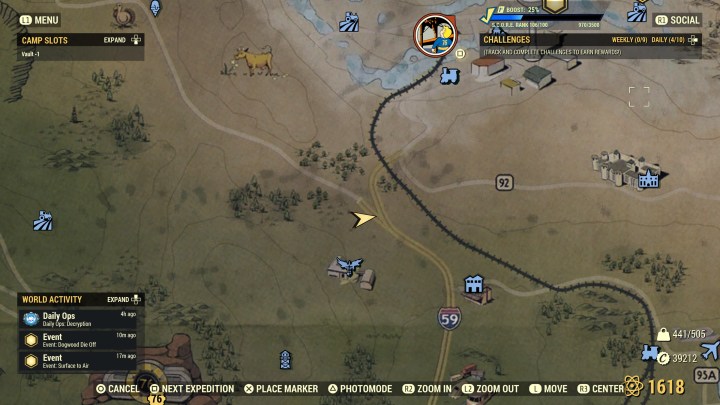
Location #3 — Hunter’s Ridge (Forest)

This wood deposit is near Hunter’s ridge along the road where the marker shows. This pile has two orange cones.
Location #4 — Pylon V13 & Drop Site C2 (Cranberry Bog)

This wood deposit is somewhat near the Abandoned Bog Town workshop, but is not part of it. It’s fairly far off of the road and you can hear a settler chopping wood all the way from the road if they are there.

Location #5 — North of Twin Pines Cabin (Forest)
Near where the road forks into two, you’ll find a wood deposit which is not far from Twin Pines Cabin (the Blood Eagle symbol on the map).
Location #6 — Deathclaw Island (Forest)

Slightly off of and north, just up the road from the spawn point for Deathclaw Island (pine tree marker on the map), here’s another wood resource which can be used at your camp. See the arrow marker. The wood pile looks like this.

Note that the building seen in the background is the small red shed which is part of the Tyler County Dirt Track workshop. However, this wood pile is not part of that workshop and can be used in your camp.
Location #7 — Point Pleasant (Forest)

This wood pile is very close to Point Pleasant. However, the spawn point for Point Pleasant leads you to the south entrance. This pile is near the north entrance of the city with no fast travel point close. You’ll want to fast travel to Black Mountain Ordnance Works and walk down the road towards the north entrance of Point Pleasant. Immediately after you pass a red colored large hauler truck, it’ll be on your left. Careful of a possible Blood Eagle camp nearby.

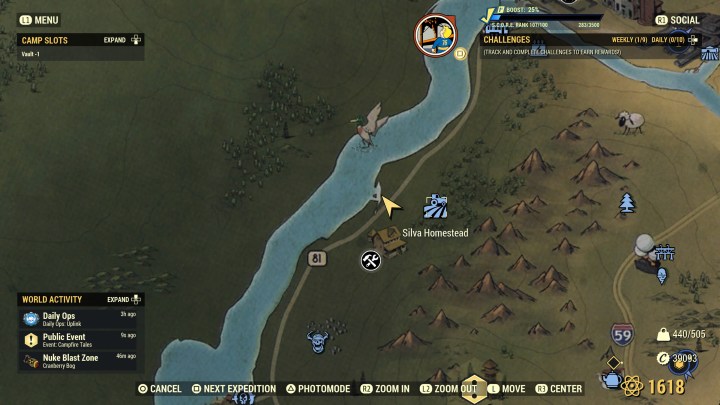
Location #8 — Silva Homestead (Forest)
This wood pile is located a little bit south of Silva Homestead and is also a little bit off of the road near and sorta behind a red tractor. This location is a little bit tricky to place the C.A.M.P. device. However, if you are creative with your C.A.M.P. device placement, you might be able to include both water and wood as resources in your camp. Note that you only need to cover about half of a ground resource with the green perimeter circle for that resource to be usable. Placement of water resources are a bit more finicky.

Location #9 — Billings Homestead (Forest)

This wood pile is located just up the road a little from the Silva Homestead pile. This pile is close to, but not part of the workshop. Like Silva Homestead, this one also requires creative placement of the C.A.M.P. device to be able to use this pile as a resource.

See the placement of the C.A.M.P. device below. Any closer to the pile and it turns red due to the workshop proximity.
Location #10 — Grafton Steel (Toxic Valley)

This wood pile is near Grafton Steel, but is on the north side. Similar to Point Pleasant, the fast travel point for Grafton Steel is on the south side. You’ll need to trek up the road to the point where the marker is. It’s just a little bit off the road, but you can still see the pile from the road.

Location #11 — Near Black Mountain Ordnance Works (Forest)

From the fast travel point at Black Mountain, travel down the road to the point you see. There’s a small gravel road that leads into an unmarked junkyard which looks like this…
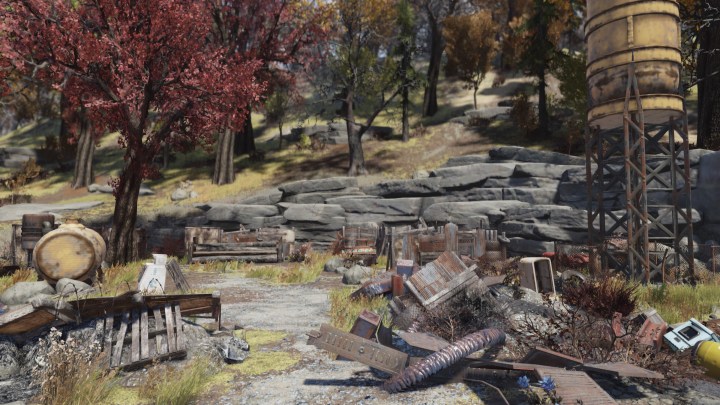
At the back of this makeshift and unmarked junkyard resides a wood pile…
I didn’t scout this area carefully to see if there were any other resources present, such as a junk resource. You’ll need to visit to determine this. It looks like there might be a junk resource available off to the right as shown in the wider picture of this makeshift junkyard.
Location #12 — Alpine River Cabins (Forest)

Just above Alpine River Cabins there’s another wood pile. Seems like there’s a lot of these in the Forest area. Makes sense, though. It looks like this…


Location #13 — Mosstown (Mire)

Very near Mosstown, but just outside of it is a wood resource pile. This resource pile is usable in your camp even though it’s very close to Mosstown.

Location #14 — WV Lumber Co. (Forest)

This wood pile is so close to the water line, you can likely claim both water and this wood pile in your camp.

Location #15 — Groves Family Cabin (Forest)
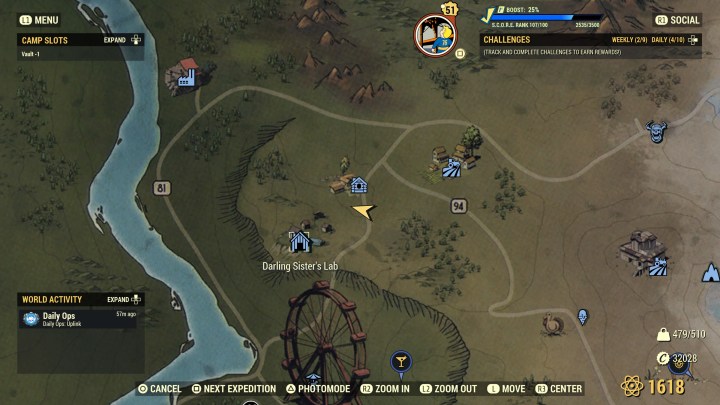
This one is closer to Groves Family Cabin than Darling Sister’s Lab. The trouble with this map image is that when the Groves marker is selected, the text obscures the arrow. I selected the Darling Sister’s Lab marker to give you a better idea of the map location.

Location #16 — Miner’s Monument (Forest)

This wood pile is just across from Miner’s Monument.

Location #17 — Southern Belle Motel (Mire)

Next to the Southern Belle Motel is, you guessed it, a wood pile ripe for claiming in a camp. This one is directly next to water. With this one, you can definitely claim both water and the wood pile in your camp. You can probably even put up a bunch of water purifiers along side your wood extractor.

New Piles Update #2 — Cranberry Bog
There are apparently a number of wood piles strewn around the Cranberry Bog, but not close to roads. Some of these wood piles reside fairly close to various Firebase sites, but not always. Here are the four newest wood piles I’ve found. Thanks go to a game friend who knew about two of these piles and helped me locate them with markers near the sites. That also spurred me to traipse around the Cranberry Bog looking for the two others included.
This player also told me he was unable to place a wood extractor at the wood pile located near Drop Site V9 when he had his base there. I have tested this location by placing an extractor and have experienced no difficulties (see below). Please let me know in the comments if you experience any problems with any of these sites listed.
Location #18 — The Thorn (Cranberry Bog)

Not far from The Thorn (see marker) is another wood pile. Sometimes a settler is not there.
Location #19 — Bootlegger’s Shack (Cranberry Bog)
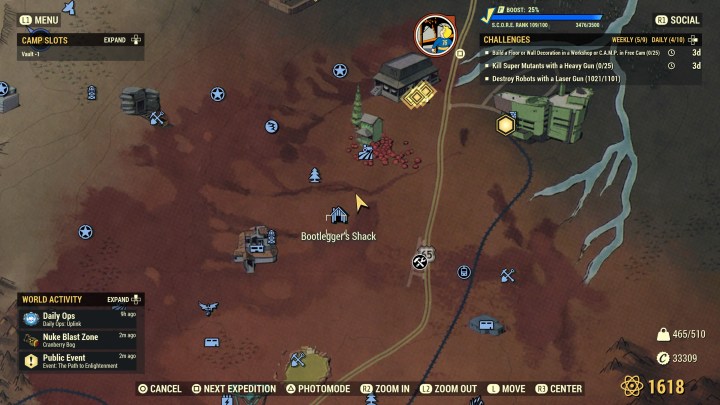
And another near a grove of Sundew Trees.
Location #20 — Drop Site V9 (Cranberry Bog)

A small trek north of Drop Site V9, you’ll find another wood pile. This one is far enough north that it shouldn’t be inside of a blast zone very often, if ever… unless it’s a newbie player who doesn’t know exactly where to nuke.

This is the wood pile I was told wouldn’t place an extractor by someone who had a camp here previously. I have tested this site and I was able to place down a wood resource extractor without any difficulties, like so…

Location #21 — Firebase LT (Cranberry Bog)

Halfway between Firebase LT and that fissure site, you’ll find another wood pile. It looks like so…

Location #22 — Sunrise Field #1 (Cranberry Bog)

This wood pile is the first in three wood piles located near Sunrise Field. You’ll need to take a close look at each marker location and correlate that with each image. Note that one of the locations that would seem natural to have a wood pile instead has a uranium deposit (see below). The third wood pile is farther away and in a different area than one might expect.

Location #23 — Sunrise Field #2 (Cranberry Bog)

This is the second wood pile located near Sunrise Field. It exists next to this small red shack.

Location #24 — Sunrise Field #3 (Cranberry Bog)

This third wood pile is located halfway between Sunrise Field and Sparse Sundew Grove. I’m connecting this one to Sunrise Field due to its close proximity.
Sunrise Field — Uranium Deposit (Cranberry Bog)
For completeness, I roamed to an area near Sunrise Field (to the right and below) where I thought another wood pile might be located. Instead of a wood pile, I see a uranium deposit. Here’s the location of this uranium deposit in case you’re curious.

The reason this uranium deposit is included here to keep you from wasting time roaming over to this area thinking there might be another wood pile there. There isn’t. It’s a uranium deposit.

For this update, I’ve finally found the location that I remember seeing months back and it’s actually in the Savage Divide! I originally thought this wood pile site was much closer to The Whitespring than it is. It’s actually very close to the Garrahan area of the Savage Divide right where it meets the Ash Heap. These wood piles, though, are considered in the Savage Divide.
![]()
Location #25 — Bastion Park (Savage Divide)
From Bastion Park, travel down the road and you’ll find this wood pile just off of the road near a semi truck with logs on the back.

At this location, you’ll see this semi truck with logs on the back right next to the wood pile.
Location #26 — Monongah Power SS MZ-03 (Savage Divide)

From site #25, trek just a little ways down the road and you’ll find this wood pile which is close to the substation fast travel point. This wood pile is the pile I thought was very close to The Whitespring. Instead, it’s much farther down near Monongah Power Substation MZ-03 and not far from the Garrahan Mining HQ. I was also surprised to find that there are actually a number of wood piles in close proximity in this area.

Location #27 — Garrahan Mining HQ (Savage Divide)

Even further down this same road near the Garrahan Mining Headquarters, you’ll find another wood pile to use. It looks like so…

This wood pile is located near a small unmarked village of houses.
Location #28 — Braxson’s Quality Medical Supplies (Mire)
This one is in The Mire. From Braxson’s Quality Medical Supplies (the icon looks like a factory), trek to the below location and you’ll find this wood pile…
Location #29 — Crimson Prospect (Cranberry Bog)
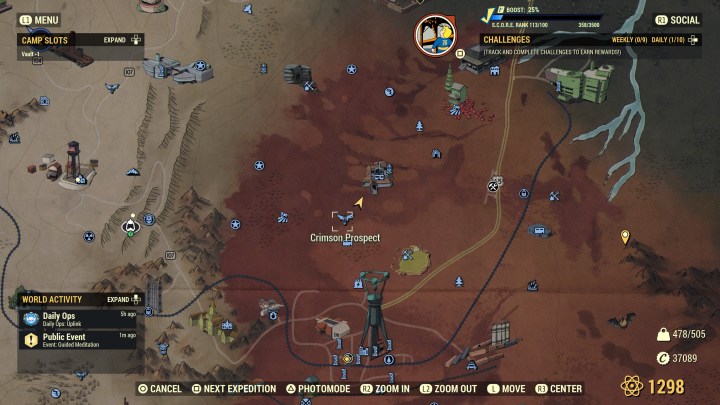
We’re back in the Cranberry Bog for yet another wood pile. Halfway between Crimson Prospect and the Ranger District Office, you’ll find another wood pile ready and waiting for a camp to be placed.

![]()
Legacy Removals and Wood Piles
As a result of Tuesday January 24th’s removal of Legacy weapons (aka Black Tuesday), I have made the decision to no longer search for any more wood piles. There are now 29 Wood Piles in this list, well enough to satisfy anyone who wishes to base their camp around one. While I was unable to find any of these wood piles in the Ash Heap, Toxic Valley or the vast majority of the Savage Divide, you’ll need to search in these areas yourself if you want your camp in a specific area not listed near a wood pile.
If you’re simply wanting a wood pile to base your camp around, there are plenty of sites listed in this article from which to choose. If you’re specifically wanting one in a region where none is listed above, I’ll leave it to you to go find one close.
My reasoning for closing this article at this time is that Fallout 76’s player base is actively under siege by Bethesda, which I further foresee many players leaving this game over the course of the next 30-90 days as a result. Without Legacy weapons, the game is likely to become “boring” and “no longer fun to play” by many. That reduction in players leaves fewer and fewer players playing Fallout 76 on all platforms. That further means that information articles like this one will see fewer and fewer searches from a dwindling set of players who need this information.
With the 29 sites already discovered above in combination with the likely significant reduction in player base, there’s no reason to continue searching. If Bethesda changes their stance on legacies or finds a way to entice a whole lot more players back into the game, then I may revive this article and continue to update it. As of now, this article is officially closed with the 29 sites listed. I am no longer actively searching out any more wood piles.
Ending Notes…
I haven’t tested placing extractors down on each of these wood piles in this list. Some of these locations may or may not allow for placement of an extractor. You’ll need to test this. The only test I have performed is to see whether it’s possible to place a C.A.M.P. device at or near the wood pile. Every wood pile in this list turns green when testing a C.A.M.P. device placement, but that test doesn’t guarantee that a wood extractor will place once a camp is established.
For map reference, the arrow marker not only denotes the location of the wood pile, the arrow’s direction also points directly towards that wood pile.
If you happen to locate a wood pile not listed or find that one of these wood piles above doesn’t work to extract, please leave a comment below. If you find a pile that is missing from this list, please tell me where it is located is in a comment below and I’ll credit you for having found it. Even though this article is closed for updates, I am still actively accepting comments from people who may find a wood pile not in the above list. You will be duly credited for having found any wood pile not in this list.
Enjoy and happy camping!
↩︎
Tips: Cooking with an Air Fryer
 You recently got a new air fryer as a holiday gift and now you’re wondering, “What can I do with this?” Or, maybe you have one sitting on a shelf that’s been there for months? Wonder no more. Let’s explore various cooking tips for that air fryer.
What Exactly is an Air Fryer?
Simply put, it’s a forced air broiler. It’s like a convection oven, but the forced air is much, much stronger. Not all air fryers are necessarily the same. While many offer touch controls, some offer only simple timer knobs (see Bella air fryer just below). Some also heat from the top, while some heat from the side. All cook pretty much in the same way. How does it work?
These small cooking appliances are designed with a fan which forces high speed air through heated coils vertically down onto the food. Some may force it across the food horizontally. That’s pretty much it in a nutshell. Even though the concept is simple, the speed of it is fairly amazing for cooking. However, there are some cautions to go with that cooking speed.
Cooking times are dramatically reduced as a result of this forced air cooking method. Because of the high speed air flow, many foods can be cooked in about the same time as using a microwave. Unlike a microwave, an air fryer makes and keeps foods crispy and brown rather than mushy or rubbery.
Here are some cautions. Because the velocity of the air fryer is quite high, an air fryer is also quite drying for all food. This can make certain foods dry out if cooking precautions aren’t taken, such as wrapping the food in foil to keep the moisture in. Wrapping with foil doesn’t allow for crisping up the food. This means you’ll want to wrap the food for long duration cooking times and then unwrap for the last 8-10 minutes at the end of the cooking time to crisp the food.
Cooking Times
Air fryer cooking times are dramatically reduced from a standard oven. It’s way faster than even a convection oven. A pizza might cook in 18 minutes in a regular oven, but may be done in 8-10 minutes in an air fryer. Speaking of…
Pizza
Cooking Pizza in an air fryer might seem natural, but it’s not. If you intend to cook pizza in an air fryer, you’ll need to know how to do it correctly or it’ll burn and get overly dry.
When cooking pizza in a conventional oven, 400ºF / 204ºC temperature is exactly that. However, in an air fryer, that same temperature is actually quite a bit hotter because of the forced air. This means you have to reduce the heat level when cooking in an air fryer by at least 50ºF / 10ºC to compensate, maybe more. Otherwise, your food will become blackened and hard.
Pizza is no exception. When cooking pizza in an air fryer, you’ll want to cook no higher than 280-300ºF / 138-149ºC and monitor it closely. Cheese easily burns in an air fryer and, yes, it’ll also burn quickly, within 6-8 minutes. Pizza can be tricky to cook in an air fryer. If you’re really wanting the best pizza, I always suggest using a real oven. For reheating pizza, an air fryer is perfect when set to 200ºF to 250ºF / 93ºC to 121ºC.
If you like and prefer a charred, blackened taste on pizza, then an air fryer is perfect for getting that result. I prefer my pizza cheese melted, a tiny bit crispy, but mostly still stringy and fresh. Getting the latter result in an air fryer requires careful lower temperature cooking.
Veggies
Vegetables can be cooked in an air fryer, but I’d suggest wrapping them in foil, adding a tablespoon of water in the foil to keep them moist and steamy. If you want more of a grilled texture to your vegetables, then steam them in foil for about 8-10 minutes, then unwrap the foil and cook for the remaining 3-5 minutes on 380-400ºF / 193-204ºC to crisp them up.
Hamburgers
A hamburger patty is easily cooked in an air fryer. However, air fryers are messy beasts and need cleaning frequently. With foods that tend to produce spatter, like beef, poultry and pork, you’ll want to be sure to clean the interior of your air fryer after cooking such foods.
Hamburger patties cook in about 8-10 minutes at 400ºF / 204ºC. Though, you’ll need to flip the food if you cook without foil. If you’re cooking in foil, there’s no need to flip as the steam will cook both sides evenly. I recommend steaming the hamburger patty for half of the cooking time, then unwrap and cook the remaining time open, being sure to flip it half way through the open cooking time.
Hamburger patties can be placed into the air fryer completely frozen and will still be cooked in that 8 to 10 minutes. Fresh, thawed hamburger patties will cook slightly faster, so check them more frequently.
Hot Dogs
You don’t really need to cook hot dogs in an air fryer. Instead, you’ll simply want to reheat them. Many air fryers offer a reheat setting. Use only the reheat setting for hot dogs. In about 5 minutes, you’ll have hot dogs cooked to perfection. For air fryers with knob settings, reheat is 6 minutes at 200-250ºF / 93-121ºC.
Choosing the air fry option, which typically runs at 400ºF / 204ºC for about 15 minutes, you’re sure to burn the hot dogs, and most anything else except french fries and other potato side dishes. If choosing the 400ºF / 204ºC option, be sure to check your food often and shake the basket about every 3-5 minutes.
Hot dogs cooked at 400ºF / 204ºC will begin to blacken within about 2-3 minutes. If you like your hot dogs blackened, then this is the option to choose. If you prefer your hot dogs warmed with a slightly crispy bite, then reheat is the choice for cooking.
Cooking Side by Side
It’s easy to cook foods side by side in an air fryer basket. For example, you can place hot dogs and fries into the basket together and have a full meal ready go to at the end of the cooking time. However, note that fries take longer to cook than hot dogs. A soon as the hot dogs are warmed, remove the dogs, then raise the temperature to cook the fries at 400ºF / 204ºC for the remainder of the time, around 6-8 minutes.
Alternatively, cook the fries until there’s about 3 minutes left, then lower the temperature to 200-250ºF / 93-121ºC to reheat the hot dogs for 5 minutes, which will also keep the fries hot.
Tortilla Chips / Dehydrating
Many air fryers offer a dehydrate setting. This cooking method cuts the fan speed down dramatically and runs at a temperature around 100-150º / 38-66ºC . This is perfect for drying foods, such as making your own baked corn tortilla chips.
For baked tortilla chips, cut fresh corn tortillas into quarters. Place the quarters flat into the basket. The chips can be overlapping without issues. I typically cut up about 4-5 tortillas and layer them on the bottom of the cooking tray. Then, set the cooking method to dehydrate for 1 hour and 30 minutes.
These chips come out quite crispy, but not the same as you can buy at the store. If you’re wanting to make nachos, it’s a reasonably quick way to make chips without running to the store.
One trick here to soften the chips a bit is to place the chips in a paper bag and let them sit overnight. The next day, the chips will have a softer crunch and be more like chips you can buy in the store.
However, don’t be fooled into thinking that air frying these tortillas at 400ºF / 204ºC will do you any favors. It won’t. The chips will blacken and taste burnt. You don’t want this for tortilla chips. If you want to heat the chips, use the dehydrate method described above to keep them crispy, yet looking and tasting like tortilla chips. You can use reheat on the chips for 1-3 minutes to warm them up, too.
Frozen Fried Foods
Here’s where the air fryer shines. For frozen foods like Totinos Pizza Rolls, corn dogs, mini tacos, taquitos or even simply fried chicken (fresh or frozen) or french fries, the air fryer setting works perfect to reheat and cook these.
All of the above foods cook using the air fry option. The air fry option typically runs 380-400ºF / 193-204ºC for about 12 minutes, shaking the basket several times while cooking to even out the cooking. No need to thaw, just place them straight into the basket frozen and 12 minutes later you’ll have piping hot and crispy foods. Some of the above foods may cook in around 8 minutes. Always begin checking your foods for doneness around 8 minutes while shaking the basket.
The air fry setting is perfect to cook fried chicken or other fried and battered foods to perfection. That’s why they call it an air fryer.
Cookies and Cakes
While it is possible to use an air fryer to bake such foods, I don’t recommend it. These baked food types don’t bake well in an air fryer. There are three reasons for this:
- The forced air ensures the top of the baked good is overcooked and dry
- The forced air will flatten cookies out and make them too flat
- The forced heat will overcook the top of cookies, but leave the underside undercooked (same for cake)
Instead, for a more even bake, I recommend using a regular or toaster oven for baking cookies, cakes and brownies. If you want your cookies a little more crispy, you can throw them into the air fryer for 1-3 minutes at around 350ºF / 177ºC after they’ve been baked in a regular oven.
Baked Pasta
If you’ve ever bought a baked personal pan pasta from Pizza Hut or any other Italian restaurant, then you may be wondering how to get that crispy cheese texture on the top of hot steaming pasta. The air fryer is perfect for making this. However, you’ll need to invest in some cooking pans that fit into your air fryer.
Up until now, I’ve not discussed the size of the baskets on an air fryer. Here’s where you’ll need to get your tape measure out and determine the dimensions of your air fryer basket. Mine is about 8″ across. With that sizing in hand, head over to Amazon and search for air fryer accessories that will fit inside your basket. It’s possible your air fryer came with small pans that fit inside of your basket. Mine did not. You’ll want to obtain either a square or round baking pan that fits inside your air fryer basket.
For baked pasta:
- Layer your cooked pasta on the bottom of a round or square pan (not in the basket directly)
- Layer mozzarella on top of the pasta
- Layer cooked pasta sauce on top of the cheese
- Place various toppings like beef, pork, veggies and pepperoni
- Top with a layer of cheese
Cook in the air fryer at 350ºF / 177ºC for about 6-8 minutes, checking for cheese browning at around the 5 minute mark.
Note that if you’re using a basket type fryer, be sure sure to buy a pan accessory kit which also includes a pan grabber. This grabber grabs hold of the lip of the pan which allows you to easily lift and extract the pan from the basket without using your hands and without spilling. Though, you can use oven mitts if you prefer… a pan grabber is much easier to prevent food spillage.
Cooking Other Foods?
There are plenty of other foods you can try cooking in an air fryer. For example, if you buy a frozen food from the store and there are not air fryer cooking instructions on the package, subtract 50% of the cooking time from regular oven cooking and that is usually what’s needed for an air fryer. You may also want to reduce the cooking temperature by at least 30-50ºF / 8-20ºC to avoid overcooking or burning.
As I said above, if it’s cookies, cakes or other baked goods, you should opt for baking in a regular or toaster oven. Even such foods as pot pies or sweet pies may cook better in a conventional oven. Some foods are easy to over bake in an air fryer.
When cooking meats, many cooks want to save the drippings to make gravy. If you’re wanting to make gravy, don’t use an air fryer. Air fryers force evaporate almost all liquids produced by foods. This means, no gravy. If you’re wanting to make gravy, then you’ll want to braise your chicken, pork and beef in a regular oven to retain those juices. Don’t use an air fryer.
If you don’t care about gravy, then cooking your food in an air fryer is an option. Just don’t be fooled into thinking you can make gravy from cooking meats in an air fryer. It doesn’t work.
Pre-heating an Air Fryer
Some air fryers have a preheat setting. However, it’s really unnecessary. You can throw your food straight into the basket and begin the cooking instantly. It might add 1 extra minute to the cook time, but it’s faster than waiting 2 minutes for a preheat. To be fair, it only takes about 1 minute for an air fryer to preheat… which is why it’s mostly unnecessary to preheat your air fryer unless you want the grill surface to be hot so it will add grill marks to your food.
Basket vs Trays vs Cleaning
Some air fryers are more like toaster ovens with trays. If you have this kind of air fryer, you’ll need to use an oven mitt to pull out the trays to shake them. If you have the basket type fryer with a handle, these are more convenient because the handle stays completely cool on the basket. I recommend the basket variety because it’s much easier to clean and the handle remains cool.
If you have the basket variety of air fryer, there are lots of “keep it clean” options, including basket inserts made of paper, parchment and even silicone. These inserts allow for cooking and removal to keep your basket clean. There are also pans, as mentioned above, which can be used to help bake foods while keeping the interior clean.
Still, spatter from foods can get into the heating elements and surrounding areas. You’ll need to periodically wipe and clean the interior of the air fryer after it has completely cooled. You may need to use a little Easy Off oven cleaner to fully clean this spatter. Be sure to clean your basket every so often to make sure you’ve cleaned off food smells from previous uses.
 Final note. Some air fryer images show a basket filled to capacity, like this Ninja to the left. Don’t do this. The maximum you should ever fill your basket is about half to 3/4 full. Never fill your basket entirely to the top with food. The reason? The top most food is too close to the heating element and will burn. You want to keep your food far enough away from that heating element to keep it from burning. Such images are strictly for marketing purposes, not for functionality. Do not replicate these marketing images when cooking.
Happy Air Frying!
↩︎
How to pair your PS5 controller wirelessly
 As a follow-on to Randocity’s original How to Pair your PS4 Controller Wirelessly article, here’s how to do this for your PS5 controller. Yes, it’s still possible to pair a controller wirelessly. Let’s explore.
Intent
This article is intended to allow PS5 owners to pair a PS5 controller to your PS5 console without the need to use that ever elusive USB cable. If you’ve lost or misplaced your cable, no need to fret if you have certain prerequisites available. Unfortunately, if you don’t have any of these requisites, you’ll need to dig up a USB cable.
PS5 Controller
The PS5 Controller is much the same as the PS4 controller in terms of its buttons, with the exception of the controller’s labels. Instead of clearly worded ‘Share’ and ‘Options’ labels, they now have obscure icon labels. If you’re familiar with PS4 button placement, it is identical on PS5 controllers. Left upper button next to the touch pad is Share, right is Options.
To pair your PS5 controller wirelessly, however, you’ll need to have at least one controller active on your PS5. That controller doesn’t necessarily need to be a game controller. If you’ve enabled the HDMI link on your TV, you can likely use your TV’s remote to navigate the PS5’s UI to the proper settings location to pair your controller.
Many people don’t know that your TV’s remote control (via HDMI) can be used to navigate the PS4 and PS5’s menu systems by using the arrow controls on the TV’s remote control. With your TV remote, you can navigate to the settings area needed to pair your controller. Note that the HDMI Link must be enabled on the PS5 and may not work on all TV models. It seems to work correctly on Sony TVs (as expected), but brands other than Sony may or may not work. You’ll want to test your TV for functionality to ensure control with your TV’s remote works via HDMI.
To make the TV’s controller work, however, it must also be the active controller at the time you sign into your PS5 (or PS4). The controller that signs into the PS4/PS5 is the active controller. You can’t switch to the TV’s controller after a PS5 controller signs in. You’ll need to sign out or reboot your PS5 / PS4 to get back to the sign-in screen.
Also note that the TV’s remote control itself will not power on the PS4 or PS5. You’ll need to press the power button on the front of the PS5 unit if you have no PS5 controller handy. Alternatively, your PS5 should power on by switching to the PS5’s HDMI port using the TV’s remote control. If switching to the HDMI port doesn’t work, then you’ll need to press the power button on the PS5.
If you’re new to the PS5 and don’t know where these buttons are, they are on the opposite end from the blue USB port on the front of the unit. The longer button is the power button, the shorter button is the disc eject button. The Digital version might not have a disc eject button.
Pairing the Controller
Here’s the meat of this article. There are two pieces involved:
- The PS5 needs to see and be ready to accept the device once it’s found
- The PS5 controller needs to be placed into pairing mode.
Ensure that you have a controller that functions, such as your TV’s remote control or a second PS5 controller. Once you have this, on the PS5 navigate to Settings -> Accessories -> General -> Bluetooth Accessories. This places your PS5 onto the correct screen to continue the next part of this process.
 Here are the PS5 controller pairing steps:
- For 5-6 seconds or so, press and hold the Share button and the PlayStation (PS) button simultaneously until the controller light begins to flash in rapid succession. Once the lights begin to flash, look at your TV screen to see the controller appear under new Bluetooth accessories.
- The new controller will show up as ‘Wireless Controller’ below all other paired controllers.
- With your TV remote or your currently active controller, navigate down to that “Wireless Controller” and select it with the X button on a PS5 controller. TV remotes may use an OK or ENTER button for selection.
- Once selected, the PS5 will ask, “Do you want to register this Bluetooth Accessory?”
- Choose “Yes”.
- The PS5 will ask you to select an account for that controller. Choose an account.
- That new controller will be paired to your PS5.
- Done.
Your new controller is now paired and ready for use. If you have questions or if this article has helped you, please leave a comment below.
Enjoy.
If you found this article helpful, please click the ‘Follow‘ button on your screen. In a web browser, that will be in the upper right corner. In the WordPress App, press the 3 vertical dots in the upper right, then click ‘Follow site’ on the menu that appears.
↩︎
PS4: How to repair extended storage that won’t repair
 Occasionally, you may find the need to unplug your PS4 because, well, it’s hung. Or maybe, the whole system just crashed hard. It happens. When rebooting from these conditions, it causes all hard drives to need a filesystem repair upon reboot. If you have an extended storage hard drive plugged in via USB, sometimes the PS4 will attempt to repair the extended storage, but then refuse to complete the repair. Fret not. If your hard drive was working fine prior to the crash, it’s likely still working just fine. Let’s explore.
PlayStation 4 (and PS5?)
Note that while this repair tutorial was written to address the PS4’s external storage, it likely also works with the PS5. With that in mind, let’s understand what goes wrong under these circumstances.
After rebooting from a crash, the PS4 system naturally takes a longer amount of time to boot up than is otherwise normal. This is expected. The internal boot drive filesystem needs to be repaired. I’ve never encountered a problem with the system repairing the internal drive unless the internal hard drive has failed. If your system won’t boot after a hang, you’ve got a lot bigger problems than the extended storage hard drive.
Swapping the PS4’s Internal Hard Drive
Here’s another scenario where this HowTo article may apply. If you’ve had to rebuild your PS4 with a new boot drive or you simply wanted to upgrade to a bigger drive, you’ll need to boot into safe mode and reinstall the latest boot system and operating system to get the system bootable once again. Once you’ve done that, you’ve got a whole lot of work ahead before your system will be back to the same state before replacing that internal drive.
That setup process is not within the scope of this article, however. This article also applies to the situation when your PS4 is fully once again bootable after a reinstall, but your external hard drive refuses to repair.
Extended Hard Drive after PS4 Crash
If you’ve encountered any issue where the PS4 refuses to repair the extended storage media connected via USB, then you’re not alone. It’s a relatively common problem and usually has a very easy fix, one that’s also not obvious.
Note that the operating system on the PS4, under this failure-to-repair scenario, is likely misleading you when that it suggests that the extended hard needs to be reformatted. Don’t listen to this advice. It very likely doesn’t need reformatting. Raise your hand if you enjoy having to download gigs and gigs of games again from the Internet! No one? Alright then, let’s continue.
Because of a crash or a hang, the operating system might have lost some critical data stored on the primary internal hard drive that prevents the repair and misleads you into an action that’s actually not needed.
Licenses
Every game that operates on the PS4 requires a license to operate. If you’ve purchased digital copies from the PlayStation store, these licenses are stored on your console’s internal boot drive. For physical disk copies, the license is the physical disk. This is why the PS4 requires insertion of the media into the drive before it allows the game to operate.
If your PS4 (or PS5) has had a crash or a hang, a hard boot may occasionally corrupt that licensing data, specifically about the game that was operating at the time. It only takes one corrupt license to prevent the external hard drive from repairing properly.
Don’t fret here. Game licenses are easily recovered, but may require two different steps.
Extended Storage and Licenses
Why do corrupt licenses cause this problem? When the operating system needs to repair an external hard drive, it seems to validate every license for every game stored on that extended storage before attempting a repair the external volume. If the licenses are invalid or cannot be found, the PS4’s operating system will refuse to repair the extended storage and suggest reformatting the hard drive… which, in turn, seems to suggest there’s a physical problem with the hard drive itself. Under this condition, there is absolutely nothing wrong with the the external hard drive.
In fact, all of the data is still completely intact. You just need to recover the licenses. So let’s do that now.
License Recovery
To allow your external volume to repair, ‘Restoring Licenses’ is the operation that needs to be performed. This action is done through the PS4’s settings area. This is located under:
Settings => Account Management => Restore Licenses
When you activate this function, the PS4 will clear all old licenses and then download all authorized game licenses anew from the PlayStation store. Then, write those licenses to your PS4’s boot drive. Once this action is complete, the game licenses for all of your digital game versions will be restored.
A second action may also be required called ‘Rebuilding the Database’. This isn’t done from within settings. It is performed from the PS4’s safe mode menu. To get into Safe Mode, you’ll need to use the following:
- Shutdown your PS4 fully (not Rest Mode) until it powers off.
- Press and hold the power button your PS4. You’ll hear one beep upon pressing and ~7 seconds later, you’ll hear a second beep.
- Once you hear the second beep, stop pressing the button.
- The system will boot into Safe Mode and show you a menu of options.
- Choose the option ‘Rebuild Database’ and activate
- Once this function is complete, choose ‘Restart PS4’ to boot the console into normal mode.
Repairing the External Hard Drive
Now that you have restored the licenses and rebuilt the database, your console has been prepped for your external hard drive to be repaired. At this point, plug the drive into a USB port. The system should automatically detect the drive needs to be repaired and prompt you to repair it.
This time, your hard drive should fully repair without any problems. If so, you’re good to go and enjoy your fixed up console.
Failure Continues?
If your external hard drive fails to repair after all of these steps, then clearly there’s something amiss with your hard drive that is likely not related to licensing. From here, you can try to reformat the drive and see if that works. However, if the PS4’s operating system cannot properly format the drive, attempting a reformat may not fix this problem. In fact, this problem may indicate your hard drive has gone bad or is in the process of failing.
Because you’re going to need to reformat the drive, I might suggest connecting the drive to a Windows or Mac system and attempt to have the drive perform a full long format on the drive. This might take several hours. This process allows the operating system to check every sector of the drive and explicitly mark bad sectors while formatting.
Unfortunately, the PS4 doesn’t offer this deep level of formatting. Thankfully, Windows does, but Macs don’t do it easily. As long as you format the drive as exFAT, you will be able to use it on the PS4 later. However, you may not be able to use it as an extended drive on the PS4 as that may require the PS4 to reformat the drive, which may release all of the bad sectors that Windows was able to find and mark as bad. Though, it’s worth a shot to try.
If you convert that drive to an extended drive and find that the PS4 can’t repair the drive again later, then you may want to repurpose that drive strictly for your Windows or Mac use and go buy a new drive for your PS4.
↩︎
How to poach an egg in the microwave?

There are a number of YouTube videos claiming to poach an egg in a microwave. Almost every one of them is wrong and, worse, exceedingly dangerous. So, how do you poach an egg in a microwave? Let’s explore.
The Art of Egg Poaching
Poaching an egg is a cooking style which “poaches” an egg in hot water. Let’s understand that like oil and water, microwaves and water don’t always mix well, specifically when the water is heated. Microwaves tend to heat water excessively hot, to the point that the water becomes superheated. Superheated water is water that has reached a temperature beyond the boiling point.
Whoa! Wait a minute! Hold on. “Beyond the boiling point”, you say? You ask, “So why doesn’t it boil?” Good question. Microwaves are exceedingly efficient at heating water molecules rapidly. In fact, this is exactly how microwaves work. Microwaves target water molecules and energize them into moving rapidly. Molecules moving rapidly release heat. However, because the speed at which the microwave can heat water, it can get the molecules moving beyond the boiling point, but the water remains entirely still (i.e., no movement).
This is a dangerous and very deceptive condition. It means that the first thing placed into the water will cause the water to instantly explode into a boiling frenzy and spray boiling hot water everywhere, including potentially all over you causing burns. The point is, you never want to submerge an egg (whole or cracked) into water, then attempt to cook / poach it using a microwave. This is not at all a recommended cooking method. It’s also exceedingly dangerous.
Proper Egg Poacher Cookware
As with anything cooked in the microwave, appropriate cookware is required. Not only is each microwave cookware designed for a specific purpose, it ensures the safety of the person using the cookware for that purpose.
 For the microwave, there are a number of different egg poachers that you can find. The most common is a clam shell style cooker with two compartments, into which you can crack two eggs. For example, here’s one type of clamshell style egg poacher at Amazon. If you prefer to buy name brands, here’s a Nordic poacher at Amazon (see inset image). You can sometimes find these style poachers at dollar stores and clearance home shops, like Home Goods.
How to Poach an Egg in a Microwave?
This method assumes you have acquired one of the above microwave cookers. DO NOT use an uncovered bowl instead.
Before I get into the how to portion, let me say that eggs, particularly the yolk, cook exceedingly fast in a microwave regardless of wattage. What this means is that even the best microwave poached egg won’t have a texture like an egg poached in a pan of water over open heat. This further means that if you are set on the texture and style of an actual poached egg, you’ll want to prepare it using a pan of heated water on a stove top, not by a microwave… especially if you like your yolk runny. On the flip side, poaching an egg in a microwave is easy and fast. If speed is important, then this method is the preferred choice.
With that said, to poach in a microwave egg poacher, the instructions are as follows:
- Crack one or two eggs into the compartment(s)
- Place one teaspoon of water on top of each egg
- Close and lock the lid over the egg(s)
- Place the cooker into the microwave, being careful to keep the unit level to avoid spilling
- Cook the eggs in the microwave for 1 minute
- Open the lid and check for doneness (careful, as steam may release which will be hot)
- If the egg is still not done, close and heat again in 20-30 second increments until done, checking after each 20-30 seconds.
Note that when poaching, the yolk will likely cook completely. It’s almost impossible to prevent this in the microwave. Once done, the egg whites will have a similar texture to poached. Unfortunately, the yolk is likely to be fully cooked and have that crumbly fully cooked texture.
This is a super fast way to cook an egg, but it may not provide the exact “poached” texture you’re looking for in the stove top method. However, this method, when used in the recommended microwave cookware, has very little chance of causing scalding hot water burns.
Also, be cautious when piercing the yolk with a fork immediately after coming out of the microwave. The yolk has a tendency to build up steam pressure inside and explode upon being pierced. You’ll want to wait for the egg(s) to cool for a few minutes before piercing. Alternatively, cover the egg with a paper towel and gently pierce it with a fork underneath, keeping your hands clear or covered with an oven mitt. If it explodes, the paper towel will catch it.
Be Safe and Happy Cooking!
↩︎
10 Best Ways to Make Money in GTA Online
Unlike Grand Theft Auto V, where lots of money is thrown the player’s way all the way to the end of the game, Grand Theft Auto Online isn’t at all like this. Let’s explore the top ways to make money in GTA Online. Before we get started, let’s clarify several issues.
Daily versus In-Game Day
There is some confusion with GTAO using the word, “daily”. The game world has a day that lasts around an hour of real world play time. Then, there’s an actual in-real-life (IRL) day.
The use of the word ‘Daily’ below in the Type area means 24 real world hours must pass before that challenge or event resets in the game world. The challenges do not reset based on the in-game day, but instead reset based on waiting a full 24 clock-on-the-wall hours from the last time you played it.
You can specifically see this timer when you visit the Lucky Wheel at the Casino. However, other events which also require a 24 hour waiting period do not have visible timers. Instead, you must remember the last time you completed that specific event to know when you can play it again.
Costly Purchases
Unfortunately, too many activities in Grand Theft Auto Online require spending significant amounts of GTA$ to unlock access to those missions and areas (i.e., Cayo Perico Island). Once unlocked, you can then run those missions and make whatever money is given. However, the game is severely lopsided with too many of these missions and areas, such as Heists, falling into this category. What this all means? It means that Rockstar requires that you spend millions in GTA$ to gain back only a fraction of that money after completing the missions. This article intends to focus on the easiest ways to make money including ways that are entirely free (no costs involved), which don’t cost too much and/or ways that return a significant or passive amount of GTA$ for any money spent.
Any mission or activity which requires you to become a VIP, CEO or Motorcycle Club President (MCP) means you’ll need to purchase at least one of a VIP organization, an Executive Office (CEO) or a Motorcycle Clubhouse (MCP). All of these require at least GTA$1,000,000, with the VIP option being the worst deal in the game as you get no property out of the deal. If you’re going to pay at least GTA$1 million, you might as well get property out of the deal.
For activities in GTAO which primarily seek to take your GTA$, these are mentioned at the bottom of this article. Though, these activities aren’t worth playing simply to make money and should be avoided for that purpose. These up-front cost missions should only be played for their entertainment value… and only if you have the spare millions of GTA$ needed to unlock them. However, you don’t need to pay to unlock these expensive missions. There are plenty of activities which will yield GTA$ without paying anything.
Update for June 2022
Rockstar has permanently upped the ante for the Nightclub daily payout. Instead of the pittance of GTA$10,000 per in-game day, the game is now paying a whopping GTA$50,000 per day with a maximum safe capacity now at GTA$210,000. Normally, we would only see this kind of bonus as a short term weekly promotion. It seems that Rockstar has upped this payout permanently (or at least as permanently as Rockstar’s payouts can be… which probably means that it was a mistake and once Rockstar notices it, it will go back to GTA$10,000 per day). For now, gain from this while it lasts. So far, it’s lasted quite a while.
Is this update worth buying a Nightclub? Yes. In fact, I definitely recommend this purchase as the first property after purchasing an MC, VIP or CEO property. At GTA$50,000 per in-game day, you could see your Nightclub purchase refunded in around 30 in-game days assuming the Nightclub costs around GTA$1.5 million. In real world time and at 48 minutes IRL per in-game day, that would mean ~24 real life hours to see a GTA$1.5 million payout. If you play 4 hours a day, that’s around 6 days to recoup the cost of the Nightclub. After that, all money is bonus.
Tuners Update — Reduced Payouts
After the Tuners update rolled on July 20th, 2021, many payouts (including the nightclub missions) seem to have been reduced. This article is intended as reference, but know that with every update that Rockstar rolls, Rockstar can reduce payouts on any of what’s documented below without warning, as is the case with Simeon’s request and Nightclub missions. Simeon’s car request formerly offered up GTA$20,000 per car prior to Tuners, but has since been reduced on some cars to GTA$15,000 after this update. Rockstar just can’t seem to get enough of continually screwing us over.
Legend
The legend includes a Difficulty Level that ranges from 1 (Easy) to 5 (Medium) to 10 (Hard). The rest that appear in the legend are self-explanatory.
With these problems clarified, let’s start making some entirely free GTA$ starting with the best first …
⤵
1. Spin the Lucky Wheel

The first way to earn money in GTA online is by spinning the Lucky Wheel every day in the Diamond Casino. This activity costs nothing.
Landing on the GTA$50,000 spot each day for 7 days will net you a cool GTA$350,000 a week. Performing this activity for a full 31 days will net you GTA$1,550,000. How do you land this spot every day? The simplest way is to close the application before the wheel stops spinning. Once you know the wheel is not landing on GTA$50,000 (easy to see), close out, then reload into the game and try spinning again. There are also other money spots on the wheel such as 25,000 casino chips (which can be converted to GTA$), GTA$30,000, GTA$40,000 and others. While the highest is GTA$50,000, landing on any of these money spots is free money. Take advantage.
The best thing about this activity is that you don’t have to spend any money or perform any silly activities to get this free money, but you do have to sometimes restart the app several times before you can land on the exact spot, which takes a bit of time.
Cost: Free
Type: Free Money, Daily, Recurring
Reward: up to GTA$50,000 max depending on which space you land
Difficulty Level: 1 (Easy)
⤵
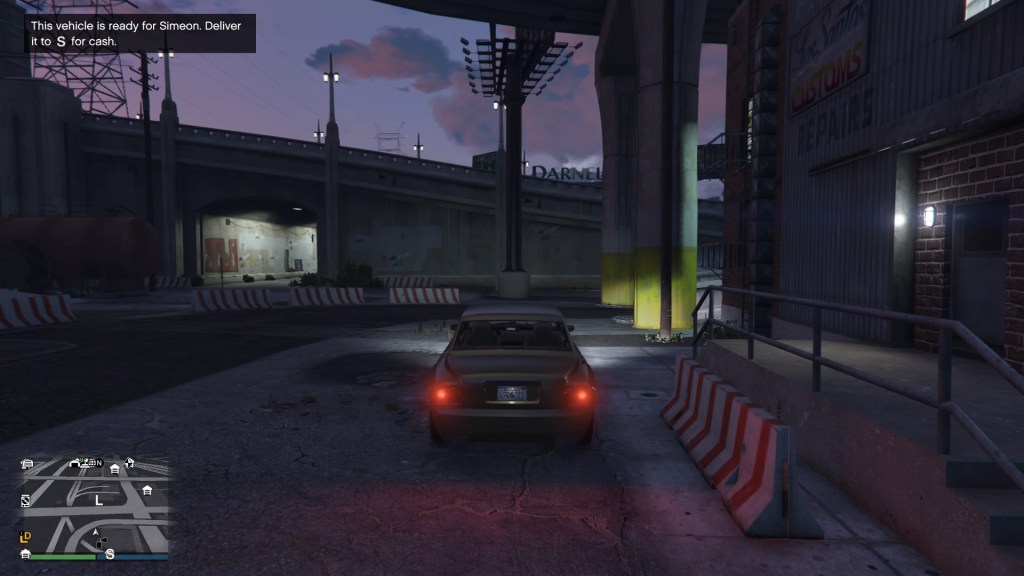
2. Simeon
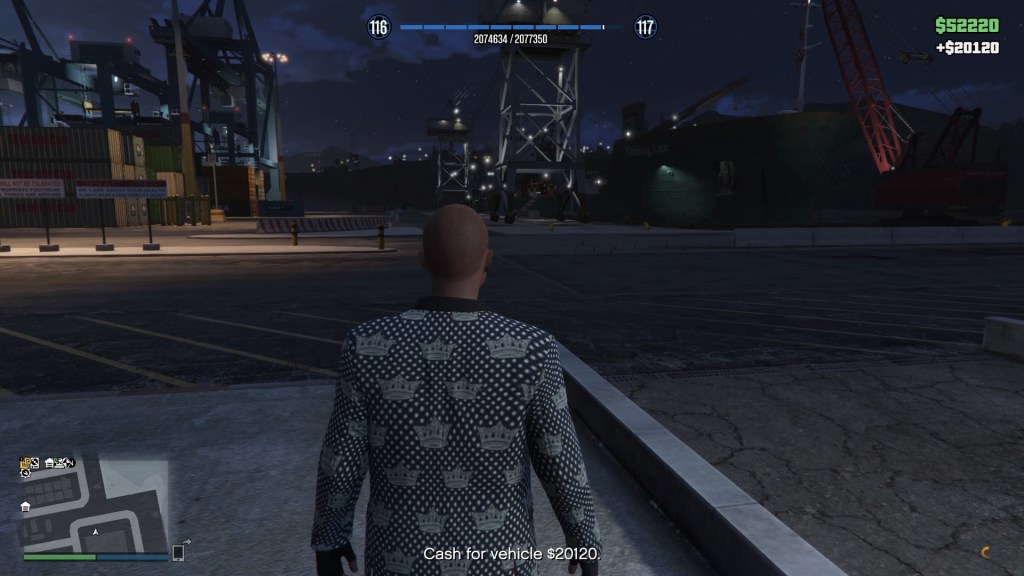
This free activity appears once per day. Simeon will send you a text to locate one of several cars from his list. It can take about 30-45 minutes real play time before Simeon’s text pops up. If you’ve waited that long without a text, this likely means it hasn’t been a full 24 hours since the last time you performed this activity. These cars range in cost and only one of those listed cars will reward a maximum of ~GTA$20,000 (some cars reduced to $15k after Tuners update July 20th, 2021). Locate the highest cost car in the list, lose the 2 wanted stars, take it to Los Santos Customs and paint it for free. Then, drop it off at Simeon’s dock warehouse garage to pick up your free ~GTA$20,000 (or whatever you find your car is worth). This one only appears every 24 hours, like spinning the wheel.
If you do Simeon’s text mission every day, in 31 days you’ll have made GTA$620,000. The challenge with this mission is in finding the car Simeon wants. The biggest hint I can give is try looking at the Diamond Casino parking lot. At least 2 times out of 5, you’ll find his highest priced car parked there, just waiting to steal.
Note, this one can be tricky. The game’s car spawning mechanic doesn’t sync up with this quest and won’t always spawn the cars Simeon wants. This means you can literally spend hours waiting on specific cars to spawn. Sometimes, the cars are readily available at a parking lot, sometimes you can drive around for hours looking. If after driving around for about 5-10 minutes without success, I recommend logging out and logging into a new server and waiting for Simeon to text you his newest list again. Moving to a new server can sometimes make this quest easier and faster. It’s worth noting that whatever it costs to repair the car at Los Santos Customs, after being chased by the cops, will be reimbursed to you upon turning the vehicle in. You don’t need to treat the car with kid gloves when heading over to Los Santos Customs. Once you’ve repaired and painted the car, then yes, you’ll want to be careful when driving over to Simeon’s warehouse at the docks.


Cost: Free
Type: Active Income, Daily, Recurring
Reward: Max GTA$20,000 + repair costs reimbursed per day, depends on which car you drop off.
Difficulty Level: 3 (Medium… depends on whether cars spawn + must get rid of a 2 star wanted status + must drive car safely to the docks without damage)
Correction: I have since found that even though some cars have had their take reduced to GTA$15,000, some have not. The maximum is still GTA$20,000 + repair costs if you choose the correct car.
⤵
3. Stealing Cars
This is a free activity that can be had once per day. As in the game’s name as Grand Theft Auto, stealing random cars off of the street and driving them to Los Santos Customs can net you between GTA$3,000 to GTA$9,000 per car, depending on the car model you sell. You can only sell one car per day. While this isn’t a whole lot of money each time, it’s still enough that it’s worth doing for some quick cash.


Cost: Free
Type: Active Income, Daily, Recurring
Reward: Up to GTA$9,000 per day depending on which car you drop off
Difficulty Level: 1 (Easy)
⤵
4. Robbing Convenience Marts
This is a free activity. While this activity can be a bit more on the fun side, it isn’t without its downsides. The difficulty isn’t so much with holding up the store, but that the maximum money you’ll get from each store is maxed at around GTA$1,000. That amount of money almost seems not worth the hassle, except there are 19 stores that you can hit up around the map to net somewhere close to GTA$19,000 per day. Not the best haul in this list, but it’s decent.
Cost: Free
Type: Active Income, Daily, Recurring
Reward: Up to GTA$1,000 per store with 19 stores
Difficulty Level: 3 (Mostly easy, but will need a decent getaway car)
⤵
5. Gang Attacks

Gang attacks appear as a large red circular area on the mini map and full sized map. These activities have you take down a bunch of thugs in that area. Upon successful gang attack completion, you receive 500 RP. Where you make your payout here is looting all of the gang bodies and the weapon crates. Gang members may drop between GTA$20-50 each. Each weapon crate drops GTA$500. Most areas have around 5 crates or more. The crates can total at least GTA$2,500 + whatever money you can loot off of the gang members.
Cost: Free
Type: Active, Daily, Recurring, Multiple map areas, Time Suck
Reward: ~GTA$2,500 + loot + 500 RP * ~36 Gang areas on the map >= GTA$90,000 per day
Difficulty Level: 6-8 (Medium hard, requires ammo, decent shooting skills and persistence)
⤵
6. Visit the Casino Cashier
This one offers free money every day. Visiting the casino cashier allows you to pick up 1000 visitor bonus casino chips every single day. You can cash these chips out to GTA$ at any time. This one is down the list because it doesn’t offer a lot per day, but it is free money with no catch. Like the Lucky Wheel, this one also takes a full 24 hours before it resets. If you do this one just after spinning the wheel, the Lucky Wheel timer can be used to cover both activities.

Cost: Free
Type: Recurring, Daily
Reward: 1000 chips daily or GTA$70,000 every 7 days or GTA$300,000 every 30 days
Difficulty Level: 1 (Easy)
⤵
7. Freemode Events
To participate in Freemode events, you’ll need to play in public servers. Private servers of any type do not spawn Freemode events. These events are random in type and require specific things, like opening a parachute closest to the ground. Whomever does this the best gets first place and the highest prize.
Cost: Free
Type: Multiplayer, Recurring, Random throughout the day
Reward: GTA$18,000+ to a little more than GTA$20,000
Difficulty Level: Depends on the event and how many participate
⤵
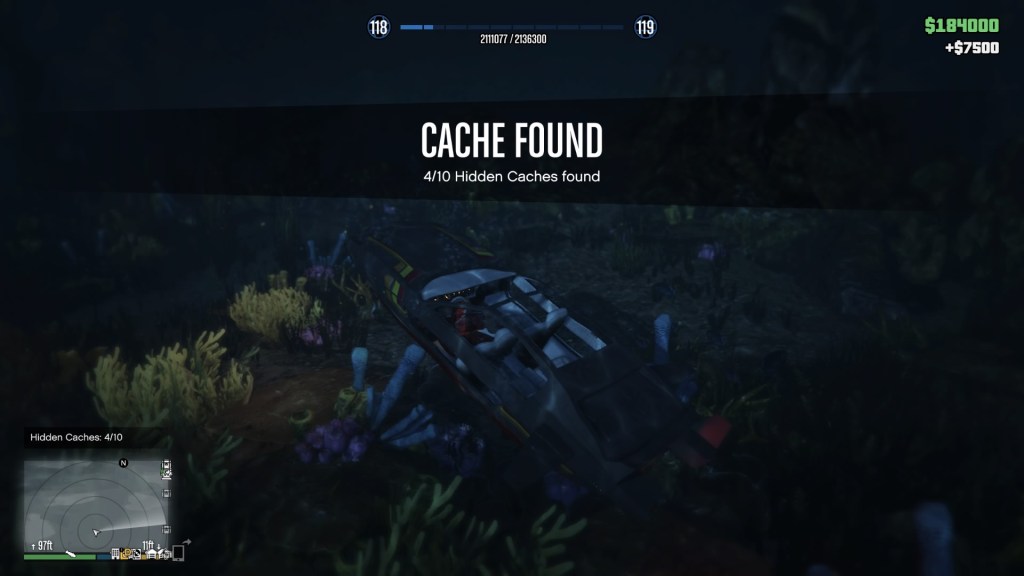
8. Hidden Caches

Here’s another treasure hunt that was introduced as part of Cayo Perico. This is similar to the treasure hunt that’s also available on Cayo Perico Island (see below), except this hunt is much, much better for GTA$ and doesn’t require purchasing the expensive Kosatka Submarine. In this case, there are 10 hidden caches to find and because there are so many and because these caches can be found daily, it’s makes the list at spot 8. However, there are 100 locations from which those 10 caches can spawn, making it a medium difficulty event. This means you’ll need to check a lot of different locations to find all 10. The caches can be picked up inside or outside of a vehicle. This means you can use an underwater vehicle, like the Toreador, if you have one or you can use a scuba diving suit, your choice. If your vehicle has a sonar (i.e., you have bought the Kosatka), the sonar will make it somewhat faster to find all 10.
This one rewards GTA$7,500 and 500 RP for each cache found. Finding all 10, you will net GTA$75,000 and 5,000 RP. The caches reset daily, allowing you to pick up that GTA$75,000 each day. In 7 days, that’s GTA$525,000. In 28 days, that’s GTA$2.1 million. That’s a lot of GTA$ to get if you do it every day for a month. In fact this one is far easier than doing the Daily Objectives and awards more GTA$ in 28 days, though less RP at 140,000.

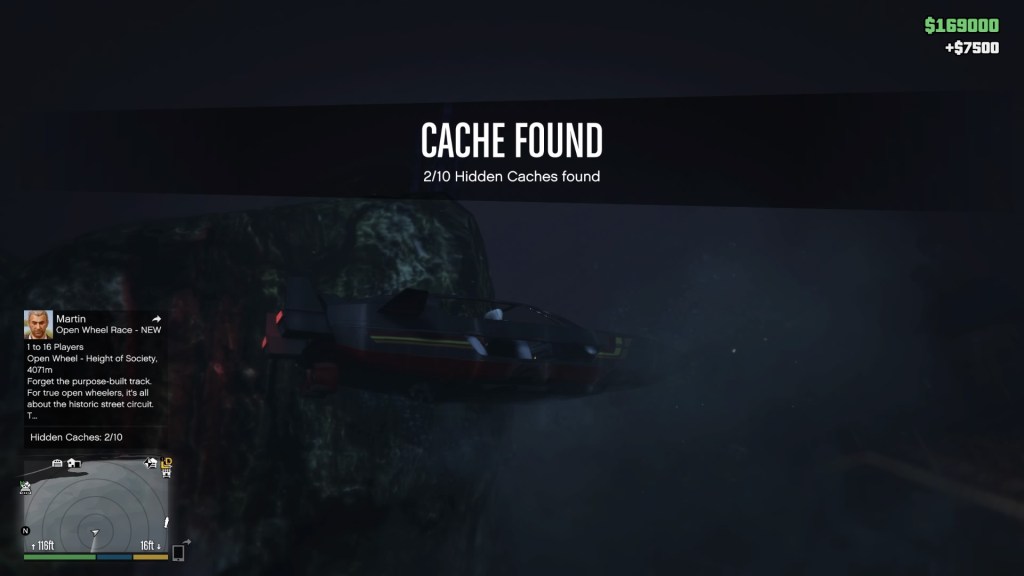


Cost: Free
Type: Daily, Recurring
Difficulty Level: 5 (Medium — must be tenacious)
Reward: GTA$7,500 + 500 RP per cache (10x = $75,000 + 5,000 RP per day)
⤵
Income which requires a purchase….
Here are the final two of our top 10, but these require buying properties to gain a daily income. These final two are included in this top 10 list because these are the only properties you can own in GTA Online that produce truly passive income.
Update: There has been one new property added that also adds passive income, although very little per day at around $500. This new property is the Agency. This is the Franklin Clinton and Partner property. It isn’t included in the top 10 because these two below are still the highest paying for passive income in the game. The Agency’s passive income is too low to be of any real value. The game claims that if you do Security missions that the daily income increases. Unfortunately, I’ve not found that to be the case. I’ve done at least 20-30 of the Security missions and the daily income remains at a low $500 per day.
⤵
9. Nightclub Promotion

As of June 2022, the daily nightclub payout has been increased to GTA$50,000 per day. The safe capacity has also been increased to GTA$210,000. Nightclub ownership activities have now moved into the top spot for residual income from a property purchase.
Because this activity still requires investment, it has moved up one place to 9. However, because of the GTA$50,000 per day income, owning a nightclub is now the #1 activity to do once you can afford this property purchase. In other words, this is the recommended first property to purchase (after buying an executive suite to be CEO) and to milk for cash once you have grinded enough GTA$ from the top free list above. With this new increased in-game daily payout, in 4 hours of play, you can earn GTA$200,000 for mostly doing nothing.
Owning a nightclub is a property type that you must purchase before you can reap the passive monetary rewards. However, this property comes with a catch. To make the maximum money per day (GTA$10,000 now raised to GTA$50,000), you’ll need to complete various Nightclub management missions. These activities promote the nightclub and keep the club full. So long as the nightclub remains full of people and the popularity progress-bar is filled, the nightclub will earn you GTA$50,000 per day doing next to nothing. As the club popularity decreases and the popularity bar dips, so does the income. However, you will also need to invest in the nightclub security to drastically slow down the loss of income each in-game day.
Like arcades, nightclubs cost around GTA$1.5 million depending on the property. However, once you own it, it is guaranteed to generate some amount of passive income. If you do nothing and choose not to promote the club, the club still produces a minimum amount of passive daily income, maybe GTA$1,000 per day or possibly higher.

You’ll also net various amounts of GTA$ from 2,500 to 5,000 for each successful promotion activity completed, such as putting up posters yields GTA$5,000 and a small amount of RP on completion.
Note that to run nightclub missions, you need to become CEO, which also costs GTA$. To become CEO, you’ll need to buy an Executive Office or pick one up in the Criminal Enterprise Starter Pack. Becoming VIP or MC might also work, but these also cost GTA$ to buy into.
Cost: GTA$1-2 million depending on property + GTA$1-2 million for Executive Office to be CEO
Type: Active or Passive Income, Daily, Recurring
Passive Income: GTA$50,000 per day down to GTA$1,000 per day depending on popularity.
Mission Reward: GTA$2,500 to GTA$5,000 + RP depending on promotional activity
Safe Capacity: GTA$210,000
Difficulty Level: 1 (Easy) to 3 (Medium) depending on activity
⤵
10. Arcade

Owning an arcade requires buying it with GTA$. The cost to buy an Arcade is around GTA$1,300,000. However, Rockstar regularly puts properties on heavy discount throughout the game. At a 40-50% discount, you might spend as little as GTA$500,000 to get a property.
Sometimes you can even get some properties included in a bundle or possibly free from Rockstar promotions. Bundles such as in the Criminal Enterprise Starter Pack (CESP), which costs somewhere between USD$10-$20, includes a bunch of properties, weapons, vehicles, outfits and tattoos… including a bonus of GTA$1,000,000. This bundle might also be included with the purchase of certain game versions. Take advantage of freebies included with such bundles if you can afford them.
For example, the CESP bundle includes the following properties:
- Maze Bank West Executive Office — No Garage w/o GTA$
- Paleto Forest Gunrunning Bunker — 1 Car Garage
- Senora Desert Counterfeit Cash Factory (must be a motorclub president)
- Great Chaparral Biker Clubhouse — 17 Bike Garage (10 for you, 1 each for 7 members)
- 1561 San Vitas Street Apartment — 2 Car Garage
- 1337 Exceptionalists Way — 10 Car Garage
However, CESP doesn’t include an Arcade property. Take advantage of the property discounts when they roll around each week, which may include discounts for an Arcade, a Hangar and Nightclub properties.
Keep in mind that owning properties isn’t without cost. Every property you buy has a daily payment that is subtracted at the end of each game world day from your GTA$ (about every hour of play). This means that you won’t make exactly GTA$5,000 per day… it’ll be more like GTA$4,500 after daily expenses are subtracted for that specific property. You will see the full GTA$5,000 deposited into the safe and the daily expenses are subtracted separately.
However, you don’t have to do anything to get that income. It rolls in without even being there and I’m not even sure you have to buy arcade machines either. Just be sure to stop by and pick the money up before the safe fills up. Yes, you must stop by the arcade to pick it up. You also have to remain online for a full in-game day for the money to show up.
Finally, it’s worth noting that unlike GTA V, you cannot own multiple businesses like arcades or nightclubs as you might expect. In GTA Online, you can own one of each type of business property including the executive office, arcade, nightclub, hangar and motorcycle clubhouse. Garages and apartments are the exception which you are allowed to own up to 6, excluding garages attached to businesses like the executive office, casino penthouse, arcades, nightclubs, bunkers and facilities. For completion’s sake, you can also only own one each of these vehicles including the Super Yacht, Kosatka, Mobile Operations Center, Terrorbyte and Avenger.
If you attempt to buy a second “one-only” property or you’ve used up your 6 slots, the game will apply credit from your old property towards your new purchase so that you only pay the diffence in price between the first and second. If the new property is less costly than the old one, you’ll get money back. Note that freebie properties might not offer a trade-in allowance towards a new property.
Cost: Minimum GTA$1,300,000 for Arcade (may be able to get one free)
Type: Passive Income, Daily, Recurring
Passive Income: GTA$5,000 per day
Active Income: None
Difficulty Level: 1 (Easy)
⤵
Runners Up
Here are some other runner up events and activities that didn’t make the top 10 but are well worth considering. Note, the Payphone hit payouts have been reduced from GTA$85,000 per hit to GTA$50,000 per hit after the 2022 Summer update. Rockstar has seen the error of their ways and reinstated the GTA$85,000 per hit reward.
⤵
Franklin’s Quests (First Runner Up)
[Updated 7/26/2022] After the 2022 summer update (July), Rockstar has lowered payouts for Payphone hits to GTA$50,000. The GTA$85,000 reward recently reinstated for payphone hits. This means payphone hits are back to being an excellent money making opportunity in the GTA Online.
I’ve been thinking a lot about this recent addition and I’ve come to the conclusion that this Agency addition is way better than I had originally thought and is pretty much better than any other update for money making purposes. In fact, it’s so great, I would bump The Agency update into the number 10 position if not for one thing (well, a couple). It costs a LOT of cash to buy an Agency plus it costs to buy an Executive Suite and it offers very little passive income in return per day. The passive income isn’t where you make money.
It’s the Payphone Hits which can definitely net a crap ton of GTA$ in very little time. In fact, Payphone Hits can make you so much money so rapidly, that it will pay for the cost of the Agency property in ~30 Payphone Hits (less when they boost the return). After that payback time, it’s all profit. With Payphone Hits, you can make around 6 hits per hour. Meaning, in about 5 hours of doing nothing but Payphone hits all returning $85,000 per pop, these will completely pay for the Agency.
[Updated: 3/11/2022] I’ve been remiss in updating this article, but here’s the 2022 update including Franklin’s new quests. Franklin’s quests cost around GTA$2.2 million because you have to buy into the new Agency property. Like the Auto Shop addition just before this one, you must pay to unlock the Franklin quests by buying a property. For that money and property, however, you will also unlock 20 new garage spaces. If you’re like me, forever running out of new car spaces, getting a new 20 car garage is a pretty sweet deal. However, it also means shelling out around GTA$2 million… a lot of grinding.
The biggest deal unlocked with Franklin’s quests, besides the property, is Dr. Dre’s quests. Though, Dre’s quests aren’t the best way to make money from this update. No, it’s the Payphone Hits!
Dr. Dre
I’m including the Dr. Dre quests here because it’s technically part of Franklin’s quests. Dr. Dre’s quests only unlock after you run at least one Security mission, which requires being a CEO, MC or VIP.
However, know that Dr. Dre’s quest line is like the Heists… effectively one time, but restartable. Yes, you can do them over again, but must start from the beginning. The haul for these quests is decent, but I don’t at all recommend these for ongoing money making opportunities due to the complexities of Dre’s quests. For each mission, you’ll earn GTA$100k. For completing the entire Dr. Dre quests, you’ll earn GTA$1 million. It’s a decent haul, but the missions are not simple and may require trying multiple times if you’re doing it alone. These quests are also easy to fail.
Cost: GTA$2.2 million to buy an Agency PLUS Buying a VIP, CEO or MC property
Type: Not Free, Restartable One-Off
Reward: GTA$100,000 per mission + GTA$1,000,000 for completing them all
⤵
Agency Security Quests
These missions require that you to become a CEO, VIP or MC to complete them. This means you will need to purchase a VIP pass, a Motorcycle Club (MC) or an Executive Suite (CEO) before you can run these. One of these costs around GTA$1 million to GTA$1.5 million depending, but you only need one. This is in addition to cost of purchasing the Agency to get access to Franklin.
Franklin offers your character multiple types of agency Security Missions from protecting supplies, to stealing items, to protecting a person, to stealing vehicles. Each of these missions earns you a random amount of GTA$ decided by the computer system on your Agency desk. Whatever the computer says the mission will earn, that’s what it earns. It typically ranges from about GTA$33k to GTA$64k. It depends on the mission and what the game decides that mission is worth.
The Agency Security Missions are decent hauls, but the missions can sometimes go south easily. If you fail a mission, that mission disappears from the computer and cannot be repeated. It will be replaced with a new mission, usually offering a much smaller haul. Because of the randomness with these agency quests, the complexity of them combined with the ease for which they can fail, I don’t recommend these for ongoing cash grabs in the game. There’s also a cooldown timer between each quest.
You can do them, but know that they aren’t always worth the time and effort for the money return involved. Do them for fun, not for profit.
Cost: GTA$2.2 million to buy an Agency PLUS Buying a VIP, CEO or MC property
Type: Not Free, Recurring
Reward: GTA$33k to GTA$64k
⤵
Payphone Hits
These quests are where the GTA$ are. Not only do Payphone hits not require being a CEO, MC or VIP to run them, when you complete the Bonus, you will get an extra GTA$70,000 for a total of GTA$85,000 for each successful hit completed. You can even run these in Invite Only Sessions to avoid interaction with other players. Because there’s no limit in how many you can do of these in a day, doing 10 will net you GTA$850,000. Doing 12 will earn you, GTA$1,020,000. Keep in mind that it takes a minimum of about 10 minutes per hit, that means it will take you about 120 minutes (2 hours) to earn GTA$1 million. There is a cooldown timer on these hits, but this can be avoided if you save immediately after receiving your cash by changing your outfit, then killing and restarting the game. However, doing this means you have to wait through the very long game restart process (around 4 minutes to load and another 2 minutes to get online). After that, it takes another 4 minutes to complete a hit. That totals right around 10 minutes per restart and Payphone Hit. This means you can complete about 6 per hour netting you $510,000 per hour of play.
Occasionally, Rockstar increases this bonus by 50% earning you GTA$105,000 as Bonus and GTA$22,500 for base fee, for a total of GTA$127,500 per successful hit. This will net you GTA$1 million a whole lot faster (in about an hour).
Hits consists of 5 types:
- The Cofounder — This type of hit requires you visit a motel, wait for him to check out, then perform the action required to take him out such as a sticky bomb on the car or using a scoped weapon to blow the engine.
- The Tech Entrepreneur — This type of hit requires a taxi cab. You pick up a cab at the designated location, then drive the Tech Entrepreneur to the location required and do the deed by drowning or the scrapyard.
- The Judge — This type of hit requires visiting the golf course. You will do away with her by golf club, running her over with a cart or blowing her up with a sticky bomb.
- The Popstar — This type of hit requires you to chase the popstar in the car and take them out with a specific method, like chasing them in a cop car to intimidate them, taking them out Vagos style with a driveby or using a truck cab to ram them into submission.
- The Trolls — The Trolls are 4 hits. You must visit all 4 locations and take out the trolls with various criteria, such as in 7 minutes, using headshots or running them over in a vehicle.
- The CEO — This mission requires taking out a CEO playing construction worker. The mission will require you to use various construction equipment to take him out, like blowing up a gas tank, dropping a container on him or triggering a dozer to run him over.
Two additional missions exists, but only if you are logged in as a CEO or MC and have two people. All of these missions are most easily launched by calling Franklin from the contact on your phone. Though, you can also wait until Franklin randomly launches one. Using the phone makes these missions the fastest to get started, because you don’t need to visit the Agency computer at the office.
Note, for missions that require you to pick up a taxi or police cruiser, you don’t need to wait for the message. Go to the taxi location near the Casino or to the Chili restaurant or similar. For the police cruisers, they will spawn sometimes at a location closest to the Popstar’s car. Though, not always. Once you locate a cruiser, you may find yourself driving all over Los Santos go get to where the Popstar is.
Bugs exist here. If you are using a Deluxo, any Trolls Bonus will fail if you accidentally run them over in that specific car. Meaning, if you are given the criteria to run the Trolls over in a Vehicle, don’t do it in a Deluxo. Choose another car. However, even if you’re running a different Bonus requirement and accidentally run a Troll over in the Deluxo, that bonus will also fail even if unrelated. This bug has been reported. Note, this issue may affect all types of special weapons vehicles like the Toreador and the Stromberg.
Bugs in the GPS leading to the Scrapyard (The Tech Entrepreneur) and the door of the Von Crastenberg Richman (also The Tech Entrepreneur) is inaccurate. If you follow the GPS, it will lead you incorrectly. You will need to find these two locations on your own and remember how to get there when these mission requirements appear.
A bug exists with The Judge missions. All of The Judge missions occur at the golf course. If you fail to change into the Golf Outfit and Golf Club, the mission bonus will automatically fail even if you successfully do what the bonus requires.
A bug exists with The CEO. If you accidentally wander too close to the construction site, this will disrupt The CEO’s walking path. Once this occurs, there’s no way to recover to receive the bonus. He simply won’t resume his walking path once disrupted. In fact, any targets that follow a walking path will fail to recover that walking path if they are disrupted. However, some targets that lose their walking path can still see a successful bonus, it’ll just be a whole lot more difficult. However, The CEO will fail the bonus because he won’t line up with the requirements.
One last thing about these Payphone Hits is that they’re not all equal in time and effort. Some hits are way more complex than others. For example, one of the Popstar hits requires taking him out in drive-by style using a Vagos wagon. Shooting while driving in this game is, at best, a miss affair. While it is possible to do it, it’s not easy nor is it accurate. Another more complicated hit is The Judge hit that requires taking her out with a sticky bomb planted somewhere close to her on the golf course. That’s next to impossible to do. Anytime you get close to her and take out any kind of weapon, her goons start firing on you. That spooks her and she runs away, failing the “sticky bomb” Bonus. If she runs away with either of the other requirements, it is possible to get the bonus. When these overly complex missions appear, I kill the game instantly and try again. There’s no reason to do these complex missions when most of the rest of the missions are straightforward and relatively easy.
Complicated Hit Example
As an example of a complicated and time consuming hit, one of the The Judge hits requires you do it with a sticky bomb at a specific hole on the golf course. This one is so specific about where and how you must do it, you are required to know the golf course like the back of your hand. The one thing Rockstar forgets is that even if you play the golf course through, the game takes control over which hole you’re on and automatically transports you to the next one after completion.
You don’t get the benefit of actually walking from hole to hole yourself. This means that even if you play the golf course, you still don’t get to know the course. You get to know the holes specifically, but not where they are located on the property. To run this specific sticky bomb mission, that means you’ll need to spend time at the golf course learning exactly where each of the holes are, how they are laid out and how to get to each one of them. That’s something you must do on your own, wasting a lot of time in the process. Oh, and once you get onto the property, knowing which hole is which is not terribly easy to determine. As I said above, some hits are way more complicated and time consume than others. I don’t even get why Rockstar would think people could actually perform this hit. Yet, it’s included in the batch of hits. I always drop from this one when it appears. I don’t have the time to scour the golf course to find exactly where hole 3 is or hole 6 or any other hole.
Cost: GTA$2.2 million to buy an Agency (may require VIP, MC or CEO first time to unlock)
Type: Not Free, Recurring
Reward: GTA$22,500 to GTA$85,000 each hit depending on bonus success
The best of all of the above are most definitely the Payphone hits. However, I can’t remember if the game requires completion of at least one Security contract and/or Dr. Dre’s missions to unlock the Payphone Hits. If so, that means you will need to invest in CEO, MC or VIP to unlock these Payphone Hit missions. I’m assuming it does. These expensive investments is why the Franklin missions failed to make the top 10, even though the Payphone Hits net a lot of GTA$ quickly.
For the Payphone Hits alone, however, this is the reason the Franklin section has been placed immediately below #10 as the first runner up.
⤵
Auto Repair Shop + Los Santos Car Meetup

This brand new addition arrived as of July 20th, 2021. Two new features have been introduced into GTAO. The first is the Los Santos Car Meetup. This is a large warehouse building where players can meet and show off their cars, but unfortunately only one car at a time. As you show off and mod your car, your Meetup reputation points will increase. These reputation points are separate from standard RP. There are 32 parking spaces in the warehouse where cars can be parked. There’s also an indoor track that can be raced. The second is the Auto Repair shop, which you have to buy.
To begin this whole deal, once you get inside of the meetup building, you’ll meet with Mimi (the organizer) who introduces you to Sessanta and KDJ. Sessanta and KDJ want to open an auto repair and modification shop with you. However, Rockstar leaves it up to you to buy this new business location in the game. To buy an auto repair shop, you’ll need to visit Maze Bank Foreclosures. Here, you’ll find several locations which you can purchase. As of now and with Prime Gaming, one of the locations (Strawberry) is free to obtain, the rest cost around GTA$1.5 to 1.9 million. If you have Prime Gaming, grab the freebie now before Rockstar kills the promotion. Without Prime Gaming, you’ll have to pay.

Once you own an auto repair shop, like most other Heist operations, there’s a contract job board. To access it, you’ll need to become a CEO. Here’s the expensive catch.
To become CEO, you’ll need to own an Executive Office Suite (~GTA$1,000,000, see below OR ~USD$20 to buy the Criminal Enterprise Starter Pack, see Arcade above). See, I told you that Rockstar gets you to spend massive amounts of GTA$ all over the place in this game.
The first job given by Sessanta is to rescue Sessanta’s car from the impound lot at the police station, the same car you first saw her in at the meetup. This is a fairly difficult mission because you have to mow down a bunch of cops at the impound lot. However, as soon as you arrive there, you get a 3 star wanted rating causing even more cops to swarm. Suffice it to say, you’ll need to grab the car as fast as possible and attempt to lose the wanted status quickly. Once you do this, bring it back to the auto repair shop and the actual jobs begin on the job board.
There are three ways to make money with the auto repair shop. The first is to perform the job board contract jobs. The second is to wait for customers to arrive to have their cars repaired and modded. The third way is to complete one contract to unlock specific wanted cars to jack and return for GTA$, like Simeon’s request above. Here’s where the second way gets convoluted.

Repairing and modding cars forces you to pay out some amount of GTA$ from your own pocket which will get reimbursed by the customer plus their service fee on top. I’ve done two of these. The first one was -GTA$50,000 to repair and +GTA$30,000 as the car repair payment, for a total of +GTA$80,000 once the car is delivered. The second car was -GTA$20,000 to repair and +GTA$20,000 as payment, for a total of +GTA$40,000 once delivered. If the car is delivered damaged, the game reduces the amount you get paid. You’ll need to have at least GTA$100,000 in your account if you intend to run these repair jobs.
However, Rockstar failed us with this new feature because I’d like to have an Open sign that I can turn on and off. If I don’t want the jobs to appear at all, I’d like to turn off the Open sign and prevent Sessanta from calling me with new jobs.
As for the contract jobs, KDJ takes a 10% cut of whatever payment amount is offered. Note that all of the contract jobs are reasonably complicated and difficult to complete when playing solo. However, they can be completed solo, but you’ll have to play them multiple times learning strategies via trial and error. The three jobs that appear for me are as high as GTA$185,000 and as low as GTA$170,000. I have personally confirmed that KDJ’s cut is, in fact, 10%. You definitely will not get the amount listed on the job board. For a GTA$178,000 job, I got GTA$160,200 + another $75,000 about one minute later for some odd reason. Maybe Rockstar is offering up a bonus for the first contract completed? *shrug*
For car repairs and mods, you do get the full amount listed on the job order. You just have to be sure to follow the instructions on the bottom of the screen to do exactly what the customer requests. If you choose to place random mods on the car, the customer likely won’t pay you for them. Also, if you choose not to hire a tech, you’ll have to deliver the cars yourself. If you hire a tech, you’re going to see a higher daily fee to pay the staff at the auto repair garage. These jobs appear several times in the same day. These are not limited to one repair per 24 IRL hours… yet. If you buy a second lift (GTA$650,000), you can repair two cars at the same time and double your income.


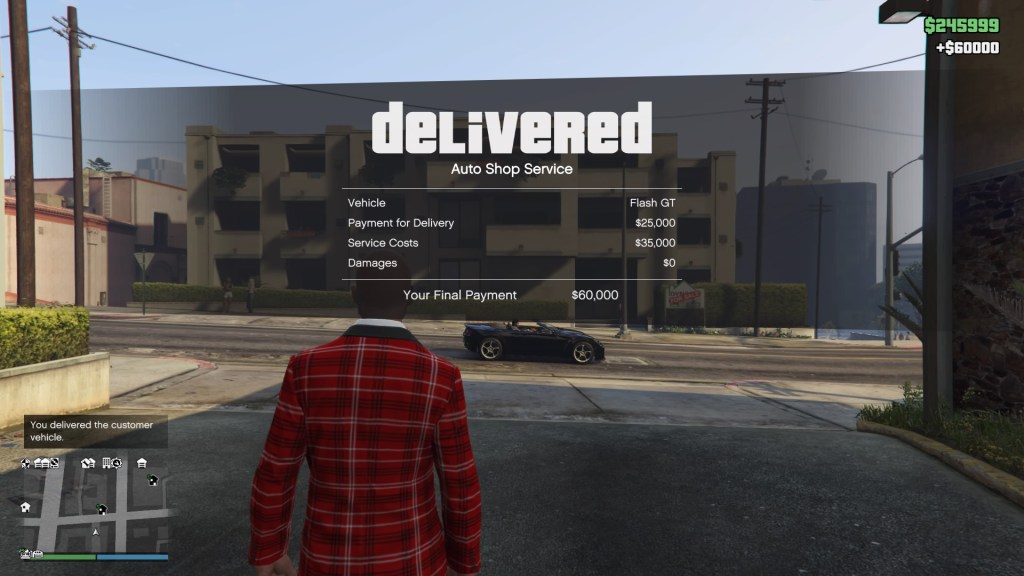

Note that the auto repair shop doubles as a new 10 car garage. Getting a new 10 car garage for free (with Prime Gaming) is a pretty sweet deal. Also note that if you buy any add-on decorations for the auto repair shop, they will not show up until you complete Sessanta’s first mission to rescue Sessanta’s ride from the impound lot (assuming everyone gets this same mission as the first mission).
There’s also one more way to make additional GTA$ from the auto repair shop:
Once you have completed at least one contract from the board, the game unlocks a list of wanted vehicles that can be searched for, jacked and sold in similar form to Simeon. I’m not yet certain what the payouts for these are, but since you’re delivering to the docks, it is likely the same payout (max GTA$20,000 per car) as it is for Simeon… and this is probably the reason Simeon’s payout dropped. In fact, it is the same payout amount (GTA$20,000) as you get from Simeon’s car request. It does say you get a bonus if you deliver all on the board, but this is almost impossible to do. This also illustrates why it’s important to read the loading screens.
Difficulty
Attempting to locate each of the 10 cars each day is about as easy as completing the Daily Objectives for 31 days. Some cars are highlighted with a blue dot on the minimap. Cars that are “standard spawn” must be found and jacked in the normal way. Because of this harem-scarem means to locate the cars, you can’t rely on any one specific method. It also means you have to be super great a spotting specific cars by make, which is tricky enough in itself. Waiting for the blue dots for the ‘special’ cars to show up is near impossible. In fact, because other blue dots show up which aren’t related to this, you can literally spin your wheels doing unrelated tasks. Rockstar has made this task as difficult as possible and only 24 hours in which to complete it.
It’s great that this chalkboard car search is daily in that you the chance to get up to GTA$200,000 (plus bonus if you get all 10) per day doing this, but you can spend many, many hours looking for those 10 cars. Worse, the chalkboard can change out from under you when those 24 hours are up without you knowing… all while searching for a car that’s no longer on the board.
Note also that Simeon’s car quest and the Auto Shop car quest can conflict, requesting the same vehicle. This means you’ll need to make a choice to whom you intend to deliver. It also means that you’ll need to find that same car a second time for whichever one you didn’t fulfill. This is frustrating. Sometimes you find cars for both Simeon and the Auto Shop at the same lot. Again, you’ll have to choose which car to jack and deliver. The problem is, when you come back, the game will have despawned those other cars and respawned something else. That means you’ll have to go looking again. Also frustrating.
Tricks
One trick that sometimes works in finding one of the 10 cars is going in and out of the garage at the casino. When you enter the garage and then exit, the parking lot will respawn with all new cars. Occasionally, a blue dot will spawn there in the parking lot. The blue dot sometimes spawns in a space to the right of the the exit across from Downtown Cab, Co. This is probably the fastest way to get the parking lot to respawn with new cars. That doesn’t mean you’ll get a blue dot, but occasionally you might.
Bugs
There are a number of bugs with the auto repair shop. If you drive a car into the garage, you will be unable to repair a waiting car or even repair your own cars. The controller option never appears. You’ll need to exit the shop by walking out, then reenter to fix this problem. Another bug has just surfaced today, July 24th, 2021. If you attempt to deliver a car and enter the yellow ring, the ending does not complete. With this one, I thought that killing and restarting the game might help. It doesn’t. When I did that, the car was back at the repair shop awaiting delivery again. I tried delivery for a second time that took me to a new location, but the car still wouldn’t deliver. It seems that the game progress gets stuck when you can’t deliver the car.
Not getting jobs? Don’t stay inside of your Auto Repair shop or Sessanta can’t text you to give you car repair jobs. The game seems intent on avoiding refreshing the Auto Repair shop (required to put a car on the lift) with you in it. If you’ve been wondering why you haven’t been called for repair jobs and you’ve been working in the repair shop, that’s why. Also, you can’t cancel contract jobs while inside of the Auto Repair shop. To cancel a contract job, you need exit to call Sessanta. You can only call her outside of the repair shop. If you try to call Sessanta inside of the shop, you’ll get a busy signal.
There’s also some dumb logic when performing repairs… for example, the customer might request Secondary color bumpers or Secondary hood options, yet there’s no way to paint the car with a secondary paint job. All cars currently paint all surfaces the same color even if the car supports primary and secondary paint colors. What’s the point in requesting ‘secondary’ anything if you can’t paint the car with a secondary paint?
Blue dots and chalkboard cars bug. I’ve had this bug happen to me almost every single time I’ve played. I’ve found up to 6 cars on the chalkboard, but as few as one. Yet, after traversing the entire map from top to bottom, the game will not reveal any further cars via blue dots from the board. Even if the remaining cars are specialty cars that require a blue dot, no blue dot ever spawns anywhere on the map. This bug makes it impossible to complete collecting all 10 of the cars on the chalkboard.
Cost: Property is Free (with Prime Gaming) + cost of whatever decorations added to Repair Shop
Type: Mission Based + Intraday Recurring car repair jobs,
Passive Income: None
Active Income: Job based (around GTA$100,000 or so), Car repair (GTA$20,000 to GTA$30,000) per car
Difficulty Level: 3 (Somewhat difficult)
Daily Cost: Minimum GTA$250, more with staff
⤵
Rockstar Newswire and Loading Screens
Each week beginning on Thursday, a new Rockstar Newswire is released offering all of that week’s newest promotions and activities. Many of these activities also appear as messages on the loading screen.
Be sure to read each of these loading screens carefully. For example, the week this article is written, Rockstar is offering 2X GTA$ and RP on new survival map challenges. Participating in these new survival events during this week will earn you 2X GTA$ and RP plus a bonus of GTA$100,000 simply for participating in a Survival. Reading these screens closely can help you nab $100,000 or more simply by doing whatever Rockstar is requesting. Usually, it’s not hard to do what they’re asking you to do.
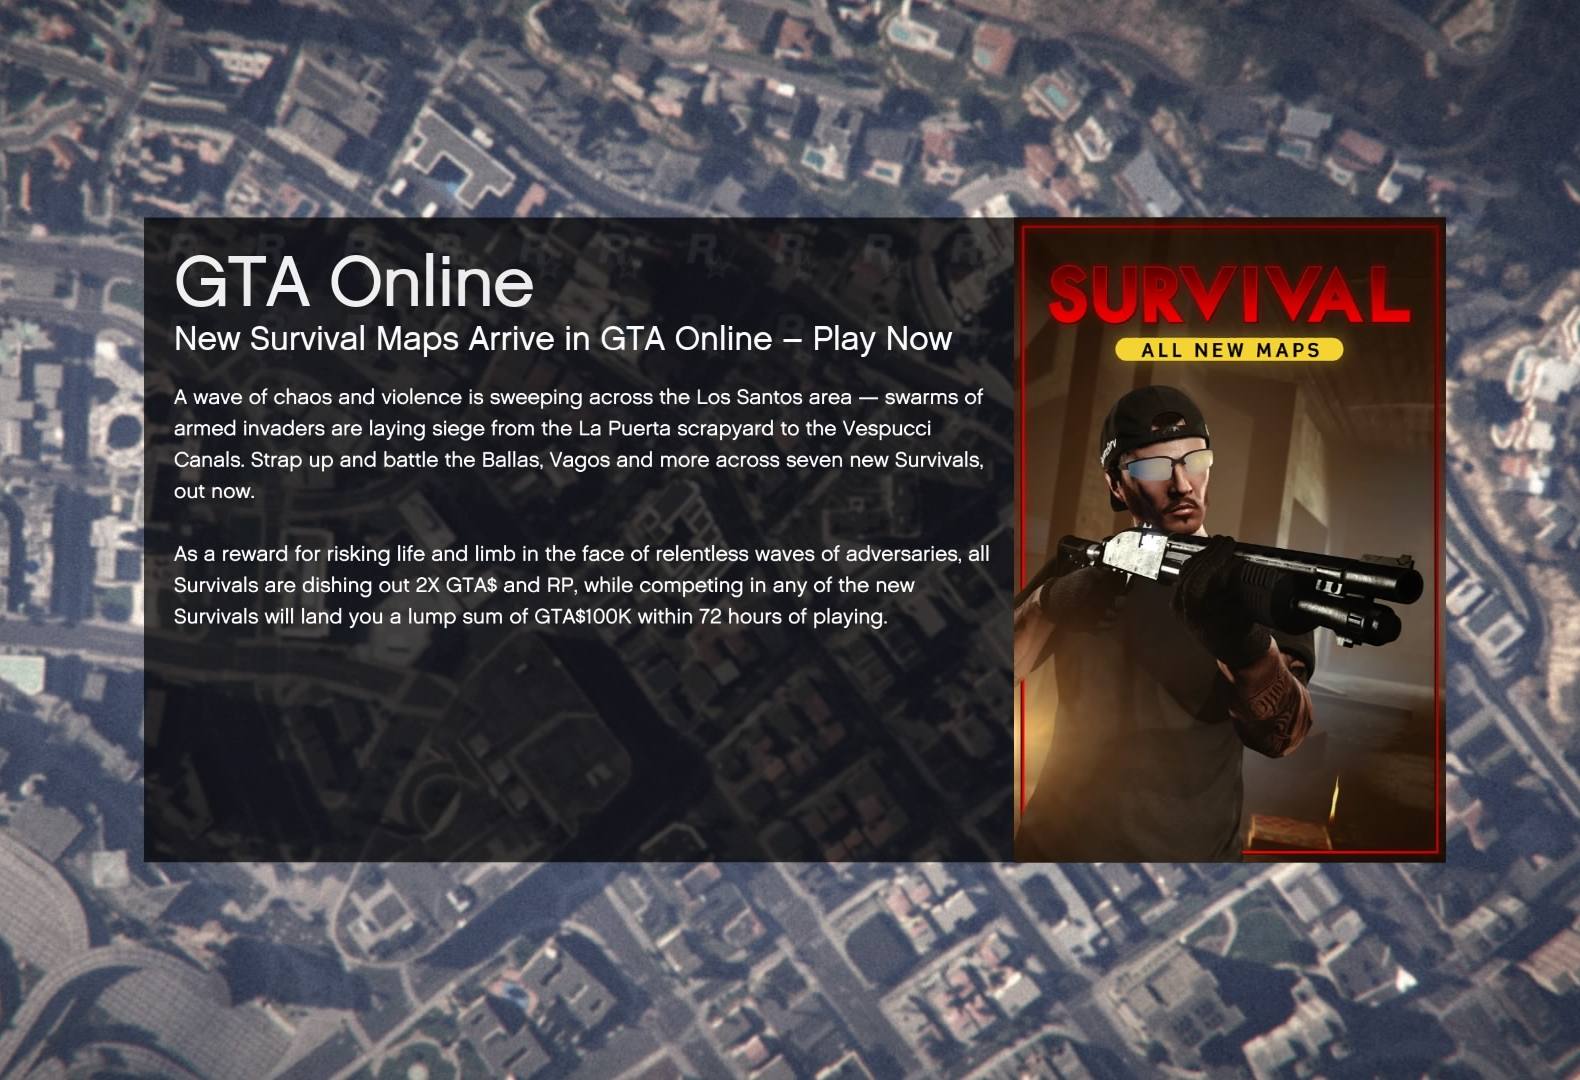
However, sometimes Rockstar might require the purchase of a Mobile Operations Center, a Terrorbyte or an Avenger, which can negate the GTA$ bonus. If you know you don’t have the vehicles needed to get the bonus, then skip it. By simply being required to participate, such as the Survival Challenge above, its easy to nab that GTA$100,000.
Type: Free
Difficulty Level: Depends, usually easy
Reward: Depends
⤵
Daily Objectives
This free activity is just barely a runner up because while the payout is big, it is incredibly difficult and you need to be level 15 or higher. However, you can make some serious bank if you’re tenacious. This one requires performing 3 Daily Objectives for 28 consecutive days. Some of the objectives can be extremely obscure, difficult to do, take a lot of time, dependent on challenges that may not appear and/or require loads of cash to complete (like Complete a Heist Setup). For these complicated reasons, it’s not included in the top 10. If you’re tenacious and willing to attempt the objectives each day, you can earn some serious bank after 28 days. If you miss a day or cannot perform one of the objectives, you lose the streak and must start over. To perform each daily objective, you’ll need to read the objectives closely.
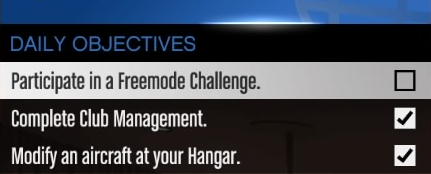
Note that you can effectively change two of your three daily objectives by launching into GTAO, then immediately checking your current objectives in the character menu. The bottom two are not set in stone if it’s a new day. If you don’t like the bottom two objectives, kill the game and restart.
Keep restarting the game until you get two objectives you can perform, like Visit the Casino OR Relax in a hot tub OR Mod a car. Once you’ve got two objectives you like, modify your character’s appearance by wearing glasses. This will force a cloud save and lock the objectives in. Make sure to read the Daily Objectives closely, otherwise you might be stuck with objectives you cannot complete. Don’t hesitate long. You’ll only get a few minutes before the game automatically performs a cloud save and then those objectives are locked in for that day.
The topmost objective is always set in stone for the day by Rockstar. You’ll have to perform this one whether you want to or not. Examples. If you don’t own a hangar, you can’t perform an objective like Modify an aircraft at your hangar. Rockstar might also set the objective as Complete a Heist Setup. If you’re already past all of your setups, the only way to complete that objective is to join another player who hasn’t yet done it.
Progressive Rewards
- 1 day of objectives will earn you GTA$30,000 and 5,000 RP (28x = GTA$840,000 + 140,000 RP)
- 7 days (week) worth will earn you GTA$150,000 and 20,000 RP (4x = GTA$600,000 + 80,000 RP)
- 28 days (month) worth will earn you GTA$500,000 and 50,000 RP
In 28 days, you earn (D) GTA$840,000 + (W) GTA$600,000 + (M) GTA$500,000 = GTA$1.94 million + 270,000 RP
As implied above, some objectives can appear that are impossible to complete either because you can’t afford to buy something or because you’re past that part of the heist. This can cause failure when attempting to do this for 28 days, thus making this challenge quite difficult.
Cost: Free
Reward: GTA$30,000 to GTA$1.94 million depending on how many you perform daily + 5000+ RP
Difficulty Level: 10 (Hard) — requires performing challenges for 28 days straight, though you can still get the daily challenge reward even if you miss a day in between.
Level to Complete: Rank 15 or higher
⤵
Cayo Perico Treasure Hunt Challenge
This is a runner up because it requires significant cash outlay and is not super easy to do. However, it offers okay payout. This means that even though it will cost you a lot to unlock, you can keep doing these treasure hunts daily until you’ve recovered whatever it’s worth to you. Before I get into the hunt, let me explain the costs.
To unlock Cayo Perico Island, you’ll need to buy the Kosatka submarine from Warstock Cache and Carry to launch the mission to take you to this new island. This sub costs GTA$2,200,000 base price. If you wait for Rockstar to slash the price, you can get it for around GTA$1 million, which is what I paid when I bought it on sale. Because of the daily treasure hunt, it’s worth the GTA$1 million (on sale) investment to buy the Kosatka. Buying it for the Heist? Not so much.
Now, onto the treasure hunt. There are 10 possible treasure chest locations across Cayo Perico Island. There are 5 locations on land and 5 underwater, all dotted around the island. You’ll need to check many of the locations until you find the two available treasure chests. You can only open two per day. Opening up both treasure chests yields GTA$15,000 per chest for a maximum of GTA$30,000 per day. That’s a reasonable amount of GTA$ income, which is why it is included here.
Rockstar has even been known to 2X these daily challenges, doubling the GTA$ to 60,000 per day for up to 7 days.
Cost: Kosatka costs around GTA$2.2 million
Type: Active Income, Daily, Recurring, Time Suck Activity
Reward: Up to GTA$30,000 per day or GTA$210,000 every 7 days or GTA$900,000 every 30 days
Difficulty Level: 5 (Medium — must scout many locations to find two) … must be tenacious
⤵
Character Bounties
These are separate from the Bounty Missions described below. This activity costs nothing to the player and is somewhat easy to get. A character bounty is had when you steal a car and someone unknown puts a bounty on you. These are easy money and may be worth trying to get, but they don’t pay much and can be slightly difficult to find…. which is the reason it didn’t make the top 10. A bounty reward can range from GTA$1,000 to GTA$3,000. If you end up with a bounty and want that money, you’ll need to move to a private server so other players don’t try to collect on it. Then wait out one full in-game day on that private server (about an hour of play time). At the end of that day, you’ll be paid the amount of the bounty. You’ll need to play on a private server or with trusted friends until the bounty pays out.
Typically, these bounties will appear when you steal expensive cars parked on the side of a road. One vehicle that always gives up a bounty is the Sprunk Extreme van, which you can’t keep or own. This van is a trap and always issues a bounty. If you see this van, steal it, get the bounty and hide out on a private server for one full in-game day to collect the bounty. Though, there are plenty of other expensive cars which can also turn a bounty. The more expensive the vehicle is, the more likely the owner will put a high bounty on you.
Note that bounties hang around on your character until either another player collects on it in a public server or one full in-game day passes and you get the money. Also note that only one bounty can be active at a time. Can’t get greedy with this one.
Cost: Free
Type: Active, Recurring
Reward: GTA$1,000 to GTA$3,000
Difficulty Level: 1 (Easy, so long as you hang out on a private server until you get paid)
⤵
Good Sport
Here’s another runner up that didn’t make the grade, but is worth realizing that it exists. This one is a periodic GTA$2,000 that is given to the player for keeping up Good Behavior. I’m not completely certain what all triggers ‘bad behavior’ and prevents this award, but I believe it is related to the character’s mental state. If you start mowing down civilians on the sidewalk with your car, for example, this raises the character’s mental state and may forfeit the Good Behavior award. This one doesn’t seem to award once per day. It seems to award the player this money at random times while playing.
Cost: Free
Type: Active, Recurring, Unpredictable
Reward: GTA$2,000
Difficulty Level: depends on how you play GTAO
⤵
Sleeping Bums

This runner up is one that likely only shows up after you have visited Cayo Perico island. This, in turn, means you will need to own the Kosatka Submarine (see above).
How it works. Occasionally, the game will tell you that you have found a small key which is useful on Cayo Perico island. When you see this message, that means there’s a blue dot somewhere near you. Once you find the blue dot on the minimap, go to it and there will be a sleeping drunk bum. Loot the bum and you’ll get some GTA$. I’ve gotten up to GTA$7007 from looting, but the amount varies.
Cost: Requires Kosatka and visiting Cayo Perico island
Type: Random, Recurring
Reward: Varies, but can be up to GTA$8000 or possibly higher
Difficulty Level: 1 (Easy)
⤵
Amazon Prime Gaming
Owning this type of membership offers freebies each and every month. However, to gain this freebie, you’ll need to subscribe to Amazon Prime. If you own this membership, you’ll link your Rockstar account to your Amazon Prime Gaming account once and each month Rockstar will offer various freebies and discounts for this linkage.
For a while, Rockstar was offering up GTA$1,000,000 each month at GTA$200,000 each week with the fourth week culminating in a payment of GTA$400,000. Recently, this has been reduced to GTA$100,000 a week for a total of GTA$400,000 each month. I don’t know if the last week culminates in an extra $100,000 as there has been no mention of this by Rockstar. In fact, there was no mention of the reduction of this Prime Gaming benefit.
Cost: Amazon Prime membership (USD$12.99 a month or USD$119 a year)
Type: Passive only
Reward: Up to GTA$400,000 a month
Difficulty level: N/A
Caveat: This benefit can be discontinued or altered at any time by Rockstar without warning
⤵
Additional ways…
These didn’t make the cut for reasons listed below. However, they are still valid for making at least some money in the game. These events are free to participate, but may require the use of weapons, armor or the purchase of expensive cars (racing), specific ammo or expensive weapons to win.
Survival Events
I hesitate to include these events because they require crap tons of ammo (which you have to buy) and, in the end, net very little in the way of cash. In other words, you may spend more on ammo to win the event than you’ll get back from surviving it. However, I’ve included it because these jobs are open and available all of the time. You can join a survival job at any time. The longer you last, the more money you’ll make, but only to a point. Keep in mind that surviving a long time doesn’t necessarily net you more GTA$ in the way you might think. You’ll get whatever you get from the survival event, which includes both RP and limited GTA$, maybe around GTA$3,500 or so max.
Cost: Free
Type: Multiplayer Active, Recurring, Available all of the time
Reward: Depends on many factors, but usually no more than GTA$3,500 on average.
⤵
Racing

Racing events can net you some GTA$, but typically you’ll need a decently fast car if you hope to win and win max bank. This means either buying an expensive Supercar from Legendary Motorsports or being lucky enough to win one from the Lucky Wheel podium. Racing is included because occasionally Rockstar will introduce a new racing type into the game and to promote it, they will award GTA$100,000 or more simply by participating.
Cost: Dependent on car needed
Reward: Limited GTA$ depending on placing, but probably no more than GTA$5,000
Notes: Sometimes newly introduced events will offer a large award for participating.
⤵
PlayStation 4 Promotion
While Rockstar readies GTA Online for play on the PS5, they are giving GTA$1,000,000 each month to PS4 members who also have PlayStation Plus. In order to play GTA Online, you need PlayStation Plus for the network access. The way to obtain this money changed in April, now requiring each player to head to the PlayStation store to claim the GTA$1,000,000 on the first of each month until the PS5 version of GTAO becomes available.
GTAO on the PS5 may release as soon as August or September 2021, so this promotion may end very soon. This one is only included here now because it’s still active for a limited time. Note, if you’re logged into GTAO when you head to the store and claim it, you’ll have to log out and back in to see your GTA$ update.
Cost: Requires PlayStation Plus subscription and a PS4
Reward: GTA$1,000,000 monthly
⤵
Gambling at the Casino
This one is not included in the top 10 because casino gambling is too risky for several reasons. I didn’t include this one in the ‘avoid’ area below because it is possible to win. It also takes GTA$ converted to Chips to make a bet and you can easily lose it all.

The problem with winning in the casino is that Rockstar monitors large wins coming out of the casino. If Rockstar determines you cheated to win, they can take all of your money away or outright ban you from the game. Be careful when attempting to win large bets in the casino. For this reason, I don’t recommend trying to gamble at the casino other than with the smallest bets (i.e., less than 100 chips). Even then, play only a little, win only a little and walk away. If you press your luck and win a large pot, Rockstar may flag your account for cheating.
Cost: Chips to bet
Type: Recurring
Reward: Whatever you win
Risks: Can be suspected of cheating and lose all money or be banned from the game
⤵
One Off Activities
Rockstar includes a few one-off activities which are worth doing because you can net a decent amount of cash from each of them. These are not included in the top 10 above because they cannot be performed more than once.
Bounty Missions
A random NPC named Maude will ask you to help her with some bounties. As a result, you will receive GTA$300,000 and the Stone Hatchet for returning the bounties to Maude alive. Returning them dead yields less. There are 5 bounties to be had.
Cost: Free
Type: One off
Reward: GTA$300,000 + Stone Hatchet
⤵
Rampage

This next activity requires using the Stone Hatchet that you got from Maude’s quests. Once you kill 25 NPCs while in Rampage mode using the Stone Hatchet, you will receive GTA$250,000. You must do this rampage specifically with the Stone Hatchet. There are other hatchets in the game, but only the Stone Hatchet unlocks this reward. Make sure you have the correct hatchet equipped.
Cost: Free
Type: One off
Reward: GTA$250,000
⤵

Golden Revolver
This is a cross promotion for Red Dead Online. To receive the Golden Revolver, you’ll need to start with a treasure hunt email. This will lead you to 4 different clues which, if correctly decoded, will reveal a chest containing the Golden Revolver.
Once obtained, you can then jump right into the Golden Revolver headshot kills challenge. Once you have killed 25 NPCs with headshots using the Golden Revolver, you’ll receive GTA$250,000.
.
Cost: Free
Type: One off
Reward: Golden Revolver + GTA$250,000
⤵
Radio Signal Jammer
There are 50 radio jammers placed on various tall radio towers and buildings. This is part of the Casino Heist. These look like small black boxes with a red light and an antenna on top. These also beep so you can hear them at a distance. Once you destroy all 50 radio jammers, the game unlocks a person useful to the Casino Heist. That’s not really the money reason to do this challenge. By destroying all jammers you’ll net GTA$150,000 and 50,000 RP.
Cost: Free
Type: One off
Reward: GTA$150,000 + 50,000 RP
⤵
Avoid these activities….
Most of what’s listed below are one-time and/or overly-complex activities. This means that once you complete those specific missions, you either can’t do them again or you must start over from the very beginning and do all steps again. You can also participate as a team member in a friend’s unfinished heist or mission if you need to do a specific step quickly. This top 10 list was designed to include easy and quick money making opportunities that can be repeated every day, which these below most certainly are not. This section isn’t meant to imply that you can’t enjoy these activities for the entertainment value, just don’t do them in hopes of making money in the game.
Heists
Heists are some of the most expensive and complex ways to make income in the game. Why? Because Rockstar requires that you buy very, very expensive real estate, boats, equipment, personnel and trucks to support the heist. All told, you’ll end up spending GTA$3-5 million (or more) in buying random in-game junk, just to net GTA$300,000 – GTA$500,000 back from the heist. You won’t make back even a fraction of what you spent to buy that boat, truck, warehouse, safecracker tools AND bunker. However, you can do it all again, but you’ll likely have to spend for at least tools, people and random junk running the heist for a second or third time.
Heists, while they may be fun when played in groups, are the worst ways to make money in the game.
Cost: Depends on Heist, but no less than GTA$3-5 million
Passive Income: None
Heist Reward: A paltry GTA$300,000 to GTA$500,000 max.
⤵
Galaxy Super Yacht
The Super Yacht is a waste of money. Sure, the captain of the yacht offers up some missions, but like Heists above, you must sink at least GTA$6,000,000 into the thing to get a couple hundred thousand out of it. Don’t buy this thing for the mission reward money. However, there are six missions which can be performed only once.
Cost: The Super Yacht begins at GTA$6,000,000 and is rarely ever discounted more than 10%
Passive Income: None
Active Income: Around GTA$30,000 per mission
Reward: Captain’s Outfit after completing all 6 missions
Daily Cost: GTA$1,000
⤵
Bunker Missions
Like Heists, you have to first invest in a bunker property, which is costly. Once you do this, you have to keep resupplying the bunker with more and more materials until you max out the products storage area. Then, you can take those products, load them into a crap vehicle and drive them across the map to the delivery location.

The problem is, bunker missions can only be performed in public servers. This means you’ll need to endure other players who are told you are moving goods and basically where you are on the map. Other players can come screw with you and those goods.
Once sold, you’ll get a fraction of the value because, in typical Rockstar fashion, they always skim GTA$ right off the top to keep you from getting as much as it says the goods are worth. Honestly, this one is too much of a hassle and costs too much money simply to net GTA$100,000 (or less). There are easier ways to get that amount of GTA$… see above.
Cost: Bunker cost begins at GTA$2 million, but you may be able to get it included in some bundles
Type: Recurring
Passive Income: None
Active Income: Requires carrying good across the map on a public server.
Reward: Some percentage of the value of the goods, if successful
Daily Cost: GTA$7,800
Note, the maintenance cost for owning a bunker is whopping GTA$7,800 per in-game day, but only if you’re actively CEO. Make sure to ‘retire’ as CEO before the day ends to avoid paying this stupid fee. This is the only maintenance fee you can avoid paying in this way. Also note, moving Bunker goods across the map requires at least two people to drive two separate delivery cars… it cannot be done solo.
⤵
Nightclub Goods

For the same reason as Bunker Missions, moving these goods has the same problem… public server, public announcement and players can screw with you. On top of that, your nightclub manager takes a cut leaving you with 10% less than what the goods are worth.
Cost: Nightclub costs around GTA$2,000,000 to own, plus maintenance costs.
Type: Active, Recurring
Passive Club Income: GTA$10,000 down to GTA$1,000 depending on whether the club is promoted
Reward: Depends on amount of goods sold, less 10% to Tony
Daily Cost: GTA$800 to GTA$2,250
⤵
Simeon Premium Deluxe Repo Cars
These missions are entirely multiplayer missions. If you can get a team of only your friends, it might be fun. If you are matched with randoms, likely there will be one who will torpedo the whole mission.
Cost: Requires multiplayer session with randoms. I’ve tried playing several times and each time the mission fails due to some random torpedoing it.
Type: Multiplayer, Recurring
Reward: Depends, but not as much as you’d hope.
⤵
Casino Penthouse
To own the Casino Penthouse, it costs GTA$1.5 million to GTA$6.5 million depending on which features you choose to buy. However, along with owning the casino penthouse, you’ll unlock missions from Agatha Baker, the casino manager. There are 6 casino missions that, when completed, will reward you with $GTA100,000 and the Enus Paragon R Armored version, which you pick up at the docks.


Cost: GTA$1.5 million to GTA$6.5 million
Type: Once Only
Reward: GTA$100,000 and Enus Paragon R Armored
Daily Cost: GTA$500 to GTA$1,350
⤵
Executive Suite Cargo Missions

Like most money making activities in the GTA Online world, for these you’ll need to invest in an Executive Office Suite, a cargo storage warehouse and probably several other things. All told, you’ll spend at least GTA$3-5 million (probably more) to net maybe GTA$100,000 every week or so. For example, the high value car cargo missions allow you to steal expensive cars, then store in them in the cargo warehouse. You can sell them immediately. The thing is, even though the car may be worth GTA$1.5 million, the maximum you’ll get by selling the best of them is GTA$80,000. In fact, it’s so little money and because it’s a real hassle, it’s not really worth the effort.
Cost: Executive Office (~GTA$1,000,000 or USD$20 for CESP) and Cargo and Crate Warehouse … ~GTA$5-7 million total
Passive Income: None
Active Income: Limited by Rockstar’s stupidity
Daily Cost: GTA$800 to GTA$950
⤵
50 Stunt Jumps
Don’t bother with this activity if you’re looking for GTA$. The only reason to do this one is if you’re trying for the Collectibles trophy. There are 50 stunt jumps all over the map. However, completing each jump only earns a tiny amount of RP. At 1, 5 and 25 jumps, these will unlock paint jobs at Los Santos Customs. This activity rewards no GTA$ at all.
Type: Free
Cost: None
Rewards: Only RP and Unlocked paint jobs
⤵
Stretching your GTA$ farther
As has been hinted all throughout this article, it’s better to wait for Rockstar to put vehicles, properties, weapons, armor and even outfits on sale. Each week, Rockstar chooses various items to discount. Some discounts are given straight up to all players. Extra discounts are given by linking your Amazon Prime account to Rockstar. These discounts never overlap, but do run concurrently with one another. For example, Rockstar typically puts properties or property features on sale regularly and then simultaneously discounts vehicles via the Prime Gaming benefits. However, when Rockstar puts properties on sale, they typically do not discount a property’s sub-features, which is a little frustrating.
For example, when Executive Offices are discounted, the Executive Office garages and the Cargo Warehouses are not discounted. This means, you’ll need to wait for the garages and warehouses to go on sale separately. This means you’ll need to wait until Rockstar puts those specific properties and features on sale, which might occur months apart.
For vehicles such as the Kosatka, Avenger, Terrorbyte and Mobile Operations Center, you’ll also find only one of these on sale at a time. Typically when a vehicle is discounted, its renovation features are not, though rarely they might discount both. You have to check.
When you find one of these vehicles heavily discounted, such as the Kosatka priced around $GTA1 million, you gotta jump on the deal quickly because it won’t come around again for at least 6-12 months.
Reviewing this article, you might notice I have a lot of these very expensive items in the game. I didn’t pay full price for any of them. I’ve been buying all of these items slowly on discount when the discounts occur. Some of the vehicles, I’ve won off of the podium, such as the Toreador, though I paid for the Stromberg, but on sale. However, I have been waiting for some vehicles to go on sale for several years, such as the Vigilante and the Oppressor. This is the only downside to waiting. However, waiting for discounts means you can stretch your GTA$ much, much farther and you get way more for less money.
That’s also how I afforded the Penthouse suite at the Casino. I first waited for the property to go on sale and spent about GTA$1 million. Then, I waited for each of the renovation features to discount and purchased those while also discounted. All told, I spent just over GTA$3 million to unlock all Penthouse features.
I’ve also specifically waited for many of the Super Cars to show up on the Lucky Wheel podium to win rather than spending GTA$2-4 million on each vehicle. Though, when I have occasionally purchased Super Cars, they have also been close to 50% off.
I know it can be difficult to wait, but waiting is far better than spending twice as much for in-game stuff that may never even be used. For example, the Avenger, Terrorbyte and Mobile Operation Center and even the Kosatka vehicles are a major waste of money. It’s a good thing I bought all of them when heavily discounted. In fact, I’ve never even used the Avenger, Terrorbyte or Mobile Operations Center. I also have a lot of vehicles I rarely ever use. My most used vehicle is the Deluxo, which I also won off of the podium.
Winning cars and using Rockstar’s discounts is the best way to stretch your GTA$ much farther. Also, take full advantage of any freebies Rockstar gives, particularly money giveaways for event participation.
⤵
Overall
There are other activities not mentioned above which can yield various amounts of GTA$, like the impossibly stupid flying missions at Los Santos Airport flying school, which yield insulting amounts of GTA$ once each impossibly hard and useless test is completed. Unfortunately, the rest in the game are not really worth mentioning, like RC car races.
One thing Rockstar needed to add to GTAO was way more passive income features from purchasing and owning properties. For example, every owned property should offer some level of passive income… at least enough to cover the daily expenses.
Overall, Rockstar pretty much failed us with Grand Theft Auto Online. While GTA V’s in-game money balance was decent, all of that was removed from GTA Online. What’s left is a basic shell that teases the player by handing out a pittance of money each day here and there. Even the Heists in GTA V offered up a decent sized reward. In GTAO, the Heist rewards are entirely insulting after spending millions buying all of the garbage needed to complete it. The best use of money in GTA Online is buying the cars. However, if you wait long enough you can win most of them off of the Lucky Wheel at the Casino, not pay anything for them… the best way to get most expensive cars in this game.
What you can’t win off of the Lucky Wheel podium are vehicles like the Kosatka, the Mobile Operations Center, the Super Yacht, the Avenger and the Terrorbyte. What’s worse is that the MOC, the Avenger and the Terrorbyte are all effectively the same vehicle, each in a different class. It’s such a waste of GTA$ buying the same thing multiple times.
Worse, these mobile weapon-and-vehicle workshops only work on weaponized vehicles. Even though these mobile workshops allow similar customization features as Los Santos Customs, these mobile workshops can’t modify regular vehicles… thus rendering the convenience of paying for these mobile workshops pointless. Rockstar just doesn’t seem to get that the usefulness of these mobile ‘Los Santos Customs’ workshops is the fact that you can modify your cars anywhere you choose rather than spending time driving the car over to an LSC. As expensive as these mobile workshops are, why wouldn’t you allow us to modify any vehicle in that mobile vehicle workshop?
What difference does it make if we modify our car in our Avenger or at Los Santos Customs? We’re still going to pay the price for each mod.
↩︎
Fallout 76: A Guide to a Bloodied Build

It seems a lot of people don’t really understand how to manage a Bloodied character build in Fallout 76. It’s not terribly hard once you understand the details. Let’s explore.
[UPDATE: 3/17/2022] “Invaders from Beyond” brought with it a new alien event, but also nerfed VATS critical shots. VATS critical shots formerly never missed. This “never miss” critical made sense. It takes about 5-10 standard shots to fill the critical bar, affording one critical shot about every 5-10 shots, a few less if you have VATS critical luck cards on. VATS criticals are already heavily nerfed from this inability to use VATS crits frequently. Yet, with this latest update, VATS critical shots now miss with the same frequency and sometimes more often than standard VATS shots. If you rely on VATS critical shots, expect your gun to miss often, wasting your precious VATS critical bar. This issue now builds upon my previous update just below.
With all of these nerfs to VATS, Bethesda is slowly and silently gutting VATS. In fact, hip-fire shots are way now more useful in this game than VATS… which is the wrong direction for Fallout. This forces people to build “tank” builds rather than sneaky snipers. Sneaky sniper builds have almost always been the strongest builds in Fallout, yet Bethesda devs have taken it upon themselves to effectively nerf the sneaky sniper to offer half or less the damage of a “tank” build. Bethesda is only serving to chase off more and more of its core gamers.
While this bug isn’t specific to a Bloodied build, it directly affects it. VATS has recently been updated to be far less accurate. In a recent change to Fallout 76, Bethesda has made an update (one of many) that drastically reduces the accuracy of shots made through VATS. Originally, VATS was designed as a sure shot method of fire. Meaning, VATS was intended as a form of aim assist that simply just worked and landed shots every time. No longer. Since the game’s launch, Bethesda has seen the need to muck about with the VATS system and has broken it many times since 2018. With some weapons, VATS is still entirely broken.
In fact, with the Flamer, VATS is still fully broken. Using hip-fire shots at close range, the flamer weapon is 100% accurate. Using VATS at that same close range, the Flamer is 0% accurate (missing the target completely) even though the flame has clearly engulfed the enemy. This is the kind of broken that I describe.
With the Lever Action Rifle, a rifle known to have high accuracy levels even at great distances, Bethesda has decided to screw with VATS again. While you can sniper scope shots with 100% accuracy, performing the same shot with VATS offers maybe a 10-40% chance of a hit. That’s a drastic reduction in accuracy for the Lever Action using VATS. It gets worse.
The change that Bethesda recently made is that the accuracy of the shot is directly related to the position of the head / body part (facing towards you or away from you). It doesn’t matter whether the body part is obscured, it matters the position in space. This change in accuracy is questionable. A head sticking out there is just as accessible facing towards as it is away. Yet, VATS now reflects a drastic reduction in accuracy under this condition. Facing towards, the accuracy shows 95%. Facing away, the head shot shows an accuracy of as low as 40-60%. Because the NPC is constantly moving, this VATS value is recalculated in microseconds. Meaning, what you see on the screen isn’t the accuracy that applies when you fire. Thus, you can see miss-miss-miss-miss with each bullet striking above or to the side or somewhere else, but not hitting the target at all.
What this translates into within Fallout 76 is a lot of wasted ammo and missed shots. It’s also exceedingly frustrating that even facing forward, shots can now literally miss multiple times in a row. I’m standing within the rifle’s distance of an enemy. I could bash them as close as they are, yet VATS misses multiple times in a row at a distance that shows a 95% hit chance. It’s also frustrating and annoying that it’s recently come down to the fact that the creature can now land a blow AFTER I’ve shot them and killed them.
However, that’s an entirely separate and long standing bug from VATS. Some creatures and robots can now land melee blows from yards away. For example, I hear the melee swatting noise from a Mr. Handy, yet the closest one is at least 10 yards away. I’ve also had this bug show with both Mutant Hounds and Liberators. Worse, enemies are now allowed to instantly warp to your position and land blows. There is literally no mechanism given to the player to avoid enemy teleportation. Typically, when enemies warp, they appear outside of the play field view, so you have no idea a creature has warped behind you. In fact, there’s no sound when it occurs. Yet, swat-swat-swat forcing you to turn around.
Bethesda has literally found ways to cheat against the player in Fallout 76. If the combat in Fallout 4 was fair, Fallout 76 now offers combat that’s anything but fair.
[UPDATED: 10/30/2021] As of early Sept. 2021, Bethesda has rolled an update to Fallout 76 that disabled interaction and collection of Toxic Goo at West Tek Research Center. However, as of October 29th, this issue has now been resolved and Toxic Goo is now, once again, collectible from the vat pools.
New Legendary Effects
In a previous update (but not necessarily the one above), Bethesda introduced a number of new legendary effects into the game (along with the ability to now roll legendary effects directly onto armor and weapons and now even power armor). These new legendary effects include Aristocrat’s, Gourmand’s and Juggernaut’s. Why is this important? Because these are brand new effects, it seems that Bethesda’s devs have given these effects higher priority over older effects, making these legendary effects more likely to drop as loot than the older effects.
This means that you’ll need to read the below knowing that when I said, “rare” in relation to Bloodied, it’s now even more rare and less likely to get a Bloodied weapon as a loot drop because of these new “higher priority” effects. The same goes for Unyielding armor, which was a rare roll anyway, but now it’s way more rare… especially on power armor pieces. The plus is that legendary enemies are dropping crap tons of power armor legendary pieces, mostly one star. They’re heavy, yes, but legendary PA pieces also offer more Scrip per piece when sold than standard legendary armor.
And now back to our regularly scheduled programming….
Bloodied Weapons
There are many different types of legendary weapons and armor in Fallout 76, but none really more rare than Bloodied weapons. In fact, there are a number of relatively rare spawning legendary items in the game including Unyielding Armor and Bloodied weapons. Just visit Purveyor Murmrgh at the Rusty Pick and roll your chances to find out. You’ll find that it’s quite rare to roll a Bloodied weapon or get a piece of Unyielding armor. The most common armor received from the Purveyor are Assassin’s, Bolstering and Zealot’s, with the most common ranged weapons being the Zealot’s Gatling Laser and Zealot’s Laser Pistol.
What exactly is a Bloodied weapon? This legendary weapon effect increases damage of the weapon as the player’s health decreases. To get the most out of this legendary weapon effect, you must keep your character’s health as low as possible. Unfortunately, Fallout 76’s developers didn’t offer the player a way to manage the character’s health directly. Instead, the player must find substances in the world to keep the player’s health low.
Combat?
One might initially think that combat is the way to do this, but no. Well, it is one way, but it’s not the most optimal way. There are easier ways to do this, but it will take just a little effort to find the necessary items to manage a low-health character situation.
Toxic Goo
⬆️ See update note above. ⬆️ There are few items within Fallout 76 that confer a substantial amount of health reduction on the player. One of these mechanisms is radiation. As radiation increases, health points (HP) decrease. By keeping radiation of the character high, the HP always remains low no matter what foods or medicines are consumed. In fact, this game mechanic is really the only mechanic that functionally works to keep your character’s health at a specified level. By keeping rads high and health low, you can take advantage of both of these conditions using different Perk cards.
One foodstuff item that can impart a boatload of radiation onto the player rapidly is Toxic Goo. This consumable is found primarily at one location in Fallout 76. That location is WestTek Research Center in the Savage Divide. This consumable adds 125 radiation points per vial consumed (more if you suffer from Radworms). It also does it even with the Lead Belly card in place, which means you can leave the Lead Belly card on while still consuming and taking 125 rads per vial. It takes about 3-5 vials (depending on your HP bar length), to get HP under 60. Don’t take too much or else your character will die.
As a side note, I’ve recently found that having the Aquaboy/Aquagirl card on prevents Toxic Goo from working. I don’t quite understand why. The Aquaboy card has nothing to do with consuming food items at all. In fact, drinking dirty water imparts radiation damage even with Aquaboy on. Why this perk card prevents Toxic Goo from working is anyone’s guess. My guess is yet another Bethesda bug. Bottom line is, always remove the Aquaboy / Aquagirl card when needing to consume Toxic Goo.
To obtain Toxic Goo, head to the WestTek Research Center (not far from Foundation), which houses a lot of super mutants. You’ll want to enter through the back door of the building. Going in through the front is pointless unless you really like mowing down lots of super mutants to get to the large cylindrical vats of goo in the back. If you enter through the rear of the building, the vats are right there. On the outside of the rear of the building, there are about 5 super mutants, a turret and a dog. Once inside, you only have to clear out one or two dogs and about 5 super mutants to get to the vats. If you have the Sneak card, you might even be able to get away with only one or two kills and then sneak your way up to the vat and grab a bunch of goo and fast travel out of there.
You’re also going to need the perk card Traveling Pharmacy or the backpack equivalent perk to reduce the weight of aid items. This will reduce Toxic Goo weight so you can carry a bunch with you. I usually stock up and carry about 150 of them at a time. When I get down to about 20, I head over and fill up again.
Under 60 HP?
Keeping your character’s health under 60 is the magic number for a Bloodied build. Over 60 and you don’t reap the rewards of a Bloodied weapon or Unyielding armor. Though, you can still reduce your health more and gain a few more damage points. This number exists for several reasons. A Bloodied build is a bit more complicated than simply drinking Toxic Goo and grabbing a Bloodied Gatling Gun. While that will work, you’ll want to also outfit your character with some damage and radiation resistance to avoid mucking with this build. This number is also optimal for keeping most creatures from one-shotting you instantly. Though, recently, Bethesda has given a major buff to too many enemies in the game and too many enemies can one-shot your player, regardless of either’s level, depending on their attack method.
Armoring up for a Bloodied Build
Note, there is no Bloodied legendary effect on armor. This effect only exists for weapons. There are several armor effects which work well with a Bloodied build, including Unyielding and Bolstering armor. Sentinel armor formerly existed in Fallout 76, but was removed and replaced with a crappy equivalent.
Sentinel armor formerly afforded 100% protection while standing still (effectively god mode armor), but this legendary armor effect was removed from the game. Sentinel armor was a fan favorite for a Bloodied build for the first 12 months of the game’s existence until Bethesda did away with Sentinel as a primary effect. Bethesda’s developers replaced and updated a tertiary Sentinel effect equivalent, which is literally worthless (75% chance to reduce damage by 15% while standing still). Not only does it reduce damage resistance down to a max of 15%, it will only offer that protection 75% of the time… which with Fallout 76’s developer math will actually occur less than 10% of the time. Worse, you won’t even know if the effect is working or not. There’s no notification to the player if the legendary armor’s effect has actually worked. Worthless.
Unyielding and Bolstering are the armor legendary effects of choice for a Bloodied build. These effects operate 100% of the time as you would expect of any legendary effect. How can you call something a legendary effect when it only works no more than 75% of the time? Why even add something that crappy to the game? Simply just get rid of it from the game entirely. I digress.
Unyielding works not only by having damage resistance (limited to the armor piece worn), but by increasing all SPECIAL stats (except Endurance) by up to +3 for each piece of armor worn. This means that you can gain up to +15 to every SPECIAL stat if you wear a full set of Unyielding (two arms, two legs and chest piece). Why is this important? Because you’ll get a permanent +15 buff to strength, perception, charisma, intelligence, agility and luck so long as you maintain low health. You can raise up Endurance in other ways, but not with Unyielding armor. If you happen to find 5 pieces of Unyielding Marine armor, you can really get your damage resistance up there.
Bolstering armor, on the other hand, doesn’t buff any SPECIAL stats, but it does increase damage resistance the lower your health. By keeping your health low, whatever armor type you are wearing will see a buff to damage resistance and hopefully keep your character alive even up against large foes. In this case, you won’t necessarily need to wear Marine armor to get a higher amount of damage resistance. Though, wearing Bolstering Marine armor wouldn’t hurt.
Personally, I prefer Unyielding armor because of the +15 extra charisma points means I don’t need to worry about putting on the Hard Bargain card to get the best buy and sell prices at vendors. Adding +15 to luck also means better drops at the end of quests and from dead enemies, especially from enemies like the Scorchbest Queen. Unfortunately, any extra points cannot be used to place more perk cards on the stack. Only applying a Legendary SPECIAL card and ranking this card up will afford extra points for card use, but that means you’ll need your character to be at least level 200 to have enough spare slots and enough perk coins to spend. As for armor itself, mix and match Bolstering and Unyielding in whatever proportions work best for your character.
Damage Resistance
Because a Bloodied build requires keeping health low, that means your character is constantly vulnerable to certain types of attacks, like Suicider Super Mutants whose mini nuke can easily kill your character in one hit. Additionally, being hit by the Scorchbeast Queen or Wendigo Colossus or even just a plain old Wendigo can probably take your character out with one hit. For this reason, Bloodied builds will want to combine with Sneak and other sneaky features to remain hidden while attacking. Not only does this keep you at distance from your enemies, it affords you 2x or more bonus damage from attacking while hidden.
Brahmin Milk
One trick to maintaining to a Bloodied build at just the right amount of health is Brahmin Milk. Before this consumable came along, there was no way to tweak your health in small amounts easily. This consumable is the only foodstuff in the game that not only increases health, it simultaneously removes a small amount of radiation. This means you can nudge your health up by a tiny amount while reducing rads. I believe each Brahmin Milk adds about 8 HP and removes an equivalent amount of radiation. Best of all, drinking Brahmin Milk has no chance of removing mutations from your character. This means you can combine Toxic Goo and Brahmin Milk even with characters below 30 and run a Bloodied build.
Unlike Radaway which affords a chance to remove a mutation without having a maxed Starched Genes card in place, drinking Brahmin Milk doesn’t do this. Though, without a maxed Starched Genes card, you can still gain more mutations.
This next part is where wearing Unyielding armor becomes a major benefit. Milking a Brahmin is entirely dependent on your character’s luck. With the +15 buff to luck while wearing Unyielding armor, you are guaranteed to get at least one milk every time. Typically, you’ll get 3 or more. Wearing Unyielding armor, I have occasionally received 5 milks from all 9 of the Brahmin in Flatwood… that’s 45 milks! With the additional 3 Brahmins now at the Wayward, that adds a possibility of 15 more milks for a possible total of 60.
If you’re willing to adventure a little, both Big Bend East and West tunnel entrances, the very long tunnel which links the Ash Heap to the Cranberry Bog, have Brahmin which can be milked: two Brahmin on one side, three on the other, adding a possible 25 milks. Between all of these locations, I pick up no less than 30 milks, and with Unyielding + Low Health, there’s zero chance of seeing that kicking behavior from the Brahmin, that you failed to milk it.
To carry this much milk around, you’ll need to have the Good with Salt perk card. This card reduces food spoilage by 90%. This means you can carry around a lot of Brahmin milk for a long time, though Toxic Goo doesn’t expire.
Note that Chally’s milk is special and not the same as standard Brahmin milk. If you run into Grahm, you can milk Chally, but it has special benefits. Recently, I’ve recently also run into a number of wandering caravans with multiple Brahmin which can also be milked, but these are random encounters.
If you’re really wanting even more milk, assuming you haven’t found enough already, you can start the Riding Shotgun event at the East side of the Big Bend tunnel, by talking to Vinny Costa. This event spawns 2 Brahmin which can be milked, but you’ll have to enter the tunnel to milk them. Of course, you can always server hop and usually get more milk each time from each location listed above. If you have Fallout 1st, you can load into that server and collect even more.
Finally, it’s worth noting that even with the Good With Salt perk card, Brahmin milk spoils rapidly. It’s one of the fastest spoiling foods in the game. Don’t rely on using a fridge or a fridge backpack mod, which only reduces spoilage by 50%. Instead, you’ll need to rely on a maxed out Good With Salt card (90% reduction of spoilage) to maximally slow spoilage of Brahmin Milk and offer the longest carry time.
Other things to do with Brahmin Milk
One recipe that Brahmin milk is useful for is Pepperoni Rolls. These rolls confer 30 carry weight for ~30 minutes when consumed. You can purchase this recipe from Molly at The Crater. You’ll need Gulper Innards x2, Pepper x2, Brahmin Milk x2, Razorgrain x2 and Wood x1 to craft. Pepper may seem a difficult ingredient to find, but check every kitchen, diner or restaurant you happen upon. You’ll usually find at least one pepper at each of these locations. You can amass a lot of pepper quickly. Gulper Innards can be had at Gulper Lagoon and from two gulpers near Crevasse Dam in the water. Be sure to use Butcher’s Bounty to get the most innards possible.
This recipe is an excellent way to use up Brahmin milk before it spoils.
Perk Cards
As mentioned above, there are a number of perk cards you’ll want to consider while keeping rads high and health low.
Low Health + Unyielding:
- (I) Nerd Rage — While below 20% Health, gain 40 Damage Resist, 20% damage and 15% AP regen (3 star)
- (A) Dead Man Sprinting — Sprint 20% faster at increased AP cost when your health is below 50% (3 star)
- (L) Serendipity — While below 35% health, gain a 45% chance to avoid damage (3 star)
- (E) Lifegiver — Gain a total of +45 to your maximum Health. (4 star)
- (L) Last Laugh — You drop a live grenade from your inventory when you die. (1 star)
- (A) Evasive — Each AGI point adds +3 Damage and Energy Resist (Max 45). [No Power Armor] (3 star)
High Radiation:
- (E) Radicool — The greater your rads, the greater your strength! (+5 Max) (1 star)
- (E) Ghoulish — Radiation now regenerates even more of your lost Health! (3 star) (only somewhat effective)
More Damage:
- (A) Adrenaline
- (I) Nerd Rage
- (P) Rifle, (A) Pistol, (S) Melee, (S) Heavy Gun and/or (S) Shotgun damage multiplier cards
- (L) Better Criticals
- (L) Bloody Mess
- (I) Demolition Expert
- (C) Tenderizer
Damage Evasion:
- (E) Rad Resistant — +40 Radiation Resistance (4 star)
- (E) Nocturnal Fortitude — Gain +40 to Max Health between the hours of 6 p.m. and 6 a.m (2 star)
- (E) Ironclad — Gain 50 Damage and Energy Resistance while not wearing Power Armor (5 star)
- (E) Fireproof — Take 45% less damage from explosions and flame attacks (3 star)
Sneaky + Bloodied + Unyielding:
- (A) Sneak — You are 75% harder to detect while sneaking.
- (A) Covert Operative or (A) Ninja — Ranged or Melee sneak attacks do 2.5x normal damage (3 star)
- With Unyielding, take advantage of ALL luck cards to gain better chances to repair armor, weapons, better VATS chances and better critical damage. Too many Luck cards to list here, but take advantage when wearing Unyielding.
Cards and Armor to avoid:
- (A) Born Survivor — Falling below 40% health will automatically use a Stimpak, once every 20s. (wastes Stimpaks)
- (E) Sun Kissed — Slowly / Quickly regen radiation damage between the hours of 6 a.m. and 6 p.m. (ensure teammates DO NOT share this one).
- (Legendary Perk Card) What Rads? — X Rad Resist, restore X Rads per second. (like Sun Kissed, avoid)
- (Legendary Armor) Life Saving armor — This armor, like its sister card Born Survivor above, wastes Stimpaks.
What are some other useful legendary armor effects?
Of course, there are other useful legendary armor effects, but none more useful to a low health, high rads build than Bolstering or Unyielding. These are the two best primary effects to wear. However, if you wish combine your Bloodied build with the Chameleon mutation, then you can’t use Bolstering or Unyielding and still have the Chameleon mutation work. To have Chameleon work, the only armor that’s useful to wear is Weightless. In fact, the Chameleon mutation requires that you are limited to Weightless armor if you wish to combine a Bloodied character with a functional Chameleon mutation AND still have functional armor.
Other secondary effects that are useful to a Bloodied + Chameleon (and, in general, a sneaky Bloodied sniper) is the “Increases action point refresh speed” secondary legendary armor effect. This effect stacks with each piece of armor worn and drastically (and constantly) increases action point refresh speed. This legendary effect is quite useful if you intend to use V.A.T.S. It is also great at being able to run extremely long distances without stopping… great at getting away from persistent enemies and remaining at a distance. You’ll only find these secondary effects on 2 and 3 star armor… with 3 star armor being the best to find.
However, because V.A.T.S. is fairly broken in the most recent builds of Fallout 76 (spring 2021), your V.A.T.S. mileage may vary depending on your weapon and amount of action points (AP). Regardless, having a lot of AP and regenerating it rapidly is exceedingly important for anyone who depends on V.A.T.S. for getting hits on enemies. You don’t want to be standing around waiting for AP to regenerate at a snail’s pace. You’ll need to consume AP enhancer foods (i.e., Corn Soup or Company Tea), wear Action Boy/Girl, or, better, wear the “Increases action point refresh speed” legendary effect on armor. Though, it’s exceedingly rare to find (or roll) this effect on legendary armor.
Other effects that can help a Bloodied build, but that aren’t super important are +1 to a specific SPECIAL. This secondary effect can be found on both legendary armor and weapons. If you’re planning on being a sneaky Bloodied melee build, having +1 to Strength on weapons and armor is important to add damage to the melee weapon. Keep in mind that the +1 to a SPECIAL doesn’t allow you to add more perk cards. Only the Legendary perk SPECIAL cards do this, up to a maximum of 5 points and even then you have to be above level 50 to even get one legendary perk card slot. However, having one character above level 50, allows all secondary characters to have the same number of slots as the high level character. For example, a character who is above level 300, will see all 6 Legendary perk card slots opened, allowing all other characters (of any level) in that account to also have 6 slots. At least, this is currently how it works as of 2021. Bethesda is constantly changing the rules of this game, so this rule could change in the future.
One other effect that is also useful to a sneaky sniper is “become harder to detect while sneaking”. This effect is equally rare to the action point refresh speed perk. It’s doubly rare to find it on Unyielding or Bolstering.
Most other legendary armor effects, while they can be nice, don’t offer that much benefit to a sneaky Bloodied build.
Rolling for Legendary Effects
Some useful effects can come attached to Legendary weapons that you can get from Purveyor Murmrgh. However, these effects are only active while you actively wield that weapon. If you put the weapon away or switch weapons, the effect is gone. If you rely on a specific effect on a weapon, you’ll need to keep that weapon out 100% of the time.
I prefer not to let my character become dependent on effects attached to weapons and, instead, prefer to find the effects attached to armor pieces which can be worn. This is why I’m constantly using Scrip to roll new 3 star Legendary armor pieces and hope that I get one decent piece every 20-30 rolls. However, I’ve been recently getting one Unyielding piece about every 30-50 rolls at Murmrgh. Unfortunately, those 3 star Unyielding pieces that I roll tend to have useless secondary effects… effectively making it a one-star Unyielding. I don’t keep these.
I’m specifically wanting Unyielding with “Increases action point refresh speed”. So far, I’ve gotten zip from Murmrgh in the last 100-200 rolls. When I top out at 1000 5000 Scrip (cap raised to 5000, fall 2021), I will roll about 6 pieces and see what I get. Then, Scrip those that are useless. Repeat until the machine runs out of Scrip for the day. Yes, I lose Scrip in this process, but it’s the only way to get exactly what I’m wanting. Though, it’s kind pointless that this is the process Bethesda has saddled us with in this game. I don’t know why we can’t choose the effects we want rather than having to roll the dice and waste excessive amounts of time and Scrip. After the cap raise to 5000 Scrip, Beth didn’t raise the Legendary Scrip machine payout cap.
It’s great we can now carry 5000 Scrip, but the max you can buy, then Scrip in one day is still limited to ~500 Scrip… unless Beth offers a double Scrip weekend on Legendary Scrip machines. It’s too bad we can’t buy stuff from the Legendary Scrip machine directly to replenish Scrip in the machine, like we can replenish Caps at vendors by buying things.
Other Legendary Effects
Another legendary weapon effect that’s extremely useful in low health situations is Vampire’s. This legendary effect gains a brief amount of health regeneration per bullet. This effect is particularly pronounced with high fire rate weapons.
Weapons such as the Minigun, Gatling Laser, Gatling Gun, Flamer and most other automatic weapons work exceedingly well with Vampire’s. It also works reasonably well with fast melee weapons, such as small knives and a Vampire’s Mr. Handy Buzz Blade. The best weapons, however, for the Vampire’s effect are shotguns. Because shotguns spew out up to 30 pieces of shot at a time, each piece of shot offers a regeneration effect, with up to 30 pieces acting like consuming a Stimpak. With a high fire rate shotgun, you can maintain your health even while being struck by gun fire or by melee attacks even from larger creatures like the Mirelurk Queen’s acid spray. Some consider these high fire rate Vampire’s weapons god mode weapons. However, you have to be cautious because while it does keep your health high, you can still be staggered which can then open you up to attacks. Also, some enemies can one shot a Bloodied player at around 60 health.
Note, there is some discussion that the Vampire’s Legendary effect might be removed from Fallout 76. If you’re wanting Vampire’s weapons, you might want to go searching now (Spring 2021). Unfortunately, if the effect is removed from the game, it is also likely that Bethesda will drastically nerf by reducing the effectiveness of the Vampire’s effect, effectively negating it, like its sister Two Shot Explosive weapons before it. While Bethesda can’t remove already owned Vampire’s weapons from people’s inventories, they can reduce the Vampire’s effect to being effectively useless.
Bethesda can even completely change how Vampire’s works. For example, instead of transferring health to the player, it could change to only confer health 10% of the time. The Bethesda developers can also make it so that players can no longer sell, drop or transfer Vampire’s weapons via vending or trading, thus making these weapons entirely useless and worthless. Be cautious if you are making your character reliant on this weapon. You might want to also consider trying other weapons instead, like Bloodied.
If Bethesda does get rid of it as a primary effect, it’s likely that Bethesda will turn Vampire’s into a secondary legendary effect that only operates some percentage of the time. A secondary effect could even turn into something stupid like 75% chance to add 1 point of health over 3 seconds as a secondary effect. Not only would that limit how fast the health is transferred, it only offers a maximum of +3 HP over 3 seconds and reduces the chances of actually getting it by 25%. Not only would each bullet strike roll the dice on whether you even see the effect, if you do get the effect, it’s limited in how much health you get out of the deal. Whatever Bethesda does in this area, it will make Vampire’s weapons effectively useless. If you’ve got Vampire’s weapons, use them now while they still work as they were originally designed.
Nuke Zones and High Radiation Areas
If you’re in a Nuke Zone, you’ll need to wear Starched Genes at max level and wear some form of high radiation resist armor (Chinese, HazMat, Power Armor or Diving Suit). If you don’t rely on Speed Demon (see bugs below), you can wear Power Armor. However, you’ll want to drink a radaway to keep your rads at a lower level, but also leave your health low. Don’t drink food or take stimpaks, though. Eating or drinking any HP increasing foods, will halt your bloodied build. If you lose any health, drink water only. This will increase health by only a little and allow you to maintain a Bloodied build. Also, remove any cards like Dromedary, Good Doggy and Slow Metabolizer that yield more HP for food eaten while in a radiation zone.
Putting It All Together
Toxic Goo increases radiation by +125 for each vial consumed regardless of Lead Belly. Each Brahmin milk decreases radiation and increases health by 8. These two together allow you to maintain your character’s health just below 60. You can keep it lower than this if you prefer, but this combination of foodstuffs is the only way I’ve found to achieve and maintain consistently high rads and low health at a specific level.
Weapons that boost your abilities at this low health include Vampire’s and, of course, Bloodied. Armor like Unyielding and Bolstering enhance the Bloodied build to allow this build to be maintained without constantly dying, particularly in combination with the above listed perk cards and properly configured legendary armor.
Secondary armor effects that can enhance your build include “Increases action points refresh speed” and “Become harder to detect while sneaking”.
Finally, a low health Bloodied build works best as a sneaky sniper build which doubles the damage level of the weapon and maintains a distance from the enemy.
Bugs
This article wouldn’t be complete without mentioning various bugs in Fallout 76 when maintaining a Bloodied build.
- When your character falls in battle and respawns, your character’s health resets to a default value of between 70 and 80 HP. This is frustrating if you’re trying to keep your health at or below 60. The game forces this reset upon respawn… which leads to the next bug…
- Toxic Goo fails to work for approximately 1 to 3 minutes after respawning OR logging into a server. This means that if you were in a heated battle and you want to get back to it quickly, you can’t lower your health until Toxic Goo begins working. This can be particularly problematic if your character has become overencumbered as a result of respawning with higher HP when combined with losing strength buffs from wearing Unyielding armor.
- Some world servers load your character in with HP and Rads different (and higher) from how you last logged out. This is similar to bug #1 above. You may need to wait for Toxic Goo to work to apply the +125 rads to lower your health and begin playing.
- I’m happy to report that this next bug appears to have been fixed in the September 2021 update. Entering and exiting power armor no longer seems to trigger this mutation bug. Please keep this in mind while reading. While not exactly related to this build, it can affect your Bloodied build. Many players rely on the Speed Demon mutation to increase reload speed and to run faster. Wearing Power Armor breaks this mutation. If you enter any Power Armor set, Speed Demon’s faster reload stops working while in it and for a time after exiting. The game will eventually correct itself after a couple of fast travels. The takeaway is, don’t use Power Armor if you rely on Speed Demon for faster weapon reloads. Instead, opt for the Cave Diving suit, Chinese Armor or a HazMat suit to avoid radiation damage in nuke zones and avoid broken mutations… and rely on being a sneaky sniper to remain far away from enemies and still do maximum damage.
One possible workaround for a broken health situation when combined with the Toxic Goo failure is to drink Brahmin Milk first. This can force a change to HP and rads and sometimes allows the Toxic Goo to begin working faster. Sometimes this workaround doesn’t work. Dirty water may also work. Carrying around dirty water isn’t as optimal for this purpose as Toxic Goo, but it may avoid the Toxic Goo failure-to-work after respawn bug, but it also means carrying and drinking a crap ton of Dirty Water to match the 125 rads you get from drinking one Toxic Goo.
Annoyances
Suffice it to say that Fallout 76 has a lot of annoying little problems. With a Bloodied build, there are plenty to find. One in particular is the new ally by the name of Solomon Hardy. He’s a former medic from the Brotherhood of Steel. While it’s nice that he’s a medic and a merchant, his dialog is particularly annoying if you choose to carry a Bloodied build. Several of his dialog pieces contain annoying bits about “bleeding all over the floor” or that the player “shouldn’t be bleeding like that”. Solomon makes incessant comments about bleeding everywhere and being injured, constantly offering to treat the injuries. That’s pretty much what makes up his dialog every time you pass him.
Unfortunately, there’s no way to get him to stop with his incessant badgering and complaints for medical assistance. I got so annoyed by this constant unnecessary dialog that I ended up removing him from my CAMP and replacing him with another ally. I know that I’m carrying a Bloodied build. I don’t need to be reminded about it every few minutes by Solomon. Be warned that if you choose to add Solomon to your CAMP and you carry a Bloodied build, you’ll be forced to listen to his incessant complaints about your character’s low health condition.
↩︎
What is Critical Thinking?

Critical Thinking, when taught in a classroom setting, teaches something that approximates critical thinking, but isn’t actually critical thinking. In fact, what is taught is more deductive or logical reasoning than critical thinking. Let’s explore.
This article is 6647 words. At an average reading speed of 200 words per minute, this article will take slightly more than 33 minutes to read it. Grab your favorite beverage and let’s get started.
Critical Thinking Tests
Here’s a test example:
Which of the following reflects the intention of the writer well?
A. To call men intelligent who are not strikingly so must be to use the concept with undue imprecision
B. Every empirical concept has a degree of vagueness
C. Calling someone intelligent or not depends upon one’s whim
D. There is no need to be as indecisive as the writer of the above
While there is an answer to this question, I’m not going to go into what it is just now for a number of reasons which will become apparent shortly. Instead, let’s analyze this type of question for its appropriateness for critical thinking skills.
First, let me start by saying that the grammar on this question is absolutely atrocious. Without proper grammar, you can’t make heads or tails of what the question is actually asking. The grammar forces you to trip over the question which then forces you to become distracted by the grammar. This fact alone leads to confusion and interpretation problems. Once we’re off track for the interpretation, we can’t easily arrive at a correct answer. Is this a test writer trick? I’ll leave that for you to decide.
Second, this question has multiple choice answers. I vehemently dislike multiple choice answers for a number of reasons. The first reason to dislike multiple choice answers is that they offer a limited selection of choices. You can’t be free to think through the question critically… which is the whole point in this exercise. Instead, you must keep your thoughts constrained to only 1 of 4 answers. On the plus side, the question author didn’t include the absolutely horrid trick answers, “All of the above”, “None of the above”, “Answers 3 and 4” or any similar type answer tricks.
The second half of the second reason to dislike multiple choice answers is that you must decipher what the question author is asking you to do and then keep your thoughts constrained to only those 4 answers… even though your own critical thoughts may lead you to additional answer conclusions not included. This means, you have to put yourself into the shoes of the question author to try and determine how the question author expects you to answer this question. In fact, this makes answering this question less about performing actual critical thinking and more about trying to get into the head of the question author to determine the test author’s motives. That’s not a critical thinking exercise at all. No.
That’s test taking 101. Meaning, it actually becomes more important to understand the test author’s tricks than it is to actually utilize critical thinking skills to answer the question. This is an important distinction to understand about test taking. This is why multiple choice test taking is less about what you know and more about how best to decipher the test author’s motives for the inclusion of the question… and more importantly, how they are expecting you to respond (correctly or incorrectly) to their biased notions. In other words, test authors leave you just enough threads of logic to lead you in multiple directions. Only one thread, if you follow it, leads to the correct answer. Other thought threads, if you are tricked by the question author’s lead, will lead you down the the wrong answer path.
This means you may be betrayed by your very own thought processes. You may postulate the wrong answer simply because the question author led you down the wrong path based on reaching the wrong conclusion. Again, this is test taking 101. You have to become a savvy test taker to understand that the test author is intentionally leading you down the wrong answer path. You have to be smart enough to understand this aspect of test taking to rethink your conclusion to lead you to the correct answer. Again, this has nothing whatever to do with critical thinking skills and everything to do with avoiding test author traps.
Third, this snippet of text is too small to draw any real conclusions. It’s like taking two sentences from the Star Wars novel and then expecting you to understand the author’s intention behind the story. You can’t do this with only two sentences. This question text lacks the bigger context of why it exists in a larger text. If the “author” behind this question included this small statement in a romance novel, for example, and was then talking about a specific character with this statement, you could much more easily draw conclusions to the correct answer because you have wider context surrounding its reason to exist. However, pulling a small snippet out of a larger story, then expecting a test taker to rationalize conclusions without the necessary larger context means jumping to conclusions mostly by guessing. Guessing isn’t the way to critical thinking. Guesswork is best left for situations where the outcome is more or less meaningless. Guesswork shouldn’t be part of or required as a strategy when taking any standardized multiple choice test of any kind. For test taking, you either know the answer or you don’t.
Free Form vs Multiple Choice
Free form answers range in difficulty, but at the same time, require more actual critical thinking. You have to be able to articulate into words the answer to the question. These word answers can then be read by the teacher to understand the student’s thought rationale. That’s the point in critical thinking. For some, writing a free form answer can be easier. For others, it can be more difficult. One thing is certain. Writing a free form answer means you’re not constrained to a limited set of answers… which takes trick answers by wily question authors off of the table. It also takes misinterpretation issues off the table. However, it won’t solve poor grammar problems, such as in the question above.
There, I Fixed It
The question above should have been correctly worded as follows:
Which of the following reflects the intention of the writer well?
A. To call men intelligent who are not strikingly so must be to use the concept with undue imprecision
B. Every empirical concept has a degree of vagueness
C. Calling someone intelligent or not depends upon one’s whim
D. There is no need to be as indecisive as the writer of the above
In fact, the text of this question, now that this question been grammatically corrected, is technically an alternative form of the classic “glass half-full” vs “glass half-empty” argument. Let’s examine.
Of intermediate men (meaning, men who fall halfway between intelligent and not intelligent), do we call them intelligent or not? Again, this situation illustrates another version of the “glass is half-full” versus “glass is half-empty” argument. Thus, such situations can be both rationalized and stated either way.. and correctly I might add. It’s particularly true when extenuating circumstances are present (i.e., how thirsty you are, for example).
Recognizing that this is a case of “glass half-full vs glass half-empty” should be the critical thinking challenge. Once you recognize this fact, the answer should become obvious. Yet, it doesn’t. There’s no answer here that immediately rewards the critical thinker for recognizing this fact. Instead, we are still left with 4 bland answers… answers that don’t adequately or obviously sum up the question author’s reason for writing this question.
However, according to this test author, the answer is A… “To call men intelligent who are not strikingly so must be to use the concept with undue imprecision”. There is nothing in the snippet that describes a man as “strikingly so”. This “strikingly so” concept was added in the answer and was not part of the question. In fact, the correct answer should be C… “Calling someone intelligent or not depends upon one’s whim.” Why?
Why Indeed
The answer A works only from a utility perspective, but the answer breaks down under scrutiny. The “strikingly so” text, which was only present in the answer and not in the question, was added as a qualifier for the intermediate man. This qualifier didn’t exist in the original text and was incorrectly introduced as a new concept in the answer. This violates answer protocol.
A man who is of intermediate intelligence can’t really be called unintelligent unless someone who is much more intelligent stands next to him. Intelligence is a matter of degree. This means that so long as the intermediate man is the most intelligent man in the room, then the glass is half full… or more specifically, the man is intelligent. However, if the intermediate man isn’t the most intelligent man in the room, then the glass is half-empty… or more specifically, the man is considered unintelligent. It’s all a matter of context.
The label is then applied based on the context (or whim) of the situation… which means answer C, “Calling someone intelligent or not depends upon one’s whim”. Even though neither C nor A correctly or adequately describe this situation, C is the most correct of all of the included weak answers, because C doesn’t introduce new information.
Let’s also keep in mind that the definition of “undue” means “excessive”. Calling an intermediate man intelligent isn’t, in any way, excessive. Anyone who is not unintelligent must be, by their very nature, some amount of intelligent. We all understand that intelligence is a matter of degree. It is not an absolute. Calling someone intelligent doesn’t immediately conjure up images of Einstein and Mensa when using that word to describe someone. Instead, calling someone intelligent means to recognize that they are not stupid. For this reason, this question is better served (as a critical thinking exercise) by recognizing that it is, in fact, a form of “glass half-full” vs “glass half-empty” and then treating the test taker accordingly with an appropriate answer. That is the reason for this answer’s existence… an exercise that the test writer him/herself wasn’t intelligent enough to realize.
Critical Thinking
The above proves that this form of test taking isn’t sufficient to demonstrate if a student really understands critical thinking. This form of test only tests if the student can take tests, not that they understand the concept of critical reasoning.
Critical thinking and reasoning is designed to compare ideas, learn the most you can about it, apply logic and determine if what someone is saying is true, partly true, partly false or entirely false. Again, there are degrees to falsities and truth. Understanding and being able to critically find these half-truths or half-falsities (seem familiar?) is the art of critical thinking. It is a concept that the question author above failed to understand. It is a concept, however, that is the reason critical thinking skills are very important.
To ferret out truth from fiction using logic and reasoning is, by its very nature, a skill that everyone needs to master. Sure, you may know when your kids are lying, but can you tell when your co-worker is lying? Your boss? Your doctor?
You can’t just blindly go around thinking that all of these people are telling you the absolute truth any more than thinking they are outright lying. You need to be able to determine degrees to their truth and their deceptions. This is where critical thinking comes into play. Critical thinking isn’t just about reading text, either. It’s also about reading body language, reading into a person’s words and watching how people interact with one another. To become a critical thinker, you must also be able to read human body cues and nuances. Critical thinking skills are rarely ever just about one thing. It’s a combination of cues, text, conversation and rhetoric that combines to create a whole. Once the whole is created, it can be dissected and analyzed by your brain. The point is, to work through not only the logic or irrationality of the situation, but also to combine all aspects to see the bigger picture. Only then can you really think critically about what you know.
Case in point, the above question. If I had attempted to guess what the question author wanted, I would have gotten the wrong answer… because my analysis was not what the question author was seeking. Instead, my thought processes led me down the wrong path because I saw something in the question that turned out to be ignored by the question author. Instead, the question author took the wrong path by introducing information in the answer which shouldn’t have been there. I would have ignored the A answer because of the introduction of information that wasn’t in the original question. In fact, the introduction of that new information was actually the author’s trick to lead you away from the correct answer… to have you select an answer that didn’t introduce new information.
That’s not the critical thinking that the author intended. Instead, you were forced to use critical thinking to deduce which answer is the best based entirely on what you guess the author expected. In fact, there is even less information to go on about the test author than there is in the question. However, taking a test as a whole, you might be able to, through critical thinking, ascertain patterns in the questions and answers. It is these patterns that might lead you back to the above question to later realize the obviousness of the answer.
Unfortunately, you would have to have answered many questions on the test to realize the test author’s scam behaviors. Once you can recognize the test author’s scams on the test as a whole, you can then go back and rework previous answers to fall in line with that new information gleaned from the full test. This is why there’s an art form in taking tests… and while it might utilize critical thinking, it is more dependent on second guessing the test author correctly. I digress.
Critical Information
Critically viewing the world is important. You don’t have to tell everyone your conclusions. You simply need to be able to reach reasoned conclusions based on all information you can obtain. Conclusions aren’t always correct, but critical thinking isn’t an exact science. Because data is always changing and being updated and more information can be found, conclusions may change based on new data. This is the reason to always remain open to new data with a willingness to update conclusions based on that new data.
Jumping to conclusions is easy. It’s just that people tend to jump to conclusions way before having enough critical information. In fact, many people jump to conclusions with only the barest of information. Snap conclusion jumping is the whole reason why TV sitcom programs like Three’s Company (and many other situation comedies) can even exist. With access to the Internet, everyone now has a treasure trove of information right at their fingertips. Don’t just search one thing and call it a day. Spend some quality time searching and digging and reviewing. Look at all sites… even if the site is primarily made up of kook conspiracy theorists. There are always grains of truth tucked everywhere. It’s the commonalities between the various sites that are likely to lead you to those grains of truth.
If you can call and ask questions of people, you can even gain more insight. Nothing is off limits when seeking information. The worst that someone can say to you is, “No” and then you’re no worse off than you were before. As long as you understand this aspect, you can dig for information and sometimes get the information you need. Most times you don’t even need to call and talk to someone. An email will typically suffice. Some people can even be more forthcoming in email because it doesn’t require speaking aloud, which can be overheard by bosses and other staff. Typing, on the other hand, isn’t a problem… which documents yet another critical thinking exercise.
Getting the information to aid in finding an answer is half the fun. The other half is analyzing the data in your brain for even more ideas. Not everyone has the aptitude or desire for this. I get that. But, critical thinking is still very much a useful life skill.
Testing vs Real Life
Understand that the test question above is the kind of question you might expect to see on an aptitude test, like the GMAT. To pass that test, you will need to study similar kinds of questions like the above. You’ll then need to understand how to read and interpret these questions for the appropriate answer. However, know that that kind of “critical thinking” isn’t the same as you would use in everyday life… and herein lies the rub.
Teaching critical thinking skills in a class room will gear the student towards passing an aptitude test. Unfortunately, such tests don’t adequately prepare the student for using genuine real world critical thinking skills to solve actual problems, get to the bottom of a lie or in any other way support any other real life dilemma. We must rely on a completely different set of thinking skills than those taught in a class room. For this reason, relying on academia alone to impart the necessary information tends to come up short in real world applications. It is for this reason that I write this article.
Academia
Don’t get me wrong. Academia is great for learning new information. The teachers are excellent at getting students up to speed on various topics that they may know nothing about. Unfortunately, as great as they are at doing this, you also must recognize the limitations of academia. The biggest limitation is that university and college classes aren’t great at teaching information that’s real world applicable… or more specifically, how you can apply that knowledge to real world, real life situations. Instead, the student is left to his / her own devices for how to tie course materials to every day life.
Some course materials lend themselves to real world application much more readily than others. For example, accounting classes. It’s fairly obvious that the information learned in an accounting class can be used at an accounting firm. Classes like Sociology, Psychology, Art History, History and even Geology glasses don’t always offer up real world applicable information. They’re “great to know” classes, but can’t often be used in real life. Even mathematics classes don’t always have real world applicable uses, unless you’re a video game programmer. Even then, there’s limited use cases for that information. Knowing Calculus, for example, may not be helpful in programming a video game unless you’re designing a new and better physics engine.
In most cases, however, a game developer will grab an existing game engine off of the shelf which doesn’t require a need to know that level of calculus…. because you’re using an existing pre-programmed engine, not designing a brand new one. You will need to know how to use the engine to its fullest, but that won’t require that level of mathematical understanding.
Academia does have its uses. Specifically, it helps you to get a degree. Having a degree is exceedingly helpful in obtaining a job in certain fields. Unfortunately, much of the required academic information learned at a university is lost in time… which means that the money wasn’t well spent. Certainly, you got the degree out of the deal, which is the primary reason to spend the money. However, not retaining the learned information is a loss to not only in what was learned, but to a lesser degree in the money spent in that attempt to learn. That doesn’t mean all will be lost after earning a degree.
Academia isn’t totally a waste for learned information, however. Some of the information learned can be useful in real everyday life… if you can manage to retain it. If you use some of that information on a regular basis as part of a job, then you will at least retain that information. However, keep in mind that learning information during the pursuit of your degree can become outdated years later. Even such topics as history, physics and mathematics can change as new assumptions are made, as new information is uncovered and as new technological achievements arrive. In other words, some information learned in 1995 might be outdated by 2005, just 10 years later. Indeed, computer systems will be far outdated. Learning to use, for example, the WordStar word processor was entirely outdated by the release of Windows 98 and packages like Microsoft Word. As another example, learning to use Windows 95 had become entirely outdated by 2020 with Windows 10 being the most current edition.
Even the introduction of the iPhone and the iPad have changed academia from 1995. For this reason, many professions require refresher courses every year to keep each professional informed of the latest changes in the industry. Unfortunately, too many industries don’t require such refresher courses.
Learning Everyday
The point to all of this is that critical thinking is left to the individual to both address on their own, but continue to learn, grow and expand their own knowledge and contemplation skills. Critical thinking isn’t something that you put down or use occasionally. You must use this skill every time you interact with anyone. That includes watching the news, reading a book, talking to your friends and, indeed, even interacting with your boss.
What you’ll soon learn is that everyone has an agenda. It may be as small and innocuous as attempting to sway your point of view, but it might be as big as attempting to manipulate you into doing something for them. Critical thinking is an important life skill. This can’t be emphasized enough.
You must be both willing and able to see through to a person’s real agenda. Not everyone wants something from you… at least, not something that’s tangible. Television news programs want your attention and they want to sway you to a specific point of view… a point of view that is dictated by only the information presented.
A real world example
COVID-19 comes to mind. Vaccines do have benefit when designed correctly. However, the agenda now is to push the vaccines at all costs. News programs have been pressing this point almost relentlessly… to the point of ignoring the pandemic itself. We now get 5 minute snippets of the death numbers and we get 30 or 60 minute long segments with “medical professionals” espousing how well the vaccines work… yet, how scarce they are.
We know that. We knew that when the vaccine rollout began. It’s as if the news shows each want to insult our intelligence by assuming we didn’t know that the vaccines would be scarce for months on end. Yet, instead of covering the pandemic and showing us the carnage, the news producers instead choose to show us a whole lot of nothin’ about how poorly and slowly the vaccine rollout is progressing. In fact, news programs have chosen to politicize this whole issue by blaming it on the politicians. I won’t go down into the politicization quagmire that literally has no end. Instead, let’s move on.
These news shows have chosen a one-sided approach to pandemic reporting. Instead of reporting on the actual pandemic, they are reporting on the vaccine rollout and pretending that the vaccine rollout is considered reporting news on the pandemic. Hint: it isn’t. The vaccine is but one small subset of the entire pandemic. The pandemic is about how the virus is spreading, not how well the vaccine rollout is going.
Let’s understand more. The vaccine brings hope. The pandemic brings despair. As a producer, which would you rather report on? Here’s where biased reporting comes into play. The pandemic is not just about the vaccine, it’s about how, when and why people are contracting the virus. It’s about contact tracing. It’s about timely testing. It’s about hospitals under siege. It’s about the resulting deaths. It’s about running out of medical equipment. It’s about all of these things and more…. and yes, it is also about the vaccine rollout.
When a news program chooses to ignore all else to bring the vaccine rollout front and center, that’s disingenuous reporting and it’s the very definition of biased reporting. One might even consider this kind of repetitive reporting as a kind of reporting designed to convince the viewer the vaccine is a “good thing”. This aspect requires critical thinking skills to both realize and understand. If you don’t use critical thinking skills here, you can’t know to visit other news sites to get information about the pandemic itself sans the vaccine rhetoric. Critical thinking allows you to bring all aspects into perspective.
In the last example, trying to convince someone of something by repeating it often is a recent, but definitely not new, trend. As a critical thinker, you must recognize this false strategy to understand just how misleading this trend is. Donald Trump utilized this “repeat often” strategy in an attempt to convince people that the election was rigged. Here we have news programs using this same exact strategy to sway people to the news producer’s agenda about, “pandemic bad, vaccine good”.
Let me just stop here to point out a prior Randocity article about the vaccine. Again, this is another critical thinking article. I’m not attempting to convince you of my point. Instead, I’m offering up various sides and I leave it for you to decide your own point of view. I also don’t use repetitive reporting techniques to barrage you with the same point over and over and over as a technique of persuasion. I could most certainly use this technique, but then this blog would be no better than Donald Trump or various major news networks.
With this article, I want you to rise above these petty persuasion techniques and see these things for what they are… by using critical thinking and reasoning. However, as the saying goes, “You can lead a horse to water, but you can’t make it drink.” I can lead you, but you must choose to understand. I’m not here to convince you. You must make the leap to understand for yourself.
One Last Exercise — COVID-19
Let’s critically discuss the vaccine rollout. The vaccine rollout team has chosen a very specific rollout methodology. A methodology that I have begun to question. There’s no argument that choosing to inoculate those most at risk first seems like the best strategy, but is it? Clearly, those at high risk stand to lose their lives if they become infected. However, how do those at risk become infected? The answer is most likely, by those who are much younger and healthier who bring it to them.
Reasoning this out, it seems that rolling the vaccines out to those at highest risk of carrying the virus around would make the most logical sense, regardless of age. Yes, it’s been stated the vaccines won’t necessarily prevent carrying the virus asymptomatically. Let’s examine who I propose here: children in school. Because children are dependent on adults for their well being and because children must return to school and daycare centers which congregate children into close social groups and because children are not yet capable of understanding the ramifications and risks of carrying around COVID-19, children carriers are the most likely reason those at risk could become infected.
Children congregate socially to play and learn. Because of that, they then pass COVID-19 around and bring it home to their parents. If it’s a multi-generational household with grandparents at home, then those most at risk can easily become infected. The parents can then become unknowingly infected and, for a short asymptomatic time period, carry and spread COVID-19 to work, retail businesses when shopping and others they encounter… even to social events like the year end holiday season.
Many people have presumed this next false logic about children and COVID-19: “Because children are less prone to the affects of COVID-19, this means they are less likely to spread it.” This is patently false. There is no causation between these two separate concepts. Children and adults are both human. Human to human transmission is just as likely from a child as from an adult. In fact, because children are less likely to wash hands often and less likely to cover their mouths when they sneeze or cough, transmission of COVID-19 from a child is extremely high. While the child may never get severe symptoms, that may not be true of those to whom the child has transmitted the virus. However, a child doesn’t have the life experience to understand why handwashing is important… why covering their nose and mouth to sneeze or cough is important… why it’s important to take regular baths and to wash clothing. That leaves adults at greater risk from their own child, particularly if they’ve been at school around other children.
I’ve even seen doctors on news programs implying that children can’t as easily transmit the virus to adults as justification of getting the children back into school. I get this want. I truly do. Parents can’t have their children at home 100% of the time. They need their child back in school. After all, school is really treated primarily as a form of free daycare… with the added benefit that the child might learn something. However, the misguided logic of children being unable to spread COVID-19 is patently false and will bite us all in the ass.
Children can pass COVID-19 to an adult just as easily as an adult can pass COVID-19 to a child. There is no transmissibility decrease from child to adult or adult to child for any virus, including colds, flu and, yes, COVID-19. You are just as likely to catch a virus from a child as from an adult or from anyone of any age. Anyone claiming otherwise is flat out lying to you. Human transmissibility of a virus doesn’t change simply because of the age of the human. Believing that lie could get you and your family dead.
For this reason, using this lie to justify school reopening is ripe for a resurgence of the virus… not to mention, the unnecessary loss of teaching staff life that, at this time, can’t be easily replaced. If school districts want to believe this patently false lie and reopen the schools simply to get the kids back at their desks, then don’t say you haven’t been warned.
Vaccination
If schools wish to reopen, children and teachers must be vaccinated for COVID-19. Why? Not because the vaccine won’t stop children from being carriers, but because it will reduce the amount of time they can carry COVID-19 when they get it. In fact, a child taking the vaccine may actually reduce and limit the child’s ability to transmit the virus to others. If their immune system fights off the virus quickly (in a day or two), a child’s ability to transmit is limited to a day or two at most. Because the vaccine kickstarts the immune system into action fairly quickly, a child should be able recover far, far faster from even an asymptomatic infection than an adult. Vaccination can then drastically reduce transmission from child to child in a school setting. It also drastically reduces the chances a child may transmit it to a teacher (particularly if the teachers are also inoculated) or to their parents.
For this reason, the currently flawed strategy of inoculating the eldest groups first and working downward means leaving school age children as the very last group to receive the vaccine. Again, flawed logic. Yet, parents want schools reopened now. If schools want to reopen, then everyone working in schools, including the children, must be vaccinated. There is no other choice. This means modifying the present rollout strategy to send vaccines into schools by having schools be the next group in line to receive the vaccine. Attempting to open schools without a vaccine strategy will lead to the unnecessary deaths of teachers and staff operating the schools… at which point the schools will be forced to close, not because of the virus threat, but because there’s simply no longer enough staff to operate the school system. Then, the choice to reopen schools will have been firmly shut down until such time as staff can be replaced.
Of course, no new teachers will want to hire onto school districts whose leadership so callously let their own teachers and staff die by becoming infected with COVID-19 via the children, particularly when this situation could have been entirely avoided by choosing a safer distance learning approach. In other words, the schools and school districts will have a logistical public relations nightmare on their hands should such a situation unfold. Not to mention, many, many lawsuits from teacher and school children families alike. Opening schools to 100% capacity without any mitigation strategies, such as the vaccine, is ripe for many, many more COVID-19 deaths, not just in schools. Think about the holiday season surge, but then realize it won’t end until schools end up forced closed because of loss of a critical amount of staff. It’s ultimately a no-win scenario. Believing the lie that schools are “safe environments” without offering a vaccine strategy is likely to end up with the same outcome as the year end holiday season COVID-19 death surge. Here you should use critical thinking to think through this assertion.
Reducing the Spread?
The bigger question… Is anything that we’re doing, including the vaccine rollout, actually making a dent in COVID-19’s spread? As of now, probably not. The vaccine rollout might eventually begin to take an effect, but that probably won’t happen for at least a year or longer. Even if the vaccine reduces the symptoms of COVID-19 to a manageable and survivable level, that still means that COVID-19 still has the potential to be fatal in some risk groups where the vaccine doesn’t work properly or can’t be administered. The vaccine may reduce the mortality rate in an eventual way, but we don’t yet as know how far the mortality rate may be reduced.
On the other side, we are also running against the variant clock. I really dislike the term variant and, instead, prefer the term strain. I don’t know why the news programs are using the term variant instead of strain, but here we are. The primary defined difference between a variant and a strain is its functional difference. For example, scientists believe that if a mutated virus is capable of getting past a vaccine, then it is considered a new strain. If a virus has mutated, but functionally hasn’t changed and vaccines are still equally effective, then it is a new variant. However, I’d argue that if the virus hasn’t functionally changed, it isn’t even a variant … regardless of whether its genome has mutated? In other words, variants aren’t important until they are able to get around a vaccine, in which case it’s no longer a variant, but a new strain.
The clock, however, is still ticking. That means that eventually a new strain (not variant) of COVID-19 will emerge that (almost) completely evades the current vaccines. That means vaccine manufacturers will need to rework the vaccine to include the new strain(s) or provide a booster shot that boosts the antibodies to now include the new strain(s). Though, I’d logically argue that a booster shot that intends to combat a new strain is not a booster and is instead a new vaccine unto itself. Additionally, when a new strain emerges, it likely won’t be a single strain. It will be multiple strains. Once this happens, tracking them all down to modify the vaccines can be a challenge. In other words, the vaccine efficacy is entirely dependent on how long the current strains remain unchallenged. As soon as new strains emerge, this whole situation starts all over again.
That’s an example critical thinking, not the test that began this article. The test example above doesn’t actually detect your ability to reason. It tests your ability to take tests. It’s one of the fundamental problems with academia. Until universities wake up to this fundamental disparity, they remain status quo by offering an alternative universe from reality. Universities need to wake up to the realities of the world and learn to teach real world experience. Right now, the best universities offer is book knowledge which, unfortunately, may only offer less than 20% usability in the real world. For this reason, it’s why corporations shy away from hiring recent graduates for critical business roles… which makes recent graduate employment all the more difficult. Graduates may wonder why. Well, now you have your answer. Only real world business experience offers businesses the safety net they need to know the individual understands how to operate in a corporate culture and do the assigned job to the satisfaction of the corporation leadership team.
A Final Word to College Graduates
A recent college graduate has little to no corporate experience and, thus, has no way to know how to time manage themselves or their job efforts. Time management is never taught in college. The recent grad will eventually learn this, but many businesses want new hires to hit the ground running on day one. Managers don’t want to spend hours and hours training a recent college graduate only to find them walk away from the job a year later for significantly higher pay. For training reasons, hiring managers typically hire recent graduates for significantly less pay than someone seasoned. Training is costly both in time and money, which is a significant part of the reason for the lower pay. To invest that time and money into a recent college graduate only to have them walk puts managers on edge… and makes them gun-shy to try it again. That doesn’t mean a raise won’t be forthcoming to get you up to market levels. Don’t assume you’re stuck at the pay rate where you are. However, many graduates are too impatient to wait.
I realize college graduates want higher pay on their first job, but that isn’t usual. Worse, using a new employer simply to put the company name on your resume for a year is callous and manipulative. It may also hurt your future job prospects. If as a new graduate, you commit to a job, stick with it for at least a couple years. Don’t use the company as a stepping stone for resume experience and discard them like an empty bottle. Sticking with the job increases your marketability for new jobs and increases your chances for much better pay opportunities. Walking away too soon will be frowned upon by hiring managers. Hiring managers will notice your itinerant nature is a problem… particularly if you’ve left the job in a year or less after graduation. They may even insinuate there’s a problem afoot with hiring you. Be careful with your first job as it sets the tone for all future jobs.
Again, this is critical thinking and reasoning skills at work. You must think through all aspects of the hiring processes to understand how and why what you do and how you treat your employer can help or hurt your future career. Learn to use all of your critical thinking skills to think through every situation. Critical thinking is a skill that’s difficult to master, but it is a life skill that will greatly aid you in many different ways throughout your life.
↩︎
Grahm’s Meat Cook Tips

If you’re reading this, you’re probably playing Fallout 76. This likely also means you’re playing the Meat Week event, until August 26th, 2020 (i.e., two more days left as of this post). This event runs every hour on the hour. Let’s explore.
Playing Drums and Turning Spits
A lot of people seem to think that these activities don’t matter to the event. They do. In fact, they’re very important to the event succeeding.

Both playing the drums and turning the spit do several things at once. The first important thing these activities do is to majorly slow the decrease of the Event’s progress bar by a lot. This gives those performing collection more time to complete their collection activities in larger quantities. The more people who are handling these two activities, the slower the progress bar decreases. While these activities don’t increase the progress bar by themselves, they aid in reducing the decrease. This is why these activities are important.

Further, these activities significantly contribute to the 100% success of the event (i.e., getting the best prizes from the event). If no one is playing the drums or turning the spit and everyone is running around collecting meat and greens, contributing Chally’s feed and cleaning up messes and fires, that’s not enough to get 100% event completion.
All aspects of the Meat Cook event need to be touched, including turning the spit and playing the drums in addition to all of the rest. More than this, these two activities are important to contributing to the 100% success of the event, which affords the best prizes. When I have played through this event without these activities, even when the progress bar reaches the steak, you won’t necessarily see the best prizes without these stations having been manned.
Not only do these give the best chances at the best prizes, these slow the progress bar’s decrease by allowing the collectors to collect more. Without these being manned, the progress bar decreases quite a bit faster.
Also, manning the spit 100% of the time during the event raises the chances of getting the best prizes. Keep that spit manned at all times!
Collecting
It seems that everyone prefers to run around finding and collecting greens and critter parts. It makes sense. It’s the only combat activity at this event (such that it is). I get this aspect. This activity alone can’t carry the event.
Cleaning up and Putting out Fires
This is also an important activity. Cleaning up dirty messes, putting out fires and picking up after Chally is also important. Don’t forget this activity.
Prime Meat Collection
Here’s one aspect that doesn’t seem to be that important to the event. Grahm makes it a big deal, but the best that contributing Prime Meat does is give you Scrip at the end of the event.
Chally’s Feed
You’ll learn how to create Chally’s Feed the first time you play the event. To make Chally’s Feed, you’ll need 2 Boiled Water, 2 Carrots, 3 Razorgrain, 3 Tatoes, 1 Wood. This means you’ll need to plant carrots, razorgrain and tatoes at your camp or in a workshop. You can use Green Thumb to double what you pick and Super Duper to help in duplicating more quantities when you craft. You craft this recipe on a cooking station.

Contributing Chally’s Feed to the hay pile near Chally will help you gain a better reward at the end. I don’t believe Chally’s feed contributes to the overall reward of the event, but it does give you a personal reward for feeding Chally. You can feed Chally once every minute or so as there is a cooldown timer after you deposit.
Depositing
When you’re done collecting, you’ll need to deposit your collected items into the Critter Chunks or Greens area. Don’t forget to do this.

Here’s where people make the mistake of attempting to drop what they collect in one by one. DON’T DO THIS. You need to collect as much as you can, then drop it all in at once in a large amount. The more you collect and deposit together, the larger of a deposit bonus you will see. This can move the progress bar very far, very rapidly.
This is why sometimes the bar moves from chicken leg all the way to steak with one go. It’s because people are collecting massive amounts of everything and depositing it all at once. Don’t collect and drop one by one. Do it in bulk and you’ll get a bigger deposit reward.
[Update 8/25/2020] One thing I forgot to mention about Grahm’s Meat Cook is … if 3 people are on the drums and 3 people are on the spits during the entire 2 minute countdown timer before the event begins, this can sometimes start the event just past the turkey leg icon (middle of the progress bar). This means that it only takes a tiny bit of work to complete the event. I’ve seen events that have completed in around 30 seconds if all 6 people are manning these two activities before the event begins. Apparently, these activities do contribute to the event even during the pre-event 2 minute countdown timer. I can’t tell if this is an oversight by Bethesda or intentional.
Hopefully, this helps you win this event if you’ve been having troubles. Please leave a comment below if you have questions.
↩︎


3 comments