10 signs you’re living in an echo chamber

As politics become ever more and more polarizing and divisive amongst individuals, it’s not the politics that are the problem, it’s the echo chambers that feed into misinformation and into false beliefs. Let’s explore.
Background
More and more I find people who profess openness and critical thinking skills, yet I also find it is these very people are actually holed up and living in local echo chambers, chambers that only serve to reinforce their own beliefs; but whose beliefs have no actual basis in reality or what’s actually happening in or to the world around them. It is these echo chambers which are causing the divisive nature of not only politics, but just about any other belief which can be found in the world. It seems that more and more people are choosing their personal beliefs over using their eyes, ears and most importantly, their brains.
With that said, let’s uncover the 10 signs that prove that it is YOU who may be living in an echo chamber. Before we begin, let’s define…
What is an Echo Chamber?
An echo chamber is simply a space where you tend to converse with people who also tend to believe in the same things as you and/or who are feeding you disinformation that seems as though it is genuine and truthful; but that disinformation supports your beliefs, which makes you want to believe in it. An echo chamber is designed to 1) never contest your current belief system and 2) reinforce your beliefs, supporting your way of thinking… even when your way of thinking is completely based on fantasy, not reality. Echo chambers can be filled with friends and family who converse by using a gossip-like information transmission methodology (word of mouth, texting, etc), but may extend onto social media sites like Facebook.
Basically, instead of watching news programs directly and forming your own objective opinions yourself, you, instead, rely on receiving your news mostly by using a gossip grapevine of friends and family. When you do watch the news, you turn it off as soon as anything contests your beliefs. In your mind, you believe that news channel is then biased.
An echo chamber thrives because everyone in it essentially agrees on a very specific skewed view of the world… viewing the world not actually how it is, but how everyone in the echo chamber believes that it is.
In other words, an echo chamber is, yes, a form of brainwashing.
Without further adieu, here are the 10 signs you’re living in an echo chamber…
10. You firmly believe to the point of anger that the world is one way when actual news events prove your beliefs are invalid.
This sign shows us that you have subscribed to a belief system so strongly that you simply cannot allow anyone to disrupt that belief system at all, not under any circumstances. In other words, you are fully unwilling to even entertain the possibility that your belief can be in any way proven false.
You remain so firmly entrenched in that belief, even if it can be proven to be a false belief, shows that you are not only stubborn, but also exceedingly closed-minded. You are absolutely not interested in truth. You’re interested only in others who are willing to coddle and support your beliefs. Being unwilling to entertain any outside information that disagrees with your belief system is a hallmark sign that you have succumbed to the power of an echo chamber.
9. You say that you’re open to all ideas, but you instantly shut down anyone who puts forth an idea that doesn’t support your beliefs.
Here’s a situation where when you have a discussion with someone who doesn’t believe what you believe, you then feel the need to counter their arguments with such phrases as, “Well, I’ve always seen the exact opposite.” However, instead of actually providing concrete examples to support your “exact opposite” belief statement, you delay, avoid and ignore requests to provide any details on how those “exact opposite” beliefs actually became real in your mind. In other words, your beliefs are crafted entirely on faith, not on facts.
What this typically means is that you’re listening to the (false) beliefs of others in your gossip group, instead of forming your own opinions based on witnessing world events yourself and digesting and forming your own opinions from actual world events. Listening to other’s words and trusting that those words are valid reinforces your belief system under an echo chamber.
8. You instantly counter any argument to which you disagree, then attempt to insult the person by claiming you’ve been offended by the other person’s argument.
This is both bad debate form and it also proves you’re living in an echo chamber. This situation manifests when another person (party 2) counters one of your beliefs with actual real world facts showing exactly how your belief is invalid and untrue. Instead of rationalizing and realizing the possibility that that belief is wrong, you instantly take offense to the statement and then claim that party 2 is in the wrong for insinuating that you’ve been brainwashed.
This is a circular argument that only intends to insult the second party solely to reaffirm that your own personal (false) belief is true and valid. This is strictly a manipulation tactic to get the other party to back down. Using any form of manipulation in an attempt to win your argument is not only bad debate form, it is illogical, it shows that you’re closed minded, it shows that you’re unwilling to entertain any outside ideas and it also proves that you’re living in an echo chamber.
7. You only visit social media sites that support your belief systems. More than this, you only friend accounts who also believe like you do.
This one should go without saying. However, many people may not realize that this is exactly what they are doing. When you sign up at or into Facebook or X (formerly known as Twitter) or similar, you find yourself gravitating towards those who believe like you do. This does two things at once: 1) Like minded “friends” make you feel instantly comfortable and 2) by doing this, nothing will ever challenge your beliefs (see point 1).
By not exposing yourself to counter arguments from others, you limit your view of the world to only those people who profess to believe just like you. This is the very definition of an echo chamber.
6. You state that you’re critically open minded and claim to watch all types of news programs, but you prove that you don’t do this when you’re presented with reports that invalidate your beliefs… and then you claim news media bias.
It’s easy to profess equality and critical thinking skills, but it proves more challenging for some people to actually do this. Typically, even if a person does watch many news programs, it’s very easy to discount and invalidate what any news reporter is showing you by simply claiming that news channel is biased. This rationale instantly allows you to shut off that real news spigot claiming it as “fake news” or disinformation, thus keeping your false beliefs fully intact.
Here you’ve just watched a news program that has shown you the reality of the world, yet you’ve instantly decided to completely discredit the news report, and by extension the entire news channel, simply because that news report invalidates your own personal beliefs.
Discounting ALL news reports that are fully documented with videos, clips and interviews using people who are first-hand involved, yet you STILL choose to discredit all of that simply to hold onto a (false) belief indicates you’re living in an echo chamber.
5. Using year’s past examples or potentially old and misleading information to support your beliefs. (Cherry Picking)
It’s easy to call on examples from the past, using potentially misleading or cherry picked quotes that support your beliefs. Instead of researching the full information and context surrounding any given quote or news snippet, you choose to take a quote or snippet entirely out of context or, worse, choose to cite sources of misinformation or disinformation solely to support your beliefs.
Cherry picking tiny bits of (mis or dis)information that supports your beliefs, but where the very real and full context of information doesn’t hold up your beliefs under contextual scrutiny is a sign you’re living in an echo chamber.
4. Your actions prove you’re unwilling to entertain any other points of view.
This one is pretty simple. It’s not what you say. It’s how you respond and act as actions always speak louder than words. Sincerity is easily determined not by your words, but by how you respond to argumentation. A listening party can easily determine you’re not being sincere when you make claims of being fair and open-minded, but prove that you are not by devolving arguments into nonsensical debate tactics solely in an attempt to win your arguments.
Not only does this prove you’re not sincere, it proves you’re only in it solely for the argumentation and most likely only to support your current beliefs. This is entirely a defense mechanism against outside beliefs, but it also proves that you’re living in an echo chamber.
3. Instantly discrediting legitimate news sources and news articles because “they’re biased.”
While definitely linked to number 6, this one is wholly separate. When you cannot win your belief argument because of counter facts brought up using a news article example of how the beliefs are false, you insist on attacking the news source as highly biased, non-credible, illegitimate and “fake news” strictly because they have written an article that runs counter to your beliefs.
I won’t state which person now does this frequently, but suffice it to say that he has taught others to do exactly this and that this behavior is acceptable. It isn’t. Not only does this tactic look insanely stupid, it shows us that you’re close-minded and unwilling to entertain alternative beliefs AND that you must instantly attack anyone or anything that doesn’t fit within your belief system. This one shows us you’re living in an echo chamber.
2. You find news articles on extremist and tiny “news” sites that almost no one has heard of solely to support your beliefs.
When a counter argument to your (false) belief system is given to you by the likes of The New York Times, The New York Post, USA Today or even featured on CNN, MSNBC or Fox News, you counter those articles by claiming “biased reporting”, choosing instead to locate an article on a super tiny “news” site that few have ever heard of and which receives maybe 50 views per day solely to show that your belief is valid and true.
Having to dig down into the bowels of the internet to a teeny-tiny “news” site solely to refute articles published by large news organizations, like those listed above, your actions say you’re not interested in being open minded or fair. Forget that these tiny news sites are likely mini echo chambers themselves by echoing extremist disinformation view points, many of their “news” articles are not even professionally written nor do the “reporters” even have journalism credentials. If they did, they’d be working for CNN or The New York Post.
It also says you’re willing to put your faith into a super tiny “news” site with no notable credentials over actual professional journalistic organizations whose sole goal is to produce professional news segments 24 hours and 7 days a week, employing hundreds if not thousands of degree holding journalism majors. What credentials does your tiny news site offer? Not much. What proves your cited article is even valid? Nothing.
Relying on extremely tiny, boutique news sites that few use or have heard of proves you’re trying way too hard to support your belief system and that you’re living in an echo chamber.
1. You resort to insults and name calling to support your beliefs.
Insulting someone by name calling is not only extremely bad debate form, it’s stupid, inane, insipid and sophomoric. It tells the other party that not only is your point entirely invalid, it shows us that you have no solid way to debate your beliefs using actual real facts. Further, your name calling not only tells other parties that you are NOT open-minded nor do you possess any critical thinking skills, you also don’t even know how to properly argue your stance in any legitimate way.
Because you are unable to win on actual facts, articles and information that support your beliefs, you must resort to name calling and by insulting the other party; which seems to be the modus operondi for such sophomoric behaviors when all else fails. This action is considered such a bad sporting tactic that, if you were playing in an actual professional sporting event, you’d have been suspended and required to leave the field.
By resorting to this kind of amateur action, you have proven that you have no interest in hearing any other points of view or in listening to other belief systems other than your own. Doing this one proves you are 100%, most definitely living in an echo chamber.
Conclusion
While these 10 signs are the most critical, these are not the only signs that indicate you’re living in an echo chamber. Any way that sees you to rationalize and maintain your belief system by potentially hurting others indicates you are living in an echo chamber. If you are doing any of the above, you may not personally want to believe that you’re living in an echo chamber, but you are. You can choose to continue to pull the blinders over your eyes, or you can firmly open them to the world around you.
It’s far easier to live in a world of fantasy than it is to live in a world of reality. Unfortunately, living in that fantasy world does you no favors. For example, if you vote a candidate in based solely on your false beliefs, you may be dooming yourself and, more importantly, your children and grandchildren to something they may not comprehend until years later when it’s way too late. It is on you to choose to wise up and become a responsible adult. Living in an echo chamber may feel nice right now, but it won’t prevent the chaos and decay that will born and consume us from such destructive echo chambers.
If you wish to break free from an echo chamber, it may not be easy and it definitely won’t feel comfortable. You will need to stop the arguments designed to support your beliefs. Instead, you will need to ask questions and find out why the “other side” believes the way that it does, read articles that support other beliefs and understand why those beliefs make sense. Additionally, you will need to use your eyes, ears and brain to comprehend it all. Stop the arguing and begin questioning.
As long as you’re arguing for your stance only, then you’re not open to all information out there. You must be willing to open your eyes, ears and mind to ideas and beliefs beyond your own world view. Until you are willing to do this, you will remain stuck in your comfortable, but destructive echo chamber.
Feedback Is Always Welcome
Here at Randocity, we’re always open to feedback. Please use the comment panel below to tell us what you think. If you like what we do at Randocity, please consider clicking the “Follow” button in the upper right corner when using web browser or if using the Jetpack app, click the follow button at the top of the feed.
↩︎
Tips: Cooking with an Air Fryer
 You recently got a new air fryer as a holiday gift and now you’re wondering, “What can I do with this?” Or, maybe you have one sitting on a shelf that’s been there for months? Wonder no more. Let’s explore various cooking tips for that air fryer.
What Exactly is an Air Fryer?
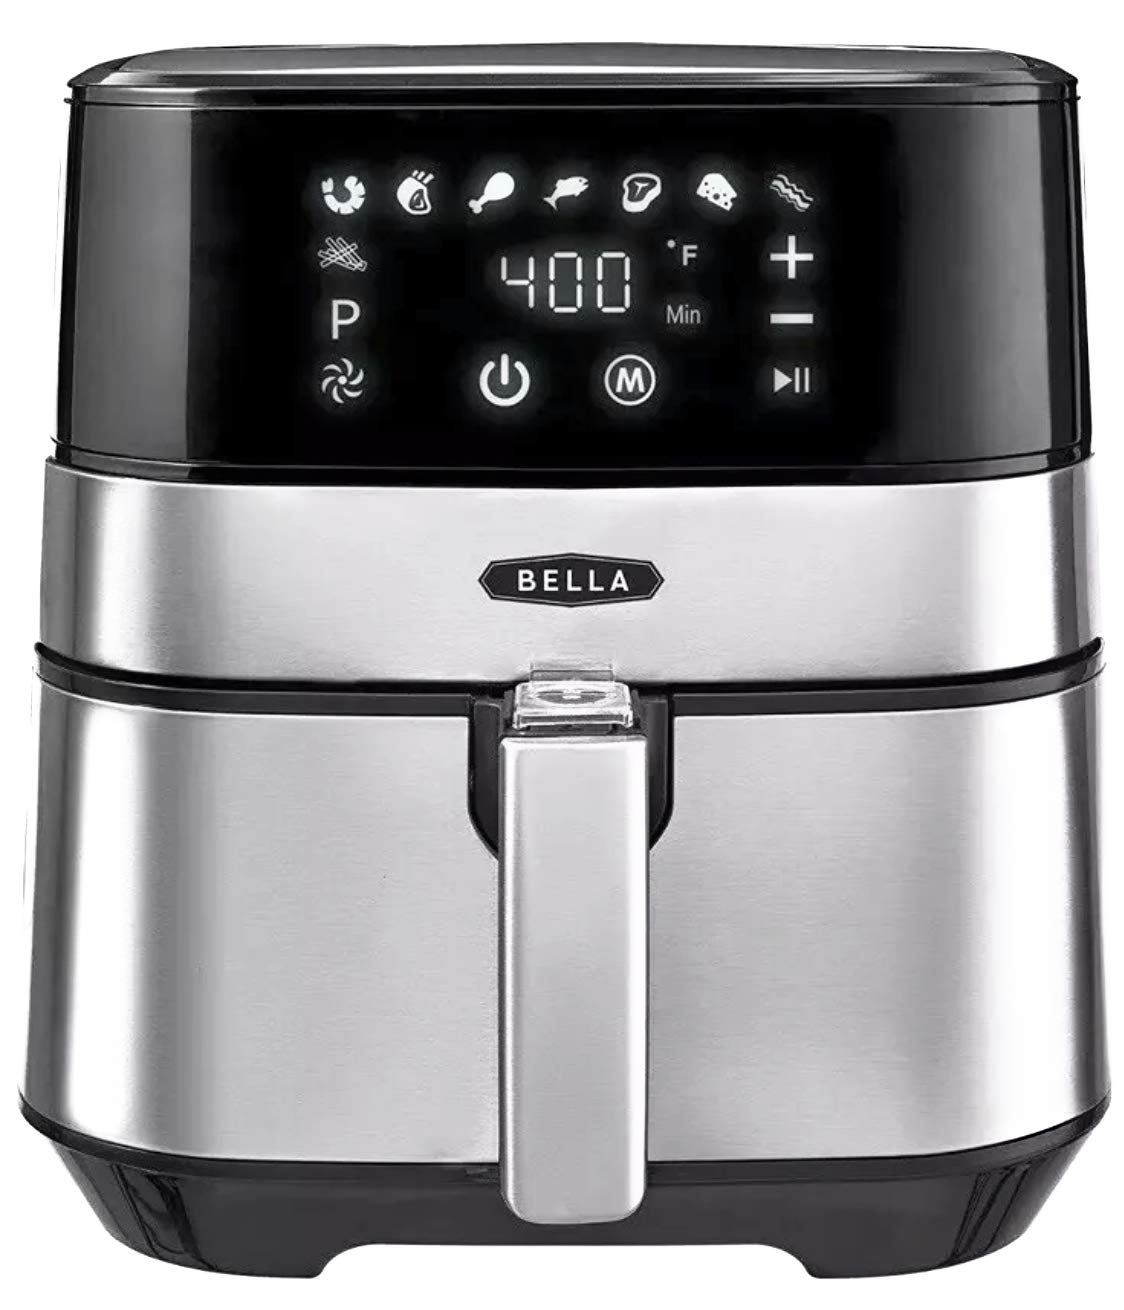
Simply put, it’s a forced air broiler. It’s like a convection oven, but the forced air is much, much stronger. Not all air fryers are necessarily the same. While many offer touch controls, some offer only simple timer knobs (see Bella air fryer just below). Some also heat from the top, while some heat from the side. All cook pretty much in the same way. How does it work?
These small cooking appliances are designed with a fan which forces high speed air through heated coils vertically down onto the food. Some may force it across the food horizontally. That’s pretty much it in a nutshell. Even though the concept is simple, the speed of it is fairly amazing for cooking. However, there are some cautions to go with that cooking speed.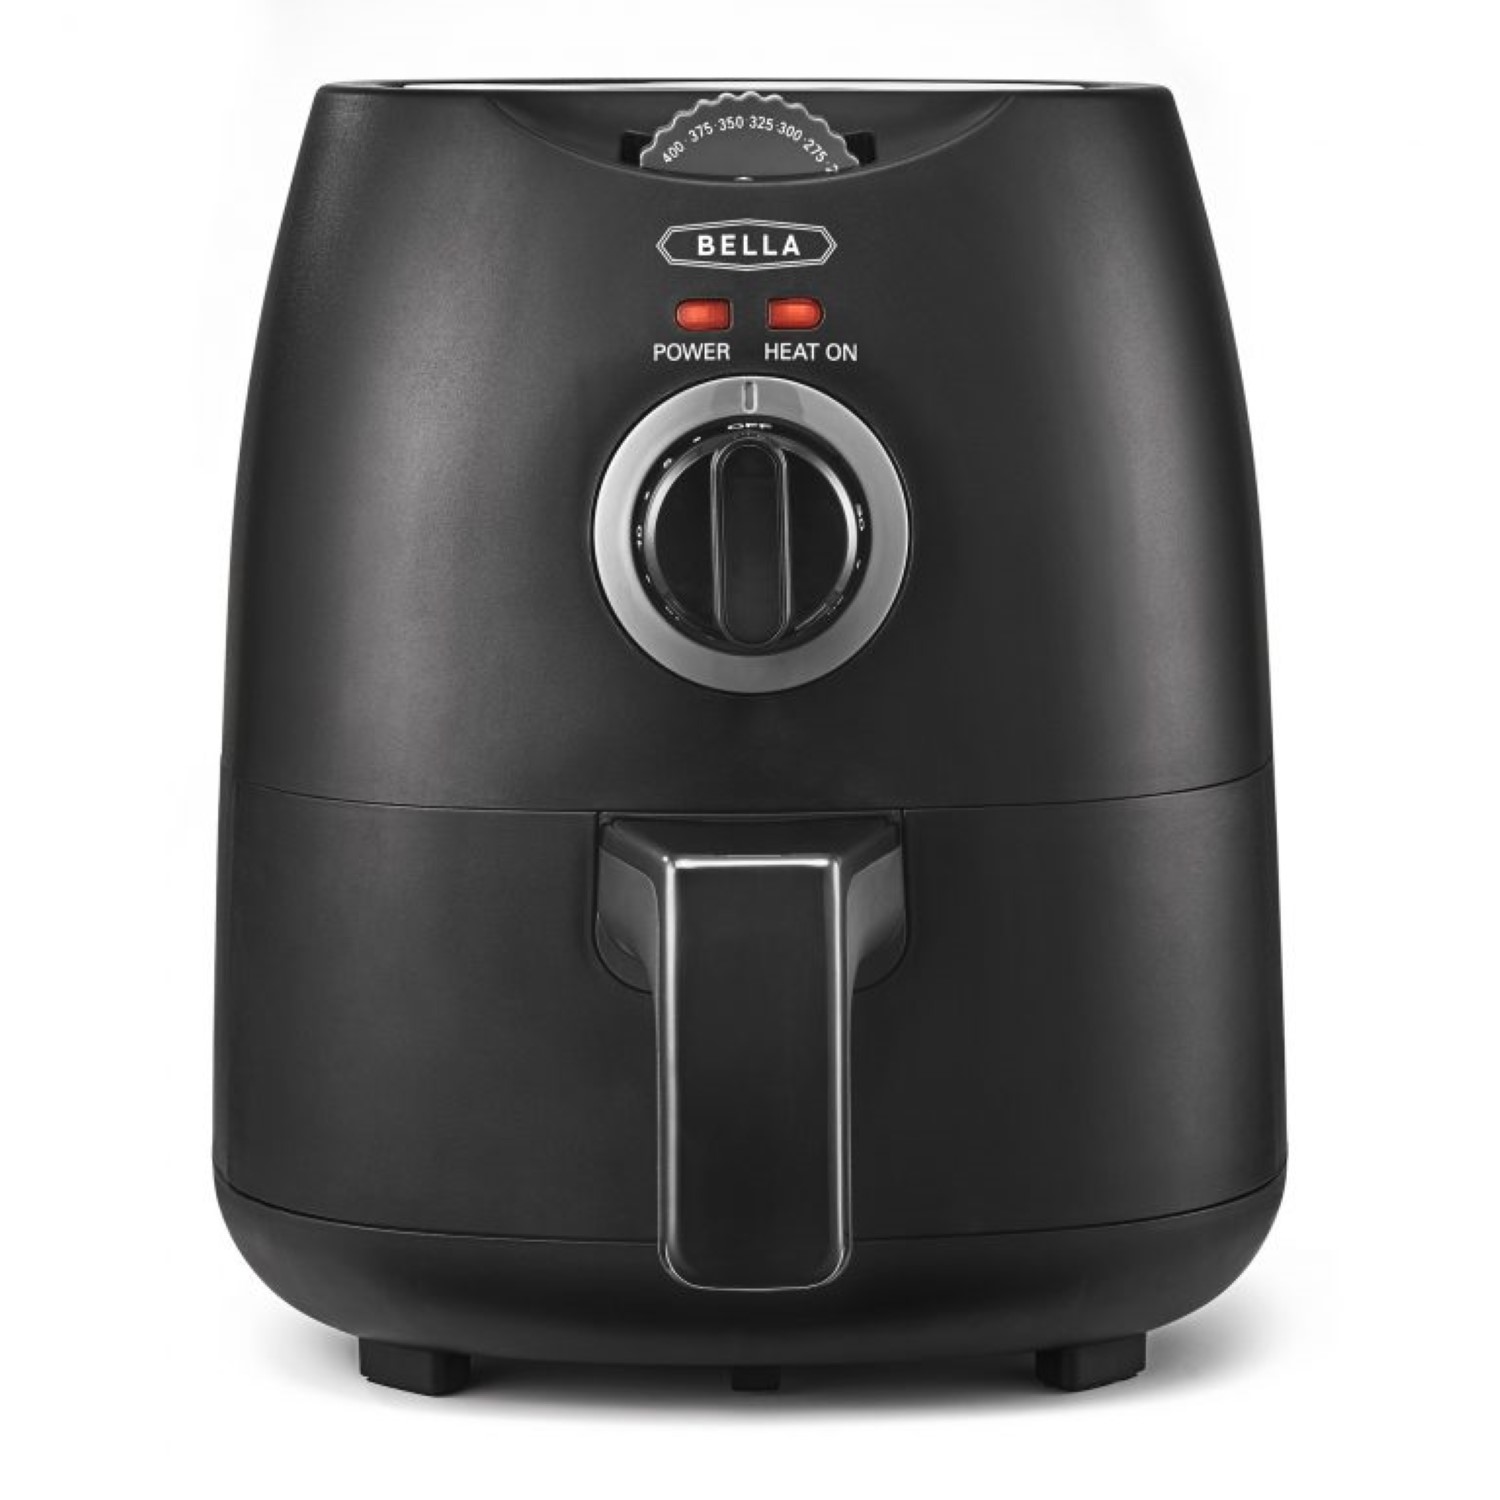
Cooking times are dramatically reduced as a result of this forced air cooking method. Because of the high speed air flow, many foods can be cooked in about the same time as using a microwave. Unlike a microwave, an air fryer makes and keeps foods crispy and brown rather than mushy or rubbery.
Here are some cautions. Because the velocity of the air fryer is quite high, an air fryer is also quite drying for all food. This can make certain foods dry out if cooking precautions aren’t taken, such as wrapping the food in foil to keep the moisture in. Wrapping with foil doesn’t allow for crisping up the food. This means you’ll want to wrap the food for long duration cooking times and then unwrap for the last 8-10 minutes at the end of the cooking time to crisp the food.
Cooking Times
Air fryer cooking times are dramatically reduced from a standard oven. It’s way faster than even a convection oven. A pizza might cook in 18 minutes in a regular oven, but may be done in 8-10 minutes in an air fryer. Speaking of…
Pizza
Cooking Pizza in an air fryer might seem natural, but it’s not. If you intend to cook pizza in an air fryer, you’ll need to know how to do it correctly or it’ll burn and get overly dry.
When cooking pizza in a conventional oven, 400ºF / 204ºC temperature is exactly that. However, in an air fryer, that same temperature is actually quite a bit hotter because of the forced air. This means you have to reduce the heat level when cooking in an air fryer by at least 50ºF / 10ºC to compensate, maybe more. Otherwise, your food will become blackened and hard.
Pizza is no exception. When cooking pizza in an air fryer, you’ll want to cook no higher than 280-300ºF / 138-149ºC and monitor it closely. Cheese easily burns in an air fryer and, yes, it’ll also burn quickly, within 6-8 minutes. Pizza can be tricky to cook in an air fryer. If you’re really wanting the best pizza, I always suggest using a real oven. For reheating pizza, an air fryer is perfect when set to 200ºF to 250ºF / 93ºC to 121ºC.
If you like and prefer a charred, blackened taste on pizza, then an air fryer is perfect for getting that result. I prefer my pizza cheese melted, a tiny bit crispy, but mostly still stringy and fresh. Getting the latter result in an air fryer requires careful lower temperature cooking.
Veggies
Vegetables can be cooked in an air fryer, but I’d suggest wrapping them in foil, adding a tablespoon of water in the foil to keep them moist and steamy. If you want more of a grilled texture to your vegetables, then steam them in foil for about 8-10 minutes, then unwrap the foil and cook for the remaining 3-5 minutes on 380-400ºF / 193-204ºC to crisp them up.
Hamburgers
A hamburger patty is easily cooked in an air fryer. However, air fryers are messy beasts and need cleaning frequently. With foods that tend to produce spatter, like beef, poultry and pork, you’ll want to be sure to clean the interior of your air fryer after cooking such foods.
Hamburger patties cook in about 8-10 minutes at 400ºF / 204ºC. Though, you’ll need to flip the food if you cook without foil. If you’re cooking in foil, there’s no need to flip as the steam will cook both sides evenly. I recommend steaming the hamburger patty for half of the cooking time, then unwrap and cook the remaining time open, being sure to flip it half way through the open cooking time.
Hamburger patties can be placed into the air fryer completely frozen and will still be cooked in that 8 to 10 minutes. Fresh, thawed hamburger patties will cook slightly faster, so check them more frequently.
Hot Dogs
You don’t really need to cook hot dogs in an air fryer. Instead, you’ll simply want to reheat them. Many air fryers offer a reheat setting. Use only the reheat setting for hot dogs. In about 5 minutes, you’ll have hot dogs cooked to perfection. For air fryers with knob settings, reheat is 6 minutes at 200-250ºF / 93-121ºC.
Choosing the air fry option, which typically runs at 400ºF / 204ºC for about 15 minutes, you’re sure to burn the hot dogs, and most anything else except french fries and other potato side dishes. If choosing the 400ºF / 204ºC option, be sure to check your food often and shake the basket about every 3-5 minutes.
Hot dogs cooked at 400ºF / 204ºC will begin to blacken within about 2-3 minutes. If you like your hot dogs blackened, then this is the option to choose. If you prefer your hot dogs warmed with a slightly crispy bite, then reheat is the choice for cooking.
Cooking Side by Side
It’s easy to cook foods side by side in an air fryer basket. For example, you can place hot dogs and fries into the basket together and have a full meal ready go to at the end of the cooking time. However, note that fries take longer to cook than hot dogs. A soon as the hot dogs are warmed, remove the dogs, then raise the temperature to cook the fries at 400ºF / 204ºC for the remainder of the time, around 6-8 minutes.
Alternatively, cook the fries until there’s about 3 minutes left, then lower the temperature to 200-250ºF / 93-121ºC to reheat the hot dogs for 5 minutes, which will also keep the fries hot.
Tortilla Chips / Dehydrating
Many air fryers offer a dehydrate setting. This cooking method cuts the fan speed down dramatically and runs at a temperature around 100-150º / 38-66ºC . This is perfect for drying foods, such as making your own baked corn tortilla chips.
For baked tortilla chips, cut fresh corn tortillas into quarters. Place the quarters flat into the basket. The chips can be overlapping without issues. I typically cut up about 4-5 tortillas and layer them on the bottom of the cooking tray. Then, set the cooking method to dehydrate for 1 hour and 30 minutes.
These chips come out quite crispy, but not the same as you can buy at the store. If you’re wanting to make nachos, it’s a reasonably quick way to make chips without running to the store.
One trick here to soften the chips a bit is to place the chips in a paper bag and let them sit overnight. The next day, the chips will have a softer crunch and be more like chips you can buy in the store.
However, don’t be fooled into thinking that air frying these tortillas at 400ºF / 204ºC will do you any favors. It won’t. The chips will blacken and taste burnt. You don’t want this for tortilla chips. If you want to heat the chips, use the dehydrate method described above to keep them crispy, yet looking and tasting like tortilla chips. You can use reheat on the chips for 1-3 minutes to warm them up, too.
Frozen Fried Foods
Here’s where the air fryer shines. For frozen foods like Totinos Pizza Rolls, corn dogs, mini tacos, taquitos or even simply fried chicken (fresh or frozen) or french fries, the air fryer setting works perfect to reheat and cook these.
All of the above foods cook using the air fry option. The air fry option typically runs 380-400ºF / 193-204ºC for about 12 minutes, shaking the basket several times while cooking to even out the cooking. No need to thaw, just place them straight into the basket frozen and 12 minutes later you’ll have piping hot and crispy foods. Some of the above foods may cook in around 8 minutes. Always begin checking your foods for doneness around 8 minutes while shaking the basket.
The air fry setting is perfect to cook fried chicken or other fried and battered foods to perfection. That’s why they call it an air fryer.
Cookies and Cakes
While it is possible to use an air fryer to bake such foods, I don’t recommend it. These baked food types don’t bake well in an air fryer. There are three reasons for this:
- The forced air ensures the top of the baked good is overcooked and dry
- The forced air will flatten cookies out and make them too flat
- The forced heat will overcook the top of cookies, but leave the underside undercooked (same for cake)
Instead, for a more even bake, I recommend using a regular or toaster oven for baking cookies, cakes and brownies. If you want your cookies a little more crispy, you can throw them into the air fryer for 1-3 minutes at around 350ºF / 177ºC after they’ve been baked in a regular oven.
Baked Pasta
If you’ve ever bought a baked personal pan pasta from Pizza Hut or any other Italian restaurant, then you may be wondering how to get that crispy cheese texture on the top of hot steaming pasta. The air fryer is perfect for making this. However, you’ll need to invest in some cooking pans that fit into your air fryer.
Up until now, I’ve not discussed the size of the baskets on an air fryer. Here’s where you’ll need to get your tape measure out and determine the dimensions of your air fryer basket. Mine is about 8″ across. With that sizing in hand, head over to Amazon and search for air fryer accessories that will fit inside your basket. It’s possible your air fryer came with small pans that fit inside of your basket. Mine did not. You’ll want to obtain either a square or round baking pan that fits inside your air fryer basket.
For baked pasta:
- Layer your cooked pasta on the bottom of a round or square pan (not in the basket directly)
- Layer mozzarella on top of the pasta
- Layer cooked pasta sauce on top of the cheese
- Place various toppings like beef, pork, veggies and pepperoni
- Top with a layer of cheese
Cook in the air fryer at 350ºF / 177ºC for about 6-8 minutes, checking for cheese browning at around the 5 minute mark.
Note that if you’re using a basket type fryer, be sure sure to buy a pan accessory kit which also includes a pan grabber. This grabber grabs hold of the lip of the pan which allows you to easily lift and extract the pan from the basket without using your hands and without spilling. Though, you can use oven mitts if you prefer… a pan grabber is much easier to prevent food spillage.
Cooking Other Foods?
There are plenty of other foods you can try cooking in an air fryer. For example, if you buy a frozen food from the store and there are not air fryer cooking instructions on the package, subtract 50% of the cooking time from regular oven cooking and that is usually what’s needed for an air fryer. You may also want to reduce the cooking temperature by at least 30-50ºF / 8-20ºC to avoid overcooking or burning.
As I said above, if it’s cookies, cakes or other baked goods, you should opt for baking in a regular or toaster oven. Even such foods as pot pies or sweet pies may cook better in a conventional oven. Some foods are easy to over bake in an air fryer.
When cooking meats, many cooks want to save the drippings to make gravy. If you’re wanting to make gravy, don’t use an air fryer. Air fryers force evaporate almost all liquids produced by foods. This means, no gravy. If you’re wanting to make gravy, then you’ll want to braise your chicken, pork and beef in a regular oven to retain those juices. Don’t use an air fryer.
If you don’t care about gravy, then cooking your food in an air fryer is an option. Just don’t be fooled into thinking you can make gravy from cooking meats in an air fryer. It doesn’t work.
Pre-heating an Air Fryer
Some air fryers have a preheat setting. However, it’s really unnecessary. You can throw your food straight into the basket and begin the cooking instantly. It might add 1 extra minute to the cook time, but it’s faster than waiting 2 minutes for a preheat. To be fair, it only takes about 1 minute for an air fryer to preheat… which is why it’s mostly unnecessary to preheat your air fryer unless you want the grill surface to be hot so it will add grill marks to your food.
Basket vs Trays vs Cleaning
Some air fryers are more like toaster ovens with trays. If you have this kind of air fryer, you’ll need to use an oven mitt to pull out the trays to shake them. If you have the basket type fryer with a handle, these are more convenient because the handle stays completely cool on the basket. I recommend the basket variety because it’s much easier to clean and the handle remains cool.
If you have the basket variety of air fryer, there are lots of “keep it clean” options, including basket inserts made of paper, parchment and even silicone. These inserts allow for cooking and removal to keep your basket clean. There are also pans, as mentioned above, which can be used to help bake foods while keeping the interior clean.
Still, spatter from foods can get into the heating elements and surrounding areas. You’ll need to periodically wipe and clean the interior of the air fryer after it has completely cooled. You may need to use a little Easy Off oven cleaner to fully clean this spatter. Be sure to clean your basket every so often to make sure you’ve cleaned off food smells from previous uses.
 Final note. Some air fryer images show a basket filled to capacity, like this Ninja to the left. Don’t do this. The maximum you should ever fill your basket is about half to 3/4 full. Never fill your basket entirely to the top with food. The reason? The top most food is too close to the heating element and will burn. You want to keep your food far enough away from that heating element to keep it from burning. Such images are strictly for marketing purposes, not for functionality. Do not replicate these marketing images when cooking.
Happy Air Frying!
↩︎
Is it safe to drink soda left in a hot car?
This question seems like it should have a simple answer. However, the answer is more complicated than it would seem. Let’s explore.
Canned Soft Drinks and Beverages
Canned sodas are hermetically sealed and are bottled with bacteria free water. This means that high heat won’t grow anything undue. However, sodas have flavorings, artificial and sometimes natural colors and sugar or artificial sweeteners. Depending on these ingredients, sodas can deteriorate if left in hot conditions.
Canned sodas are “bottled” (or canned) in aluminum cans. While aluminum is heat safe, think about the aluminum foil you use to bake with, there is no problem with the aluminum itself. In fact, because the drink is fully sealed and not exposed to UV light, this method of storage with heat probably offers your best chances of retaining a drinkable beverage even after being exposed to excessive heat. If the aluminum were the only problem, this section would be over.
However, we must also consider the ingredients. The good news here is that artificial and natural colors are generally heat stable. Again, think about baking with food coloring. Colors don’t degrade under 350ºF / 176.7ºC baking temperatures, which is far higher than the heat your car interior should ever reach.
The same goes for soda flavorings. Most flavorings are designed for baking purposes which also reach high temperatures needed for baking.
What’s ingredients are left?
Sweeteners and preservatives. Depending on the sweetener, it might or might not be high heat stable. For example, it is known that Aspartame (aka NutraSweet) is not high heat stable. As temperatures increase, Aspartame begins to break down into components such as methanol. Keep in mind that Aspartame is made up of 10% methanol, 40% aspartic acid, and 50% phenylalanine.
Methanol is a highly toxic substance that, when heated above 86 degrees F (as it is in your body), is metabolized into formaldehyde (embalming fluid) and formic acid (the poison in fire ants).
https://www.downtoearth.org/articles/2009-03/13/aspartame-potential-risk-lurking-your-cabinets
As the above quote states, at 86ºF / 30ºC is when methanol begins to break down into formaldehyde and formic acid. This temperature is well lower than the temperatures which can be reached inside of a hot car. During a hot summer day, temperatures in a car can reach temperatures 20-30ºF / 5-10ºC hotter than the outdoor temperature. For example, a 90ºF / 32ºC ambient outdoor temperature can see temperatures rise to between 110ºF-120ºF / 43.3ºC-48.9ºC inside of a car.
If a beverage you’ve left in the vehicle contains Aspartame, it may not be safe to drink if the can has reached these high temperatures. For canned drinks, it takes between 30 minutes up to 1 hour to heat a can up to these high temperatures once in a vehicle.
Beverages that contain other sweeteners, such as saccharine, sugar, stevia or agave, are considered heat safe sweeteners. Sucralose (aka Splenda) claims to be heat safe, but may or may not be. If a drink contains Sucralose, you might want to taste it first. If the drink is no longer as sweet as you expect, a portion of the sweetener may have broken down in the heat and it’s not recommended to drink.
Bottled Drinks
There are two different types of bottles: glass and plastic.

Glass
Glass bottles are safe to drink so long as it contains heat safe ingredients. However, if the bottles have been exposed to UV by sitting in direct sunlight, some of the coloring might have faded and flavors may have changed. I’d be cautious if the bottle has been sitting around for hours in sunlight. I’d strongly suggest a smell and taste for any bottle which has been sitting in UV light for longer than 1 hour. If the bottle has been sitting for an hour, then it shouldn’t be problem. Always use the nose and taste test to determine suitability for drinking. If it doesn’t taste right, spit it out, then toss it out.
Plastic
Plastic bottles are different beast. Plastic bottles can leach plastic and chemicals into the beverage after sitting in a hot car. This goes for water bottles and flavored beverages. If your beverage has been sitting for hours in direct sunlight in a super hot car, toss it out. Don’t risk it. It doesn’t matter if the ingredients are heat safe. It’s the plastic leaching that becomes the problem with plastic bottles.
Wine, Beer and Spirits
Wine is a drink that is best kept at room temperature (i.e., at or below 78ºF / 25.6ºC). If wine bottles are exposed to higher heat, such as 85ºF / 29.4ºC or hotter, the bottle of wine can be ruined. By ruined, the flavors change, the subtle aromas are lost and the bottle may increase tannins, making the wine unpalatable. The longer the wine remains at a high temp, the more the wine may turn into a flavor resembling vinegar. If you open a bottle and it tastes of vinegar, the bottle is bad. This goes for all wines including white, red, rose and bubbly.
Beer, like wine, will also sour and go bad when stored above room temperature for long periods. Unlike wine, beer is carbonated. This goes for sparkling wine and Champagne as well.
If you’re paying a lot for your wine or beer, you want to keep it in your car near an air conditioning vent, then remove from the car as soon as you arrive home. If it’s an especially hot day and you need to do a lot of running around, I’d suggest bringing a cooler with you and placing these into a cooler with ice. That, or shop for these items last.

Spirits, such as Tequila, Vodka and even Liqueurs can go bad in high heat. This is especially true for liqueurs like Bailey’s Irish Cream, which does contains dairy cream. Anything containing dairy should always be stored refrigerated once opened. However, Bailey’s Irish Cream remains shelf stable if unopened and is stored under room temperature conditions.
Changing Flavors
Regardless of whether a drink contains high-heat safe ingredients, sitting in super hot conditions or subject to UV exposure for long periods isn’t good for any food or drink. If you accidentally leave a case of soda cans in your car for three days or longer, I’d suggest tasting one first. By tasting, I mean just that. Taste and spit. If it tastes at all funny, then the cans are bad.
When buying drinks, it is suggested to take them into an air conditioned climate as soon as possible. Sure, you can run around for a little while shopping, but be cautious for how long. If you know you plan to shop the entire day for hours, then plan to bring a cooler and place beverages and food items into the cooler to keep them stored properly and safely.
Explosions
Carbonated beverages have one other problem with high heat. As more and more manufacturers reduce costs, they tend to make their product containers (cans and bottles) as thin as possible. These containers are safe when stored in appropriate conditions. However, under high heat conditions, these containers can weaken and burst.
As high heat creeps in, this weakens a plastic bottle or can, which can lead to an explosion. Safety is a concern when buying a case of cans or plastic bottles and choosing to leave then in a hot car. Glass bottles should be safer in regards to exploding, but the beverage itself may not survive high heat conditions.
Summer Safety Tips

Always store cans and bottles in a cooler, if at all possible. If you know you plan shopping at a number of stores, plan to bring a cooler with ice. This way, you can store cans and bottles in the cooler while remaining out and about. As our summers seem to be getting hotter and hotter each year, carrying around a cooler becomes ever more important.
If you’re buying expensive beer, wine and spirits, then you definitely want a cooler. There’s no danger in storing wine at ice temperatures for a short time, but there is definitely a danger from wine becoming too hot. Same for beer and spirits. For soda or bottled water, it’s fine to remain in the car for a 20 minute drive home, but if it needs to remain in the car for hours, then you’ll want plan a cooler for these as well.
As we move into the hotter days of summer, plan to spend for and use a decent cooler for those days when you need to be out and about for longer than a few hours.
↩︎
Grahm’s Meat Cook Tips

If you’re reading this, you’re probably playing Fallout 76. This likely also means you’re playing the Meat Week event, until August 26th, 2020 (i.e., two more days left as of this post). This event runs every hour on the hour. Let’s explore.
Playing Drums and Turning Spits
A lot of people seem to think that these activities don’t matter to the event. They do. In fact, they’re very important to the event succeeding.

Both playing the drums and turning the spit do several things at once. The first important thing these activities do is to majorly slow the decrease of the Event’s progress bar by a lot. This gives those performing collection more time to complete their collection activities in larger quantities. The more people who are handling these two activities, the slower the progress bar decreases. While these activities don’t increase the progress bar by themselves, they aid in reducing the decrease. This is why these activities are important.

Further, these activities significantly contribute to the 100% success of the event (i.e., getting the best prizes from the event). If no one is playing the drums or turning the spit and everyone is running around collecting meat and greens, contributing Chally’s feed and cleaning up messes and fires, that’s not enough to get 100% event completion.
All aspects of the Meat Cook event need to be touched, including turning the spit and playing the drums in addition to all of the rest. More than this, these two activities are important to contributing to the 100% success of the event, which affords the best prizes. When I have played through this event without these activities, even when the progress bar reaches the steak, you won’t necessarily see the best prizes without these stations having been manned.
Not only do these give the best chances at the best prizes, these slow the progress bar’s decrease by allowing the collectors to collect more. Without these being manned, the progress bar decreases quite a bit faster.
Also, manning the spit 100% of the time during the event raises the chances of getting the best prizes. Keep that spit manned at all times!
Collecting
It seems that everyone prefers to run around finding and collecting greens and critter parts. It makes sense. It’s the only combat activity at this event (such that it is). I get this aspect. This activity alone can’t carry the event.
Cleaning up and Putting out Fires
This is also an important activity. Cleaning up dirty messes, putting out fires and picking up after Chally is also important. Don’t forget this activity.
Prime Meat Collection
Here’s one aspect that doesn’t seem to be that important to the event. Grahm makes it a big deal, but the best that contributing Prime Meat does is give you Scrip at the end of the event.
Chally’s Feed
You’ll learn how to create Chally’s Feed the first time you play the event. To make Chally’s Feed, you’ll need 2 Boiled Water, 2 Carrots, 3 Razorgrain, 3 Tatoes, 1 Wood. This means you’ll need to plant carrots, razorgrain and tatoes at your camp or in a workshop. You can use Green Thumb to double what you pick and Super Duper to help in duplicating more quantities when you craft. You craft this recipe on a cooking station.

Contributing Chally’s Feed to the hay pile near Chally will help you gain a better reward at the end. I don’t believe Chally’s feed contributes to the overall reward of the event, but it does give you a personal reward for feeding Chally. You can feed Chally once every minute or so as there is a cooldown timer after you deposit.
Depositing
When you’re done collecting, you’ll need to deposit your collected items into the Critter Chunks or Greens area. Don’t forget to do this.

Here’s where people make the mistake of attempting to drop what they collect in one by one. DON’T DO THIS. You need to collect as much as you can, then drop it all in at once in a large amount. The more you collect and deposit together, the larger of a deposit bonus you will see. This can move the progress bar very far, very rapidly.
This is why sometimes the bar moves from chicken leg all the way to steak with one go. It’s because people are collecting massive amounts of everything and depositing it all at once. Don’t collect and drop one by one. Do it in bulk and you’ll get a bigger deposit reward.
[Update 8/25/2020] One thing I forgot to mention about Grahm’s Meat Cook is … if 3 people are on the drums and 3 people are on the spits during the entire 2 minute countdown timer before the event begins, this can sometimes start the event just past the turkey leg icon (middle of the progress bar). This means that it only takes a tiny bit of work to complete the event. I’ve seen events that have completed in around 30 seconds if all 6 people are manning these two activities before the event begins. Apparently, these activities do contribute to the event even during the pre-event 2 minute countdown timer. I can’t tell if this is an oversight by Bethesda or intentional.
Hopefully, this helps you win this event if you’ve been having troubles. Please leave a comment below if you have questions.
↩︎
Getting the most out of Black Friday
 Black Friday is a quagmire of sales prices across many stores both online and brick and mortar. It can be difficult, if not impossible to navigate your way to the best deal on any specific item. Let’s explore how to find your best deals during Black Friday.
Focus on Specific Products
While you can run to Target or Walmart or Kohl’s looking for random deals, and sometimes this can be great fun just to “see what’s out there”, if you’re looking for the best deal on a specific item, make a list of items you want. Let’s start with the elephant in the room, Electronics.
Electronics Deals
Clearly, electronics or technology items are the biggest sellers in any store during Black Friday. These include the immense flatscreen TVs, earbuds, cell phones, game consoles and even video games themselves. In fact, so many of these deals are really about splitting hairs… and here is where your best deals come.
So, what is it that’s important to you? Do you want instant savings today, this very moment or can you be satisfied with savings on a future order? Here’s where the nuances come into play.
Black Friday deals are no longer about the door buster 50% off deals. Now, many stores throw in store gift cards and additional store coupons to sweeten the deal. Ultimately, it’s not simply just getting a great percentage off, it’s about getting the most savings you can get… so take advantage. Let’s start with Target as an example.
Target’s Deals and Reward Cards
Target is a company that is out to offer savings in many different and subtle ways. If you have a Red Card (credit or debit) store loyalty card with Target, Target will automatically give you 5% off of your total purchase 365 days a year. That’s an amazing savings every single day. Better, this savings stacks with all sales deals which offers you even more savings. This is particularly useful during Black Friday. So, whip out that Red Card and take advantage. Granted, if you’re using a Cash Back or Rewards card, here’s where these savings can get murky.
Unfortunately, you can’t double dip between the Target Red Card and using a Cash Back credit card, so you’ll have to take your pick: 5% discount using Target’s Red Card or ~%1 Cash Back using your credit card. For me, it’s a no brainer, 5% is a better deal. If you really want that cash, go for it. And then there are reward credit cards…
Reward credit cards offer rewards instead of cash back. Here’s where things get a bit more murky. If you’re using a Delta credit card to get miles and you fly a lot, those miles might make a huge difference. This is where you need to decide what’s important to YOU. In the case of flying frequently, miles may be way more important to you than a 5% instant discount using the Red Card. So, choose your rewards carefully when shopping. Of course, when you’re shopping at many stores, you can pick and choose which payment method to use, so you can spread the rewards across many cards if that’s your best option. You will want to examine all rewards systems you have and what’s most important to you during your Black Friday shopping.
When visiting a store that doesn’t offer a discount or reward program (such as Walmart), you’ll want to use any reward cards you have in your wallet. For example, Walmart, while they do offer a wallet pay system, does not offer any rewards for using their wallet. Walmart assumes that their in-store savings should be enough and so they do not offer a loyalty program. Walmart, however, assumes wrong as their prices are typically no better than other discounters who do offer discount systems and loyalty programs, such as Target.
Read Coupon Terms Carefully
Some stores offer in-store savings, coupons and instant rebates. But, read those terms carefully. Many items are not included in the savings even though it appears they should be discounted. Retailers have obligations to their suppliers, such as Apple, Samsung, Haggar and Hanes. Always read the terms of discount coupons carefully as it might not apply to that thing you’re looking to buy.
For example, many discount coupons given almost never apply towards gift cards. They may not even apply towards Apple, LG or Samsung products. You might find that the only things you can buy in the store with added discount coupons is the in-store brand. Be cautious when a store offers you a 20% off coupon good on your next order. It may not be as great a deal as you think… unless you’re willing to make concessions.
Even instant savings coupons found by scanning an item’s barcode in the store can have important limitations. For example, Target’s Circle program (formerly Cartwheel) typically limits the discount to 4 of the item. However, you’ll want to read the Circle small print terms. In those terms it will tell you exactly how many items you can buy discounted… sometimes it may even be just one. You can buy more discounted, but you’ll have to separate the items out across several separate orders at the check-out lane. It might be easier to do multiple orders at self-checkout than when using a staffed register… particularly if you have 3, 4 or more different orders. Target doesn’t limit how many times you can apply a Circle coupon on separate orders… but they do limit how many discounts it will apply on a single order. Don’t bother trying to argue this issue with the Customer Service desk. They’ll look at you like you’re crazy. If you want to buy a large number of items discounted via Circle, be prepared to separate them out into multiple orders at the checkout lane.
Membership Discounts / Loyalty Programs
Target is a store that not only offers sales and instant in-store discounts, it also has a discount program / loyalty program called Target Circle (formerly known as Cartwheel). Circle offers additional savings on in-store items, though items chosen for discounts are almost always Target’s House Brands, such as Up & Up and Market Pantry. It’s rare that Target Circle discounts apply to major brands, but it can happen occasionally. However, they will occasionally apply to soft goods major brands, such as Hanes or Jockey, but more often than not it will apply Target’s house brand, Merona.
If you’re happy using Target’s house brand items, you can rack up fairly substantial savings towards these items. Savings such as 5% Red Card + 20% Circle + 20% Promotional savings coupons. That’s a whopping 45% savings off of whatever price is listed. If it’s also on sale, then that’s likely an additional up to 50% savings. You won’t get the item for free, obviously, but you can reduce the price by up to 80% just by stacking. This stacking almost never applies to major name brands. The best you can do here is typically 5% Red Card + any in-store applicable discounts (perhaps up to 15% off). Don’t expect to run over to Electronics to get that 80% discount, but sometimes it can happen.
I picked up a Vizio 55″ 4K TV for $768 at a time when the full price was around $1200 in-store. That was a mid-summer price, too. It was not during the holidays. This stacked Red Card savings, an in-store electronics coupon and a sale price. All three stacked to give me a whopping $432 instant discount or a 36% discount. Today, a similar TV might sell for $500-600 which is still not far off the discounted price I paid several years ago. With Target, you don’t necessarily have to get your best deals during Black Friday, but it certainly doesn’t hurt.
Free Gift Cards and their Benefits
Another promotional system is offering free gift cards of a certain amount for specific purchases. Here’s where you can get a great deal, if you’re cautious and you are willing to invest in the cost of whatever items are needed to get that card.
For example, Target offers a Black Friday deal that will give you a $400 gift card for the purchase and activation of a modern Samsung Galaxy Note 10+ smart phone. If you’re in the market to buy this specific item, then you can certainly take advantage of this deal. However, be cautious. There are a lot of terms and expenses in buying a smart phone and in being under contract with a carrier. Those terms have fees attached. Fees that you may need to pay for up to 2 years. Even though Target may be willing to hand you a $400 gift card to spend at Target, you may end up spending $5000 over the term of that 2 years. $400 isn’t that great of a deal considering you can only use it at Target and not towards paying down that expensive phone you just purchased.
However, a $400 gift card could be useful towards accessories such as a case, extra charging cables, better earbuds and so on. This is where value to you becomes important. If you’re willing to live with the terms of a new phone contract, then that $400 could come in extra handy during your next shopping trip at Target. And yes, you can use that gift card towards anything in Target (yes, even Apple products).
Gift cards are ways for stores to allow for discounts without restrictions. Looking for deals that offer you gift cards is better than looking for percent off coupons… so long as you’re okay shopping at that specific store. However, I have found that by and large, there are very few deals in Target that offer gift cards for purchase. When they do exist, it’s usually tied to a large purchase, such as a tablet, smart phone, expensive large screens or bulk sized household cleaning supplies (mega size toilet paper rolls, bulk paper towels, monstrous jugs of detergent, etc). Usually, you’ll need to spend at least $30-45 to get a $10 Gift Card.
The downside, however, of buying these items is that if you need to return an item for refund. The store will deduct a portion of the gift card amount from your refund. In fact, some stores may require you to return the gift card in full along with any items in the bundle before they will allow a refund. You’ll need to talk to the customer service desk for details. While the free gift cards are great for purchases you intend to keep, returns can become a problem. Be cautious with these if you have a tendency to frequently return items.
Importance of the Above on Black Friday
Why is all of the above important during Black Friday? It’s important because these are the nuances of the savings you’ll run into. When you go download a cost savings app, these apps are likely not taking into account these above nuances, such as in-store loyalty programs, membership discount programs and so on.
Apps that compare prices between stores are likely comparing discounts without any added loyalty programs. This means that the price comparisons won’t show you any additional discounts which may apply to you.
This means you could be lulled into thinking that Walmart has the best deal on that TV when Target is actually offering you a 5% Red Card discount, a 10% Circle discount and a $40 Gift Card (assuming you buy something else with it). These are the kinds of added savings that you can get by shopping at Target.
If you don’t or can’t shop at Target regularly, then these added discounts may not apply to you or may not be convenient. However, if Target is a store you frequent regularly, then this deal is likely much better than Walmart’s deal.
Price for Price, however, Walmart’s deal may look better on paper. Now, let’s talk about Black Friday products.
Electronics Brands
To pull off Black Friday, Walmart, Target, Kohl’s, Macy’s and even Amazon, swing deals months in advance for specific products to sell on Black Friday. These deals were likely swung early in the year to give the manufacturer plenty of time to manufacture the quantities needed for as many stores as these chains have.
What does that mean for the product itself? It means that these products can be exclusive to Black Friday only. How is that a bad thing? Well, many of these TV brands are lesser known or off-brands (i.e., Westinghouse) trying to their name back into the good graces of the public. This means they’re willing to swing deals with Target and Walmart for Black Friday. They’re willing to sell a 65″ LCD TV for $350 (plus discounts and promotions). It also means these specific product models are likely only made and sold during Black Friday. They are not sold throughout the year. You should ask the store if a Black Friday electronic deal is specific to Black Friday. You don’t want to get saddled with a lemon.
It doesn’t necessarily mean the quality is bad, but it could mean that because it’s not a normally stocked brand / model throughout the year, the quality of the product is unknown. Thus, buying these Black Friday deals could lead you into a product purchase that might break 1, 2 or 3 months down the road. When buying Black Friday electronics, be sure to ask lots of questions and if you purchase, buy an extended return policy / service plan to go with it (when applicable). You just don’t know what kind of quality you are buying when you buy an “exclusive” Black Friday deal. Always be cautious.
This also brings up another point that is related…
Apple, Last Gen Models and Black Friday
Apple is a brand that heavily relies on last gen sales to continue its business forward. However, this situation muddies the water when it comes to Black Friday. Because Apple’s products (and packaging) mostly look alike, it’s difficult to tell an old product apart from its current generation brethren. Be cautious when buying Apple products on Black Friday for this very reason.
The current generation may be the sixth generation, but Target or Walmart are actually ‘clearancing’ out the third generation under the guise of Black Friday. Here’s where the deal is too good to be true.
This situation isn’t exactly deceptive or fraudulent by the retailer, but it definitely skirts that thin grey line towards shady. While an ad might say “Third Generation”, it might not. Even then, the ad DOESN’T tell you which model is the current model. You have no idea if “Third Generation” is the latest unless you keep up on Apple products. The use of this ad nomenclature is shady at best. They tell you its a third gen model, but what they don’t tell you is how many models old it is. If it’s a third gen model and the current is the sixth gen, then that product was manufactured at least 4-5 years ago. It also means that Apple will likely stop supporting it in about 1 or 2 years. You don’t want to buy into a product that has about 1 year left before it becomes obsolete.
Don’t kid yourself, once a product becomes obsolete in the Apple universe, it turns to crap. Apps stop working, apps stop being updated, memory problems begin and the overall device degrades into a potentially useless mess. Don’t buy products that are about to be obsolete, particularly not Apple products.
No matter how great that deal appears to be, no matter how pristine that Apple box appears, no matter what other discounts the retailer throws at you, don’t buy 4-5 year old (or older) Apple, Samsung or any other computer product. Anything that’s about 1 year from being obsolete is worth, at most about $50-100 no matter what it is. If Target or Walmart is selling it on Black Friday for $350, it’s a rip-off! Do your homework and find out 1) what generation is current and 2) what generation is being sold and 3) when that generation was made. Don’t buy old generations of computer products. Just don’t do it. The manufacturer won’t continue to support those products forever.
Smart TVs
If you rely on your Smart TV’s apps to feed you with content, be careful of these also. App developers have already begun dumping apps on lesser brand smart TVs. For example, Netflix and Amazon has stopped producing its app on some brands of smart TVs, particularly older TVs. If you want to watch content on your smart TV, don’t rely on the TV’s built-in apps. Instead, pick an HDMI smart device to plug in. Treat your Smart TV as dumb by ignoring the built-in apps and simply plug in content devices to your TV. Some popular devices are Apple TV, Google Chromecast, Roku and Amazon’s Fire Stick. You can easily replace these low cost devices and get updated apps via these dongles simply by upgrading to the latest.
The Smart TV, on the other hand, is a fad that seems to be fading. Name brand TVs such as Samsung and Sony may be in the App game for the long haul, but lesser brands like Vizio apparently are not. Even then, there is no guarantee that any developer will continue to develop for bigger TV brands like Sony, LG or Samsung. Instead, relay on small plug-in HDMI devices to give you access to your favorite “channels”. You can even find these devices on Black Friday deals for super cheap prices.
Movies and Music Content
The one place where you can get some of your BEST savings deals is on disc based movies and video games. Here’s where $59 priced games can be as low as $20. Here’s also where some of the latest Blu-Ray and UltraHD 4K movies can be had for as low as $6-15. Picking up UltraHD 4K movies for $15? That’s a great deal you’re not going to find at any other time of the year. These deals are great no matter where you find them… whether at Target, Walmart or on Amazon. This kind of content is a winner no matter when or where. I always recommend shopping through movie and music content because Black Friday is a time that offers the steepest discounts of any other time of the year. This is the best time to pick up some of the top blockbuster films for low, low prices. For example, Spiderman, Shazam and Aquaman UltraHD Blu-rays are all priced at $15 at Target in 2019. Normally, these cost around $29-35 per disc. Still, that’s costly for a film at $15 when you can rent them for $2 at RedBox or see them on Netflix at some point, but UltraHD Blu-ray 4K discs at $15 are practically a steal of a deal. Take advantage if you have the disposable income.
Gift Cards and iTunes
Don’t just focus on physical items when you’re shopping. Some retailers will discount gift cards, like iTunes cards, XBox Live or PS4 PlayStation Plus subscriptions. You can then get a decent discount when purchasing one or more cards. For example, Target usually puts iTunes gift cards on a discount every year on Black Friday. For the last two years, they have offered a buy-one-get-one-30%-off deal. This means that $100 in iTunes credit (two $50 cards) will cost you $85. If you’re subscribing to Apple Music at $99 a year, for example, this means you’re only paying $85 for that $100 in credit which you can apply to your Apple Music subscription. Yet more savings simply to use a well established music service. You’ll never get a discount like this from Apple directly. But, when buying iTunes gift cards, that $100 credit spends like all $100 credit… and can be used towards your subscriptions. In fact, Apple has no idea that you bought the cards for $85 versus $100.
Black Friday Savings
Ultimately, to get your best deals, you need to look at ALL of the offers a store is giving. You’ll need a sale paper for that. Don’t just look at the price at its face value. You may find stores are willing to give you much steeper discounts by using loyalty programs, gift cards and coupons for later use. Stores can sometimes even couple items together as a bundle and get deeper savings for both items than you can get by buying them separately.
For this reason, you can’t simply take Black Friday comparison apps at face value. You need to visit the store to find all of the deals they are offering you. This is why it is a bit more complicated than simply visiting an app store and downloading a Black Friday comparison app. Many of these comparison apps don’t consider loyalty program discounts as part of the Black Friday deal. If you’re an active Red Card holder and use Target Circle, you can get even steeper discounts on top of the Black Friday deals. Don’t forget about these extra discounts if you are a member in loyalty programs.
To get your best deals, you’re going to need to get your hands onto a copy of the sale paper from each store, then comparison shop between the sale papers. Even then, some stores offer in-store only deals that you can only find once you are in the store… which means you’ll need to spend time physically heading over to the store to 1) find out what special deals they offer and 2) whether the item is in stock.
On the other hand, be careful of buying older generation computer products which, at face value, may seem to be a great Black Friday deal. Unfortunately, that great deal may turn sour within a year because the manufacturer as stopped supporting the device. It also seems that discount retailers rarely put the latest generation of computer devices on Black Friday deals. If you want any kind of a discount on the latest greatest device, you’ll need to visit a manufacturer’s store, like the Apple store. And yes, the Apple store itself does offer Black Friday deals. They’re not always the best deals, but for Apple they’re some of the best deals available on new Apple products that you can find from Apple throughout the year.
Finally, focus on specific items that you really need. Don’t just go and browse. If you want to find the best deals on those things you need, you’ll need to stay focused on finding the deals on those items. If you spend your time browsing stores and randomly looking, you’ll never get to other stores to see if they have a better deal. I also don’t recommend calling the stores to ask for pricing. More often than not, Black Friday is way too busy for them to talk on the phone. You’re more likely to sit on hold only to hang up. Just head over to the store for yourself. Additionally, many stores do allow you to download digital versions of their Black Friday sale papers. Just be sure to download the one for your specific store so you can see what that store is offering.
Happy Black Friday Shopping!
↩︎
Amazon How-To: The ASIN
![]() Many thousands of people shop Amazon daily. Did you know that every product at Amazon has a unique identifier? In most stores it’s called an SKU or stock-keeping unit. Amazon’s stock code is called the Amazon Standard Identification Number or ASIN. Let’s explore.
Many thousands of people shop Amazon daily. Did you know that every product at Amazon has a unique identifier? In most stores it’s called an SKU or stock-keeping unit. Amazon’s stock code is called the Amazon Standard Identification Number or ASIN. Let’s explore.
Product Identifiers
Every product stocked at any retailer uses a product identifier to locate that product in its database. In fact, many retailers have their own unique identifiers which are separate from such other identifiers as the Universal Product Code (UPC) or the Industry Standard Book Number (ISBN). In Amazon’s case, its unique identifier is the ASIN, not the UPC. The ASIN is visible on the URL of every product you view on Amazon. It’s a 10 digit code containing both letters and numbers. For example, a pair of cut resistant gloves has the ASIN of B012AFX9VY.
Many store products might have as many as two, three or even four unique identifiers. Books, for example, use the ISBN as an identifier in addition to the UPC code and Amazon’s ASIN. However, stores and online retailers typically use their own product identifier to identify stock in their system. For example, Target’s stock identifier is the DPCI code which goes back to Target’s original days of price stickering or tagging its merchandise with a Department, Class and Item… hence DPCI.
Even the UPC code, which is typically used at the register to ring up items, is simply translated to Target’s, Best Buy’s, Walmart’s or Amazon’s unique product identifier to locate the item and its price in its database.
How is the ASIN helpful?
Knowing the ASIN is useful because this quick identifier allows you to locate to a product on Amazon easily. If you’re on Amazon’s web site, you simply need enter the product ASIN into Amazon’s search panel and it will immediately bring up that item’s listing.
If you’re off of Amazon’s web site and you have the ASIN, you can easily craft a URL that will lead you to Amazon’s product listing in your browser. To craft a functional URL, is simple…
Append the ASIN number to the following URL: https ://amzn.com/ASIN … or in the case of these gloves: https://amzn.com/B012AFX9VY.
While that domain may seem strange, Amazon does own the amzn.com domain. This domain is actually intended to be used as a URL shortener for locating Amazon products in combination with an ASIN. Simply by post-appending the ASIN to this much shorter URL, you can feed this into your browser’s URL field and get right to the product’s details, pricing and all of that information. You can also use it on social media sites as a much shorter URL to aid with character limit restrictions.
Product Reviews
Many of us rely on Amazon’s product reviews to know whether the product is worth considering. Many of us also contribute to Amazon’s product review area for the products we purchase, particularly when we feel strongly about the item’s quality (good or bad).
Amazon has recently taken its website backwards in time (before Web 2.0). Amazon’s older editor was much more feature rich than its newest editor.
When writing product reviews, you could immediately search for items right in the ‘Insert Product Link’ area and then insert those product links and place them into your product review. Unfortunately, with Amazon’s recent interface change, Amazon web developers have inexplicably removed the insertion of product links via this former feature. Now, you have to know the product’s ASIN and craft a product link yourself.
Worse, you can only get access to this ‘Insert Product Link’ feature when you’re crafting a new comment on a product reviews, not when creating or editing a new product review. Odd. You don’t even get it when you edit a comment.
Here’s the latest search panel when attempting to insert a product link:

As you can see, it’s odd. I mean, why even change it to this non-intuitive interface? Now you are required to open a new browser tab, go chase down the product using that separate browser tab, copy the URL then come back to this panel and paste it in and hit enter. That’s a lot of extra work which could be done (and was previously offered directly) in this panel. After that, it will either find the product and offer a SELECT button or fail to provide you with anything. And that “http ://…” nonsense is entirely misleading.
You can enter ASIN numbers right in this field and it will locate Amazon’s products from this panel strictly using the ASIN only, even though it does not indicate this in any way. No need to type in that silly http:// stuff. I’m not even sure why they want you to spend the time to go find and insert URLs here. Why can’t this panel search in Amazon’s product database directly with key words? Ugh.. Oh Amazon, sometimes I just don’t get you and your want to be obtuse.
Creating / Editing Product Reviews
Let’s move on. The new product review editor no longer offers a facility for inserting product links via a search helper tool. It’s simply gone. Poof. Nada. However, you can insert them if you happen to know the format, but you’ll have to manually craft them using the ASIN or ISBN.
If you’re wanting to add product links to your review, you have to now do it ALL manually. I’m entirely unsure why Amazon’s web development team decided to take this odd backwards step in its user interface, but here we are. You would think Amazon would be pleased to have people hawking additional products in their product reviews, but based on this step backwards, I’m guessing not. Either that, or someone at Amazon is clueless… maybe it’s a bit of both? *shrug*
Crafting Product Links in your Product Reviews
When you’re writing a product review and you realize you’d like to insert one or more product links into your review using the completely idiotic ‘new’ (and I use the term ‘new’ very loosely) and far less intuitive editor, you’ll need to craft them yourself.
The format of an Amazon product link is as follows:
[[ASIN:B012AFX9VY The Product’s Description Here]]
Example:
[[ASIN:B0792KTHKJ Echo Dot (3rd Gen) – Smart speaker with Alexa – Charcoal]]
The format of the product link is:
[[ID_TYPE:ID_NUMBER PRODUCT_DESCRIPTION]]
where
ID_TYPE = ASIN, ISBN or any other product identifier which Amazon supports
ID_NUMBER = The product’s unique identifier, like B012AFX9VY
PRODUCT_DESCRIPTION = The description of the product with spaces
Once you create a product link, you can use it in place of words and it will show a clickable link. Take note that there’s no space after [[ or before ]]. For example:
This product offers you two pairs of [[ASIN:B012AFX9VY Black Stainless Steel Cut Resistant Gloves]] for use in the kitchen.
once published, the sentence should translate to…
This product offers you two pairs of Black Stainless Steel Cut Resistant Gloves for use in the kitchen.
Questionable Changes
Because Amazon seems intent on sabotaging and gutting its own web user interface at the expense of important and useful features for shoppers, it’s possible that such product links may no longer function at some point in the future. You’ll want to try this out and see if this tip works for you. If it doesn’t work, it’s very possible that Amazon no longer allows product links inside its reviews. However, they are still available as of this writing. If you find that product links no longer work, please let me know in the comments below.
However, the https ://amzn.com/ASIN should continue to work unless Amazon loses or dumps this domain. Note that this feature doesn’t work when using https ://amazon.com/ASIN. Amazon’s primary domain of amazon.com is not set up to handle short ASIN link syntax. You’ll need to use the amzn.com domain instead.
If this information helps you, please leave a comment below. If not, then please leave a comment below and let me know that, too. Happy shopping and reviewing!
↩︎
Crafting Medicines in Fallout 76
 If you’re interested in crafting medicines within Fallout 76, this guide should hopefully help get the most out of your crafting. Let’s explore.
Crafting Perks
If you’re interested in crafting anything in Fallout 76, it’s worthwhile to consider all of the perks you’re going to need to get the most out of your ingredients. For crafting medicines and chems, you’ll want to invest in the following perks:
- Green Thumb — Doubles what you pick from plants. (Perception)
- Super Duper — A chance to double what you craft. (Luck)
- Chemist — Doubles all items crafted on a chemistry table. (Intelligence)
- Aquaboy/Aquagirl — Lets you walk in water without taking radiation damage (Endurance)
- Butcher’s Bounty — When crafting items that require meat, you’ll also want to invest in this card to get more meat from your kills. (Perception)
- Good With Salt — While this one is not strictly that necessary, it’s a great option for carting around ingredients for longer periods without spoiling. (Luck)
- Sunkissed — Removes radiation damage from 6AM to 6PM in-game time. (Endurance)
Green Thumb, Aquaboy/Aquagirl and Chemist are 1 star cards. However, Super Duper and Butcher’s Bounty are 3 star cards and increases your chances with each star. Super Duper offers a chance to double your creations with all crafting station types with the exception of the Brewing Station (at the moment) and when bulking items. You’ll want to max out Super Duper to get the most out of your crafting.
Good With Salt is also a 3 star card and it is well worth ranking this card up to the max if you intend to carry around foods and drinks that spoil. This card is great for keeping ingredients from spoiling before you get back to a chemistry station to craft.
Crafting Medicines
The two most important items in the game to keeping your character alive and healthy are Radaway and Stimpaks. The Recipe for Stimpaks can be found at the Enclave bunker MODUS medical wing seller. You’ll need to join and get access to the Enclave bunker to obtain this recipe. Unfortunately, the recipe for Radaway isn’t quite so easy to obtain. You’ll need to play various events and you may eventually be awarded this recipe at concluding the event. The Radaway recipe will most probably require a wee bit of grinding.
Another recipe that you find early on in the game is Healing Salve. This recipe is about half of the strength of a Stimpak and is a great option if you can’t get the Stimpak recipe. This is also easy to craft from readily available ingredients.
Because Bethesda’s Fallout 76 is a dynamic changing online game experience, patches and server updates can change the amounts and types of ingredients required for recipes. This means the recipes listed below are correct at the time of this article. However, Bethesda could change the requirements at any time. Always check at the crafting table to be sure you are collecting the correct ingredients for any specific recipe.
Recipes
For Stimpaks, you’ll need the following:
- 2 Antiseptic
- 1 Bloodpack
- 1 Steel
To make a Bloodpack, you’ll need:
- 1 Antiseptic
- 2 Tick Blood (use Butcher’s Bounty)
For Radaway, you’ll need:
- 2 Antiseptic
- 3 Glowing Fungus (use Green Thumb)
- 1 Plastic
- 1 Purified Water
For Healing Salve (Forest), you’ll need:
- 1 Bloodleaf (Green Thumb)
- 1 Boiled Water
- 1 Soot Flower (Green Thumb)
For Disease Cure (Forest), you’ll need:
- 1 Bloodleaf
- 1 Boiled Water
- 1 Firecap (Green Thumb)
- 1 Snaptail Reed (Green Thumb)
To make Sugar, you’ll need
- 2 Snaptail Reed
- 1 Wood
While Sugar isn’t used in healing recipes, it’s great for foods, particularly Sweet Rolls and Lemonade. You’ll probably have some Snaptail Reed left over after crafting, which is why the Sugar recipe is listed.
Locations for Ingredients
To make all of these ingredients using forest recipes, you can find what you need starting at slightly north on the hill of Gauley Mine down to the red railroad bridge, then walking the creek all the way down the just past Vault-Tec Agricultural center in Flatwood. Near Gauley Mine, you’ll find Firecaps on logs. At the bridge across the creek across from the Overseer’s camp, the Firecaps stop and this begins the area with Bloodleaf, Snaptail Reed and Glowing Fungus. Between Gauley Mine and the Bridge, you’ll find Firecaps (not far from the water) and Snaptail Reed.
The forested regions will also contain Starlight Creeper, Firecracker Berry, Soot Flower and Wood.
There are other recipes you can find for other regions like Toxic Valley, The Mire, The Cranberry Bog and so on. However, because of the relative closeness to the Vault 76 fast travel point, it’s easiest to focus on the Forest recipes as these are the ones you are likely to come across first… and they also have the easiest locations to reach and easiest ingredients to obtain.
Sources for Antiseptic
In some of these recipes, you may need antiseptic. This can be had easily by killing ticks and picking up their Blood Sacs. Unfortunately, you can only use Butcher’s Bounty on ticks for Tick Blood, not their Blood Sacs. If they don’t drop a sac, you’ll need to locate and kill a different tick.
Two good spots for killing about 6-8 ticks is Moonshiner’s Shack just below Vault 76 and Gilman Lumber Mill immediately south of Moonshiner’s Shack. These are great for harvesting when you’ll need to produce Stimpaks. You can sometimes find ticks in the wooded area of Camden Park near the Railroad.
Abraxo Cleaner is also another source of Antiseptic. You can usually find boxes of this sitting around kitchens and other facilities. Toothpaste and Turpentine are other sources.
Why Perk Cards?
With Green Thumb, Chemist and Super Duper, you can effectively double what you get at each step. Green Thumb doubles what you pick. Chemist Doubles what you make. Super Duper doubles that. You can easily end up with half to double more than what you expect. It’s well worth using these cards if you need larger quantities of Stimpaks or Radaway. With these cards, you can make hundreds easily… instead of relying on finding 1, 2 or 3 in a container.
Tips Before Crafting
-
- Always remember to place your perk cards on before crafting.
- You don’t need these cards to be on all of the time, only when crafting.
- Don’t waste card slots with these cards if you are not crafting.
- Remember your Green Thumb card when picking flora. This will always double what you pick.
Remember your Aquaboy/girl card when wading through water looking for ingredients. Collect considering multiple recipes at a time. For example, when collecting for Disease Cure, you only need to pick Soot Flower to make Healing Salve after you’ve run out of Firecaps for Disease Cures. Don’t take off Good With Salt (if you need the card space) until just right before you begin to craft. After you’re done crafting, immediately put Good With Salt back on. You can make teas, sugar and other foodstuffs from the remaining unused ingredients.
It’s easy to forget your perk card setup when crafting… so, always check before picking flowers or flora or before crafting. It would be great if we had some kind of quick view reminder of our perk cards through a hot key, but no such luck in this game. You’ll just have to stop whatever it is you’re doing and go look and rearrange before you pick or craft.
Happy Crafting!
↩︎
How to revive old Wasabi powder
You bought some powdered Wasabi 3 years ago in a can and forgot all about it. You’ve let it sit in your pantry all that time. You need wasabi and you remember that you have some powder. When you try to mix it up, it tastes bitter and not at all like Wasabi. There is a fix. Let’s explore.
Genuine Wasabi Japonica vs Horseradish
I’d be remiss by not leading with this. Genuine Wasabi comes from the Wasabi Japonica plant. This plant is notoriously difficult to grow and is extremely persnickety when it comes to where in the world it wants to grow. Obviously, it grows well in parts of Japan. It also grows in parts of New Zealand. It looks like this when growing:

Wasabi Japonica also has a long tapered cylindrical root that when grated or ground becomes the signature garnish we’ve come to know and love. The roots look like this:
This is Wasabi Japonica.
The difficulty with this green garnish is that it can be readily mimicked by horseradish, hot mustard and green food coloring when dried into a powder. Some people call this “fake” Wasabi. I simply call it “wasabi” with a lower case ‘W’.
This ‘wasabi’ version is most often the powdered form that you’ll find in supermarkets and is what is most often served at Sushi restaurants in the U.S. (read the label or ask your sushi chef). If you live in North America, “wasabi” (horseradish) is typically what you’ll find 99% of the time. The 1% of the time where you find genuine Wasabi Japonica is a rarity and it means the Sushi restaurant understands the subtle, important difference in flavor between the genuine article and the horseradish version. I’ve even found fresh cut Wasabi Japonica at one sushi restaurant. That was a treat!
The most often cited reason for using horseradish over genuine Wasabi Japonica is cost. While that may be mostly true, the truth is that it’s actually much more difficult to get genuine Wasabi in the US simply because it’s notoriously difficult to grow. This, of course, raises the price because you have to import it.
This means importing Wasabi Japonica from places like Japan or New Zealand and there is a monetary cost to importing produce. However, the flavor profile between the horseradish version and genuine Wasabi Japonica is markedly different. Even though they both produce the signature nose heat we know and love, Wasabi Japonica simply tastes different.
Powdered Wasabi
Dried and powdered wasabi, whether genuine or horseradish must be rehydrated to be useful in all of its green pasty glory. The difficulty with its powdered form is that, depending on the powder’s age, it takes longer and longer to hydrate fully to bring back its signature heat. This is called blooming.
For example, if you hydrate wasabi powder and immediately taste it, you’ll notice no heat at all. It’ll only taste bitter. This means that the wasabi has not yet bloomed. You must wait a period of time before the wasabi has fully bloomed back into its signature hot flavor and lost that bitterness.
How long that bloom takes depends entirely on the ….
Age of Powdered Wasabi
Let’s get back to that old powder you have sitting in your cupboard. The longer the wasabi sits in a zippered bag, can or jar, the longer it takes to rehydrate. As I said above, it will take time to bloom back into its signature flavor. How long it takes depends on how old your wasabi powder is. So, don’t throw your powder away if you rehydrate the powder and it still tastes bitter 10 minutes later. You might be thinking that because it’s bitter it’s bad. It isn’t bad. It’s just super dry.
Sure, fresh powder hydrates to full strength in about 8-10 minutes. If you need some wasabi quick, getting fresh powder from the store may be your best answer. If you can plan ahead a little, your aged wasabi powder may take up to 24 hours to reach full flavor.
For several year old powder, simply mix it up, place it into a closed container and let it finish blooming in the fridge. I personally have some aged wasabi powder that now takes up to 24 hours to bloom. This is a horseradish + hot mustard version. I keep a small amount ready in the fridge as a condiment. When it gets low, I hydrate more and let it bloom overnight. I do have some genuine Wasabi Japonica powder which blooms fully in about 8 minutes. But, I only use that for special occasions or if I need some quick. I use the horseradish version when I’m mixing it into ketchup, mayonnaise or mustard or for any other recipe purposes.
Don’t throw out your older powder thinking it’s bad because it appears to remain bitter. You just need to wait longer to let the flavor work its way back out. The fix to old powder is that might take up to 24 hours in the fridge to fully bloom! However, it also means you need to plan ahead when using older wasabi powder.
Heating Wasabi Powder
You might be thinking you can heat the hydrating bitter wasabi and make it hydrate faster. Never do this. It doesn’t work. It will make the wasabi gluey and useless. It will become bad and you will have to toss it. Do not heat wasabi powder when hydrating it. Instead, mix it up with water and let it rehydrate in the fridge overnight.
Rehydrating wasabi Powder
If you’re new to wasabi and you’re wondering how to rehydrate it, it’s simple. Grab a small container and put a teaspoon of powder in the container. Now, fill your teaspoon with water and pour about half in and begin mixing. If the powder is still too dry and thick, add a little more water to bring it to a paste consistency you like. If you like being able to shape it into a ball with your fingers, then you’ll want it a little dryer. If you like it a little more runny, then add more water.
The consistency of the paste doesn’t play a part in blooming speed. The water does need to be mixed in thoroughly, though. The paste simply needs to sit to fully bloom and that takes time. Speaking of hot mustard, this problem also applies to cans of hot mustard powder as well.
Itadakimasu!
As always, if you have found this Randocity article useful and it helped you revive some old wasabi powder, please leave a comment below.
↩︎
Disney Vacation on a Limited Budget
Is it possible to plan a budget vacation to a Disney theme park? That’s what this article intends to determine. Let’s explore.
Vacation Costs
Your primary costs for any Disney vacation include the following:
- Airfare
- Hotel
- Transportation
- Park Tickets
- Food
- Souvenirs
- Incidentals
Airfare, Hotel and Transportation
These costs can be negotiated at the time you book your vacation package. If you purchase these together as a bundle, you can save substantially booking them together. You can also get additional discounts if you utilize AAA or AARP at the time of your booking. You may see better discounts by booking off-season.
If you’re planning to rely on Disney transportation throughout the trip, ensure that your hotel is within walking distance of this transportation or that the hotel offers a shuttle to and from Disney. Any hotel near to Disney is likely to offer a shuttle, but be sure to call the hotel in advance to verify that they offer a shuttle and how often the shuttle runs. You should also confirm how long it will take to get from the hotel to Disney to plan timings. If your hotel is 30 or more minutes away from the Disney by driving, you may want to consider a somewhat closer hotel, but that may cost more money. I always recommend staying as close to the park as you can afford.
Don’t assume that using Disney’s vacation booking system will get you the best pricing. If you have AAA or AARP or Costco or Sam’s Club membership, you should try booking your vacation through their vacation site then compare it to Disney’s vacation booking system. Also compare it to other services like Expedia, Travelocity, Hotels.com, Hotwire and Priceline. You may even be able to insert your AAA or AARP membership number into many of these sites to receive discounts. You should check all of these sites to see what your best cost is.
You can save on airfare if you drive and save on hotel and airfare if you drive a recreational vehicle (RV). See camping below.
Park Tickets
Tickets to any Disney park are a fixed cost. You’ll pay whatever Disney is currently charging for the calendar year you plan to attend. However, you may be eligible for discounts on tickets if you buy them in advance through vacation booking sites like AAA or AARP. Always plan to buy your park tickets in advance rather than at the gate. Purchasing tickets at the gate will cost the most money… so buy them in advance.
However, Disney is constantly changing its arrangements with these membership services. You should always check these membership services when you plan to book your vacation to determine if these sites still offer the most effective discount tickets.
With all of that said, if you have a family of four and you’re wanting to buy 5 days of park access, you should expect to spend over $1200 for four 5 day base passes. AAA typically offers up to a 10% discount which might save you up to $120 on that $1200. A base pass will allow you to enter one park per day. If you want to hop between parks during the same day, you will need to add the Park Hopper option to each ticket (about $100 additional per ticket on each 5 day pass at Disney World). Note, prices are somewhat cheaper for children under 10. To save money, you’ll want to skip the park hopper option and simply plan one park per day. This is the best option anyway because trying to move around between the parks in the same day consumes a lot of time that you could be using at a park.
The Park Hopper option only works between Disney parks including (Florida) Magic Kingdom, Epcot, Hollywood Studios and Animal Kingdom and (California) Disneyland and California Adventure. If you want to visit Universal Studios, Busch Gardens, Knott’s Berry Farm or any other non-Disney parks, you’ll need to pay for access to these separately. You’ll want to plan for access and transportation to any non-Disney parks as part of your budget planning.
Food
Save on food costs by stocking your hotel fridge with sandwich ingredients. You can then make sandwiches to bring with you to the park rather than spending for meals inside the park. A park meal might cost $10-15 where a sandwich and water might cost you $1-2. You can save a lot if you make your own food and bring it with you or leave the park for lunch at the hotel and come back later.
Souvenirs
If you want to buy souvenirs, then you’ll need to budget for them. T-shirts, for example, usually start around $20 and go up from there inside the park. Instead, I might suggest asking the concierge at your hotel if the hotel’s shuttle can drive you to local businesses in the area, like a close Target or Walmart. Because these shops are close to Disney, they likely have a better selection of Disney souvenir merchandise than stores outside the area. These stores know that Disney park stores are expensive and that shoppers will, instead, frequent the close proximity stores looking for better prices on souvenirs. Take advantage of these lower prices at places like Target and Walmart.
Visit these local stores outside the park to buy souvenirs. Sure, you didn’t get it in the park, but you did get it while you were on vacation. The souvenir still counts as a souvenir. There’s absolutely nothing wrong with budget shopping at local retail businesses near the park to save on souvenir costs.
Incidentals
Try to bring as many incidentals with you as you can to save money. These include items like:
- SPF lotion
- Hats
- Coats
- Batteries (bring rechargeables and charger)
- Sunglasses
- First Aid Kit
- Camera
- Medicine (i.e., Pain Reliever, Imodium, Antacid, Cough Medicine, Prescriptions, etc)
- Chapstick
- Phone charger and cable(s)
- Computer power cable
- Power bank for phone charging
- Misting fans / cooling devices
- Bug Repellant
- Towels
- Reading Glasses
If you have to locate any of these items inside or outside of the park, you’re likely to pay more than you expect and paying for these will kill your vacation budget in the process. Shove as many of these into your suitcase and bring them with you to the hotel and into the park as needed.
Choose your Park destination
You can save some pennies by choosing your Disney vacation destination wisely. Many people automatically assume Disney World for their Disney vacation. If you must visit Epcot or Animal Kingdom, then Florida is your only choice. However, Disneyland exists in Anaheim, California and it’s not as captive as Florida. It can also save you some pennies depending on where you live. Southern California offers many options which are as much fun as seeing Disney World. With Southern California, you also have the option of not only the Disney parks, but non-Disney parks, Hollywood tours and the local sights (i.e., Hollywood Walk of Fame).
Choosing Disneyland in addition to all of the parks that Disney offers (i.e., Downtown Disney and California Adventure), non-Disney parks include Knott’s Berry Farm, Universal Studios and if you’re willing to drive a bit, Great America and Six Flags Magic Mountain. Of course, Universal Studios also exists in Florida, but also requires driving. Tickets to Disneyland are a bit less expensive than Disney World because there are less available parks (Disneyland, Downtown Disney and California Adventure). You want to consider this option to reduce costs in your vacation planning.
Choose your hotel carefully
It’s very tempting to stay in the Disney resort hotels. However, these can be very pricey whether in Florida or California. Consider how much time you plan to spend in the hotel room and on the hotel property. If you plan to visit the park the majority of the time, then you’ll be out and away from the hotel property. The only thing the hotel is good for then is sleeping at the end of the day. Unless you plan to spend a day or more to take advantage of the resort amenities, staying at a resort hotel is an unnecessary extra expense. Instead, choose a less expensive standard hotel with fewer amenities. This can save you money that you can put towards food, souvenirs or transportation.
Plan out your park visit
If you plan your park schedule in advance, this can help minimize your expenses. For example, if you bring your own food to the park, you can eat that instead of spending for expensive in-park dining. If your hotel is close enough, you can always take a break, head back to the hotel and eat food there. Many hotels offer both fridges and microwaves (usually on request). You can head to a supermarket and stock the fridge with sandwich fixings for the duration of your stay. Making your own food in the hotel room is the least expensive way to eat food that’s healthier and reduce your expenses. If you visit one park per day, you can save on ticket costs and reduce transportation expenses.
If you do decide to dine at a restaurant in Disney, expect to spend more than you might think. Disney’s dining experiences aren’t inexpensive affairs. You’ll also want to make sure to make reservations in advance. You don’t want to arrive at the restaurant and have to wait and hour or two just to get a table. Reservations save you a lot of time… time that you can better use in the park and get the most out of your tickets. To save the most on food expenses, head to a local grocery store and stock the fridge at your hotel and eat your meals there.
If your hotel offers free continental breakfast or a free breakfast buffet, take advantage of this food and eat breakfast there.
Breakfast with the Characters
If you want to spend a little money on food, this is one of the better ways to do it, particularly when you are with children. You can buy Breakfast in the Park with Minnie and friends. This breakfast experience, while tremendous fun for the kids, can cost between $20 to $40 per person. This breakfast experience alone does not allow you to take advantage of the 1 hour early park opening. You will have to buy the Magic Morning option separately. The Minnie and friends breakfast offers usually around 8 different characters who will interact with you while eating breakfast.
Extra Magic Hour / Magic Morning
One of the perks for staying at a Disney resort hotel is that you automatically get the Extra Magic Hour included with your stay. This means you can enter the park one hour early in the morning and take advantage of select stores and attractions. If you don’t stay at a Disney resort hotel, you can buy the Magic Morning option for each 3+ multi-day ticket. Magic Morning and Extra Magic Hour are available at both Disneyland and Disney World parks. You’ll need to consult the current schedule at the park to determine which parks open early on which days as the early openings change based on the day of the week. If you choose to stay in a Disney resort hotel to obtain the Extra Magic Hour benefit, you will want to call the hotel and confirm that your stay includes this option. Don’t just assume that it does.
When planning your visit in advance and you intend to take advantage of the early park opening, always confirm which park is open on what day so you can plan to visit that park on that day. This is especially important if you’re intending to visit one park per day to avoid the park hopper charge.
Take a Break
There’s always lots to see and do at any Disney park, but it gets tiring walking around the park and standing in lines. When it reaches the hottest part of the day, you’ll want to take a break and head back to the hotel for a few hours to cool off. If you’re at a resort hotel, you can use this time to take a swim, relax in the room or take advantage of other hotel amenities. This lets the heat pass and gives you time to energy up for the evening hours. It also gives you some time to catch late lunch or early dinner and avoid paying in-park food expenses. Taking a break is the best way to enjoy the park.
Carry a water bottle, bag and medicine
You’ll want to take a water bottle and a small bag with you into the park for keys, phone, medicine and flavoring powders. It’s easy to get ice and water from a restaurant to fill your bottle. Then, flavor the water with a flavoring packet you have with you. This saves on buying expensive sodas and drinks in the park. These flavoring powders are packed in small packets which are easily stored in a small bag. Because the packets are so small, you can carry a lot of them. You can sometimes find soda water and make your own soda with a flavoring packet.
You’ll also want to carry a small amount of medicine like Tylenol or other pain relievers, antacid and diarrhea medicine. If you realize you need these while in the park, you’re going to pay a lot to buy a tiny single dose container that may not be a brand you like or be effective. Instead, carry your favorite medicines with you in your luggage when you travel. If you buy your favorite brand medicine before you depart, you can be sure to get the best deals and use brands familiar to you. Having this medicine with you in the park, you’re prepared if your favorite ride jostles you around just a little too much or a food you consume doesn’t sit well. If you or your child has the possibility of anaphylactic allergies, be sure to carry at least one Epipen with you into the park. I’d also recommend avoiding eating foods made in the parks to avoid accidental exposure.
It’s always best to buy your medicines in advance of travel because it’s the least expensive way to get them. And, you may already have them in your cabinet at home which will save you money buying medicine in the park, at the hotel or at a local pharmacy.
Shop Around
Before buying souvenirs willy-nilly inside or outside of the park, shop the stores and see what you like. Visit as many stores as you can in the park, then outside of it. Compare prices and buy the souvenirs that fit within your budget. Keep in mind that the stores in the park carry items that you typically can’t find anywhere else. In fact, Disneyland has merchandise exclusives branded to Disneyland. Disney World has merchandise exclusive to Disney World. You won’t find any Disney World merchandise in Disneyland and vice versa. You’ll want to weigh this when you visit the stores and when planning your vacation. If you plan to buy in-park souvenirs, you’ll want to set a maximum limit to spend. Your souvenir budget is likely to stretch farther if you’re willing to buy items at discount stores outside of the park.
Keep a list or take pictures of merchandise+prices you might want. If you take pictures, you can remember both the style and price when you go looking for a similar item at Target or Walmart close to the park. For items like small pins or buttons, you likely won’t find these outside the park. You’ll want to buy them at the store in the park. For T-Shirts or other clothing items, these are usually cheaper outside the park.
Laundry Facilities
When you’re staying for 5 or more days, you’ll probably need to do laundry at some point. Many hotels offer full laundry service. You’ll want to ask the hotel if they have a self-service laundry room. This can save you money instead of using the hotel’s much more expensive full service laundry. If you can plan your hotel stay at a hotel with a self-service laundry room (call and ask before you make the reservation), you can save money by doing your own laundry. You’ll just need to pick up a small container of laundry soap or carry some with you in your luggage.
First Aid Kit
Bring a small first aid kit with you that contains adhesive bandages, antibiotic ointment and cleaning wipes at a minimum. It doesn’t have to be anything fancy. You can shove these into a small zipper lock bag which fits easily into luggage. If someone in your party is scraped or cut while in the park, you can visit the first aid center, but you’ll also want to take care of it when you get back to the hotel. I’d suggest carrying a few bandages and ointment to the bag you carry with you, but it’s not strictly necessary as the park’s first aid center can help you take care of it right away. It may take some walking to get to it. I can be faster to take care of if you have bandages and ointment with you. If you need to locate a first aid kit while on vacation, it will dig into your budget if you end up at the hotel’s gift shop or, worse, you end up at some all night drug store because nothing else is open.
SPF Lotion
Bring this with you in your luggage. Not only can it be difficult to locate a quality brand in the park, it’s likely to be very expensive for a tiny bottle. You’ll want to carry a small TSA authorized and sized container with you. This allows you to carry it into the park and also carry it on a plane. This likely means transferring some of the lotion from the original container to a TSA sized container. Be sure to label what it is. If you have to go shopping for this later, this will eat into your budget. SPF lotions are not always inexpensive even at the best of times. If you have sensitive skin and need a specific brand, be sure to carry this with you as you may not be able to find the brand you use at your vacation destination.
Hats and Sunglasses
This should go without saying, but bring your hats and sunglasses with you from home. This will save your vacation budget. Of course, if you’re looking for a souvenir hat, then fine. Sunglasses won’t be cheap inside the park. If you can get to a Target or Walmart, you can likely buy a cheap pair. Again, that eats into your vacation budget. Save this money by bringing these items with you from home.
You’ll also want to keep your sunglasses on a string or take them off and hold or secure them inside the bag when riding rides. Same for hats. Hats and sunglasses tend to sprout wings and fly on rollercoasters. Be sure to hold onto them well. This also includes cell phones. If you can rent a locker before heading onto a rollercoaster, you can lock these items up to avoid losing them while riding. Though, you should always hold your cell phone in your hand tightly while riding. You shouldn’t leave your phone in a locker.
Phone charger, cable and power bank
If you know that your phone is likely to run out of power quickly, you’ll want to carry a fully charged power bank and charge cable in your bag (and in your luggage on your trip). If you forget to bring these items with you, you’ll pay $30 to Disney to get a power bank and cable. That’s $30 you could have used to help pay for dinner or a souvenir. Of course, you might be able to run to Best Buy or Target and pick one up for slightly less, but that’s still an expense you can avoid by bringing one with you. It also means you have to leave the park and go run errands, wasting time.
Yes, the TSA allows you to carry a power bank in your suitcase or carry on bag so long as it is inside of a bag that prevents accidental discharge. Purchasing a power bank or cable is one expense you’ll want to avoid.
You may be able to find power outlets inside of Disney to plug in your charger, but that means you’ll be sitting around waiting. If you have a power bank battery in your bag, you can charge your phone while you’re walking around the park. Be sure to remember to charge the power bank each night at the hotel. You’ll also want to have a battery that can charge your phone at least twice or carry two batteries.
Strollers
If you’re traveling with children who need a stroller, you are permitted to bring your own stroller as long as the stroller is less than 36″ x 52″ in size and is not a wagon. Wagons are not permitted. You can rent a stroller at the park, but these obviously cost money. If you’re trying to save on costs, plan to bring your own stroller with you. This means checking the stroller as checked baggage at the airport.
However, many airlines today are now charging for checked bags with fees up to $50. If the checked stroller cost ends up higher than the cost to rent a stroller, renting a stroller may be worth the expense at the park. For example, if you plan a 5 day trip to the park, your rental costs will be $65-75 depending on discounts. This is higher than $50 to check a bag. In this case, it’s worth it to bring your own from home. If your trip is 3 days in the park, then it might be less expensive to rent a stroller in the park.
If you simply don’t want the hassle of carrying a bulky stroller with you while traveling, then renting a stroller is your only option.
Fireworks Show
This tip isn’t really a money saver, but it does let you take better advantage of the money you spent on your tickets. Always take advantage of the fireworks display and other large crowd attention gathering shows (i.e., parades). You’ll want to watch the fireworks show once while you’re at the park. Skip the fireworks shows on the rest of the days. Instead, use this time to ride the long wait time rides.
Because the fireworks show is a huge crowd draw, many people leave the rides to go watch the show. This gives at least 30 minutes to make haste and ride some of the more popular rides like Space Mountain or Big Thunder Mountain. These line wait times can drop precipitously during the fireworks show. Take advantage of this. You can sometimes ride these popular rides more than once in that 30 minute period. You’ll want to find which rides have the longest wait times, then plan to visit these rides during the fireworks show each successive night.
Because this window of opportunity is 30 minutes with the fireworks, you’ll need to plan which rides in advance. For example, riding Space Mountain, then traversing half the park to ride a different ride could lose you 10-15 minutes in walking time. Try to keep your rides close together to maximize this 30 minutes of short lines.
Note that this window of opportunity isn’t always a sure thing. It all depends on how many people realize this drop in wait times and take advantage of it. If you’re in the park on Halloween or Christmas, for example, these are times when the park is excessively crowded. Waiting for fireworks on these nights may not reduce the wait times simply because the crowds are already excessive.
Also note that as soon as the fireworks end, the lines go right back to the length they were before it started.
FastPass
If visiting Disney World, Take advantage of FastPass to reserve times in advance on popular rides. Note that you don’t necessarily have to reserve times the day before. If you’re diligent enough on the phone app, you can sometimes find cancelled reservations that you can immediately take advantage of (within 15-45 minutes). You just need to keep polling the FastPass app looking for cancelations.
Unfortunately, FastPass requires adding the MaxPass option to your tickets which is at least $50 extra per ticket. FastPass is worth it if you intend to ride the most popular rides in the park. Otherwise, you can find yourself standing in line for several hours to ride… or you’ll have to wait for the fireworks show later in the evening and hope the wait times temporarily subside.
Note that FastPass works somewhat differently at Disneyland than at Disney World. You’ll need to download the app on your phone for Disneyland to use FastPass.
Costs
For any Disney vacation, you’ll have to expect to spend around $1200-$1500 for a family of 4 just on tickets. This is pretty much the same cost at Disneyland vs Disney World. Depending on your distance from California or Florida, your airfare may vary. If you live in California and travel to Disneyland, it will be less expensive than traveling from New York City to California. The hotel and airfare might knock you back an additional $1400 to $2500 depending on hotel, airline and time of year.
You’ll still need to plan for food, souvenirs and incidentals. This will probably be another $1000. Overall, expect to spend $2500-$5000 for a family of four not including food or incidentals for a 5 day vacation. Disney World will be slightly more costly than Disneyland. By slightly, I mean several hundred dollars more costly as Disney World ticket prices are higher and hotel costs seem a slightly higher in Florida than in California.
Can you visit a Disney park with less money? If you drive, you can save on airfare. If you have an RV, you can live in that and save on hotel costs. Driving an RV, you can save on both airfare and hotel fees, but you’ll need to pay for RV rental space. Having an RV can substantially reduce your travel and stay costs, but this also means having access to an RV. If you have to rent an RV, per day rental fees can be very similar to hotel room rates and an RV is much more cramped. You may not save much money by renting an RV. You also likely won’t want to use the RV around town, so you’ll need to rent a car when you get there adding to the costs of the vacation.
Camping
If you’re willing to rough it a bit when at Disney World, you can camp at Disney’s Fort Wilderness. You can check this page to determine the going campsite rates. The cheapest rate I’ve seen is $55 a night before tax. There may less expensive non-Disney RV parking and campsites available (i.e., state and national parks). Check Google for details. Parking off of Disney’s grounds means you’ll need to find your own transportation to and from the parks.
Camping near Disneyland is limited considering it’s in the middle of Anaheim, CA. There are several RV parks not far from Disneyland, but you’ll need to find your own transportation to and from the RV park and Disneyland.
RV Parking at the Parks
If you intend to also use your RV as your vehicle, RV parking is permitted at the all Disney World parking areas for a fee. This fee is higher than for a car. RV Parking is only permitted in the Toy Story parking area at Disneyland also at a higher fee. You’ll need to plan for this daily fee in your vacation budget if you want to use your RV to transport you to the park(s) each day.
Tips and Traps
This section is both about saving money and about not losing your money to scams. It’s pretty much common sense, but these are always worth saying.
Avoid Ticket Scams
Don’t buy your park tickets through eBay, Craigslist or other similar classified sites or sellers. Always use reputable sites authorized to sell tickets on behalf of the Disney parks. A few of these reputable sites include:
- Disney Direct Ticket Sales
- AAA travel
- Orlando’s Official Ticket Center (Florida parks only)
- Parksavers
- Costco Travel — Disney Vacations
- Southwest Airlines Disney Deals
- Undercover Tourist
- Your local travel agent
You may find some people claiming to sell partially used tickets. DO NOT buy these! Tickets, once used, are tied to an individual’s fingerprint and cannot be transferred. There’s no way for you to make use of a anyone else’s used ticket. Also, once a multi-day ticket is used, the clock is ticking. Multi-day tickets also expire 13 days after first use. Used ticket sales are always a scam. Don’t even consider this as an option.
However, if a ticket has never been used, these are valid tickets. The problem is, if you’re not buying the ticket from an authorized channel or from someone you absolutely trust, it’s very likely a scam. It’s easy to counterfeit e-tickets and paper tickets to look legitimate. You don’t want to get to the front gate and find out what you bought was counterfeit, then be stuck paying full price at the gate. Always buy through reputable booking services. Don’t get scammed by buying tickets from a classified ad or an individual.
Use your own camera
When in the park, take photos with your own camera. Don’t fall for Disney’s photographic services. Disney will always try to entice you into using their services to take pictures of you with the characters. This is a costly service. Simply ask a cast member to take the picture with your camera or phone.
For safety reasons, only ever ask a cast member with a name badge to take a photo with your camera. Never ask another guest whom you don’t know to handle your property. They can easily run off with your camera or phone and you’ll never see it again. In a place the size of Disney’s parks, you can’t trust anyone to hold your property. The only people in the Disney parks that you can trust to hold your property are cast members. Better, bring along a telescopic selfie stick and hold the camera yourself.
Carry only what you need
This goes back to carrying a small bag with you. If you carry a small zippered bag, you can contain everything you’ll need for a day at the park and not have to carry it in your hands. Because Disney crowds can be varied and large, avoid flashing money if you don’t have to. Also, a small bag allows you to stow your camera, hat and sunglasses when you ride rides. Be sure to secure your bag when you take it onto a ride or use a locker.
Go Cashless
If you have a MagicBand wristband (not available at Disneyland) or room card and you’re staying in a Disney resort hotel, you can charge purchases to your room. I’m not a big fan of doing this because you end up with a whopping bill to pay at the end of your stay. There’s also nothing available to allow you to budget your spending. However, you can go this route if you like. I already don’t trust hotels to tally up the correct amount when the bill is due. Why convolute the bill further by charging in-park items to the hotel room?
You can still go cashless. Because Apple Pay is available within the Disney parks, this means you’ll have flexibility in using your Apple watch or phone device to pay for items within the park. Of course, you can also use a credit or debit card. This avoids cash transactions and it avoids pulling out your wallet for all to see. Unfortunately, it seems that Samsung Pay is not available at Disney. Google Wallet may only be available for use at Disney World. Apple Pay seems to be the best choice for either Disney World or Disneyland. Unfortunately, these cashless options don’t allow for easy budgeting.
Even though Apple Pay is accepted at Disney parks, it may not be accepted at stores outside of Disney. Always carry an alternative payment method when your preferred method is unavailable. For example, Target and Walmart don’t accept Apple Pay. Also, some smaller food carts in the park may be cash only.
Gift Cards and Budgets
If you want to stick to a strict budget while at Disney, buy and fill a Disney Gift card. If you have a $100 a day budget, then add $100 to a Disney gift card. You can use this card when purchasing anything at any Disneyland park, Disney World park or even at a Disney store. Using a gift card avoids overspending in the park and allows you to stick to your daily budget. Buying and using a Disney Gift card is the best budgeting choice at Disney. Note that you can only refill the cards at a location that sells them. There are refill and purchase locations in the park. Online refills are not available. This means you’ll need to buy the card(s) at a Disney Store before you travel or buy them in the park when you get there. You’ll need to allot time to refill the card each morning or before you leave the park each night. Disney gift cards have no fees. Even though the gift cards never expire, you’ll want to use up any remaining balance before you leave the park on your final day.
Protect your gift card like you would any other credit card. However, if it’s lost or stolen, you will need a copy of the original purchase receipt to freeze the account and transfer the remaining balance to a new card. Call 1-877-650-4327 to report a lost or stolen card. You will need to provide the first 12 digits of the Disney Gift Card account number to the agent to freeze the account. You can then visit a gift card location and they will transfer the remaining balance to a new card. Be sure to take a picture of the card number on your phone or write it down and take a picture of the receipt so you always have a copy of both the card number and the receipt on your phone. It’s also a good idea to back up these photos to Google Drive or iCloud just in case you lose access to your phone.
Non-Disney Parks and Cards
If your vacation plans include visits to non-Disney parks, then a prepaid Visa or MasterCard is the more flexible option even though they have fees. With a prepaid Visa or MasterCard, you will need to keep close track of the balance available on the card. Unlike gift cards that let you use every last penny on a transaction seamlessly, prepaid Visa and MasterCards don’t work like this. If you have a balance of $1.22 on the card and you attempt to spend $1.25, the payment will decline. It doesn’t automatically give you the option of spending $1.22 and then making up the difference in cash like a gift card. You’ll need to continually check the balance of the Visa or MasterCard so you know exactly how much you have left.
To work a payment similarly to a gift card, you’ll need to ask the cashier to ring exactly $1.22 onto the card which will succeed, then pay the difference with cash or another payment method. The merchant has no way to tell you how much balance remains on a prepaid card. You’ll have to check the balance online through your phone or computer. However, unlike Disney gift cards, you can refill your prepaid Visa and MasterCard cards online.
Lost or stolen Visa or MasterCard prepaid cards are more complicated. You will need to write down the phone and card numbers listed on the back of your cards or take a photo of the front and back of the card so you have it on your phone. You can then call the number on the back of the card from the photo if your card is missing. Getting a replacement card is not nearly as fast as a replacement Disney gift card. Be prepared to wait for a replacement. You might be able to request Visa or MasterCard to provide emergency cash that you can pick up somewhere close to your location until your replacement card arrives.
Stick to known payment methods
Avoid using odd payment cards like AmericanExpress gift cards, Visa gift cards, MasterCard gift cards, Visa TravelMoney (traveler’s check cards), Traveler’s Cheques (they’re old and antiquated) and other oddball payment methods. These payment methods are not always accepted everywhere and may cause you no end of trouble. The last thing you want is a bunch of vacation frustration because you chose a payment method or card that few places accept. Undoing a mistake like this can be costly and time consuming when you should be enjoying your vacation.
Stick to mainstream, well known and accepted payment methods for your vacation. If you’re unsure about a payment method, call the places you intend to visit while on your vacation and ask if they accept a specific payment method. Keep in mind that not all employees are well versed in what their employer accepts and may tell you, “Yes” just to get you off of the phone. Always ask to speak to a manager to confirm the accepted payment methods. To avoid this possible source of stress, stick to well known, modern and accepted payment methods.
Emergency Cash On-Hand
Always carry emergency cash on your person for obvious reasons. If you need a cab or similar to get out of the park, having cash will get you out of there faster.
Overall
Can you spend less money on a Disney vacation? To a degree, yes. It also depends on you. If your family is up for roughing it outside in a tent, you can save money by staying at a campground rather than at an expensive hotel. You can also save money on airfare by driving to the resort.
If you set a strict budget on your in-park spending, you can reduce your incidental and food expenses.
With that said, if you intend to fly and stay at a hotel along with visiting the park for several days, expect to spend about $300-$400 per person for 3-5 days just on tickets to get into the park. On top of that, add your airfare, hotel and food and incidental costs.
For example, to plan a Walt Disney world vacation stay in Orlando, expect to spend around $3000-$5000 for four people over 5 in-park days. You can reduce this some by reducing the number of days you stay. You may be able to get a discount if you use AAA to book your airfare and hotel rooms. Your costs may be $200-800 lower if you choose to visit Disneyland in California because hotels are somewhat less expensive and the tickets to enter the park are also somewhat less expensive. Airfare is whatever it costs to get your family from your current location to any of the parks. Note that you can have just as much fun at Disneyland as you can at Disney World. It’s just that there’s a bit more to see at Disney World because there are more parks to see.
If you choose to add on Universal Studios or other parks, the costs go up… but you can sometimes get additional park bundles that offer discounts. You’ll need to shop around and compare to get your best deals.
You may be able to get better deals on lower attendance days. You can view the expected Disney park attendance by visiting the Attendance Calendar at Undercover Tourist. Off-peak season begins when the kids have gone back to school and right after the holidays are over. While you may not be able to take your children out of school to go during off-peak, this is the best time to visit Disneyland or Disney World. If you book your trip on lower attendance days, you may also see better deals and discounts. The worst time to book a vacation is within a few weeks of when you want to go, during peak season (June and July) and during the Halloween and Christmas holidays. You’ll get the least discounts booking during peak season.
↩︎
Parental Guidance Definitely Required
While this article’s header may sound related to movie ratings, it isn’t. On the other hand, in a way, it kind of is. No, what this article is about is parents not properly guiding their children’s behaviors in public places. Let’s explore.
Lack of Guidance
In recent years, more and more children seem to misbehave in public places. Parents seem to lack the parental skills to manage their children properly (probably at home also). Although, managing your child properly in public is more important. With that said, there are many behaviors from children that are just not appropriate in public, yet parents simply seem to ignore these disrupting behaviors. In addition to bad behaviors from children, included are some equally bad behaviors from the parents.
Top 12 list of bad public parenting
12. Strollers in crowded areas — When bringing children to very crowded venues, think twice about using anything more than an umbrella stroller. When pushing strollers along in crowded areas, you are likely to run the wheels over someone’s foot. It’s never pleasant to have a baby stroller scrape up your heel or run over your toes. If at all possible, leave the strollers at home and let the children walk. If the children are unable to walk and you can’t carry them, then perhaps that event is not the place for you and your family.
11. Newborns in public — While I know that mothers of newborns can get cabin fever, that’s the price you pay to take care of an infant. However, I regularly see mothers taking 1, 2 and 3 week old babies into malls, theme parks and various other venues. This is completely selfish behavior. The baby is far too small (and unprotected) to know where it is. Heading out to these places is solely for the mom and dad. For the baby, it’s not healthy. First, babies this small cannot regulate their body temperatures yet. Heading to an overly cold air-conditioned mall or to a theme park in sweltering heat is not what your baby needs. As the mother, you can’t (and shouldn’t) be riding anything (especially if you delivered by c-section). You’ve wasted your money by going to a place that requires an entry fee. The baby won’t even know it was ever there. Second, the baby basically has no immune system. Exposing this small of an infant to crowds of people is likely to get it sick. Coupling the germs with the unregulated temperatures, and you’re just asking for your baby to get sick. Stay home until the baby is older.
10. Feeding your children from unpaid groceries — While shopping, do not grab a pack of Twinkies, loose grapes, a pack of chips, cookies or any other food item, open and hand it to your child. I’ve seen many parents do this to keep their children occupied. Not only does this teach your children the wrong food habits, it’s stealing when you don’t pay for the food. Not only is the parent contributing to the child’s unhealthy eating habits, this behavior is also teaching the child that it’s ok to grab food from a store and eat it unpaid. Only open and consume foods outside of the store and only after you’ve paid for it. This teaches your child the correct shopping behavior.
9. Screaming and yelling — When your children are in public, it is on you as a parent to keep them under control. This also means keeping them from screaming and yelling. While you may be used to this behavior from your child, the rest of the public doesn’t want to hear it. If your child begins to act up by screaming and yelling, stop and take them outside of wherever you are. This is especially true when in a movie theater or a restaurant. In a movie, silence is the key and if your child cannot sit for longer than a few minutes before acting up, then do not bring them to a movie. Instead, wait and rent the movie to watch at home. Still, it’s probably more important to figure out how to control this behavior from your child. In a restaurant, people go for a relaxing dinner, not to hear your child scream at the top of their lungs.
8. Salad and hot food bars are not for children — Children under adult height should never be allowed anywhere near salad bars or buffet tables.
First, buffet tables can be dangerously hot. Unless you enjoy taking your child to the emergency room scalded or electrocuted, children should remain safely away from hot food bars. Second, children generally have little self control over their hands and fingers. Not only are children notoriously bad for not washing their hands, they will easily stick their fingers into and play with food on food bars easily leading to a burn or contaminating food. Yuck! Combine this problem with their lack of height and their faces being just below the sneeze guard, you end up with a very unsanitary situation. Again, too many children will place their hands into the food to play and possibly sneeze and generally breathe all over the food with nothing to block this. Again, very unsanitary. Third, by letting children serve themselves, you are not controlling what food or the amount of food they eat. It is important to control your child’s nutrition. Instead, you should choose their foods from the bars and bring their food to them plated. For all of these reasons, keep your children away from food bars. Although, if you really want to keep your child healthy, don’t eat off food bars and, instead, order directly from the menu. Salad bars and buffets are generally unsanitary and the foods are excessively high in calories, anyway.
7. Grocery carts are not toys or rides — Grocery carts are intended to be used for shopping. If you want to place your child in a grocery cart, then place them into it as intended (in the front with their legs hanging out of the holes sitting down and strapped in). Do not let them play under or in the basket itself. Children should never stand up in the basket part of the cart.
6. Children under foot — Keep your children with you at all times. Do not let them run around crowded events unattended. Not only is this a potential kidnapping situation, it’s simply dangerous as small children can be easily overlooked and tripped over or trampled. Children are not good at watching where they are going or what they are doing, so keeping hold of your child in crowded situations is very important. Remember, only you are watching out for your child. Other people aren’t watching your child. Although, other people may be judging you on your lack of parenting skills.
5. Restaurant booths, movie theater seats and airplane seats — Children should always be firmly seated. Do not let your child stand up in their seat. Your children also need to be occupied with something (coloring, reading, talking to them, etc). Otherwise, children will stand up, fidget and become a nuisance to the people sitting around them. For example, a child standing up in a restaurant booth can easily turn around and stare or otherwise disturb another table. When seated at the theater or on a plane, children can easily kick the back of the seat in front of them. Control your child. Keep them occupied so they don’t do this. If they stand up, sit them back down. If you can’t control them, leave. If you’re on a plane, find something for them to do. Also when traveling, plan ahead by packing enough activities, games, crayons, etc to occupy your child throughout the entire plane trip.
4. Sit with your children — If you are a family of four, each parent should sit next to one of their children when possible. Don’t let young children sit together alone so the parents can sit together across the isle. If one of the children has an issue, you can’t easily manage it. Sitting next to the child, you can probably thwart the issue by catching it early. Of course, if you’re the Brady Bunch, that could make it harder. However, if you do have that many children, you’re probably in need of lots of help on long plane trips.. in which case, it might be better to take the train where you can have your own room.
3. Toy Stores — While the trip to the toy store may seem like a great idea, it really isn’t. To a child, a toy store is their dream-come-true. At the same time, it’s a parent’s worst nightmare come true. Don’t take your child to the toy store! Let me say that again. Do NOT take your child to a toy store. Instead, know what your child wants and go pick it up and bring it home or order it from Amazon. This way, there are no screaming fits, no “buy me this” chants and no unnecessary tantrums. The toy store should be used as only a good behavior treat. A once-in-a-blue-moon event. Some place you go only if your child has met some extremely high criteria and is extremely well behaved… and only when you’re intent on rewarding them with a toy.
2. Keeping your children out late — Children need stable and consistent sleep patterns. Therefore, as much as child may want to see a movie, don’t take them to see a movie in the theater after their normal bedtime hours. I have seen so many children out shopping, at the movies and running around after 11PM on weekends. This is wrong and bad parenting. Without consistent sleep patterns for your child, your child will want to get up late and be sleepy all day. Don’t do this. Children, especially babies, need to have a regular sleep pattern. If it’s late and your child is fussy, then you need to leave and take the child home to bed.
1. Running around stores (literally) — Stores are not playgrounds for your children. Stores are not babysitters. Stores are not day care facilities. Do not bring your children to stores and let them run around in public without any control. Stores are dangerous places for children to ‘play’. Simply because they sell bikes and skateboards doesn’t mean that’s where they are intended to be used. Remove your children from the bikes. Get them off of skateboards. Stop them from strapping on skates in stores. Don’t grab toys off of shelves to occupy them. Like foods mentioned above, giving your child a toy that you have no intention of buying teaches your child the wrong thing. If your child isn’t well behaved enough to visit a department store with you, then you probably don’t need to bring your child with you.
As a parent, it is up to you to teach your child correct behaviors in the early years. It is also up to you to make sure your child behaves correctly in public. If you are unable to control your children, then you probably haven’t enacted correct discipline in your home. If you are unable to implement proper discipline, you probably need the help of a nanny or someone who can help you improve your parenting skills. Simply because you have chosen to have children doesn’t mean that other people want to hear your child scream or run into them simply because they want to run around. As a parent, it is your sole responsibility and duty to keep control of your children. Discipline is important for a child. Yet, discipline does not mean using a belt or a paddle. Using other means, such as timeouts, can affect the same level of control without the need for physical interaction. Whatever you use to control your child, just remember… in public, we can all hear your child scream.
↩︎


leave a comment