Is it safe to drink soda left in a hot car?
This question seems like it should have a simple answer. However, the answer is more complicated than it would seem. Let’s explore.
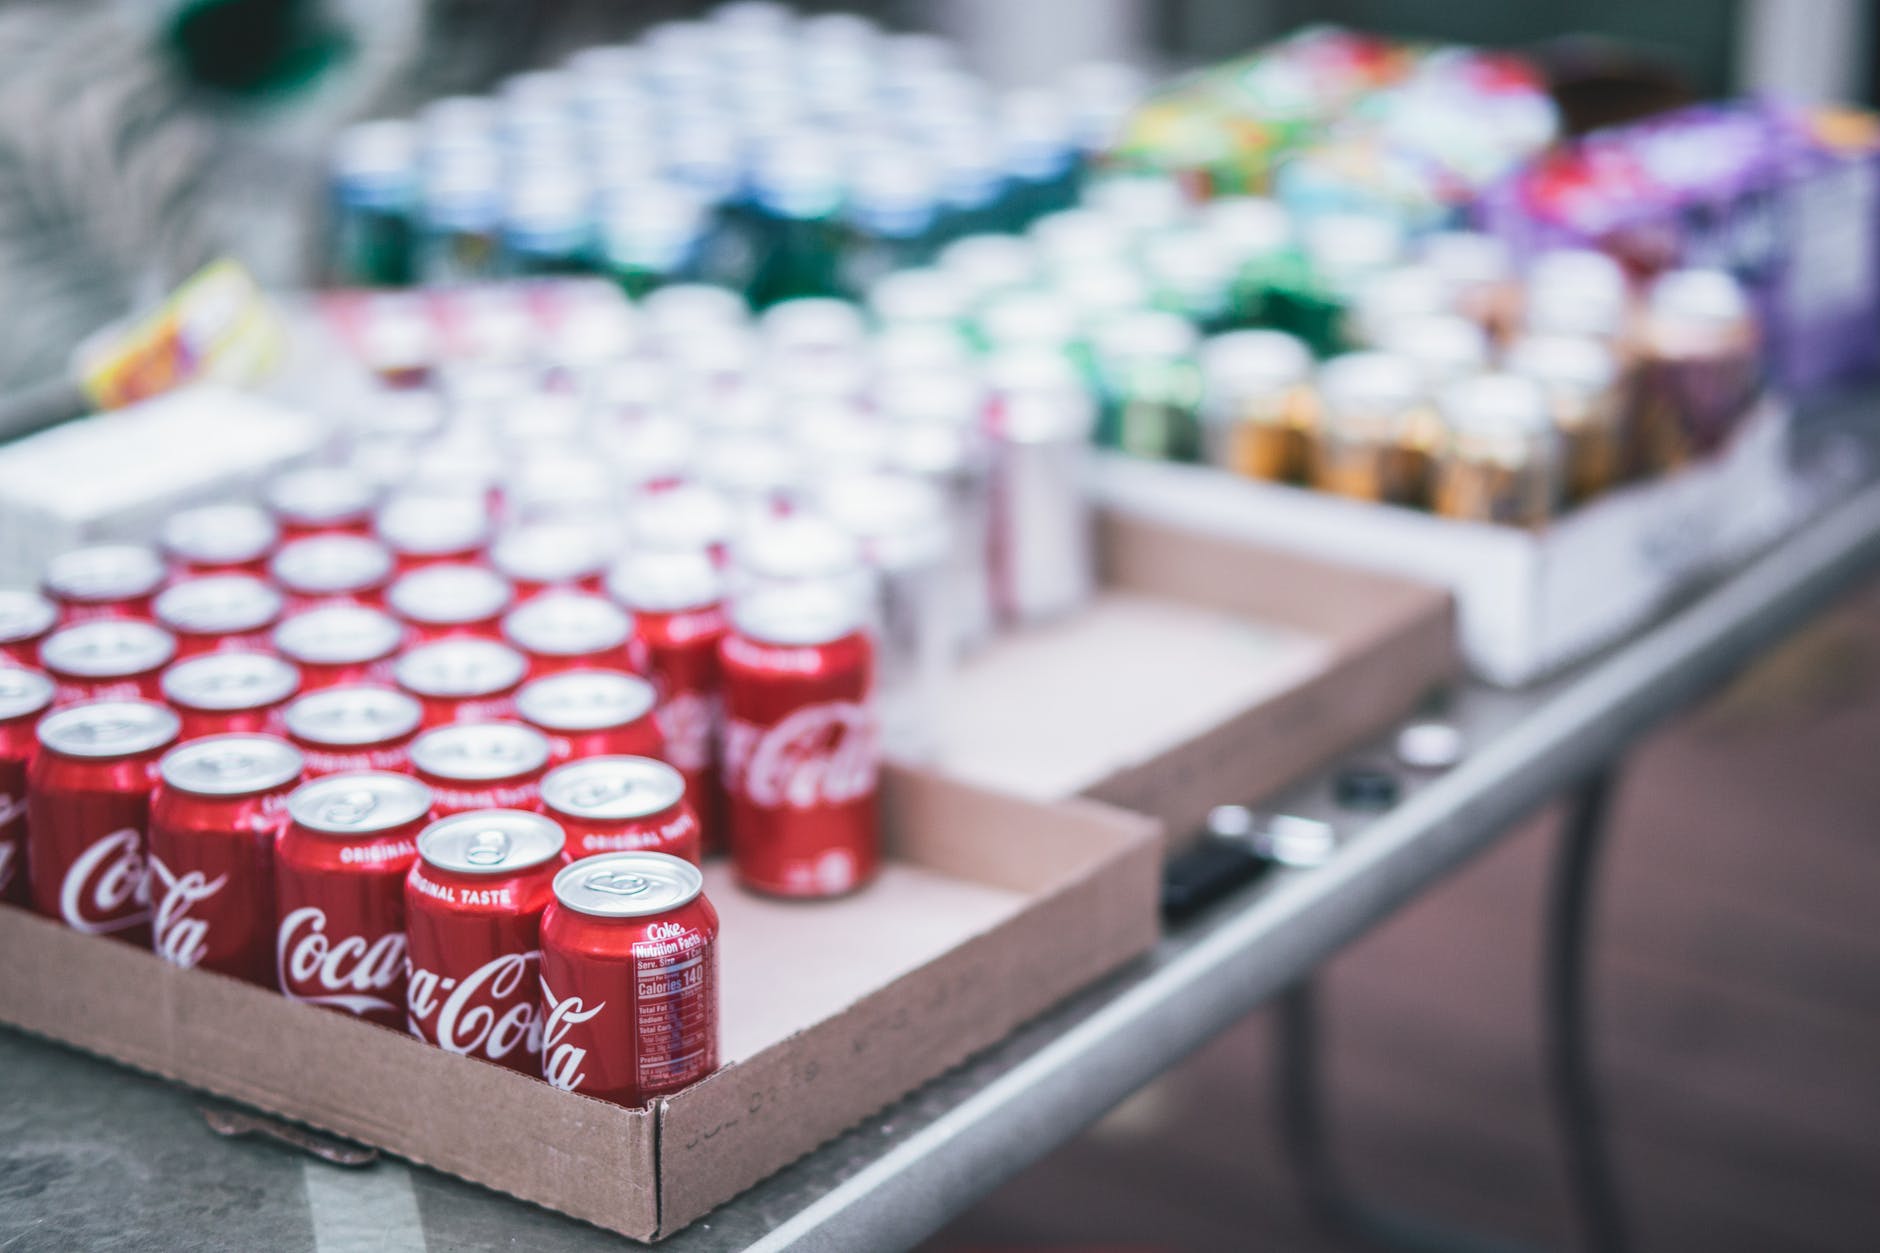
Canned Soft Drinks and Beverages
Canned sodas are hermetically sealed and are bottled with bacteria free water. This means that high heat won’t grow anything undue. However, sodas have flavorings, artificial and sometimes natural colors and sugar or artificial sweeteners. Depending on these ingredients, sodas can deteriorate if left in hot conditions.
Canned sodas are “bottled” (or canned) in aluminum cans. While aluminum is heat safe, think about the aluminum foil you use to bake with, there is no problem with the aluminum itself. In fact, because the drink is fully sealed and not exposed to UV light, this method of storage with heat probably offers your best chances of retaining a drinkable beverage even after being exposed to excessive heat. If the aluminum were the only problem, this section would be over.
However, we must also consider the ingredients. The good news here is that artificial and natural colors are generally heat stable. Again, think about baking with food coloring. Colors don’t degrade under 350ºF / 176.7ºC baking temperatures, which is far higher than the heat your car interior should ever reach.
The same goes for soda flavorings. Most flavorings are designed for baking purposes which also reach high temperatures needed for baking.
What’s ingredients are left?
Sweeteners and preservatives. Depending on the sweetener, it might or might not be high heat stable. For example, it is known that Aspartame (aka NutraSweet) is not high heat stable. As temperatures increase, Aspartame begins to break down into components such as methanol. Keep in mind that Aspartame is made up of 10% methanol, 40% aspartic acid, and 50% phenylalanine.
Methanol is a highly toxic substance that, when heated above 86 degrees F (as it is in your body), is metabolized into formaldehyde (embalming fluid) and formic acid (the poison in fire ants).
https://www.downtoearth.org/articles/2009-03/13/aspartame-potential-risk-lurking-your-cabinets
As the above quote states, at 86ºF / 30ºC is when methanol begins to break down into formaldehyde and formic acid. This temperature is well lower than the temperatures which can be reached inside of a hot car. During a hot summer day, temperatures in a car can reach temperatures 20-30ºF / 5-10ºC hotter than the outdoor temperature. For example, a 90ºF / 32ºC ambient outdoor temperature can see temperatures rise to between 110ºF-120ºF / 43.3ºC-48.9ºC inside of a car.
If a beverage you’ve left in the vehicle contains Aspartame, it may not be safe to drink if the can has reached these high temperatures. For canned drinks, it takes between 30 minutes up to 1 hour to heat a can up to these high temperatures once in a vehicle.
Beverages that contain other sweeteners, such as saccharine, sugar, stevia or agave, are considered heat safe sweeteners. Sucralose (aka Splenda) claims to be heat safe, but may or may not be. If a drink contains Sucralose, you might want to taste it first. If the drink is no longer as sweet as you expect, a portion of the sweetener may have broken down in the heat and it’s not recommended to drink.
Bottled Drinks
There are two different types of bottles: glass and plastic.

Glass
Glass bottles are safe to drink so long as it contains heat safe ingredients. However, if the bottles have been exposed to UV by sitting in direct sunlight, some of the coloring might have faded and flavors may have changed. I’d be cautious if the bottle has been sitting around for hours in sunlight. I’d strongly suggest a smell and taste for any bottle which has been sitting in UV light for longer than 1 hour. If the bottle has been sitting for an hour, then it shouldn’t be problem. Always use the nose and taste test to determine suitability for drinking. If it doesn’t taste right, spit it out, then toss it out.
Plastic
Plastic bottles are different beast. Plastic bottles can leach plastic and chemicals into the beverage after sitting in a hot car. This goes for water bottles and flavored beverages. If your beverage has been sitting for hours in direct sunlight in a super hot car, toss it out. Don’t risk it. It doesn’t matter if the ingredients are heat safe. It’s the plastic leaching that becomes the problem with plastic bottles.
Wine, Beer and Spirits
Wine is a drink that is best kept at room temperature (i.e., at or below 78ºF / 25.6ºC). If wine bottles are exposed to higher heat, such as 85ºF / 29.4ºC or hotter, the bottle of wine can be ruined. By ruined, the flavors change, the subtle aromas are lost and the bottle may increase tannins, making the wine unpalatable. The longer the wine remains at a high temp, the more the wine may turn into a flavor resembling vinegar. If you open a bottle and it tastes of vinegar, the bottle is bad. This goes for all wines including white, red, rose and bubbly.
Beer, like wine, will also sour and go bad when stored above room temperature for long periods. Unlike wine, beer is carbonated. This goes for sparkling wine and Champagne as well.
If you’re paying a lot for your wine or beer, you want to keep it in your car near an air conditioning vent, then remove from the car as soon as you arrive home. If it’s an especially hot day and you need to do a lot of running around, I’d suggest bringing a cooler with you and placing these into a cooler with ice. That, or shop for these items last.

Spirits, such as Tequila, Vodka and even Liqueurs can go bad in high heat. This is especially true for liqueurs like Bailey’s Irish Cream, which does contains dairy cream. Anything containing dairy should always be stored refrigerated once opened. However, Bailey’s Irish Cream remains shelf stable if unopened and is stored under room temperature conditions.
Changing Flavors
Regardless of whether a drink contains high-heat safe ingredients, sitting in super hot conditions or subject to UV exposure for long periods isn’t good for any food or drink. If you accidentally leave a case of soda cans in your car for three days or longer, I’d suggest tasting one first. By tasting, I mean just that. Taste and spit. If it tastes at all funny, then the cans are bad.
When buying drinks, it is suggested to take them into an air conditioned climate as soon as possible. Sure, you can run around for a little while shopping, but be cautious for how long. If you know you plan to shop the entire day for hours, then plan to bring a cooler and place beverages and food items into the cooler to keep them stored properly and safely.
Explosions
Carbonated beverages have one other problem with high heat. As more and more manufacturers reduce costs, they tend to make their product containers (cans and bottles) as thin as possible. These containers are safe when stored in appropriate conditions. However, under high heat conditions, these containers can weaken and burst.
As high heat creeps in, this weakens a plastic bottle or can, which can lead to an explosion. Safety is a concern when buying a case of cans or plastic bottles and choosing to leave then in a hot car. Glass bottles should be safer in regards to exploding, but the beverage itself may not survive high heat conditions.
Summer Safety Tips

Always store cans and bottles in a cooler, if at all possible. If you know you plan shopping at a number of stores, plan to bring a cooler with ice. This way, you can store cans and bottles in the cooler while remaining out and about. As our summers seem to be getting hotter and hotter each year, carrying around a cooler becomes ever more important.
If you’re buying expensive beer, wine and spirits, then you definitely want a cooler. There’s no danger in storing wine at ice temperatures for a short time, but there is definitely a danger from wine becoming too hot. Same for beer and spirits. For soda or bottled water, it’s fine to remain in the car for a 20 minute drive home, but if it needs to remain in the car for hours, then you’ll want plan a cooler for these as well.
As we move into the hotter days of summer, plan to spend for and use a decent cooler for those days when you need to be out and about for longer than a few hours.
↩︎
Disney Vacation on a Limited Budget
Is it possible to plan a budget vacation to a Disney theme park? That’s what this article intends to determine. Let’s explore.
Vacation Costs
Your primary costs for any Disney vacation include the following:
- Airfare
- Hotel
- Transportation
- Park Tickets
- Food
- Souvenirs
- Incidentals
Airfare, Hotel and Transportation
These costs can be negotiated at the time you book your vacation package. If you purchase these together as a bundle, you can save substantially booking them together. You can also get additional discounts if you utilize AAA or AARP at the time of your booking. You may see better discounts by booking off-season.
If you’re planning to rely on Disney transportation throughout the trip, ensure that your hotel is within walking distance of this transportation or that the hotel offers a shuttle to and from Disney. Any hotel near to Disney is likely to offer a shuttle, but be sure to call the hotel in advance to verify that they offer a shuttle and how often the shuttle runs. You should also confirm how long it will take to get from the hotel to Disney to plan timings. If your hotel is 30 or more minutes away from the Disney by driving, you may want to consider a somewhat closer hotel, but that may cost more money. I always recommend staying as close to the park as you can afford.
Don’t assume that using Disney’s vacation booking system will get you the best pricing. If you have AAA or AARP or Costco or Sam’s Club membership, you should try booking your vacation through their vacation site then compare it to Disney’s vacation booking system. Also compare it to other services like Expedia, Travelocity, Hotels.com, Hotwire and Priceline. You may even be able to insert your AAA or AARP membership number into many of these sites to receive discounts. You should check all of these sites to see what your best cost is.
You can save on airfare if you drive and save on hotel and airfare if you drive a recreational vehicle (RV). See camping below.
Park Tickets
Tickets to any Disney park are a fixed cost. You’ll pay whatever Disney is currently charging for the calendar year you plan to attend. However, you may be eligible for discounts on tickets if you buy them in advance through vacation booking sites like AAA or AARP. Always plan to buy your park tickets in advance rather than at the gate. Purchasing tickets at the gate will cost the most money… so buy them in advance.
However, Disney is constantly changing its arrangements with these membership services. You should always check these membership services when you plan to book your vacation to determine if these sites still offer the most effective discount tickets.
With all of that said, if you have a family of four and you’re wanting to buy 5 days of park access, you should expect to spend over $1200 for four 5 day base passes. AAA typically offers up to a 10% discount which might save you up to $120 on that $1200. A base pass will allow you to enter one park per day. If you want to hop between parks during the same day, you will need to add the Park Hopper option to each ticket (about $100 additional per ticket on each 5 day pass at Disney World). Note, prices are somewhat cheaper for children under 10. To save money, you’ll want to skip the park hopper option and simply plan one park per day. This is the best option anyway because trying to move around between the parks in the same day consumes a lot of time that you could be using at a park.
The Park Hopper option only works between Disney parks including (Florida) Magic Kingdom, Epcot, Hollywood Studios and Animal Kingdom and (California) Disneyland and California Adventure. If you want to visit Universal Studios, Busch Gardens, Knott’s Berry Farm or any other non-Disney parks, you’ll need to pay for access to these separately. You’ll want to plan for access and transportation to any non-Disney parks as part of your budget planning.
Food
Save on food costs by stocking your hotel fridge with sandwich ingredients. You can then make sandwiches to bring with you to the park rather than spending for meals inside the park. A park meal might cost $10-15 where a sandwich and water might cost you $1-2. You can save a lot if you make your own food and bring it with you or leave the park for lunch at the hotel and come back later.
Souvenirs
If you want to buy souvenirs, then you’ll need to budget for them. T-shirts, for example, usually start around $20 and go up from there inside the park. Instead, I might suggest asking the concierge at your hotel if the hotel’s shuttle can drive you to local businesses in the area, like a close Target or Walmart. Because these shops are close to Disney, they likely have a better selection of Disney souvenir merchandise than stores outside the area. These stores know that Disney park stores are expensive and that shoppers will, instead, frequent the close proximity stores looking for better prices on souvenirs. Take advantage of these lower prices at places like Target and Walmart.
Visit these local stores outside the park to buy souvenirs. Sure, you didn’t get it in the park, but you did get it while you were on vacation. The souvenir still counts as a souvenir. There’s absolutely nothing wrong with budget shopping at local retail businesses near the park to save on souvenir costs.
Incidentals
Try to bring as many incidentals with you as you can to save money. These include items like:
- SPF lotion
- Hats
- Coats
- Batteries (bring rechargeables and charger)
- Sunglasses
- First Aid Kit
- Camera
- Medicine (i.e., Pain Reliever, Imodium, Antacid, Cough Medicine, Prescriptions, etc)
- Chapstick
- Phone charger and cable(s)
- Computer power cable
- Power bank for phone charging
- Misting fans / cooling devices
- Bug Repellant
- Towels
- Reading Glasses
If you have to locate any of these items inside or outside of the park, you’re likely to pay more than you expect and paying for these will kill your vacation budget in the process. Shove as many of these into your suitcase and bring them with you to the hotel and into the park as needed.
Choose your Park destination
You can save some pennies by choosing your Disney vacation destination wisely. Many people automatically assume Disney World for their Disney vacation. If you must visit Epcot or Animal Kingdom, then Florida is your only choice. However, Disneyland exists in Anaheim, California and it’s not as captive as Florida. It can also save you some pennies depending on where you live. Southern California offers many options which are as much fun as seeing Disney World. With Southern California, you also have the option of not only the Disney parks, but non-Disney parks, Hollywood tours and the local sights (i.e., Hollywood Walk of Fame).
Choosing Disneyland in addition to all of the parks that Disney offers (i.e., Downtown Disney and California Adventure), non-Disney parks include Knott’s Berry Farm, Universal Studios and if you’re willing to drive a bit, Great America and Six Flags Magic Mountain. Of course, Universal Studios also exists in Florida, but also requires driving. Tickets to Disneyland are a bit less expensive than Disney World because there are less available parks (Disneyland, Downtown Disney and California Adventure). You want to consider this option to reduce costs in your vacation planning.
Choose your hotel carefully
It’s very tempting to stay in the Disney resort hotels. However, these can be very pricey whether in Florida or California. Consider how much time you plan to spend in the hotel room and on the hotel property. If you plan to visit the park the majority of the time, then you’ll be out and away from the hotel property. The only thing the hotel is good for then is sleeping at the end of the day. Unless you plan to spend a day or more to take advantage of the resort amenities, staying at a resort hotel is an unnecessary extra expense. Instead, choose a less expensive standard hotel with fewer amenities. This can save you money that you can put towards food, souvenirs or transportation.
Plan out your park visit
If you plan your park schedule in advance, this can help minimize your expenses. For example, if you bring your own food to the park, you can eat that instead of spending for expensive in-park dining. If your hotel is close enough, you can always take a break, head back to the hotel and eat food there. Many hotels offer both fridges and microwaves (usually on request). You can head to a supermarket and stock the fridge with sandwich fixings for the duration of your stay. Making your own food in the hotel room is the least expensive way to eat food that’s healthier and reduce your expenses. If you visit one park per day, you can save on ticket costs and reduce transportation expenses.
If you do decide to dine at a restaurant in Disney, expect to spend more than you might think. Disney’s dining experiences aren’t inexpensive affairs. You’ll also want to make sure to make reservations in advance. You don’t want to arrive at the restaurant and have to wait and hour or two just to get a table. Reservations save you a lot of time… time that you can better use in the park and get the most out of your tickets. To save the most on food expenses, head to a local grocery store and stock the fridge at your hotel and eat your meals there.
If your hotel offers free continental breakfast or a free breakfast buffet, take advantage of this food and eat breakfast there.
Breakfast with the Characters
If you want to spend a little money on food, this is one of the better ways to do it, particularly when you are with children. You can buy Breakfast in the Park with Minnie and friends. This breakfast experience, while tremendous fun for the kids, can cost between $20 to $40 per person. This breakfast experience alone does not allow you to take advantage of the 1 hour early park opening. You will have to buy the Magic Morning option separately. The Minnie and friends breakfast offers usually around 8 different characters who will interact with you while eating breakfast.
Extra Magic Hour / Magic Morning
One of the perks for staying at a Disney resort hotel is that you automatically get the Extra Magic Hour included with your stay. This means you can enter the park one hour early in the morning and take advantage of select stores and attractions. If you don’t stay at a Disney resort hotel, you can buy the Magic Morning option for each 3+ multi-day ticket. Magic Morning and Extra Magic Hour are available at both Disneyland and Disney World parks. You’ll need to consult the current schedule at the park to determine which parks open early on which days as the early openings change based on the day of the week. If you choose to stay in a Disney resort hotel to obtain the Extra Magic Hour benefit, you will want to call the hotel and confirm that your stay includes this option. Don’t just assume that it does.
When planning your visit in advance and you intend to take advantage of the early park opening, always confirm which park is open on what day so you can plan to visit that park on that day. This is especially important if you’re intending to visit one park per day to avoid the park hopper charge.
Take a Break
There’s always lots to see and do at any Disney park, but it gets tiring walking around the park and standing in lines. When it reaches the hottest part of the day, you’ll want to take a break and head back to the hotel for a few hours to cool off. If you’re at a resort hotel, you can use this time to take a swim, relax in the room or take advantage of other hotel amenities. This lets the heat pass and gives you time to energy up for the evening hours. It also gives you some time to catch late lunch or early dinner and avoid paying in-park food expenses. Taking a break is the best way to enjoy the park.
Carry a water bottle, bag and medicine
You’ll want to take a water bottle and a small bag with you into the park for keys, phone, medicine and flavoring powders. It’s easy to get ice and water from a restaurant to fill your bottle. Then, flavor the water with a flavoring packet you have with you. This saves on buying expensive sodas and drinks in the park. These flavoring powders are packed in small packets which are easily stored in a small bag. Because the packets are so small, you can carry a lot of them. You can sometimes find soda water and make your own soda with a flavoring packet.
You’ll also want to carry a small amount of medicine like Tylenol or other pain relievers, antacid and diarrhea medicine. If you realize you need these while in the park, you’re going to pay a lot to buy a tiny single dose container that may not be a brand you like or be effective. Instead, carry your favorite medicines with you in your luggage when you travel. If you buy your favorite brand medicine before you depart, you can be sure to get the best deals and use brands familiar to you. Having this medicine with you in the park, you’re prepared if your favorite ride jostles you around just a little too much or a food you consume doesn’t sit well. If you or your child has the possibility of anaphylactic allergies, be sure to carry at least one Epipen with you into the park. I’d also recommend avoiding eating foods made in the parks to avoid accidental exposure.
It’s always best to buy your medicines in advance of travel because it’s the least expensive way to get them. And, you may already have them in your cabinet at home which will save you money buying medicine in the park, at the hotel or at a local pharmacy.
Shop Around
Before buying souvenirs willy-nilly inside or outside of the park, shop the stores and see what you like. Visit as many stores as you can in the park, then outside of it. Compare prices and buy the souvenirs that fit within your budget. Keep in mind that the stores in the park carry items that you typically can’t find anywhere else. In fact, Disneyland has merchandise exclusives branded to Disneyland. Disney World has merchandise exclusive to Disney World. You won’t find any Disney World merchandise in Disneyland and vice versa. You’ll want to weigh this when you visit the stores and when planning your vacation. If you plan to buy in-park souvenirs, you’ll want to set a maximum limit to spend. Your souvenir budget is likely to stretch farther if you’re willing to buy items at discount stores outside of the park.
Keep a list or take pictures of merchandise+prices you might want. If you take pictures, you can remember both the style and price when you go looking for a similar item at Target or Walmart close to the park. For items like small pins or buttons, you likely won’t find these outside the park. You’ll want to buy them at the store in the park. For T-Shirts or other clothing items, these are usually cheaper outside the park.
Laundry Facilities
When you’re staying for 5 or more days, you’ll probably need to do laundry at some point. Many hotels offer full laundry service. You’ll want to ask the hotel if they have a self-service laundry room. This can save you money instead of using the hotel’s much more expensive full service laundry. If you can plan your hotel stay at a hotel with a self-service laundry room (call and ask before you make the reservation), you can save money by doing your own laundry. You’ll just need to pick up a small container of laundry soap or carry some with you in your luggage.
First Aid Kit
Bring a small first aid kit with you that contains adhesive bandages, antibiotic ointment and cleaning wipes at a minimum. It doesn’t have to be anything fancy. You can shove these into a small zipper lock bag which fits easily into luggage. If someone in your party is scraped or cut while in the park, you can visit the first aid center, but you’ll also want to take care of it when you get back to the hotel. I’d suggest carrying a few bandages and ointment to the bag you carry with you, but it’s not strictly necessary as the park’s first aid center can help you take care of it right away. It may take some walking to get to it. I can be faster to take care of if you have bandages and ointment with you. If you need to locate a first aid kit while on vacation, it will dig into your budget if you end up at the hotel’s gift shop or, worse, you end up at some all night drug store because nothing else is open.
SPF Lotion
Bring this with you in your luggage. Not only can it be difficult to locate a quality brand in the park, it’s likely to be very expensive for a tiny bottle. You’ll want to carry a small TSA authorized and sized container with you. This allows you to carry it into the park and also carry it on a plane. This likely means transferring some of the lotion from the original container to a TSA sized container. Be sure to label what it is. If you have to go shopping for this later, this will eat into your budget. SPF lotions are not always inexpensive even at the best of times. If you have sensitive skin and need a specific brand, be sure to carry this with you as you may not be able to find the brand you use at your vacation destination.
Hats and Sunglasses
This should go without saying, but bring your hats and sunglasses with you from home. This will save your vacation budget. Of course, if you’re looking for a souvenir hat, then fine. Sunglasses won’t be cheap inside the park. If you can get to a Target or Walmart, you can likely buy a cheap pair. Again, that eats into your vacation budget. Save this money by bringing these items with you from home.
You’ll also want to keep your sunglasses on a string or take them off and hold or secure them inside the bag when riding rides. Same for hats. Hats and sunglasses tend to sprout wings and fly on rollercoasters. Be sure to hold onto them well. This also includes cell phones. If you can rent a locker before heading onto a rollercoaster, you can lock these items up to avoid losing them while riding. Though, you should always hold your cell phone in your hand tightly while riding. You shouldn’t leave your phone in a locker.
Phone charger, cable and power bank
If you know that your phone is likely to run out of power quickly, you’ll want to carry a fully charged power bank and charge cable in your bag (and in your luggage on your trip). If you forget to bring these items with you, you’ll pay $30 to Disney to get a power bank and cable. That’s $30 you could have used to help pay for dinner or a souvenir. Of course, you might be able to run to Best Buy or Target and pick one up for slightly less, but that’s still an expense you can avoid by bringing one with you. It also means you have to leave the park and go run errands, wasting time.
Yes, the TSA allows you to carry a power bank in your suitcase or carry on bag so long as it is inside of a bag that prevents accidental discharge. Purchasing a power bank or cable is one expense you’ll want to avoid.
You may be able to find power outlets inside of Disney to plug in your charger, but that means you’ll be sitting around waiting. If you have a power bank battery in your bag, you can charge your phone while you’re walking around the park. Be sure to remember to charge the power bank each night at the hotel. You’ll also want to have a battery that can charge your phone at least twice or carry two batteries.
Strollers
If you’re traveling with children who need a stroller, you are permitted to bring your own stroller as long as the stroller is less than 36″ x 52″ in size and is not a wagon. Wagons are not permitted. You can rent a stroller at the park, but these obviously cost money. If you’re trying to save on costs, plan to bring your own stroller with you. This means checking the stroller as checked baggage at the airport.
However, many airlines today are now charging for checked bags with fees up to $50. If the checked stroller cost ends up higher than the cost to rent a stroller, renting a stroller may be worth the expense at the park. For example, if you plan a 5 day trip to the park, your rental costs will be $65-75 depending on discounts. This is higher than $50 to check a bag. In this case, it’s worth it to bring your own from home. If your trip is 3 days in the park, then it might be less expensive to rent a stroller in the park.
If you simply don’t want the hassle of carrying a bulky stroller with you while traveling, then renting a stroller is your only option.
Fireworks Show
This tip isn’t really a money saver, but it does let you take better advantage of the money you spent on your tickets. Always take advantage of the fireworks display and other large crowd attention gathering shows (i.e., parades). You’ll want to watch the fireworks show once while you’re at the park. Skip the fireworks shows on the rest of the days. Instead, use this time to ride the long wait time rides.
Because the fireworks show is a huge crowd draw, many people leave the rides to go watch the show. This gives at least 30 minutes to make haste and ride some of the more popular rides like Space Mountain or Big Thunder Mountain. These line wait times can drop precipitously during the fireworks show. Take advantage of this. You can sometimes ride these popular rides more than once in that 30 minute period. You’ll want to find which rides have the longest wait times, then plan to visit these rides during the fireworks show each successive night.
Because this window of opportunity is 30 minutes with the fireworks, you’ll need to plan which rides in advance. For example, riding Space Mountain, then traversing half the park to ride a different ride could lose you 10-15 minutes in walking time. Try to keep your rides close together to maximize this 30 minutes of short lines.
Note that this window of opportunity isn’t always a sure thing. It all depends on how many people realize this drop in wait times and take advantage of it. If you’re in the park on Halloween or Christmas, for example, these are times when the park is excessively crowded. Waiting for fireworks on these nights may not reduce the wait times simply because the crowds are already excessive.
Also note that as soon as the fireworks end, the lines go right back to the length they were before it started.
FastPass
If visiting Disney World, Take advantage of FastPass to reserve times in advance on popular rides. Note that you don’t necessarily have to reserve times the day before. If you’re diligent enough on the phone app, you can sometimes find cancelled reservations that you can immediately take advantage of (within 15-45 minutes). You just need to keep polling the FastPass app looking for cancelations.
Unfortunately, FastPass requires adding the MaxPass option to your tickets which is at least $50 extra per ticket. FastPass is worth it if you intend to ride the most popular rides in the park. Otherwise, you can find yourself standing in line for several hours to ride… or you’ll have to wait for the fireworks show later in the evening and hope the wait times temporarily subside.
Note that FastPass works somewhat differently at Disneyland than at Disney World. You’ll need to download the app on your phone for Disneyland to use FastPass.
Costs
For any Disney vacation, you’ll have to expect to spend around $1200-$1500 for a family of 4 just on tickets. This is pretty much the same cost at Disneyland vs Disney World. Depending on your distance from California or Florida, your airfare may vary. If you live in California and travel to Disneyland, it will be less expensive than traveling from New York City to California. The hotel and airfare might knock you back an additional $1400 to $2500 depending on hotel, airline and time of year.
You’ll still need to plan for food, souvenirs and incidentals. This will probably be another $1000. Overall, expect to spend $2500-$5000 for a family of four not including food or incidentals for a 5 day vacation. Disney World will be slightly more costly than Disneyland. By slightly, I mean several hundred dollars more costly as Disney World ticket prices are higher and hotel costs seem a slightly higher in Florida than in California.
Can you visit a Disney park with less money? If you drive, you can save on airfare. If you have an RV, you can live in that and save on hotel costs. Driving an RV, you can save on both airfare and hotel fees, but you’ll need to pay for RV rental space. Having an RV can substantially reduce your travel and stay costs, but this also means having access to an RV. If you have to rent an RV, per day rental fees can be very similar to hotel room rates and an RV is much more cramped. You may not save much money by renting an RV. You also likely won’t want to use the RV around town, so you’ll need to rent a car when you get there adding to the costs of the vacation.
Camping
If you’re willing to rough it a bit when at Disney World, you can camp at Disney’s Fort Wilderness. You can check this page to determine the going campsite rates. The cheapest rate I’ve seen is $55 a night before tax. There may less expensive non-Disney RV parking and campsites available (i.e., state and national parks). Check Google for details. Parking off of Disney’s grounds means you’ll need to find your own transportation to and from the parks.
Camping near Disneyland is limited considering it’s in the middle of Anaheim, CA. There are several RV parks not far from Disneyland, but you’ll need to find your own transportation to and from the RV park and Disneyland.
RV Parking at the Parks
If you intend to also use your RV as your vehicle, RV parking is permitted at the all Disney World parking areas for a fee. This fee is higher than for a car. RV Parking is only permitted in the Toy Story parking area at Disneyland also at a higher fee. You’ll need to plan for this daily fee in your vacation budget if you want to use your RV to transport you to the park(s) each day.
Tips and Traps
This section is both about saving money and about not losing your money to scams. It’s pretty much common sense, but these are always worth saying.
Avoid Ticket Scams
Don’t buy your park tickets through eBay, Craigslist or other similar classified sites or sellers. Always use reputable sites authorized to sell tickets on behalf of the Disney parks. A few of these reputable sites include:
- Disney Direct Ticket Sales
- AAA travel
- Orlando’s Official Ticket Center (Florida parks only)
- Parksavers
- Costco Travel — Disney Vacations
- Southwest Airlines Disney Deals
- Undercover Tourist
- Your local travel agent
You may find some people claiming to sell partially used tickets. DO NOT buy these! Tickets, once used, are tied to an individual’s fingerprint and cannot be transferred. There’s no way for you to make use of a anyone else’s used ticket. Also, once a multi-day ticket is used, the clock is ticking. Multi-day tickets also expire 13 days after first use. Used ticket sales are always a scam. Don’t even consider this as an option.
However, if a ticket has never been used, these are valid tickets. The problem is, if you’re not buying the ticket from an authorized channel or from someone you absolutely trust, it’s very likely a scam. It’s easy to counterfeit e-tickets and paper tickets to look legitimate. You don’t want to get to the front gate and find out what you bought was counterfeit, then be stuck paying full price at the gate. Always buy through reputable booking services. Don’t get scammed by buying tickets from a classified ad or an individual.
Use your own camera
When in the park, take photos with your own camera. Don’t fall for Disney’s photographic services. Disney will always try to entice you into using their services to take pictures of you with the characters. This is a costly service. Simply ask a cast member to take the picture with your camera or phone.
For safety reasons, only ever ask a cast member with a name badge to take a photo with your camera. Never ask another guest whom you don’t know to handle your property. They can easily run off with your camera or phone and you’ll never see it again. In a place the size of Disney’s parks, you can’t trust anyone to hold your property. The only people in the Disney parks that you can trust to hold your property are cast members. Better, bring along a telescopic selfie stick and hold the camera yourself.
Carry only what you need
This goes back to carrying a small bag with you. If you carry a small zippered bag, you can contain everything you’ll need for a day at the park and not have to carry it in your hands. Because Disney crowds can be varied and large, avoid flashing money if you don’t have to. Also, a small bag allows you to stow your camera, hat and sunglasses when you ride rides. Be sure to secure your bag when you take it onto a ride or use a locker.
Go Cashless
If you have a MagicBand wristband (not available at Disneyland) or room card and you’re staying in a Disney resort hotel, you can charge purchases to your room. I’m not a big fan of doing this because you end up with a whopping bill to pay at the end of your stay. There’s also nothing available to allow you to budget your spending. However, you can go this route if you like. I already don’t trust hotels to tally up the correct amount when the bill is due. Why convolute the bill further by charging in-park items to the hotel room?
You can still go cashless. Because Apple Pay is available within the Disney parks, this means you’ll have flexibility in using your Apple watch or phone device to pay for items within the park. Of course, you can also use a credit or debit card. This avoids cash transactions and it avoids pulling out your wallet for all to see. Unfortunately, it seems that Samsung Pay is not available at Disney. Google Wallet may only be available for use at Disney World. Apple Pay seems to be the best choice for either Disney World or Disneyland. Unfortunately, these cashless options don’t allow for easy budgeting.
Even though Apple Pay is accepted at Disney parks, it may not be accepted at stores outside of Disney. Always carry an alternative payment method when your preferred method is unavailable. For example, Target and Walmart don’t accept Apple Pay. Also, some smaller food carts in the park may be cash only.
Gift Cards and Budgets
If you want to stick to a strict budget while at Disney, buy and fill a Disney Gift card. If you have a $100 a day budget, then add $100 to a Disney gift card. You can use this card when purchasing anything at any Disneyland park, Disney World park or even at a Disney store. Using a gift card avoids overspending in the park and allows you to stick to your daily budget. Buying and using a Disney Gift card is the best budgeting choice at Disney. Note that you can only refill the cards at a location that sells them. There are refill and purchase locations in the park. Online refills are not available. This means you’ll need to buy the card(s) at a Disney Store before you travel or buy them in the park when you get there. You’ll need to allot time to refill the card each morning or before you leave the park each night. Disney gift cards have no fees. Even though the gift cards never expire, you’ll want to use up any remaining balance before you leave the park on your final day.
Protect your gift card like you would any other credit card. However, if it’s lost or stolen, you will need a copy of the original purchase receipt to freeze the account and transfer the remaining balance to a new card. Call 1-877-650-4327 to report a lost or stolen card. You will need to provide the first 12 digits of the Disney Gift Card account number to the agent to freeze the account. You can then visit a gift card location and they will transfer the remaining balance to a new card. Be sure to take a picture of the card number on your phone or write it down and take a picture of the receipt so you always have a copy of both the card number and the receipt on your phone. It’s also a good idea to back up these photos to Google Drive or iCloud just in case you lose access to your phone.
Non-Disney Parks and Cards
If your vacation plans include visits to non-Disney parks, then a prepaid Visa or MasterCard is the more flexible option even though they have fees. With a prepaid Visa or MasterCard, you will need to keep close track of the balance available on the card. Unlike gift cards that let you use every last penny on a transaction seamlessly, prepaid Visa and MasterCards don’t work like this. If you have a balance of $1.22 on the card and you attempt to spend $1.25, the payment will decline. It doesn’t automatically give you the option of spending $1.22 and then making up the difference in cash like a gift card. You’ll need to continually check the balance of the Visa or MasterCard so you know exactly how much you have left.
To work a payment similarly to a gift card, you’ll need to ask the cashier to ring exactly $1.22 onto the card which will succeed, then pay the difference with cash or another payment method. The merchant has no way to tell you how much balance remains on a prepaid card. You’ll have to check the balance online through your phone or computer. However, unlike Disney gift cards, you can refill your prepaid Visa and MasterCard cards online.
Lost or stolen Visa or MasterCard prepaid cards are more complicated. You will need to write down the phone and card numbers listed on the back of your cards or take a photo of the front and back of the card so you have it on your phone. You can then call the number on the back of the card from the photo if your card is missing. Getting a replacement card is not nearly as fast as a replacement Disney gift card. Be prepared to wait for a replacement. You might be able to request Visa or MasterCard to provide emergency cash that you can pick up somewhere close to your location until your replacement card arrives.
Stick to known payment methods
Avoid using odd payment cards like AmericanExpress gift cards, Visa gift cards, MasterCard gift cards, Visa TravelMoney (traveler’s check cards), Traveler’s Cheques (they’re old and antiquated) and other oddball payment methods. These payment methods are not always accepted everywhere and may cause you no end of trouble. The last thing you want is a bunch of vacation frustration because you chose a payment method or card that few places accept. Undoing a mistake like this can be costly and time consuming when you should be enjoying your vacation.
Stick to mainstream, well known and accepted payment methods for your vacation. If you’re unsure about a payment method, call the places you intend to visit while on your vacation and ask if they accept a specific payment method. Keep in mind that not all employees are well versed in what their employer accepts and may tell you, “Yes” just to get you off of the phone. Always ask to speak to a manager to confirm the accepted payment methods. To avoid this possible source of stress, stick to well known, modern and accepted payment methods.
Emergency Cash On-Hand
Always carry emergency cash on your person for obvious reasons. If you need a cab or similar to get out of the park, having cash will get you out of there faster.
Overall
Can you spend less money on a Disney vacation? To a degree, yes. It also depends on you. If your family is up for roughing it outside in a tent, you can save money by staying at a campground rather than at an expensive hotel. You can also save money on airfare by driving to the resort.
If you set a strict budget on your in-park spending, you can reduce your incidental and food expenses.
With that said, if you intend to fly and stay at a hotel along with visiting the park for several days, expect to spend about $300-$400 per person for 3-5 days just on tickets to get into the park. On top of that, add your airfare, hotel and food and incidental costs.
For example, to plan a Walt Disney world vacation stay in Orlando, expect to spend around $3000-$5000 for four people over 5 in-park days. You can reduce this some by reducing the number of days you stay. You may be able to get a discount if you use AAA to book your airfare and hotel rooms. Your costs may be $200-800 lower if you choose to visit Disneyland in California because hotels are somewhat less expensive and the tickets to enter the park are also somewhat less expensive. Airfare is whatever it costs to get your family from your current location to any of the parks. Note that you can have just as much fun at Disneyland as you can at Disney World. It’s just that there’s a bit more to see at Disney World because there are more parks to see.
If you choose to add on Universal Studios or other parks, the costs go up… but you can sometimes get additional park bundles that offer discounts. You’ll need to shop around and compare to get your best deals.
You may be able to get better deals on lower attendance days. You can view the expected Disney park attendance by visiting the Attendance Calendar at Undercover Tourist. Off-peak season begins when the kids have gone back to school and right after the holidays are over. While you may not be able to take your children out of school to go during off-peak, this is the best time to visit Disneyland or Disney World. If you book your trip on lower attendance days, you may also see better deals and discounts. The worst time to book a vacation is within a few weeks of when you want to go, during peak season (June and July) and during the Halloween and Christmas holidays. You’ll get the least discounts booking during peak season.
↩︎
Sunscreens vs Natural Tanning
Every year at this time, the zealots come out of the woodwork promoting sunscreens. After all, it’s a multi-billion dollar industry. The truth is, no one has any idea of long term toxicity risks with regards to the use of sunscreen chemicals. Worse, people slather them all over their bodies without thought to the fact that your skin is the largest organ on your body. Is it worth the long term exposure and unknown health risks with the use of Parsol 1789, Mexoryl or Methoxcinnimate (or any other chemicals)? Unless you have a form of albinism or vitaligo, you should attempt to utilize the skin’s natural tanning properties over the use of chemicals in sunscreens. The natural sunscreen that appears in the skin is melanin. Melanin is much more broad spectrum than any lab created chemical at blocking the various wavelengths of UV (other than UVC, which doesn’t reach Earth).
UVA and UVB
Sunscreens protect you mainly from UVB (think of the B to mean ‘Burn’). These rays are shorter wavelengths and only penetrate shallow skin surface layers. These are the layers that lead to burning. UVA is a much longer wavelength and is associated with deeper skin level exposure (and is thought to aid in premature aging). Sunscreens have limited ability to protect you from UVA. Note that the Sun’s natural mix of UVA and UVB (that reaches the earth) is up to 5% UVB and 95% UVA. However, during some times of the year, the UVB can slightly higher than 5% (where the UV index is at its highest). These are the times where burning is very easy.
Bad Burns
The use of sunscreen chemicals can promote a bad burn. The reasoning is very clear. When you use these chemicals to block the sun, these chemicals prevent tanning. So, the one time you forget the sunscreen, improperly apply it or forget to reapply it, you will likely get a very bad burn. Even though many dermatologists recommend and endorse the use of sunscreens, utilizing the skin’s own tanning properties helps prevent a bad burn. Melanin works 24/7 and doesn’t need reapplication every hour or two. Although, a natural tan does wear off over several weeks if you don’t keep the tan going. On the other hand, sunscreens require frequent reapplication (probably every hour, especially if you’re in water or are sweating). The UVA chemicals actually break down rapidly (as quickly as 30 minutes depending on brand, quality and body chemistry) once applied, so you need to reapply a lot more often than you think to maintain UVA protection. The UVB chemicals also break down, but much more slowly. Having active UVB protection without UVA isn’t that helpful, though. So, you need to reapply.
The point, however, is that you want to avoid a bad burn at all costs. You want to tan and not burn. Thus, the use of sunscreens does not promote natural tanning and promotes forgetting to reapply which can then lead to accidental burns after the chemicals have stopped working. Remember that sunscreens give no warning when they have worn off. Worse, you won’t know your skin is burned until 3-6 hours after sun exposure.
Vacation and Tanning
If you will be traveling to a sunny destination, it is better to build up a natural base tan than constantly applying sunscreen every hour. You can build your tan slowly and steadily outdoors or you can do it in a tanning bed. Nothing ruins a vacation more than a bad burn, however. Having a base tan allows you to be outdoors without worrying about getting a bad burn. Yes, you can still get burned even with a tan, so you should always be cautious. But, having a base tan reduces your chance of a bad burn substantially over forgetting to apply sunscreen.
Beginning your Tan
To obtain a base tan, start the tanning process at least 6 weeks out from when you leave to go on vacation. You can do this outdoors or in a tanning bed. Note, however, that tanning beds are concentrated, but also timed. So, for example, 12 minutes in a high pressure bed is equivalent to about 2 hours outdoors. So, if you can only do about 15 minutes outdoors in midday sun, then you should start at about 6 minutes in a 12 minute bed. You would think to start at about 2-3 minutes, but 6 minutes isn’t enough to burn you in a bed in one session. Needless to say, always discuss tanning bed times with your salon professional.
Another note about tanning in a tanning bed. DO NOT USE SPF SUNSCREEN WHEN TANNING IN A TANNING BED! This is emphasized because it wastes your money. Yes, you can use low SPF to aid tanning outdoors only, but never use SPF in a bed. Even though a tanning bed mimics the UV from the sun, it isn’t the sun. It is also time controlled.. and this is very important to understand. Time controlled means that you do not need to worry about accidentally getting too much exposure. The maximum you can get in one session is equivalent to 2 hours outdoors at maximum bed time. Because the time is controlled and there’s little risk of a burn, there is no need for sunscreen. Further, using a sunscreen in a bed is a waste of money. If you spend $10-$40 per session, using SPF sunscreen completely prevents the rays from tanning you. So, you will have spent your money for nothing, literally. When using tanning beds, you are paying for access to the UV. SPF lotions prevent that UV from tanning you. Don’t do this unless you really like throwing your money away.
Reading your Skin
Understand that a burn is red and melanin is also red (initially.. and oxidises to brown). So, which is a burn and which is melanin? If there’s heat, redness and/or discomfort (followed by peeling), then it’s a burn. If you see redness only without any heat or discomfort, then that’s melanin. Controlled tanning will allow you to build up a base tan without peeling. If you peel, then you’ve 1) burned your skin and 2) lost your tanning efforts. You want to gain color slowly to prevent burning and peeling.
Lotions
When tanning in a tanning bed or outdoors, using a high quality tanning lotion is important. A lotion hydrates your skin before, during and after UV exposure. So, always use a lotion as sun exposure is very dehydrating. Tanning bed lotions can be used outdoors. However, most outdoor lotions cannot be used in a tanning bed (it can cause reactions with the acrylic surfaces). So, if you want to combine bed tanning and outdoor tanning, buy a lotion that works in a bed and also use it outdoors. Again, make sure the lotion does not have any sunscreen at all. You can buy a sunscreen lotion if you really need it for outdoor use.
There are various lotions on the market from various vendors. The one thing I will caution you about is that some tanning bed lotions can be very expensive and, yet, completely ineffective. You want to find a lotion that works for you and that provides results. However, don’t be fooled by ‘Triple Bronzing Formulas’ or ‘Quadruple Bronzing Formulas’. These are buzzwords that mean they have added either 1) color or 2) self-tanners (yes, like the ones you can get at the drug store). If you want to see how you are progressing naturally, make sure to NOT buy any lotion with a self-tanner. This may mean you have to buy the lotion from the Internet (which are cheaper this way anyway) than buying it from the salon.
You will need to read the label for self-tanners. The two common self-tanners are dihydroxyacetone and erythrulose. So, if you find these ingredients in the lotion, put it back on the shelf and find something else. You may find that your salon does not carry any lotions without self-tanners. The reason that salons carry ‘Bronzing formulas’ is that these lotions give immediate color (or, at least, within 4 hours). This immediate gratification supposedly brings back the customers. However, don’t be fooled. You want a real base tan, not a self-tanner tan. So, skip self-tanner bronzer lotions and find a lotion without self-tanners.
Here are a couple of manufacturers that make lotions without self-tanners: Designer Skin (Intrigue and a select others) and Hoss Sauce (Dark, Super Dark and Ultra Dark). I personally have found Hoss Sauce to be more effective than Designer Skin, but your mileage may vary. There are some lotions that also offer tingle, hot or cold sensations when you are tanning. Avoid these until you have a base tan. Otherwise, these may interfere your tanning or increase your chances of a burn.
Note: Self-tanner color offers no protection from UVA or UVB. Don’t be fooled by the color from a self-tanner. It offers no protection from the sun and, again, can encourage a bad burn. When trying to obtain a base tan, always use a lotion without self-tanners!
Tanning Beds
When tanning at a salon, you will find many different tanning beds. The least expensive beds (sometimes $6-8 a session) are the least effective beds at tanning. They should have a ratio of 5% UVB to 95% UVA (just like the sun). However, you may find these beds aren’t that effective. There can be many reasons for this. Cleanliness in a salon is very important. Bulb age is also important. Many tanning salons have these beds booked every open hour of the salon. These bulbs, then, get a lot of use. Many salon owners try to cut costs by not replacing the bulbs as often as they should. If you find that you get nothing out of a bed, the two main reasons are that 1) the acrylic is dirty and 2) the bulbs are old. When I say the acrylic is dirty, I’m not talking about the part where you lay. I’m talking about the underside of it. These acrylic surfaces must be removed about once a week and thoroughly cleaned on both sides. The bulbs themselves should also be wiped down to prevent any buildup on the bulb. Doing this frequently increases the tanning capability of the bed to what it should be.
Many salons pride themselves on thoroughly cleaning the bed surface, but how often do they remove the acrylics and clean the underside? Not often in many cases. Yes, even the ‘expensive salons’ as well. So, you should ask the salesperson how often the underside gets cleaned.
As far as tanning capacity, on the high end beds (high pressure beds), it is not uncommon to find up to 18000-20000 watts in the bed. The low end beds might provide around 9000-11000 watts. The difference in wattage (and UV output) is substantial. The high pressure beds, then, will probably run between 8-12 minutes for the maximum time of that bed per session. Low pressure beds might run between 20-30 minutes. So, if time is important to you, the higher pressure beds get you in and out faster.
Note, never tan in a bed and then immediately lay out or stay outside for extended time without sunscreen. You are asking for a bad burn. Do not do this. If you tan in a bed and then end up outdoors in the sun the same day, wear some sunscreen outdoors. Or, better, don’t tan in a bed on the day you plan on being outdoors.
Tricks for tanning in a bed
When trying to get your base tan in a tanning bed, you will need to move around in the bed. Don’t lay absolutely still. For example, lay on your back for a bit, then lay on one side, then the other, raise your arms, etc. Doing this will give you a much more even tan than lying perfectly still. If you stay still, you will get telltale bed marks on certain places like your shoulder blades and between your buttocks (where the acrylic touches). Moving around prevents these marks. You might even turn over and lay on your stomach for a while (even in a bed where you don’t need to turn). You can also use a standup tanning booth to avoid these issues.
How long does it take?
This question can really only be answered by the salon operator after they have assessed your skin type. Once they determine your skin type, they can tell you what you need to do in order to progress. However, you need to read your skin after you have tanned at a salon to know if you are going too fast. If, after a session, you have no color or redness by the next day, then you may be progressing too slowly. However, if you are red, hot and having discomfort, you are moving too fast (burned). If you do get a burn from a bed or outdoors, do not tan until the burn has gone away (takes several days).
For the lightest skins, it may take between 6-9 weeks to build a minimal base tan. For medium skin tones, you can probably see a base tan in 3-6 weeks. For dark tones, you probably already have a base tan, but if you are a lighter skinned, it may take 2-3 weeks in a bed. As a side note, dark tones can still get darker. Melanin works the same way in all people who can produce melanin.
Again, these are only estimates. You should always discuss your skin type with the salon owner to set up a proper regimen that works for you.
Melanin Colors
This portion is to set expectations on how your skin may look tanned. Note, there are two different types or melanin (pigment): 1) pheomelanin (reds and yellows) and 2) eumelanin (dark browns). The darkness of color depends on which types of melanin your body produces and the concentration of each type. Lighter skinned people tend to produce more pheomelanin (reds and yellows) and less eumelanin (dark shades). This mix gives the redish and yellowish copper or ‘golden’ colors. Darker skinned and olive toned people tend to produce much more eumelanin and with less pheomelanin. This color becomes much darker brown to black. Darkest toned people tend to produce nearly all eumelanin and in high concentrations. So, depending on your body’s type of melanocytes, your body may produce a range between both of these types of melanin. You’ll just need assess your tone after you’ve tanned. This also means that, depending on your skin type and melanin mix, you may not be able to turn very dark brown (if that’s what you are wanting). Or, alternatively, you may find that you get darker much faster than you thought.
You can gauge your skin’s tone by your hair color. The darker your hair, the more eumelanin your skin is likely able to produce. Melanin is also used to produce hair color. So, red haired people will likely produce more pheomelanin. You can see this color in the freckles of many red haired people. Blonds are likely to produce much more pheomelanin than eumelanin (blond would be the yellow melanin). Black haired people should be able to produce the darkest brown eumelanin tones. Note that hair color should only be used as a guide as some dark haired people may only produce a lighter ‘golden’ tan.
Melanin of all types will eventually oxidise to a brown color from its initial color and deepen the color of the tan. This oxidation will make the familiar brownish tones (yes, even the reds and yellows will oxidise).
Other Benefits
Getting UV exposure to your skin also helps maintain health with Vitamin D. Sunscreens prevent the creation of Vitamin D as UV is blocked. So, getting some UV exposure aids in stimulating the creation of beneficial vitamins. So, before you immediately put on that sunscreen, leave it off for a small amount of time to get your vitamin D. Put it on later to prevent the burning.
Suntans, Skin Types and Hormones
Some people feel that a suntan looks bad and prefer not to have a tan. Again, that thinking promotes a bad burn when you do need to be outdoors. Some people may think this way because they haven’t previously been able to tan. Some skin types (type I) can’t readily tan. For Type 1 and Type 2 skins, there is a product that may soon be on the market to help. It is a peptide (melanocyte stimulating hormone) that stimulates the melanocytes to produce melanin in individuals who do not have this hormone or where the hormone is ineffective. For many people, this simulated hormone works and allows people to tan in the sun or in a tanning bed when they previously couldn’t get a tan. Of course, this hormone only works if the melanocytes are functioning properly. By having a base tan, this prevents burns and also helps reduce premature aging by blocking UVA. Note, however, that you must get sun exposure to obtain a tan even with the use of this hormone. It does not tan you without sun exposure. So, the use of the hormone still requires UV exposure to obtain the initial tan.
Overall, sunscreens may not be long term healthy for your skin. Getting a tan requires some sun damage to obtain the tan. But, the melanin helps reduce the risk of burns and other related issues. It’s up to you to choose what you want to do, but nothing in life is without risks. Know that a tan is a natural skin process. Placing chemicals on your skin is not natural. Even though you cannot see or feel any damage by using sunscreen chemicals, that doesn’t mean no damage exists. When you get a sunburn, you feel it and know the skin is damaged. With sunscreen, there’s just no way to know if something you get later in life was related to earlier years of using large amounts of sunscreen. It’s your choice, however.
Skin Cancer and Burning
Yes, I know, we’ve all heard the rhetoric: Exposure to UV causes cancer. I’ll leave this one for you to decide. But, I will say is this. Tanning beds produce UV. The Sun produces UV. UV is UV is UV. It doesn’t matter whether it comes from the Sun or from a flourescent bulb in a tanning bed, it’s still UV. But, as I stated above, the difference between a tanning bed and laying outdoors: one is controlled, one isn’t. Again, it’s for you to decide which to choose. But, because of varying conditions with laying outdoors, you could end up burned and not know it for several hours. On the other hand, a salon will assess your skin and put you in a bed that’s timed based on your skin tone and type. So, they are trying to keep you from getting burned in a Salon. The Sun is not controlled or timed to shut off. This means, if you lay out longer than you had wanted or get caught up in an activity, you can easily forget and burn yourself. Burning is definitely damage to the skin and it is theorized that this damage leads to cancer… so you want to avoid a burn at all costs.
UPDATE: World Health Oganization (WHO) lists sunbeds (specifically) and all UV exposure as fully carcinogenic at all wavelengths (highest risk)
A new study conducted with mice, that I’ve yet to read, has classified sunbeds specifically and all UV exposure as the highest risk of causing skin cancer. I’m not sure what prompted this change in view, other than a single study, but they have made this change. Clearly, one study is not enough to make this determiniation, but that is exactly what the World Health Organization is doing. There must be some subtext here that’s prompting this change. Perhaps the sunscreen industry is losing more money to people choosing to tan rather than slather on the sunscreen.


leave a comment