How to Overcome Apple’s Face ID Lockouts
 If you’re an Apple iPhone user, your phone likely utilizes Face ID biometrics to authenticate you and unlock your phone’s features. While this authentication system seems fine when it works, what happens when it fails? Not what you’d expect. Clearly, Apple didn’t think the failure design through. Let’s explore.
What is Face ID?
Face ID uses a series of hardware technologies including infrared, lidar and front facing cameras to scan your face and recognize you. It was touted by Apple as a better alternative to Touch ID, a fingerprint scanner, which was available on earlier iPhone models (and some current models too). Let’s just say that I prefer Touch ID over Face ID for various reasons, but I digress.
Face ID works fine under most circumstances, but there are conditions where Face ID could fail and prevent you from getting into your phone to perform critical diagnostic and/or troubleshooting features (or even backing it up onto your computer).
When you hold your phone to your face, the camera(s) scan your face for a number of key features which are then used to identify you no matter what angle or lighting (more or less) your face may be in. The reliability of this scanning technology is all dependent on the scanning hardware functioning 100% properly. We all know that hardware is prone to failure, either hard failure in the hardware itself or even soft failure by such things as poor lighting conditions, blocking the sensors or interference. Whatever the failure reason, Face ID has some important concerns and bugs that Apple needs to address.
Face ID Failure
This is the crux issue in Face ID that leads to all other related problems. Let’s begin with some relevant context. When you log into your favorite website or app, you’ll need credentials. Often, these consist of a username and password combination. There may be extended ways you can get authenticated beyond these two pieces of data, such as sending a one time SMS code, using an authenticator app, prompting you to press ‘accept’ in an app on another device or even using your voice, when calling into certain phone systems.
Typically, when one authentication type fails, developers offer one or more backup redundant authentication systems to help you get logged in. For example, if you’ve lost your password, sites allow you to reset your password. Resetting your password has you walk through various steps to identify that you own that account, usually by asking key questions like Name, Birth Date, Home Address or any other information that only you may know. You can often even call the support team at a website and ask them to help you get your password reset or cleared. These redundant designs prevent users from landing in dead end failures, as long as you have various other identifying data on hand to prove that you are you.
Not with Face ID… :(
Apple’s Bad Face ID Implementation
Apple created Face ID so that should Face ID fail to authenticate, it leads to a true dead end failure condition. There’s no additional way to authenticate with Face ID beyond that Face ID failure. When Face ID fails, it fails hard and it fails done. Even though the iPhone has the ability to access and request alternative identifying information, such a passcode, requesting and using your Apple ID credentials, requesting identity on other Apple devices and/or using an SMS code, NONE of these other authentication systems are used or available when Face ID fails! Nope. Apple just dead ends Face ID failures into nothingness. Face ID works or it doesn’t. When it doesn’t… yeah, here we open…
Pandora’s Box (aka Stolen Device Protection)
Apple Developers, in their infinite wisdom, have chosen to lock many critical troubleshooting and corrective features behind a successful Face ID verification. One might be thinking, “Well, that seems secure enough. So, what’s the problem?” Let me tell you.
One such feature locked behind Face ID verification is Device Protection under Face ID settings. If the Device Protection feature is toggled on, there are a number of things that Device Protection controls, including the ability (or not) to toggle Device Protection off. Another feature locked by Device Protection is the ability to use the Face ID Reset Data function, which becomes restricted and unusable when Face ID fails to verify.
This leads to a circular problem. Can’t verify with Face ID. Can’t reset Face ID’s biometric verification data to attempt to fix Face ID. Because the Reset Data function remains greyed out without a successful Face ID verification, you’re essentially locked out of the feature you need most to try to FIX Face ID. Not even Apple Support or the Apple Store can help you solve this dilemma.
Other critical features like a local Device Reset or a local Device Wipe are also locked behind Face ID when Device Protection is enabled. Once again, critical troubleshooting and corrective steps are eliminated simply because Face ID fails to verify.
How might this impact you?
There are a number of scenarios where Face ID failing to authenticate your face may affect you:
- You cannot attempt to fix Face ID if Device Protection is enabled and Face ID fails to authenticate.
- You cannot reset the device locally because Face ID fails to authenticate.
- You cannot wipe the device to factory settings because Face ID fails to authenticate.
- You can’t use many apps that rely on Face ID to authenticate you when Face ID fails.
And no, the passcode doesn’t help you here and neither does your Apple ID password. If you receive a used iPhone from a family member (or even from a used phone seller) and you want to wipe it and set it up new for yourself, you cannot do this. When Face ID was originally enabled, that means the phone will need to see the original owner’s face to unlock Face ID to enable a local factory reset and wipe options in settings.
This is particularly problematic when the device is shipped cross country and the Face ID person is not in close proximity. To solve, this means shipping the device back to the person, having them perform the wipe and then having the device shipped back. Let me just say here that SHIPPING IS EXPENSIVE! Best to avoid this back and forth shipping.
The unnecessary shipping can be avoided in used phone purchases if the seller fully wipes the device to factory defaults before shipping. However with family members, they often simply turn old phones off and forget about them. Then hand them over just as they are to other family members, leaving situations like the above.
But Wait, There’s More!!!
Apple does offer a feature that’s fairly sledge-hammery, but this feature will let you at least get the phone out of your Apple ID account as long as you own more than one iOS or MacOS device and the device exists in the “Find My” app OR you have a computer with a browser and can log into the iCloud.com website. The “Find My” app offers a critical security feature that allows you to remotely wipe your Apple devices to factory defaults, even if the device is not currently in your possession. The device will, however, need to be connected to the Internet to receive and perform the request. If the device is in your possession, there’s no problem at all. If it’s lost or stolen, it all depends on timing. If you can see the device is active and pinging in the “Find My” app, then you can wipe it.
When you buy a new iPhone, the first time you connect it to your Apple ID, this action automatically enrolls the device in the “Find My” app for tracking. You don’t need to manually add devices to this app. Apple often makes these things simple and easy for new users. This is one of those apps that “just works.”
The good thing about the “Find My” app wipe is that because it’s a remote wipe using another device on your Apple ID (usually performed because a device is lost or stolen, but can be used for other purposes), this remote wipe works around all security on the device itself, including Face ID. Meaning, no matter what security settings you have set up on the device, the remote wipe will do its thing without needing to touch the device at all.
There are some important things to consider about using “Find My” app to wipe your device, though. This wipe does as it sounds. It wipes all settings, data and information from the specific device. If you have photos or videos on the device, these will be wiped. The wipe feature erases everything back to factory defaults with the exception of ONE critical thing.
The wiped device will be placed into an Activation Lock (Cloud Locked) status. This means that in order to reactivate and use the device again, the original owner must type in their Apple ID credentials (login and password) to unlock the device for reuse. Once that’s done, the device is basically as if it’s brand new and is available to be set up again as though it were a new phone.
There are a few downsides, though. The wipe is just wee bit sledge-hammery when all you’re needing to do is something simple, like clearing out Face ID data. Because the “Find My” app lists ALL of your devices in a single convenient location, you will need to make absolutely sure that you have selected the correct device BEFORE sending out the wipe instruction. Don’t make a mistake here! Choosing the wrong device name means it will wipe that device instead. Make sure you name your devices properly for easy identification and double check that you’ve selected the correct device! You don’t want to wipe you or your spouse’s current phone accidentally. Caution is in order here.
However, the “Find My” wiping feature does mean that you can at least get your iPhone back into a workable state to begin setting it up again. If your phone has been backed up recently, then you won’t really lose all that much other than the time it takes wipe and restore the phone from your most recent backup, assuming you can get the phone back or you have it in your possession. You are backing up your phone’s data regularly, right?
How to Send a Remote Wipe Request to an iPhone
 To wipe a device remotely using “Find My”, you will need to log into the “Find My” app on a different device under the Apple ID where that device is associated. You can do this on an iPad, iPhone, MacBook or via iCloud.com in a web browser. You don’t necessarily need to have another Apple device, but you will need access to a computer or phone with Internet access and a web browser to log into iCloud.com using the Apple ID credentials associated with the iPhone. For this purposes of this article, iCloud.com is used to show how to find and use the “Find My” feature. These options are also available in the “Find My” app on iOS devices.
Since iCloud.com is a website, it’s possible Apple may redesign this website from time to time. That means that the image shown here in this article may change. The “Find My” feature may remain available, but may be located in a different place and/or may present with a different user interface. If the user interface is different from what’s shown here, you will need to look for the “Find My” app in iCloud, open it and then determine how to get to and use the described features.
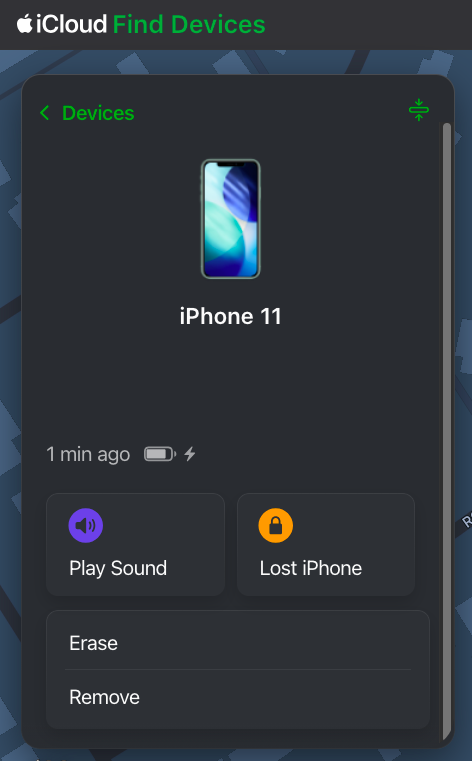
After logging into iCloud.com using the correct credentials, scroll down to the bottom of the page and you will see an array of available apps. One of the apps is “Find My”. Click it to open up the “Find My” app.
Once you have opened the “Find My” app, you will be given a number of options for each device when selected, including Play Sound, Lost Phone, Erase and Remove, at least for an iPhone. Different devices may be given more or less options, depending on the device type. The “Find My” web app may update a bit more slowly than the app available on an iPhone, iPad or Mac. You may need to wait a few minutes for the “Find My” web version to refresh fully for all of your devices to show active and online. You will be unable to send any remote commands to a device until that device is shown as online.
Once you have selected the device and opened it up, it will show you a control panel like the one shown above. The Erase option is the option you will need to remotely wipe the device. Again, make sure you have selected the correct device. I’d suggest playing a tone on the device using the “Find My” app to ensure that the correct device is chosen. However, if you’re erasing a device that is not in your possession (i.e., it’s stolen), don’t play a tone. You don’t want to alert the thieves that you’re looking at the device. In a stolen device case, check to see where the device is in the world on the map. If it’s not where you expect it to be, then you’ve selected the correct device for a wipe.
If you’re trying to solve the issue presented above and you have the device in your hand (or another person has it in their hand while you talk to them), play a tone to confirm the correct device. Once confirmed, send the erase command to the phone. If another person has the device in their hand, make sure they are talking to you on a separate device from the one that is about to be wiped. Once you send the wipe command, the phone will stop functioning. They will need to be on a different device talking to you for the duration of the wipe.
Remote Erasure — How does it work?
Once the Erase command is successfully sent to the device, the phone will immediately begin requesting to enter passwords with various popups. These popups indicate the command has been received by the phone. Ignore the popups and do nothing about them, though. At this point, the phone will need to be turned off and turned back on. Once the phone has been rebooted, the wipe will begin. The iPhone screen will turn black, a white Apple logo will appear and a small progress bar will appear just below the Apple logo.
The phone may reboot a couple of times during this wipe process, each with progress bars. Once the wipe process has completed, the device will go into Activation Lock (Cloud Locked) mode. When the phone is powered on after the wipe has completed, the phone may require setting up WiFi access before moving forward. However, at some point, you will be prompted to enter the Apple ID and Password of the person who originally owned the phone. This is a Cloud Lock. Entering these credentials will remove the Cloud Lock status and put the phone into a factory default setup mode to begin setting the phone up as if it were brand new. Once the Cloud Lock status has been removed, the phone is no longer associated with the Cloud Locked Apple credentials in any way.
Stolen Device Protection vs Cloud Locking
Here’s just a little bit of commentary about the Stolen Device Protection feature itself. I’m not exactly sure what Face ID’s Device Protection feature is actually trying to solve, honestly. Apple has already previously developed Cloud Locking. The Cloud Lock system is an effective deterrent for theft or loss. Should someone manage to get past the passcode and into your iPhone, they can’t wipe your device because the wipe process requires logging out of iCloud using the user’s Apple ID credentials and password. The wipe will stop and fail if the correct credentials are not input during the wipe process.
Unfortunately, Apple has taken this wiping problem one step further with Face ID’s Stolen Device Protection. With Device Protection enabled, not only do you still need to enter your Apple ID credentials during portions of the wipe to take it out of iCloud, but Face ID must function to even begin the wiping process.
Again, because Face ID dead end fails, this can lead to the possibility of never being able to actually remove a device from your Apple account in the expected way, by wiping the phone on the phone. Maybe you bought a new iPhone because your Face ID system stopped recognizing you. That’s fine and all, but now you cannot remove that device from your Apple ID because Face ID prevents wiping the device from the device itself. Yeah, this is Apple not thinking things through.
That is, until or unless you realize that the “Find My” app allows for remote wiping your device(s), which does solve the above Face ID dilemma. Just be cautious when selecting a device to wipe. Don’t pick the wrong one.
Conclusion
So, yes, there you have it. There is definitely a bug in Apple’s Face ID authentication system that can prevent you from locally wiping or locally fixing your Apple device. An authentication bug that should be considered oversight by Apple’s developers. However, all it is not lost. Apple has provided us with a sledgehammer approach in the “Find My” app to workaround this bug, as long as you have other devices that can initiate the wipe inside of “Find My” and assuming that the “Find My” feature is working correctly on the remote device. Lots of things need to line up properly for the “Find My” device wipe to function.
If you have run into similar issues regarding Face ID failures, please sound off in the comments. If this article was helpful to you, please follow, like and leave a comment below.
↩︎
Fediverse Reactions
Security Tip: Apple ID locked for security?
 This one also doubles as a Rant Time. Having my Apple ID account locked is an issue I face far too often with Apple. Perhaps you do, too? In my case, no one knows my account ID. Yet, I face having to unlock my account frequently because of this issue. I personally think Apple is causing this issue. Let’s explore.
Unlocking an Apple ID
As with far too many things, Apple’s unlocking system is unnecessarily complex and fraught with digital peril after-the-fact… particularly if you enable some of Apple’s more complex security features (i.e., Two Factor authentication).
One of the things Apple hasn’t yet to get correct is properly securing its Apple ID system from intrusion attempts. That doesn’t mean that your account is unsafe. What it means is that your account is unsafe against malicious attacks targeting your account ID. But, there’s an even bigger risk using Apple’s ID system… securing your credentials by using an email address. I’ll come back to this practice a little later.
Once your account becomes locked, there are a number of major problems that present. The first immediate problem is that you need to remember your security questions OR face changing your password (assuming standard security). If you use Apple’s two-factor authentication, you face even more problems. If you don’t use two-factor and you’ve forgotten your security questions, you have the option to contact Apple Support to help you with your security question problems to gain access to your account. On the other hand, if you’ve forgotten your security information set up when enabling two-factor, you’re screwed. Apple can’t help you after you have two-factor set up… one of the major reasons I have chosen not to use two-factor at Apple. Two-factor IS more secure, but by using it you risk losing your Apple ID if you lose a tiny bit of information. That risk is far too great. With all of the “ease of use” Apple is known for, its Apple ID system is too overly complex.
The second problem is that once you do manage to get your account unlocked, you are then required to go touch EVERY SINGLE DEVICE that uses your account ID and reenter your password AGAIN. This includes not only every Apple device, but every device utilizing Apple services such as Alexa’s account linking for Apple Music on the Amazon Echo. If you use Apple Music on an Android, you’ll need to go touch that too. It’s not just the locking and unlocking of your account, it’s the immense hassle of signing into your Apple ID on EVERY SINGLE DEVICE. Own an Apple Watch? Own an Apple TV? Own a Home Pod? Own an iPad? Own a MacBook? Use Apple Music on your Android? You’ll need to go to each and every one of these devices and touch them.
On the iPhone, it’s particularly problematic. You’ll be presented with at least 3 login prompts simultaneously all competing with one another on the screen. Later, you’ll be presented with a few more stragglers over the course of 30 minutes or an hour. Apple still can’t seem to figure out how to use a single login panel to authenticate the entire device and all of its services. Instead, it must request passwords for each “thing” separately. So many prompts pop up so fast you have no idea which one is which because none of them are labeled as to which service they are attached. You could even be giving your account ID and password to a random nefarious app on your device. You’d never know. If you own an Apple Watch, you’ll have to re-enter it separately for that device as well. Literally, every single device that uses your Apple ID must be touched after unlocking your Apple ID. Unlike Wi-Fi passwords which you enter once and it’s shared across every device you own, Apple can’t possibly do that with its Apple ID system so that we enter it once and it populates ALL of our devices. No. We must touch each and every device we own.
Worse, if you don’t do go touch each and every one of these devices immediately upon unlocking your account, you risk having your account locked almost immediately by just one of these devices. Apple’s ID system is not forgiving if even one of these devices hasn’t logged in properly after a security lock. You could face being locked out just a few hours later.
So the rant begins…
Using Email Addresses as Network IDs
Here’s a security practice that needs to stop. Apple, I’m l👀king at you! Using email addresses as an ID was the “norm” during the mid-late 00s and is still in common practice throughout much of the Internet industry. It is, however, a practice that needs to end. Email addresses are public entities easily seen, easily found and, most easily, attacked. They are NOT good candidates for use as login identifiers. Login identifiers need to use words, phrases or information that are not generally publicly accessible or known. Yes, people will continue to use their favorite pet’s name or TV show or girlfriend’s name as login IDs. At least that’s only found by asking the person involved. Email addresses are not required when developing login systems. You can use tie the email address to the account via its profile. But, it SHOULD NOT be used as a login identifier.
When an Apple ID account gets continually locked, Apple Support suggests to change the login ID, but that’s not going to change anything. You’re simply moving the crap from one toilet to another. Crap is still crap. The problem is that it still uses an email address and, to reiterate, email addresses are easily seen, found and attacked. What I need is a login ID that’s of my own choosing and is not an email address. This way, random folks can’t go to Apple’s iCloud web site and randomly enter an email address intentionally to lock accounts. If I can choose my own login identifier, unless I give that information out explicitly to someone, it’s not guessable AT ALL and far less likely to be locked out by random folks entering junk into web based Apple’s login panels.
Oh, and make no mistake, it’s not people on an iPhone or iPad doing this. It’s people going to Apple’s web site and doing it there. There is no other place where it can be happening. And yet, we unsuspecting users are penalized by having to spend a half an hour finding and reentering passwords on all our devices because someone spent 5 minutes at Apple’s web site entering random information incorrectly 3 times. Less than 5 minutes worth of effort triggers at least 30 minutes of work unlocking the account and reentering passwords on many devices and services. And then there are the stragglers that continue to prompt for at least an hour or two after… all because Apple refuses to secure its own web site login panels from this activity. This is not my problem Apple, it’s yours. You need to fix your shit and that’s something I absolutely cannot do for you.
Notifications
Apple prides itself on building its push notification system, yet it can’t even use it to alert users of potential unusual activity on its very own Apple IDs. If someone is incorrectly trying passwords on a web site, they know where this vector is. So then, tell me about it, Apple. Send me an alert that someone is trying to log into the Apple Store or the iCloud.net site. Inform me that my ID is being used in a place that seems suspect. You know the IP address where the user is coming from. Alert me. Google does. You can, too.
Additionally, Apple stores absolutely NO information about bad login attempts. If you attempt to contact Apple Support about your account activity, they don’t have access. They can’t even tell you what triggered your Account ID lock. This level of information is the absolute bare minimum a company using centralized login IDs must offer to its users. If Apple can’t even bother to help you find out why and where your account was locked, why would you trust Apple to store your information? Apple puts all its cards on its functionality side, but it can’t put a single card on this side of the security fence? What the hell, Apple?
Apple Locking Accounts
I also firmly believe that Apple is intentionally locking accounts. When these lockouts occur, it’s not me doing it. I’m not out there entering my account credentials incorrectly. It’s not my devices, either. My devices ALL have my correct password setup. This means that either someone has guessed my email address or, more likely, Apple is intentionally locking the account. I firmly believe Apple is intentionally doing this internally and it’s not incorrect password attempts at all. The more it happens, the more I believe Apple is forcing this. I don’t know why they would want to do this, but I do believe they are. Maybe it’s a disgruntled employee who just randomly feels the need to screw with Apple’s users?
Apple’s Response
I’ve called Apple Support at least twice regarding this issue and gotten absolutely nowhere. They can’t and, more importantly, won’t help with this issue. They claim to have no access to security logs. They can’t determine where, when or why an account was locked. In fact, I do believe Apple does have access to this information, but I believe Apple Support has been told not to provide any information.
If Apple Support can’t give this information, then this information should be offered through the Apple ID account site (appleid.apple.com). This site should contain not only the ability to manage your Apple ID, it should also store and offer security information for when and where your ID was used (and where the account was used when it locked). Yet, Apple offers NOTHING. Not a single thing. You can log into this site, but there are no tools offered to the user. Apple exposes nothing about my account use to me. Google, on the other hand, is very transparent. So transparent, in fact, that they send “unusual activity” alerts whenever your ID is used in an unusual way. Google errors on the side of over-communication. Yet, Apple hasn’t done shit in this area and errors on the side of absolute ZERO communication.
Get your act together Apple. Your Apple ID system sucks. Figure it out!
↩︎


1 comment