Recipe: How to make Sushi Rolls
 I love Sushi rolls from time to time, but I don’t often eat raw fish. This is a follow-on article from 2019’s Perfect Sushi Rice from the Microwave. This article focuses on how to actually make sushi rolls with the filling of your choice. Remember, you aren’t limited to what a Sushi restaurant offers. Let your imagination run wild and fill your roll with whatever tickles your fancy, sweet or savory. Let’s explore.
Let’s Begin
To make relatively authentic sushi, you’ll need some basic ingredients. Let’s get these food basics out of the way first:
- Nori Sushi Seaweed Sheets
- Short grain sushi rice OR medium grain rice OR Jasmine OR Brown OR Purple / Black Rice (Fan Tuan)
- Seasoned Rice Vinegar (Mitsukan / Mizkan or similar)
- Rice Seasoning (Furikake)
- Kewpie Mayonnaise (or any mayo of your choice)
- Wasabi paste or Wasabi Powder
- Sriracha Hot Sauce (optional)
- Sesame Seed (optional)
- Soy Sauce
- Pickled Ginger (red, pink or beige)
For choices of proteins, it’s really your call. If you want to make raw sushi, you’ll need to head to a Japanese market for sushi grade raw fish. Many Japanese markets cut sushi grade fish into small packages suitable for making sushi or sashimi. If you’re avert to eating raw fish, you can use whatever proteins you like.
For cooked alternatives, I like adding strips of cooked chicken, stripped and cut cooked ground beef, quarter cut hot dogs, cooked fish sticks, breaded and cooked fish, cooked and stripped fried chicken fingers, fake crab legs, etc. You can also make a vegetable roll with cucumber or even various pickles. You can even mix and match.
Yes, you can make protein salads to include inside of a roll like crab leg salad, chicken salad or even ham salad. Salads like these make excellent sushi rolls. Just make sure not to use too much mayonnaise in the salad or it may become too runny. The salad needs to remain thick and spreadable.
I’ve personally made hot dogs rolls complete with a small amount of chili as a topping. I’ve made hamburger rolls with cheese, onion, lettuce, pickle, tomato, mayo with a dollop of relish, mustard or ketchup. Just make sure the ingredients are cut into strips to fit across the roll. Or, alternatively add a small amount as toppings to the top of the roll.
The choices for what goes into your roll is endless. As long as it’s not runny or liquid, you can spread it across the roll and roll it up. Don’t feel constrained to the limited ingredients offered by Sushi Restaurants. Go forth and make new rolls.
Tools Required
You’ll also need some tools:
- Sharp Knife
- Cutting board
- Bamboo Sushi mat (for shaping rolls)
- Rice Cooker with paddle
- Rice Washer strainer and bowl combo (Daiso)
- Vegetable Peeler (optional, for cucumbers)
- A small water spray bottle
Which Rice Cooker?
A quality rice cooker is a must to make any sushi. You can buy an electric one, use a stovetop pan or cook Sushi rice in a microwave. I personally prefer using the Microwave method because it’s set-it-and-forget-it AND you’ll get every last grain of rice out of it (zero waste). When cooked properly, there is no difference between the cooked rice quality using any of these cooking methods.
Unfortunately, cooking rice on the stovetop and, to a slightly lesser degree, an electric rice cooker, is likely to yield some rice loss due to sticking. Because the rice needs to retain a sticky quality, heating element based cookers will lose a small percentage of rice to some of it getting crusted onto the sides while cooking.
The microwave method doesn’t have this waste issue. A proper microwave rice cooker will yield 100% rice out with no sticky baked on mess. If you’re paying to buy expensive Sushi rice, why waste any of it?
If your rice cooker doesn’t come with a plastic or wooden rice paddle, you’ll need to locate one. If you’re concerned over microplastics, then a bamboo paddle might be your best choice. Keep in mind that microwave rice cookers will be plastic. So, again, if you’re concerned over microplastics, you might want to opt for cooking your rice on a stovetop or in an electric rice cooker using metal components.
Rice Types and Rinsing
Many sushi chefs swear by using only short grain Sushi rice. I’ve used all sorts of rices to make sushi and while Sushi rice generally works well, it has a very soft chew, is not aromatic and is also very glutinous (making it quite sticky). Sushi rice needs to be washed until the water runs clear, about 3-5 rinses before cooking. Sushi rice cooks in the same time and in the same proportions as any other rice. When cooked, it’ll be more sticky than medium grain rice.
Medium grain white rice can be used to make Sushi rice. This type of rice is firmer than sushi rice once cooked. It has definitive bite that can be felt. While short grain Sushi rice doesn’t have this bite, medium grain white rice does. And no, do not overcook medium grain rice thinking you can make it have a similar texture to sushi rice. The only thing that overcooking does is make the rice bad.
Basmati, Jasmine and other longer grain rices can be used to make sushi, but these are aromatic rices and impart an odor onto the roll. You may like the aromatic nature of these rices, but that odor may or may not work with the ingredients you wish to add to your roll, particularly the odor of the Nori seaweed once hydrated by the rice. Additionally, longer grain rices offer less glutinous features, making the rice more dry and less sticky.
When using less glutinous rices (medium grain, Basmati, Jasmine) for Sushi, you must rinse the rice exactly one time. Rinse the rice to remove any unnecessary extras once. Rinsing only once allows much of the loose rice starch to remain. You need this loose rice starch powder to allow the rice to hold together when placed into a Nori sheet or if you want to make Nigiri and form the rice into small balls. Rinsing more than once will rinse all of these starch away causing the rice to become fluffy, but not sticky. For sushi, you don’t want fluffy rice, you need sticky rice.
Brown rice is an odd beast. It takes longer to cook and has less overall loose starch. You can use it to make sushi, but you should rinse it as little as possible. You may still find it doesn’t clump or stick together as well as some white rices, though. If you have trouble keeping your brown rice together, you might need to include some extra rice flour (quarter teaspoon rice flour per cup of rice) to add some stickiness back into the rice. You won’t know you need the extra starch until after the rice has been cooked, though. I’m not a big fan of brown rice sushi, but if you like it, go for it.
Parboiled Rice or Instant Rice?
This addition is being added after the original article’s release to head off any questions about these “quick cook” types of rice. Parboiled rice is a type of rice that has been previously PARtially BOILED, hence the name. This type of rice is not useful for Sushi. Avoid using all varieties of parboiled rice for sushi. Because of it having been previously boiled, too much of the outer starch has already been boiled away, making it not at all sticky. You need a stickier type rice to use as Sushi rice because sticky rice sticks together on itself. This stickiness is what holds the sushi rolls together. Without this stickiness, the rolls will fall apart. Often, you can visually tell parboiled rice by its yellowish color. You should also read the package which should state if the rice is parboiled.
Instant rice, like parboiled rice, is likewise previously cooked. Unlike parboiled rice which is only partially boiled, instant rice is fully cooked, then dehydrated. This dehydration process allows the rice to hydrate in just a few minutes, but at the cost of removing a ton of starch. While both parboiled and instant rices are great in certain quick culinary uses, neither are useful for making Sushi. Instant rice is not a yellow color like parboiled. If you have dry regular rice and instant rice side by side, they sort of appear similar, except that dry instant rice can be easily crunched by chewing on a single grain. Regular rice cannot be easily chewed when dry and remains rock hard until cooked.
Avoid these two types of “quick cook” rice when purchasing rice for Sushi!
Nori Sheets
Nori seaweed sheets are important for making any sushi. These sheets are made and used in Japan, South Korea and China. In Japan, it’s called Nori. In Korea, it’s called Gim. In China, it’s called Haitai or . Various similar kinds of rolls are made in all three countries.
In Japan, the rolls are called Makizushi or simply just Maki. In Korea, it’s called Gimbap or Kimbap. In China (specifically Taiwan), it’s called Fan Tuan or Ci Fan Tuan. However, Fan Tuan often uses purple or black glutinous rice instead of white rice. Most often, Fan Tuan is consumed as a breakfast food in China.
What this all means is that you have a number of choices in which to locate sheets of Nori. You can get these sheets in Chinese, Japanese or even Korean markets. I have typically found sheets sold in Korean or Chinese markets to be lower priced than those sold in Japanese markets. However, there are some quality differences in various sheets. What this means is that you will need to try various brands until you find a brand you can both rely on for quality and for availability.
Personally, I’ve found that the Yamamotoyama (Japanese) brand always offers consistent sheet quality. Unfortunately, this Japanese brand is not the lowest cost brand of Nori. However, I have also found some Gim sheets in various Korean markets that also work quite well and are much lower in price. By quality, I mean that the sheets hold up to the stresses and strains of being rolled. They do not rip and tear. However, some sheets made are of a lower quality and can and do rip and tear, both when wet and when dry. Again, you’ll need to shop the brands and find one that works for you.
Oh, and while you can buy 5 or 10 sheets at places like Walmart or your local grocery store, these are exceedingly costly per sheet. It’s better to invest in a large package of 20-50 sheets from your local Asian market to get your best price per sheet. You can order Nori from Amazon and from eBay also.
I might suggest the first time buying a small package of Yamamotoyama brand sheets so you can see what good quality sheets look like. Then branch into lesser brands and see how far you get with those.
Prepping
Preparing your ingredients and placing them onto plates in advance is strongly recommended. I recommend doing this while waiting for your rice to cook in about 18 minutes. When it comes time to assemble your rolls, it’s a simple matter of grabbing your ingredients, placing them on top, seasoning them and rolling it all up. If you’re having to prep in the middle of making a roll, your rice will cool down and the Nori wrapper will start to get flimsy. You need to work fast once you apply the rice to the Nori.
If you’re wanting to make cucumber rolls, for example, you will need to peel your cucumber, then slice it into small wedges. Cut the cucumber in half, then cut the half in half again. When I say “cut in half”, I mean long ways. You need your cucumber slices to be long and thin, longer than the length of the roll preferably. Then slice each quarter into two or possibly three wedges. You want the wedges long enough to span the entire roll length and thin enough not to make the roll be too thick, especially when using multiple ingredients. If not long enough, then place two pieces edge to edge to make it long enough.
Additionally, ensure you have your wasabi prepared and bloomed, your Kewpie mayo out and ready, your seasonings at hand, your rice paddle and spray bottle with water ready.
Seasoning the Rice
Once you have your rice properly cooked and with your Seasoned Rice Vinegar in hand, you will need to season your rice. Make sure that you’ve purchased Seasoned Rice Vinegar and not Natural Rice Vinegar. Seasoned Rice Vinegar is sweetened. Natural Rice Vinegar isn’t seasoned.
If you are watching your sugar intake, you can make your own Seasoned Rice Vinegar using Natural Rice Vinegar and low sugar sweeteners like Saccharin, Stevia and Splenda. Don’t use Equal / Aspartame because it will be applied to the rice while hot. Heating Aspartame above 86ºF / 30ºC begins breaking down Aspartame into constituent components, such as formic acid, aspartic acid / phenylalanine and formaldehyde. Only use Aspartame to sweeten cold drinks, never to sweeten hot foods or hot beverages. Keep in mind that rice is high in carbs and sugars, so reducing the amount of sugar in the Seasoned Rice Vinegar might not do much to reduce the sugar load in Sushi with rice.
Do not use unseasoned rice in a sushi roll! To season your rice and while still in your rice cooker, add in about a tablespoon and a half of seasoned rice vinegar and begin to mix (per 1 cup dry-now-cooked rice). Do this while the rice is still hot. Taste. If you can’t taste the vinegar, add a splash more to the rice, mix again and taste. You should be able to taste the vinegar, but it should not overwhelm.
Adding rice vinegar pulls some of the rice starches out of the rice and allows it to become sticky while mixing the vinegar in. This step is what helps out less glutinous rices, like medium grain white rice, to make them be useful in Sushi rolls. Absolutely do not skip this step if you’re using medium grain white rice! Remember, you don’t want fluffy rice, you want stickier rice.
Once your rice is seasoned, set it aside and let it cool a little bit more.
Rolling up your Sushi Roll
I do this next part on a paper towel because it makes for easier cleanup and offers an easy way to pick up the edge of a sheet to begin rolling it up. The Nori does not stick to the paper towel. You could use wax paper or parchment paper if you prefer.
1 cup of dry sushi rice yields enough cooked sushi rice to produce 3 full-sized Nori sheet rolls. If you want to make hand rolls, half rolls or any thing smaller than a using a full sheet of Nori, you’ll have to figure out the proportions of rice to seaweed. This article is focused on making 3 large “regular” Maki rolls using 1 cup dry cooked rice as a basic starting point.
You’ll want to use the rice paddle to divide the rice into thirds for easier visual reference and to make 3 rolls easier. Place your dry Nori sheet onto the paper towel and drop ⅓ of the cooked rice onto that Nori sheet. Using the rice paddle, begin pressing and spreading the rice to the edge of the Nori on 3 sides. When spreading, use pressure to flatten the rice onto the Nori. Use the paddle to evenly spread the rice out to 3 of the edges. On the fourth side, leave a 1 inch gap between the rice and the top of the sheet. Because the Nori sheet is rectangular, the rice will effectively make a square below the 1 inch gap.
Once you have the rice fully spread and pressed out onto the sheet, grab your Furikake and give the rice a light dusting. Now, with your clean finger or a knife, grab a dollop of wasabi and spread a small amount across the rice just below the middle. It should spread evenly all the way across. Make sure to use enough. If you have tube wasabi, you can simply use the tube nozzle itself to spread it across.
From here, grab your main protein or vegetable ingredient and place it across and centered, but running horizontally across the rice, making sure it covers all the way across. It should sit horizontally edge to edge in the middle of the rice. It’s perfectly okay for some of the protein to hang over the edge of the rice. The two cut end pieces will actually look better with a small amount hanging over. For reference, you can place two or maybe 3 different ingredients in the middle stacked neatly horizontally across the rice. Anymore than this and the roll is likely to end up too big.
On top of your ingredients, squirt a squiggly line of Kewpie mayonnaise horizontally across the ingredients. You can top the mayo with a bead of sriracha sauce, powdered cayenne pepper, pepper flakes or even chili oil if you want to make it spicy.
At this point, your roll is complete, but not yet rolled. Grab the bottom edge (opposite side of the 1 inch gap side), lift the Nori and rice carefully, then place that rice edge just over and in front of the ingredients to begin the rolling part. Push the edge under the ingredients somewhat tightly as best you can and then begin to roll towards the 1 inch gap. Leaving the empty Nori edge unrolled, grab your water spray bottle and spray the gap seaweed to wet it. Wait a moment, then slowly finish rolling over the gap edge, pausing and allowing the Nori to begin sticking to itself while the roll sits.
From here, lift the roll up and flip it over or roll it over if you’re uncomfortable lifting it. The gap edge may not yet be fully sealed to itself. Grab the spray bottle again and wet the outside of that loose gap edge to wet it fully and smooth it down. Now, set the roll down onto a plate gap edge down. The weight of the roll will seal the roll closed while you make more.
Grab the Sushi mat, place the roll into the mat, lightly squeeze and roll the mat to make the sushi more round. Note, you can skip this process if you don’t really care how your Sushi roll is shaped.
Repeat this process for the remaining two rolls. After doing this a few times, you’ll get the hang of the rolling fairly quickly and will understand the nuances of exactly how to roll it tightly. You’ll want to roll each roll somewhat tightly so that the roll holds itself together. If it’s too loosely rolled, the roll will fall apart.
Cutting the Rolls
Once all three rolls are complete, grab the first roll made, a very sharp knife and a wet towel or wet paper towel. A roll cuts into about 8 pieces. Six full pieces and two edge pieces. At this point, I’d suggest using the knife to lightly indent the Nori to make 8 potential cut marks. Just indent on the seaweed, but don’t cut it. Indenting the roll gives you a reference point to make your most even cuts, while allowing you to adjust the indents to give you the thickness you prefer. Remember, a piece needs to fit in the mouth comfortably. Eventually, you won’t need to make indents on the roll, but when learning, indenting on the roll makes it easy to create even thickness roll pieces.
Once indented, begin cutting on the indent marks with a light sawing motion. The knife should cut through the roll easily. If it doesn’t, your knife is too dull. Use a sharper knife. Use the wet towel to wipe the knife occasionally when it becomes dirty. This cleaning prevents smearing ingredients on the outside of the roll.
Place the cut rolls onto a plate in whatever arrangement looks best. It’s your plate. Present them as you prefer. If your roll is falling apart when cut, you either didn’t roll it tightly enough and/or the rice isn’t sticky enough to hold the roll together. Rinse the rice less next time, add more vinegar when seasoning and/or press the roll more tightly when rolling. You want your roll to be relatively tightly rolled, but not so tight as to rip the Nori.
From here, top your plated rolls with sesame seeds, a small dollop of Sriracha, a sprinkle of cayenne or any other topping you might think goes with your roll type. When I make hot dog rolls, I top with a tiny dollop of mustard, ketchup and relish.
Enjoying your Rolls
Once you’ve got your rolls cut and plated, to the plate you’ll want to add a ball of Wasabi, a pinch of pickled Ginger and have a small bowl of Soy Sauce handy for dipping. If you like eating with Chopsticks, then you’ll need to get a pair. You still want your sushi to be lukewarm, but not hot. The rice should still have a some warmth when consuming the roll. A little warmness makes the roll taste so much better. Don’t let them get cold before serving.
You can turn this into a full meal by adding a bowl of Miso Soup and/or steamed Edamame. You’ll need to pick these additions up and prepare them separately.
Yes, you can and should refrigerate leftovers. If you want to eat refrigerated leftovers, you might want to microwave them for about 15 seconds to slightly warm them. For safety, don’t let them sit around and warm up on the counter as they contain mayonnaise. Eat leftovers within a few days.
Final Notes
This Maki recipe above does not produce “inside out” rolls. The rolls produced here are rolls with seaweed on the outside and rice on the inside. These rolls are easier to make when just learning to make Sushi rolls.
If you wish to make “inside out” rolls, you will need to wrap your Sushi mat in plastic wrap to keep the rice from sticking to to it. Then follow the above instructions. But, after you have paddled and packed the rice onto the Nori (use a thinner layer of rice), cover in sesame seeds, turn the sheet over, add a smaller amount of rice onto the Nori to “wrap” your ingredients, then add your ingredients on top of this rice. Then roll up so that sesame seed rice is on the outside with some rice and filling on the inside with your ingredients. You may need to make a bit of extra rice for “inside out” rolls if you still want 3 total rolls.
“Inside out” rolls are often topped with Masago (tiny reddish orange roe fish eggs) and sometimes black sesame seeds.
↩︎
How to set creation file time on MacOS X

Recently, I downloaded a bunch of mp4 videos from my PS4 to create some longer form videos for YouTube with iMovie. Unfortunately, the files copied from the PS4 did not retain the original creation date and time. I was bummed because iMovie uses the creation date to sort the video clips stored in its import library.
I’m pretty sure that the PS4 stores this information with the file in the BSD operating system used on the PS4. For whatever reason, this information is lost and is not retained when copying these video files to a USB drive.
Instead, the PS4 creates the files using the current date and time of when they were copied to USB. However, the filename does includes the date and time of the PS4’s original file creation date. All is not lost. For example, one of the files is named “Grand Theft Auto V_20231021102822.mp4.” The 20231021102822 is the file’s original creation date, but it’s embedded in the filename. This is a pain in the ass, especially when you have a lot of these files and you need to depend on sorting the files by creation date.
If you’re using Linux, some of this may apply with touch, but some may not. For example, it may not be possible to set the birth time or btime in Linux. Then again, you won’t be using iMovie on Linux, so you may not encounter the same sorting problems as when using iMovie. On Linux, you’re likely to be using ShotCut. And yes, ShotCut is available for MacOS X.
Let’s explore recovering and setting the original creation date and time for these imported PS4 video files when using a Mac.
Before Getting Started / Liability Waiver / Assumption of Risk
This is a relatively deep dive tutorial and is designed for intermediate to experienced users who are comfortable running command line tools in UNIX, Linux and MacOS X. This article also expects that you are at least somewhat experienced and familiar with writing Bash shell scripts. While every care has been taken to ensure these instructions are fully accurate at the time of authorship, risk is always a possibility when running commands. Make sure you know what you’re doing and always proceed with caution when performing any shell commands.
Assumption of Risk: Should you follow any instructions provided in this tutorial, you do so at your own risk. This author and the Randocity blog holds no responsibility for how you use and/or misuse the information provided herein NOR does this author or Randocity hold any liability over any damage that may result directly or indirectly from this article’s included information. This information is provided to you AS IS. You assume all risks herein.
By proceeding with reading the remainder of this article, you agree to these terms. If you don’t agree with these terms, then navigate away NOW and go find something else to do.
Recovering Dates and Times on Files
There are two primary date/times stored as metadata with each file: creation date and last modified date. While it’s easy to set the last modification date using the ‘touch‘ command, this same command cannot be used to set the file’s creation time. Pity.
That left me looking for alternatives. If you have installed the command line development tools from Mac OS’s Xcode, there are a couple of handy command line (CLI) tools available to help with this date-setting task. These two tools are getfileinfo and setfile. Unfortunately, it seems that while the commands do get installed with Xcode, the manual pages (man pages) do not get installed. Thus, you can’t easily see or find the parameter usage of the command.
I had to refer to searching Google for the man pages for these two. Here’s the man page for getfileinfo. Here is the man page for setfile. These two commands will help get you started. If you don’t have these commands installed, you’ll need to install the Xcode command line tools.
First Step
Setting the last modification time from the above filename supplied is relatively easy by extracting the filename’s included datecode, slightly modifying it and feeding it back into the command ‘touch‘ to set the last modification date onto the file. Here’s a shell script which does just this on all files in the current directory:
#!/bin/bash
#
# setmodificationdate.sh

# FILE: "Grand Theft Auto V_20231021102822.mp4"
# DATECODE EXAMPLE: 20231021102822 => 202310211028.22

# Set IFS delimiter to EOL marker to ignore whitespace in filenames
IFS="
"

# Loop through files in current directory and update each file's last modification
# time to ${DATECODE}.${DATESS} using touch -mt [date]
for i in `ls`
do
	FILE=$i
	DATECODE=`echo "${FILE}" | awk '{print $4}' | awk -F "_" '{print $2}' | cut -c 1-12`
	DATESS=`echo "${FILE}" | awk '{print $4}' | awk -F "_" '{print $2}' | cut -c 13-14`

        # The touch command requires the date format to be YYYYMMDDHHMM.SS. Some
        # conversion is required.
	if [ $DATECODE ]; then
		touch -mt ${DATECODE}.${DATESS} "$FILE"
                echo $FILE ${DATECODE}.${DATESS} done
	fi

done
The reason it’s important to update the files using the touch command first is that we’ll later use the getfileinfo command on these updated files to extract the modification date set with touch, making it easier to extract the date format which is used by the setfile command. Otherwise, if we don’t do this, we’ll have to spend a boatload of time reformatting that 20231021102822 string into the string format required by setfile. No, thanks.
Because I’m generally lazy when I see other easier formatting alternatives, I don’t wish to spend a full day of shell scripting on reformatting strings when I don’t have to. Since both the last modification and creation dates should be set identically, using two different commands is the easiest way to get these files back to their original dates.
Second Step
After having updated the last modification date of each of the video files using ‘touch‘, we’re halfway there. The other half is updating the creation date using the ‘setfile‘ command. Right now, even though the modification date is updated, the creation date is still set to the date and time when the file was copied from the PS4 onto the USB drive. I’m still at a loss why PS4’s Capture app does this. No reason to dwell on stupidity from Sony. Let’s move on.
If you would like to see the current creation date on the files, check it with following command:
$ ls -lhU
-rwxrwxrwx 1 owner staff 334M Oct 21 20:10 Grand Theft Auto V_20220826114603_1.mp4
-rwxrwxrwx 1 owner staff 452M Oct 21 20:05 Grand Theft Auto V_20220918194930_1.mp4
-rwxrwxrwx 1 owner staff 390M Oct 21 20:04 Grand Theft Auto V_20220922235359_1.mp4
-rwxrwxrwx 1 owner staff 398M Oct 21 20:04 Grand Theft Auto V_20221002025349_1.mp4
-rwxrwxrwx 1 owner staff 347M Oct 21 20:03 Grand Theft Auto V_20221007034124_1.mp4
-rwxrwxrwx 1 owner staff 389M Oct 21 20:03 Grand Theft Auto V_20221013095807_1.mp4
-rwxrwxrwx 1 owner staff 1.3G Oct 21 20:00 Grand Theft Auto V_20221022131151_1.mp4
-rwxrwxrwx 1 owner staff 342M Oct 21 20:00 Grand Theft Auto V_20221113174109_1.mp4
-rwxrwxrwx 1 owner staff  55M Oct 21 20:00 Grand Theft Auto V_20221124014001_1.mp4
-rwxrwxrwx 1 owner staff 389M Oct 21 19:59 Grand Theft Auto V_20221211111225_1.mp4
-rwxrwxrwx 1 owner staff 288M Oct 21 19:59 Grand Theft Auto V_20221213064150_1.mp4
-rwxrwxrwx 1 owner staff 419M Oct 21 19:58 Grand Theft Auto V_20221223001116_1.mp4
-rwxrwxrwx 1 owner staff 414M Oct 21 19:58 Grand Theft Auto V_20221230055654_1.mp4
-rwxrwxrwx 1 owner staff  77M Oct 21 19:57 Grand Theft Auto V_20230108204052_1.mp4
-rwxrwxrwx 1 owner staff 427M Oct 21 19:57 Grand Theft Auto V_20230108210502_1.mp4
-rwxrwxrwx 1 owner staff 133M Oct 21 19:57 Grand Theft Auto V_20230114165648_1.mp4
-rwxrwxrwx 1 owner staff 471M Oct 21 19:56 Grand Theft Auto V_20230205042420_1.mp4
-rwxrwxrwx 1 owner staff 441M Oct 21 19:55 Grand Theft Auto V_20230222025805_1.mp4
-rwxrwxrwx 1 owner staff 424M Oct 21 19:54 Grand Theft Auto V_20230227022823_1.mp4
-rwxrwxrwx 1 owner staff 373M Oct 21 19:54 Grand Theft Auto V_20230307124853_1.mp4
-rwxrwxrwx 1 owner staff 420M Oct 21 19:53 Grand Theft Auto V_20230311090033_1.mp4
To see the last modification time set from above touch command, use the following:
$ ls -lh
-rwxrwxrwx 1 owner staff 334M Aug 26 2022 Grand Theft Auto V_20220826114603_1.mp4
-rwxrwxrwx 1 owner staff 452M Sep 18 2022 Grand Theft Auto V_20220918194930_1.mp4
-rwxrwxrwx 1 owner staff 390M Sep 22 2022 Grand Theft Auto V_20220922235359_1.mp4
-rwxrwxrwx 1 owner staff 398M Oct  2 2022 Grand Theft Auto V_20221002025349_1.mp4
-rwxrwxrwx 1 owner staff 347M Oct  7 2022 Grand Theft Auto V_20221007034124_1.mp4
-rwxrwxrwx 1 owner staff 389M Oct 13 2022 Grand Theft Auto V_20221013095807_1.mp4
-rwxrwxrwx 1 owner staff 1.3G Oct 22 2022 Grand Theft Auto V_20221022131151_1.mp4
-rwxrwxrwx 1 owner staff 342M Nov 13 2022 Grand Theft Auto V_20221113174109_1.mp4
-rwxrwxrwx 1 owner staff  55M Nov 24 2022 Grand Theft Auto V_20221124014001_1.mp4
-rwxrwxrwx 1 owner staff 389M Dec 11 2022 Grand Theft Auto V_20221211111225_1.mp4
-rwxrwxrwx 1 owner staff 288M Dec 13 2022 Grand Theft Auto V_20221213064150_1.mp4
-rwxrwxrwx 1 owner staff 419M Dec 23 2022 Grand Theft Auto V_20221223001116_1.mp4
-rwxrwxrwx 1 owner staff 414M Dec 30 2022 Grand Theft Auto V_20221230055654_1.mp4
-rwxrwxrwx 1 owner staff  77M Jan  8 2023 Grand Theft Auto V_20230108204052_1.mp4
-rwxrwxrwx 1 owner staff 427M Jan  8 2023 Grand Theft Auto V_20230108210502_1.mp4
-rwxrwxrwx 1 owner staff 133M Jan 14 2023 Grand Theft Auto V_20230114165648_1.mp4
-rwxrwxrwx 1 owner staff 471M Feb  5 2023 Grand Theft Auto V_20230205042420_1.mp4
-rwxrwxrwx 1 owner staff 441M Feb 22 2023 Grand Theft Auto V_20230222025805_1.mp4
-rwxrwxrwx 1 owner staff 424M Feb 27 2023 Grand Theft Auto V_20230227022823_1.mp4
-rwxrwxrwx 1 owner staff 373M Mar  7 2023 Grand Theft Auto V_20230307124853_1.mp4
-rwxrwxrwx 1 owner staff 420M Mar 11 2023 Grand Theft Auto V_20230311090033_1.mp4
Note that once a file’s date is considered “too old”, the ls command no longer shows the time of the file, only the “MM DD YYYY” date. The time is still there on the file, but it’s simply not shown. With ls, this will have to do.
Extracting the Date for Setfile
To extract the date string format needed for setfile, we’ll use the getfileinfo command on the now touched files. That’s done with the following:
$ getfileinfo -m "Grand Theft Auto V_20231021102822.mp4"
10/21/2023 10:28:22
The getfileinfo -m command returns the last modified date string in the date string format “10/21/2023 10:28:22”, which is a properly formatted string to immediately use with setfile -d. Thankfully, we just set this date on the file above. This output string value from getfileinfo should match the date value in the filename. If the date value doesn’t match, the touch command above might not have worked correctly.
To set the creation date on the file, we will use the following:
$ setfile -d "10/21/2023 10:28:22" "Grand Theft Auto V_20231021102822.mp4"
The -d option is used to set the creation date on the file. This command only changes one file, though. Not very helpful since we’re needing to update a bunch of files all at once. To do this, we’ll need a shell script for batch changes.
#!/bin/bash
#
# setcreationdate.sh

# Set field separator to EOL marker to ignore whitespace in filenames
IFS="
"

# Loop through files in current directory
for i in `ls`
do
        FILE=$i

        # Extract properly formatted creation date using getfileinfo
        FCREATEDATE=`getfileinfo -m ${FILE}`

        # Update creation date using setfile with date extracted from getfileinfo
        # above, stored in FCREATEDATE
        setfile -d "${FCREATEDATE}" "${FILE}"
        echo ${FILE} done
done
Both of these shell scripts have been tested and worked perfectly to update the creation and modification dates on all of my PS4 video files back to their original dates recorded.
How do I use the scripts?
To use the above scripts, simply copy and paste them into your favorite MacOS X editor such as ‘vi’ or TextEdit, then save each script to whatever name you like. I named them setmodificationdate.sh and setcreationdate.sh, respectively. You can name them however you like. To make the script executable, do this with the following command:
$ chmod 755 scriptname.sh
Do these scripts work with vFAT formatted drives?
Yes, they do. These tools will work with vFAT as well as HFS+.
Is this the only way to change file dates?
No, there are other ways. You can use tools like ‘uuencode’, ‘tar’, ‘cpio’ or maybe even ‘zip’ to create an archive backup, then modify the dates inside the backup, then restore the files with newly updated dates. This is more complicated. The above is a simpler solution than mucking about with backup and restore processes. However, this archive solution may be the only way forward on operating systems that don’t allow modification of the creation dates on live files.
Why do all of this?
The iMovie app has an import library. In this imported clip library, the sorting feature uses the creation date, not modification date to sort the files. To make sure iMovie can sort these files properly date ascending, the creation date must be set correctly. Because copying the files to USB from the PS4 reassigns the date the mp4 was copied to the USB, not the date it was originally created on the PS4, this makes sorting from oldest to newest in iMovie a big problem.
When attempting to create a new movie using PS4 clips in chronological order, not having correct datestamps on each file makes it a challenge to locate the correct clips in the iMovie library. To correct for this, setting the creation date stamps on all of the mp4 files allows iMovie to sort them in the correct order, rather than sorting them based on the random date they were copied to the USB drive.
Note that once you have updated the dates on the mp4 files, you’ll need to restart iMovie to make sure it sees the newly updated dates on the files. iMovie won’t see these file changes until it’s been restarted.
Good luck and happy rendering!
↩︎
No Man’s Sky: How to get a Sentinel Ship
 Unlike the very long tail quest line to obtain a Living Ship, the Sentinel Ship is easy to obtain by comparison. There is no long multi-day process to obtain this one, thankfully. Obtaining the Sentinel ship is fairly straightforward and easy to obtain in one game session, about an hour worth of effort, after getting the quest. Let’s explore how to get this newest ship.
Pre-Requisites
The items you’ll need to make this quest successful are:
- A well outfitted starship, for battling Sentinels successfully
- Living Glass (supplied)
- Pugneum (supplied)
- A well outfitted Multitool, for battling ground corrupted Sentinels successfully
- A hyperdrive and enough fuel to jump
- A pulse drive with enough fuel
- An Advanced Mining Laser on the Multitool (for Radiant Shards)
- One free ship slot or, alternatively, a ship that you’re willing to trade
[Update 4/14/2023] After trying for several hours across multiple saves (other than the first save, which worked), I’ve been unable to reproduce Step 1 on any save other than my very first save. The very first save actually had the pulse drive interaction occur the very first time I pulsed. I believe I have an answer.
I suspect that Hello Games may have introduced a bug in this process. It seems that Hello Games may have made this pulse interaction available one-time-only on ONLY ONE SAVE. This means that if you wish to obtain a Sentinel Ship on a second, third or any later saves, you’ll need to use the 5 Star wanted approach to get an Echo Locator OR a Dreadnought AI Fragment (via blowing up a Sentinel Freighter). I don’t know why Hello Games would have done this, but I do know that there are global variables which can be set and which are visible to across all saves (e.g., Preference Settings). It seems Hello Games may have set a global variable to indicate that the Sentinel pulse drive interaction has already occurred, thus preventing this interaction from occurring again on any other save… since every save has visibility to this variable.
What does this mean for you? If you have several saves that you regularly play, this bug means that you’ll need to choose which save where you wish to have your first Sentinel ship. Otherwise, once you’ve had this interaction on one save, on the rest of your saves, you’ll need to perform the 5 Star wanted steps for an Echo Locator device OR destroy a Sentinel Freighter for a Dreadnought AI Fragment which will lead you to a crashed Sentinel ship. [Update Complete]
Step 1 — Pulse Drive
This first step in obtaining your Sentinel ship is to grab whatever starship you have that fits the above requirements and head into space. Then, trigger the pulse drive. Remain in pulse until a distressed Sentinel ship appears in front of you. This should hopefully happen relatively quickly, but it may not. You may have to do this for a while to get it to happen. Once you get the right interaction, drop out of pulse, then a new Sentinel ship will appear and seem to be in distress. You will not be able to do anything for or to this ship, but the game will pretend to give you options. Whichever option you choose, the ship will disappear. If this pulse interaction occurs for you quickly, skip down to Step 2. If it doesn’t, please continue reading Step 1 for alternative means to get a Sentinel ship.
Alternative Ways to Begin The Salvage Quest
I had the pulse drive interaction appear almost instantly in my first attempted save. In a second save after having already had this pulse interaction previously, I tried for several hours to get it to occur and it didn’t (see more details in Update area above). Meaning, using the pulse drive to launch into this Sentinel salvage quest seems to only work one time and with one save only. Choose your save carefully.
If you wish to obtain more Sentinel ships after the first, you cannot use the pulse drive process. To begin at this point, you’ll need to fight Corrupted Sentinels (on a Corrupted Sentinel World) to a wanted level of 5 and then complete all ground kills or destroy a Sentinel Capital ship in space, which also requires a 5 star wanted level before it appears.

At the end of all ground based kills, your character will be awarded with a Sentinel crash site detector called an Echo Locator.
There is also the possibility of getting an Echo Locator from destroying Dissonance Resonators (the same drill structure that gives you Inverted Mirrors). You’ll need to step out of your starship or exocraft and check which type the Dissonance Resonator gives you. Also note that some Dissonant worlds are way more generous with the chances for finding Echo Locators than others. You may have to scout several dissonant worlds before you find one with Dissonance Resonators offering Echo Locators. If you find such a world, you should create a base there. Note that the easiest method of destroying a Dissonance Resonator is to use your starship’s weapons. Then, heading to space to eventually evade the sentinel wanted status.
Alternatively, you can destroy a Sentinel Freighter in a space battle and receive a Dreadnought AI Fragment. Each of these items will lead you to a new Sentinel ship crash site. Reaching that crash site, the below steps should remain the same.
To be fair, it may be easier to destroy a Sentinel capital ship in space than it is to perform ground combat with most of the crappy Multitool weapons they’ve hobbled us with… in combination with the fact that all corrupted Sentinels can heal each other at will. It simply takes a bit of time to destroy a Sentinel Capital ship, first by targeting the weapons and then by targeting the freighter itself.
For your second, third or further ships, it is strongly recommended that you leave the system where you found your first ship. If you use an Echo Locator or Dreadnought AI Fragment in that system, the game may locate a crash site to a ship model you already own. The game’s code is not intelligent enough to realize you already own a ship from your local system and will likely choose to send you there again. Don’t waste your Echo Locators or Dreadnought AI Fragments by using them in a system you’ve already visited. Hyperdrive somewhere else far away and then let the game use that new location to locate another ship.
If you’re really, really lazy and don’t want to fight Sentinels AND you have a full 30 fleet of Class-S 5 Star frigates, you can send your frigates on missions with the possibility of an expedition returning with a Dreadnought AI Fragment. I didn’t realize that these devices had been added as possible loot from frigate expeditions, but they have been included.
Note that Echo Locators may lead you to a Sentinel ground encampment which will give you a new Sentinel Multitool. You will have to dig around that encampment to find a way to reveal the crashed Sentinel Interceptor.
Note: You may have to complete the quest line “Under a Rebel Star” before the game allows this interaction to occur in pulse. The reason isn’t because the “Under a Rebel Star” quest is part of or even related to this Distressed Sentinel Pilot interaction, but because this quest line appears to take precedence over all Pulse Drive interactions until the quest is completed. Meaning, if you haven’t started or completed this quest line, your pulse drive interactions will be geared towards getting you to complete “Under a Rebel Star.” I recommend getting this quest out of the way.
Step 2 — Obtain the Salvage Quest
After the Sentinel ship disappears, the game will give you a Sentinel Salvage quest line. This quest will lead you to a Sentinel Salvage Site located on a Corrupted Sentinel planet (a new planet type). The game will either put a marker to a local planet in your current system or it will put a map marker onto the galaxy map for a different system. Most likely it will be the latter of the two options, requiring you to hyperjump into a new system. This is why you’ll need to have a Hyperdrive and the required amount of fuel.
Step 3 — HUD Marker
Once you have jumped into that new system, a HUD marker will appear on a planet. Head to the planet’s location, which will be an approximate location on the surface. When you get close to the marker, I suggest flying around the general vicinity of the marker to look for a crashed starship site. If you can’t find it, you’ll need to land and use the scanner to locate the general direction and head there on foot. For me, the crash site was quite visible and easy to spot from the starship.
Step 4 — Crash Site
Once you arrive at the crashed ship, there are many steps you’ll need to take to fully repair the ship. Though, as I said above, the steps are relatively simple with no long waiting periods in between. However, unlike other crashed starships, repairing this Sentinel ship is a bit different.
When you click-hold to open the ship the first time, you’ll see some components that, at first, you might think you need to repair. Don’t be fooled. You don’t repair these. Instead, Hello Games has added the questionable mechanic of requiring you to take those items out of the ship by grabbing them and dropping them into your inventory. It’s an odd play. I was a little confused at first because it’s the first time this mechanic has been used on a crashed ship. The items supplied by the ship are Living Glass, Pugneum and Hyaline Brain.
 Once you have taken the items from the ship (including the Hyaline Brain), a new slot will appear that you need to repair called Pilot Interface. To repair the “Pilot Interface” slot, you’ll actually need 3 items that you likely won’t have:
- 3 x Radiant Shard
- 1 x Inverted Mirror
- 1 x Harmonic Brain
Since you might not already have Living Glass or Pugneum needed for this process, remember to take the items from the ship as supplied. If you don’t take ALL of the supplied items, the process may fail to work. Take everything the game gives you. I actually had everything I needed from past Sentinel battles (in addition to the items supplied) including having already scavenged the new crystals. The only exception was that I didn’t have the Harmonic Brain.

One of the three items you’ll receive from the ship is a Hyaline Brain. This object, like a Emergency Broadcast Receiver or a Sentinel Boundary Map, allows you to activate it (“Probe”) and find a location to visit. This location will help you in repairing the Pilot Interface in Step 8.
Step 5 — Gathering Resources
Because this quest line leads you to a new “Corrupted Sentinel” world, you’re going to need to spend some quality time with your Multitool gathering both Atlantadeum from Living Fragments via the smaller purple crystals and the Radiant Shards via the bigger purple crystals (using the Advanced Mining Laser) and, of course, obtaining the Inverted Mirror (see Step 7).
Step 6 — Getting a Radiant Shard
This is the easiest and quickest of the 3 steps required to repair the Pilot Interface. Simply head out and find a pile of large purple crystals. Once you aim your reticle at the crystal, it should say ‘Radiant Shard‘. You’ll need to have an Advanced Mining Laser to obtain 3 of these, but it’s easy and quick with the mining tool. I’d suggest mining for more than you need, just in case.
Step 7 — Getting the Inverted Mirror
To get an Inverted Mirror, you’ll need to destroy a Dissonance Resonator. This is another new Sentinel creature type which looks like a moving crystal shard, but also kind of like a drill. Once you begin shooting this creature, Corrupted Sentinels will appear making you wanted. I’d suggest simply keeping up your barrage (ignoring the Sentinels) until you get the Inverted Mirror, then dive into the ground using the Terrain Manipulator and hide to get rid of the wanted stars.
If you hop into your starship and take off, your wanted status will be carried into a space battle with the Sentinels. It’s easiest to dive into the ground and wait it out.
Step 8 — Getting the Harmonic Brain
To obtain the Harmonic Brain, you’ll need to have a Hyaline Brain. The Hyaline Brain is given to you from the crashed Sentinel starship as one of three components given to you which includes Salvaged Glass, Pugneum and the Hyaline Brain. If, for some reason, you didn’t get a Hyaline Brain from the ship, you’ll need to go back and get it or, if you destroyed it, restore from a save before destroying it (the easiest way). Once you “Probe” the Hyaline Brain, it will give you coordinates and place a map marker on your HUD to an Ancient Monolith. Head there.
Once you arrive at the Monolith, you will hand over the Hyaline Brain in exchange for a Harmonic Brain.
Note, as stated above, you will need to take ALL of the components from the ship for the Hyaline Brain to activate. If you do not have any Pugneum and/or Living Glass and you fail to take these items from the crashed Sentinel Ship, the Hyaline Brain probably won’t activate. This includes having put these components into your Starship inventory and then having your Starship out of range. There is no warning why it fails to activate, it just won’t. Make sure to have ALL of the necessary components in your inventory before attempting activate the Hyaline Brain.
Step 9 — Head Back and Claim Your Starship
As the title says, it’s pretty straight forward. From the monolith and after receiving the Harmonic Brain, head back to the crash site, fix the Pilot Interface and claim your starship. Much, much simpler than the Living Starship.
Once again note, you’ll need to have at least one open starship slot or be willing to trade one of your starships for the Sentinel ship. I’d suggest salvaging a starship at the space station so you get all of the materials out of the ship and to free up the slot. Getting the materials from the ship is the far better option than giving over a starship in trade.
Step 10 — Build A Base
While this step is not required in getting your first Sentinel Ship, it is a step you should do to help you get more of these ships. Since this is a new world type and since you’re likely wanting to look for more of these ships, you’re going to need the resources available on this planet, since future crashed ships may not hand you all of the things you need like this first quest does. Since the game sent my character to a Paradise planet with otherwise no sentinels at all, it was the perfect place to establish a base to obtain these new resources.
Obviously, if your world is a charred, volcanic, radioactive or otherwise a rather inhospitable world, you might want to find a better world to establish a Corrupted Sentinel base. If the game sends you to a Paradise world, then it’s well worth establishing a base as there’s no way to know how these resources might be required in future updates.
Is the Sentinel Ship Worth It?
I’ll leave this up to you to decide. I find the ships to be rather blocky and odd shaped. There are a few sleeker design types, but many look like big tanks. When you’re going through this process, you don’t really get to pick and choose your ship’s design. The only way to sort-of pick is to go through this process multiple times, trading in the ships as you find better looking ones. You never really know what you’ll find, though. I was hoping for sleeker designs, like the Exotics. The Sentinel interceptors that fight us in combat actually look better. I was hoping to be able to get these.
Additionally, the Sentinel ship itself has some odd qualities. When you enter the ship, the entire ceiling of the ship becomes transparent to show the outside. The transparent effect is cool, but it also pulses an odd red circuitry pattern way too frequently while flying, which is highly distracting. I cannot guarantee all Sentinel ships have this cockpit behavior, but they probably do.

It’s not so much that the red pattern appears at all. It’s that this red pattern appears in a repeating pattern about 6 times in a row in various dimmer and brighter shades, then stops. Then the pattern repeats about every 10-20 seconds. The pattern repeats far too frequently. It would be fine if it pulsed perhaps in relation to the acceleration and/or deceleration OR with certain combat elements, like being fired upon or at most every 3-5 minutes, but it doesn’t work like this. It’s just a pattern that rotates in and out on a timer far too frequently as you fly the ship. It’s really distracting when in combat.
All-in-all, it’s an okay ship to add to your fleet, though it’s not more maneuverable than a fighter or better armored than any other class ship. Even though the slots are named oddly and the technology itself has its own special naming, it supports all of the standard technology modules, unlike the Living Ship. With that said, the Sentinel class ships don’t really have a reason to exist over other ships in the game. This is ultimately the real disappointing thing about the Sentinel ships specifically and No Man’s Sky in general… a point that Hello Games keeps missing.
Ships of various classes need to hold specific unique qualities to that class. For example, these Sentinel class ships should be better armored and better suited when used against Sentinel fleet attacks, but perhaps weaker against Korvax attacks. Focusing on these kinds of ship specialities, as a player you must plan your ship battles more thoughtfully. Instead, Hello Games keeps giving us ships that are more or less the same any other ship in the game. Even the Living Ship, which has weird technology naming and features, is really the same as every other ship. The only real differences between each of the ship classes and types are the shape of it, the size of it, the paint job and the ship’s max maneuverability. All of the ships can be modified using modules to basically become identical for use in No Man’s Sky as a Starship.
It would be great if Hello Games would get past this “sameness” and expand starships by giving us ships that both specialize in and are designed to specifically excel in certain activities, but are weak in other activities. For examples, fighters are intended to be for fighting, but they shouldn’t be at all good at anything other than fighting. Haulers are good for hauling, but not necessarily great at fighting. Shuttles should be for smuggling. Sentinel ships should be great at fighting sentinel fleets. Part of the reason for this unfortunate starship genericism is that the game makes it impossible to switch ships when in space. Only when you’re on the ground or in your freighter can you switch ships. Even then, if you’re in the middle of combat, Hello Games has made it so certain activities are impossible until the battle is over, making switching ships even more of a problem.
Know then that while the Sentinel ship may look somewhat cool, it doesn’t buy you anything more than what you already have in other ships you already own, at least not at this point in time. Here are some snaps of my ship.
![]()


Sentinel Ship Models and Availability
After having read more about this update, I thought it would be a good idea to explain how many different model Sentinel ships there are. Because there are a myriad of different parts (wings, fins, colors, etc) that can be attached to any specific Sentinel ship, the variation in ships is probably on the order of millions. With that said, there are some basic model shapes that get created from all of that variety; basic shapes which range from large tank sized ships to flat triangular style ships. Thus, there are effectively about 6-10 basic model shapes. After seeing about 6 different ships, the remaining variations are mostly minor and won’t change the overall shape of the ship. Effectively, there are only a handful of parts that affect the overall ship’s shape with the remainder of the parts changing only minor cosmetic aspects of the ship.
As for where to find any specific model ship in NMS, it’s still way too early in the release to yet have that answer. However, Reddit is a good place to start. There are subreddits dedicated to cataloging locations of specific ships in the NMS universe. If you’re looking for a specific style Sentinel ship, heading over to Reddit is probably your best answer. Such subreddits are adding new content every day. Finding a specific model Sentinel Interceptor ship is best found in one of those subreddits. With that said, I always find it much more satisfying when I can find my own ships on my own. Locating another solar system with the help of Reddit isn’t quite as satisfying knowing that you didn’t discover that system or that ship. It’s much more satisfying to be the one to discover something new.
As for how Sentinel Interceptors spawn in the game, it goes like this. Only one model Sentinel ship is available in each solar system. Meaning, if you land in a specific system, find a ship and add it to your collection, don’t bother looking for any more ships in that system if you’re looking for a different model. You’re wasting time doing this because when you do find another, it will be identical to the one you’ve already have, with the exception of its class. The only reason to go looking in the same system for another crashed Sentinel ship is when you’re looking for that same ship you already have, but in higher class (and you don’t want to pay Nanites to upgrade it).
It’s worth noting that abandoned systems as well as dead worlds and exotic / anomaly worlds do not spawn crashed Sentinel ships, even if the world is “Corrupted”. What this means is that if you’re using an Echo Locator or a Dreadnought AI Fragment to locate a ship, be prepared to reload your game quickly if the probe doesn’t find anything.
Sentinel Bug Analysis
Hello Games’s No Man’s Sky is not a bug free experience by any stretch. A question arises then, can this bug described in the update above be fixed? Not easily. Hello Games seems to have inadvertently (or possibly intentionally) used a global variable. To fix this, attempting to turn that global variable into a local variable for each save would mean every existing save would then be converted to and marked as having had the interaction if you’ve already had this interaction on one save.
That further means that only newly created saves after the bug is fixed would be able to have this interaction, but that also means starting over from scratch on a brand new save. It also means your other saves would still be required to go through the 5 Star Wanted process to get a Sentinel ship.
The better approach to fixing this bug is to have Hello Games unset the variable entirely, convert to using a save-local-variable and allow all of our saves to again get this interaction. However, that means that one of the saves could end up with two Sentinel ships using the pulse interaction. I personally don’t see this as a problem, but Hello Games probably will. If Hello Games decides to fix this bug, they’ll likely take the first approach, meaning all existing saves won’t benefit from that fix.
And Yet More Bugs
After having dived deep into Reddit around the Interceptor update, I’ve come to realize that there are many, many MORE bugs around obtaining Sentinel ships. Some of the bugs may depend on the platform you play on. For example, PC players seem to have the most problems with this update, but that doesn’t preclude problems for console players.
Here’s a short list of problems that you may encounter when playing the No Man’s Sky Interceptor update while attempting to get a Sentinel ship:
- Bug 1: The Hyaline Brain may not work correctly. Instead of leading you to a Monolith to exchange the Hyaline Brain for a Harmonic Brain, activating the Hyaline Brain instead acts like an Echo Locator, which will lead you to another crashed Sentinel ship instead of to a Monolith.
Workaround: None. - Bug 2: Arriving at the crashed Sentinel ship goes fine, but then after returning from the Monolith, the ship has disappeared.
Workaround: Disable Multiplayer while completing the quest. Because these ships are very popular, leaving multiplayer enabled allows another player to come take the ship and leave the crash site empty. - Bug 3: Arriving at the crashed Sentinel site after the Monolith, the ship flies away on its own.
Workaround: Immediately enter the ship and fix it. Don’t dawdle when you get back from the monolith. If you idle outside of the ship for longer than a few minutes, the ship may fly up and away on its own. If this happens, reload your game from the last save point and try again. - Bug 4: The Hyaline Brain doesn’t work at all.
Workaround: Ensure that you have the necessary amounts of Pugneum and Salvaged Glass in your inventory. Without this, the Hyaline Brain may not activate. If it still doesn’t activate, there may be another bug present. - Bug 5: Locator to the crashed ship doesn’t appear. This bug is actually a bigger problem within the Interceptor update than just with Sentinel crash sites. HUD markers sometimes don’t show up on planet surfaces (and in other locations) for quests. This prevents you from finding the site where you need to be.
Workaround: None known. We’ll have to wait until Hello Games finds and fixes this problem. - Bug 6: The game locks up hard even though the sound still works.
Workaround: None. You’ll need to restart the game and hope it doesn’t lock up again. We’ll have to wait until Hello Games finds and fixes this problem.
Good luck and happy hunting!
↩︎
Fallout 76: Map locations of Wood Piles

Many players are wondering where to find Wood Resource Piles (aka Wood Piles) throughout Fallout 76. While there are websites showing map locations leading the way to gold, concrete, steel, lead, waste oil and acid deposits, none yet show where to find wood resource piles for your camp. Yes, there are a number of these wood piles in Appalachia. Let’s explore.
Wood Pile Sites
Starter List
Wood Pile Update #1
Wood Pile Update #2
Wood Pile Update #3
Wood Pile Update #4
Legacy Removals and Wood Piles Update #5
The links above lead to the list of wood piles that have been found. Unfortunately, as many others have found, there are no maps to find these resources easily via Google. Well, now there is. The research for this article is time consuming as it requires searching all over the map for these wood piles. That’s where this article comes in. I’ve done this work for you and now the article is closed.
For ease of writing this article, I will abbreviate C.A.M.P. to simply the word ‘camp’ except when I’m referring to the device itself. There are a number of workshops that have wood resource piles. This article does not include wood resource piles located in workshops. If you wish to know which workshops have wood piles… then from the Fallout 76 map, hover over the workshop icon and the game will display resources available at each workshop.
Wood Resource Deposits
What are these deposits and why are they special? Like iron deposits that produce steel scrap and crystal deposits that produce crystal scrap, wood deposits produce wood scrap when equipped with a proper resource extractor in your camp. Some of these deposits exist inside of workshops, but you cannot build a camp in a workshop. Many players want to build their camp on top of a wood resource deposit so they can extract wood scraps at their camp.
Yes, these deposits do exist separately throughout the Forest and even into the Cranberry Bog. Wherever there are forests and wood, these wood pile deposits exist. That I’ve also discovered while scouting, these wood deposits seem to exist near, but outside of workshops and usually aren’t far off of a road. Though, they don’t always appear near workshops and they are not always near a road. These wood piles can be claimed using your C.A.M.P. device and used within your own camp with a wood resource extractor.
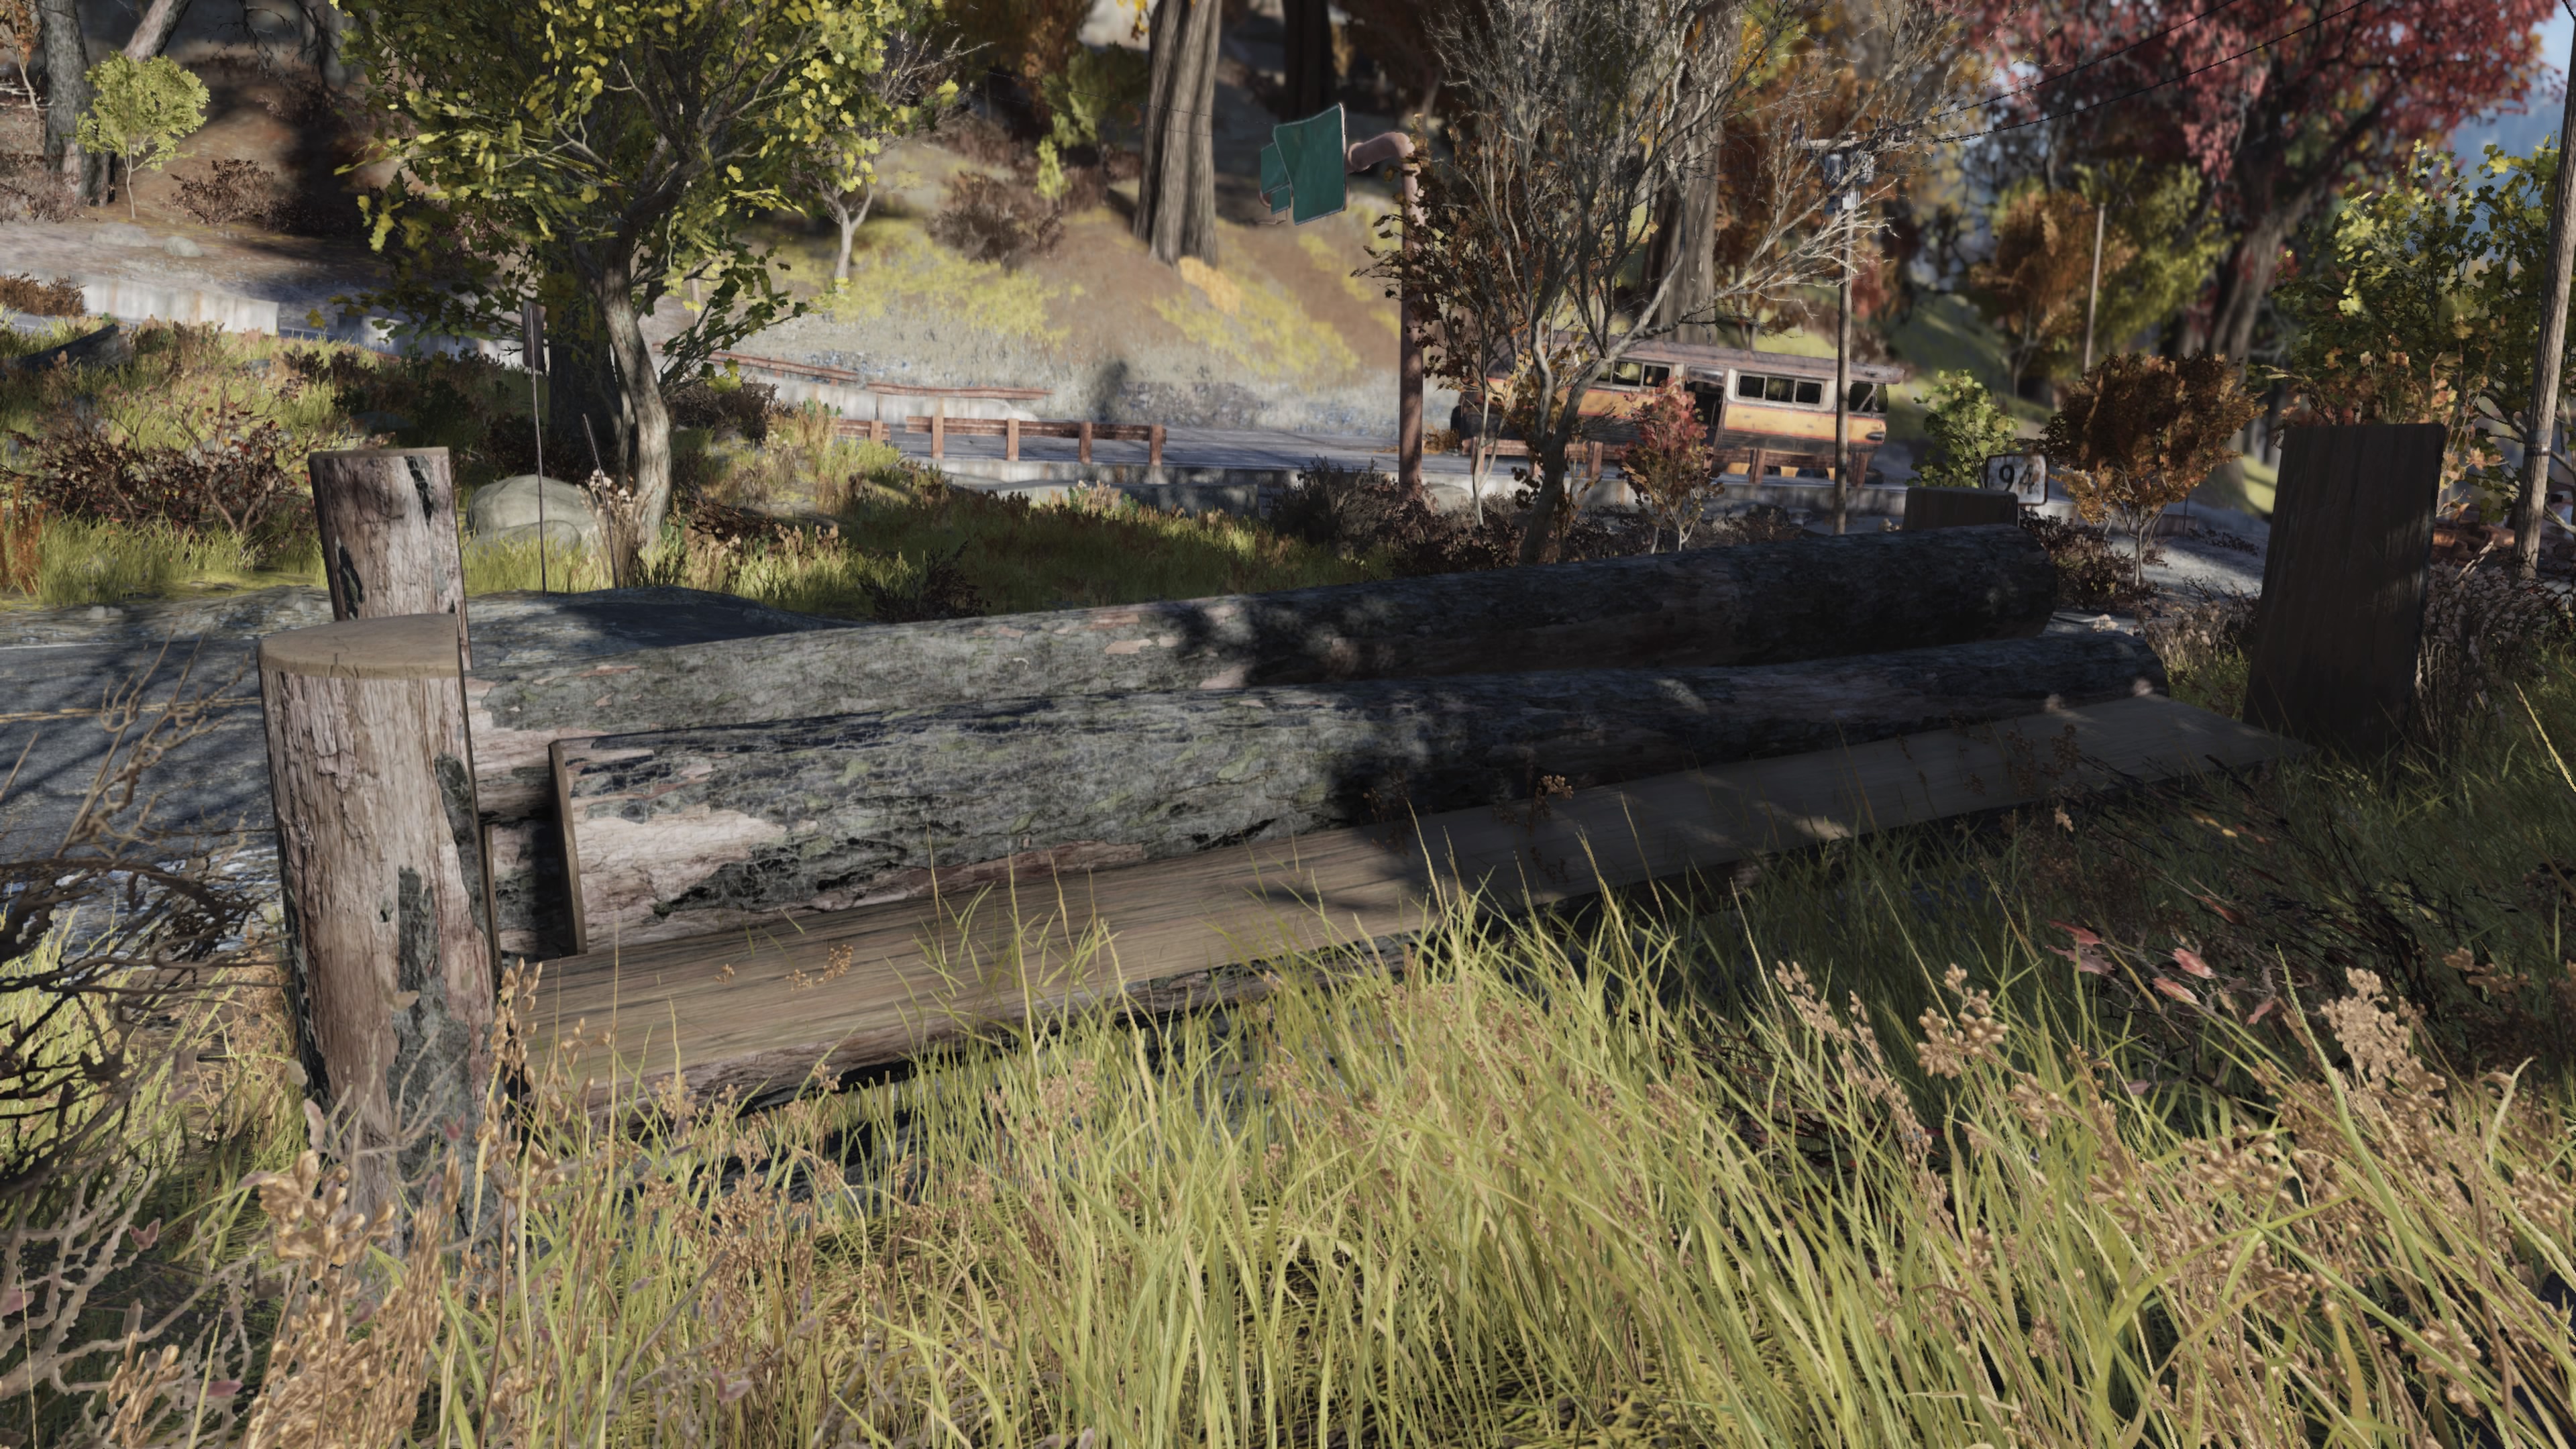
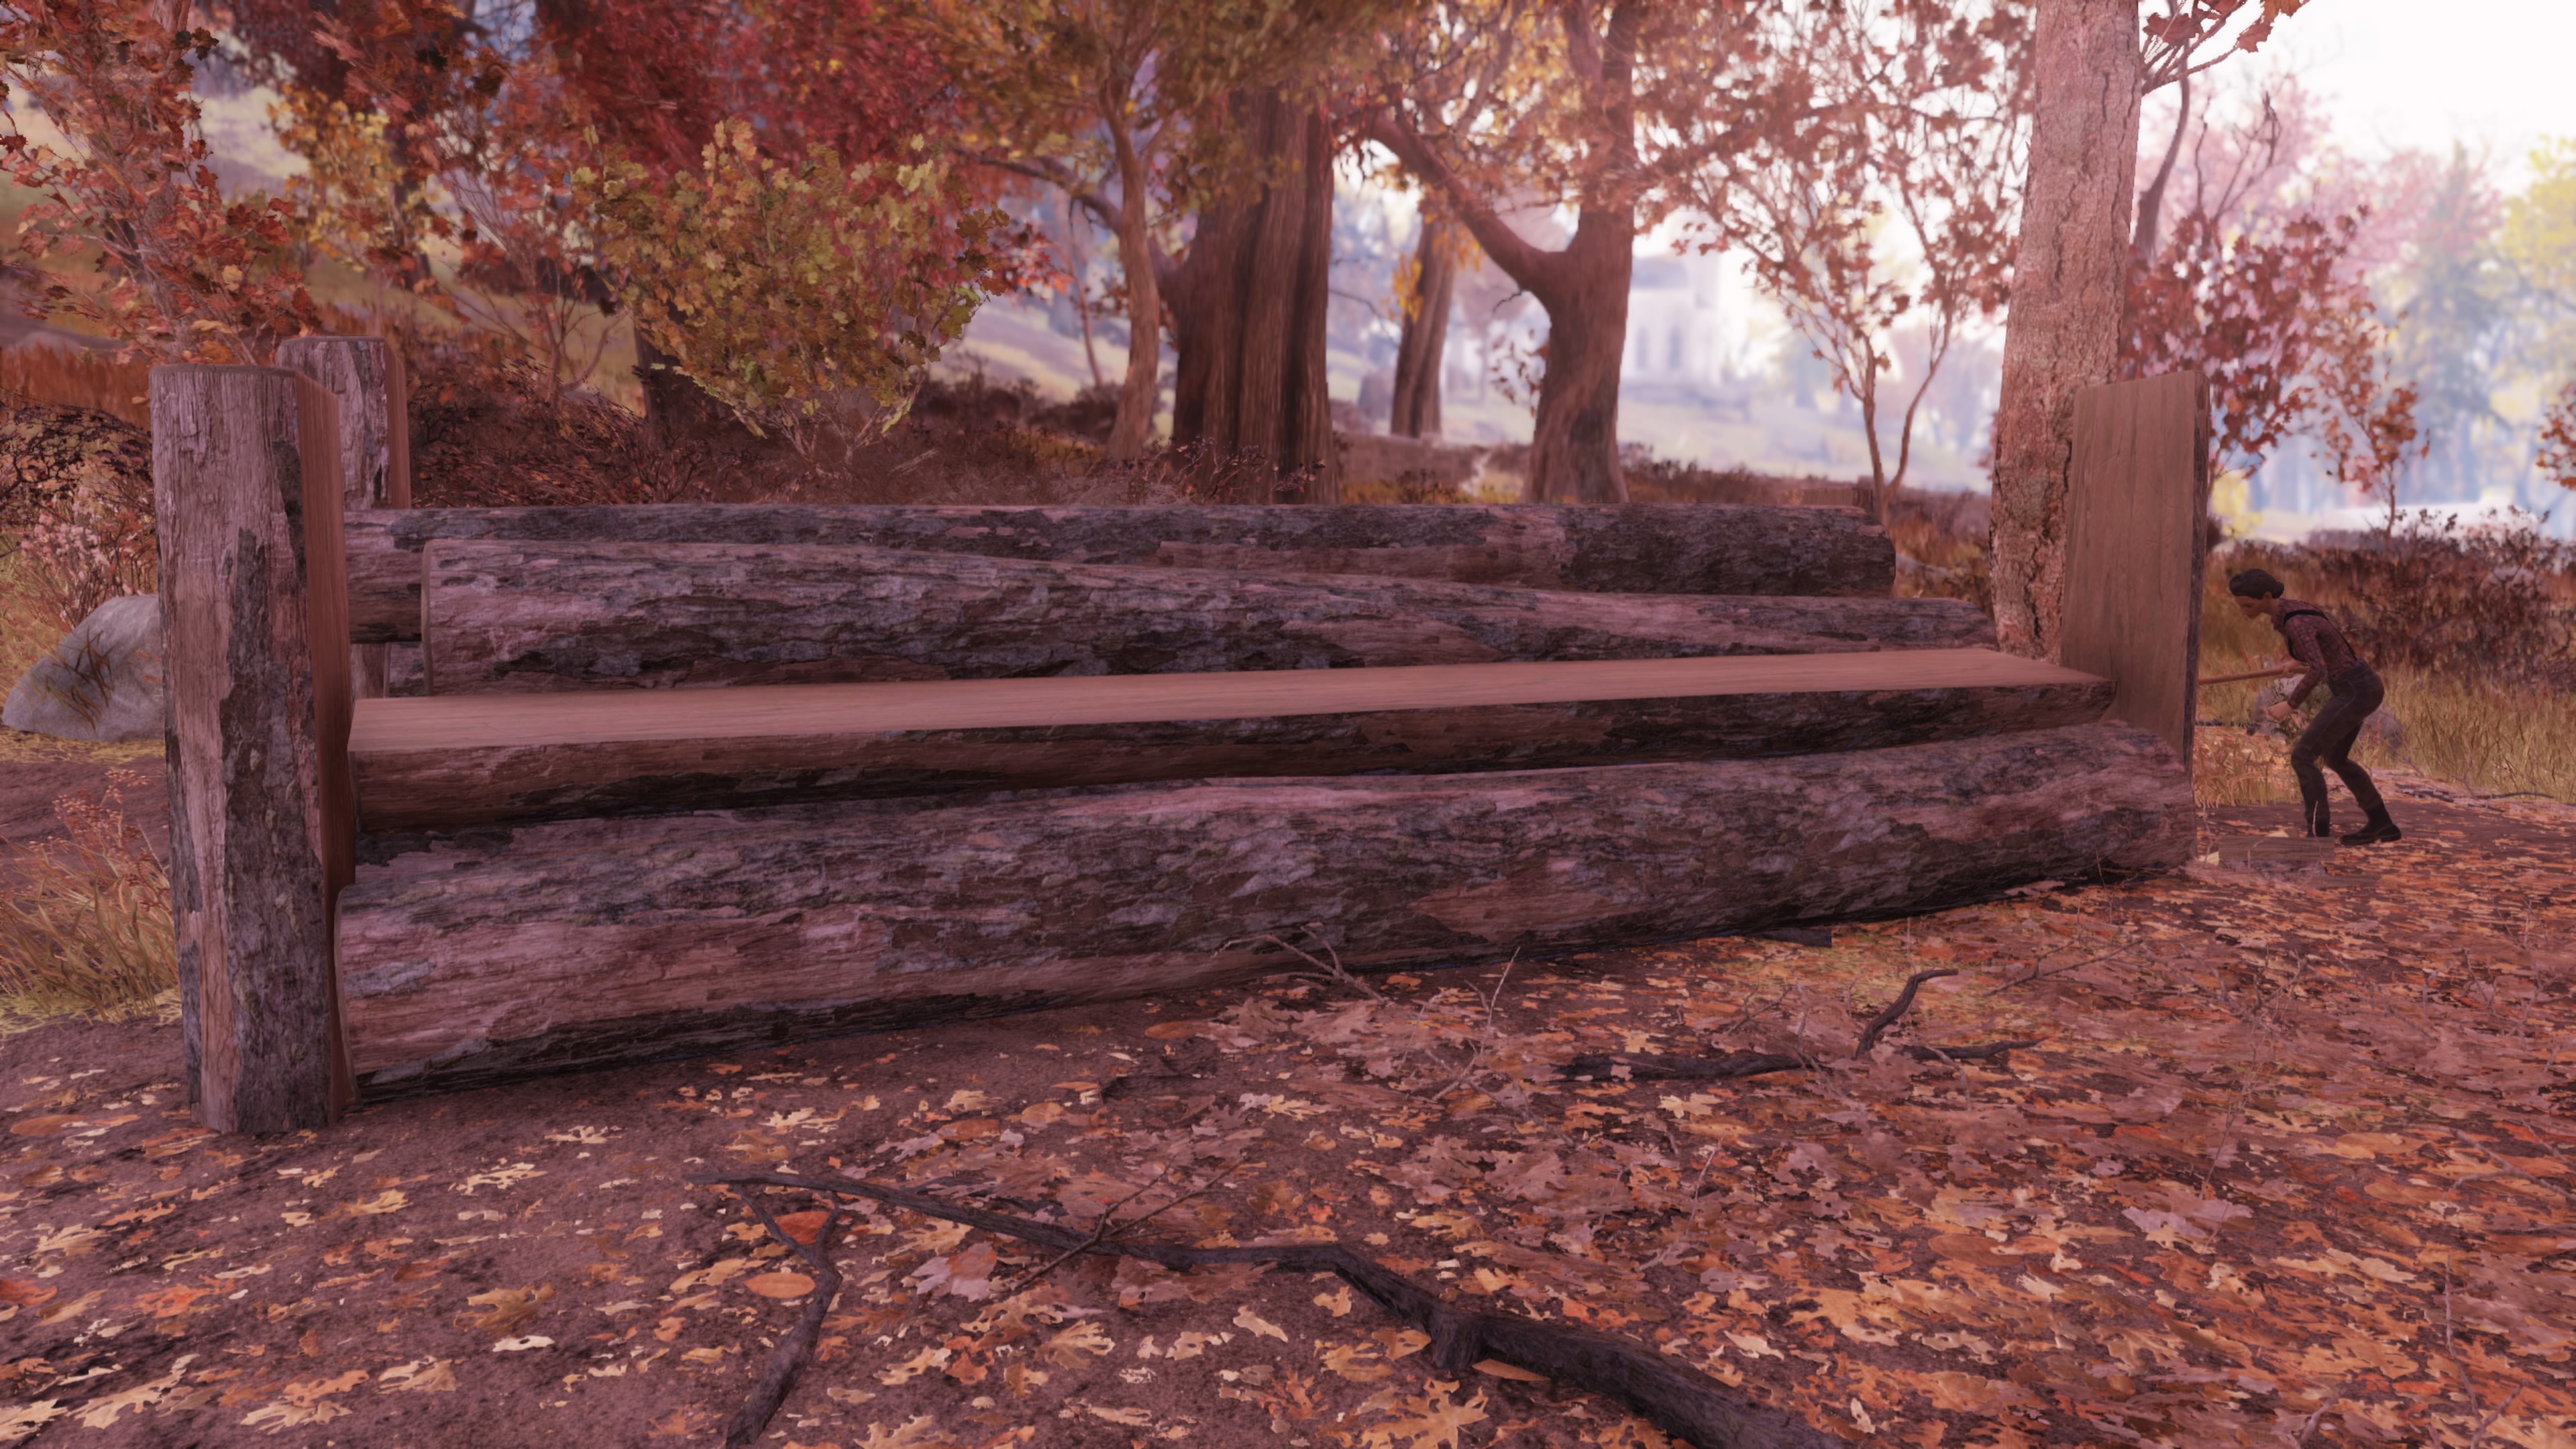
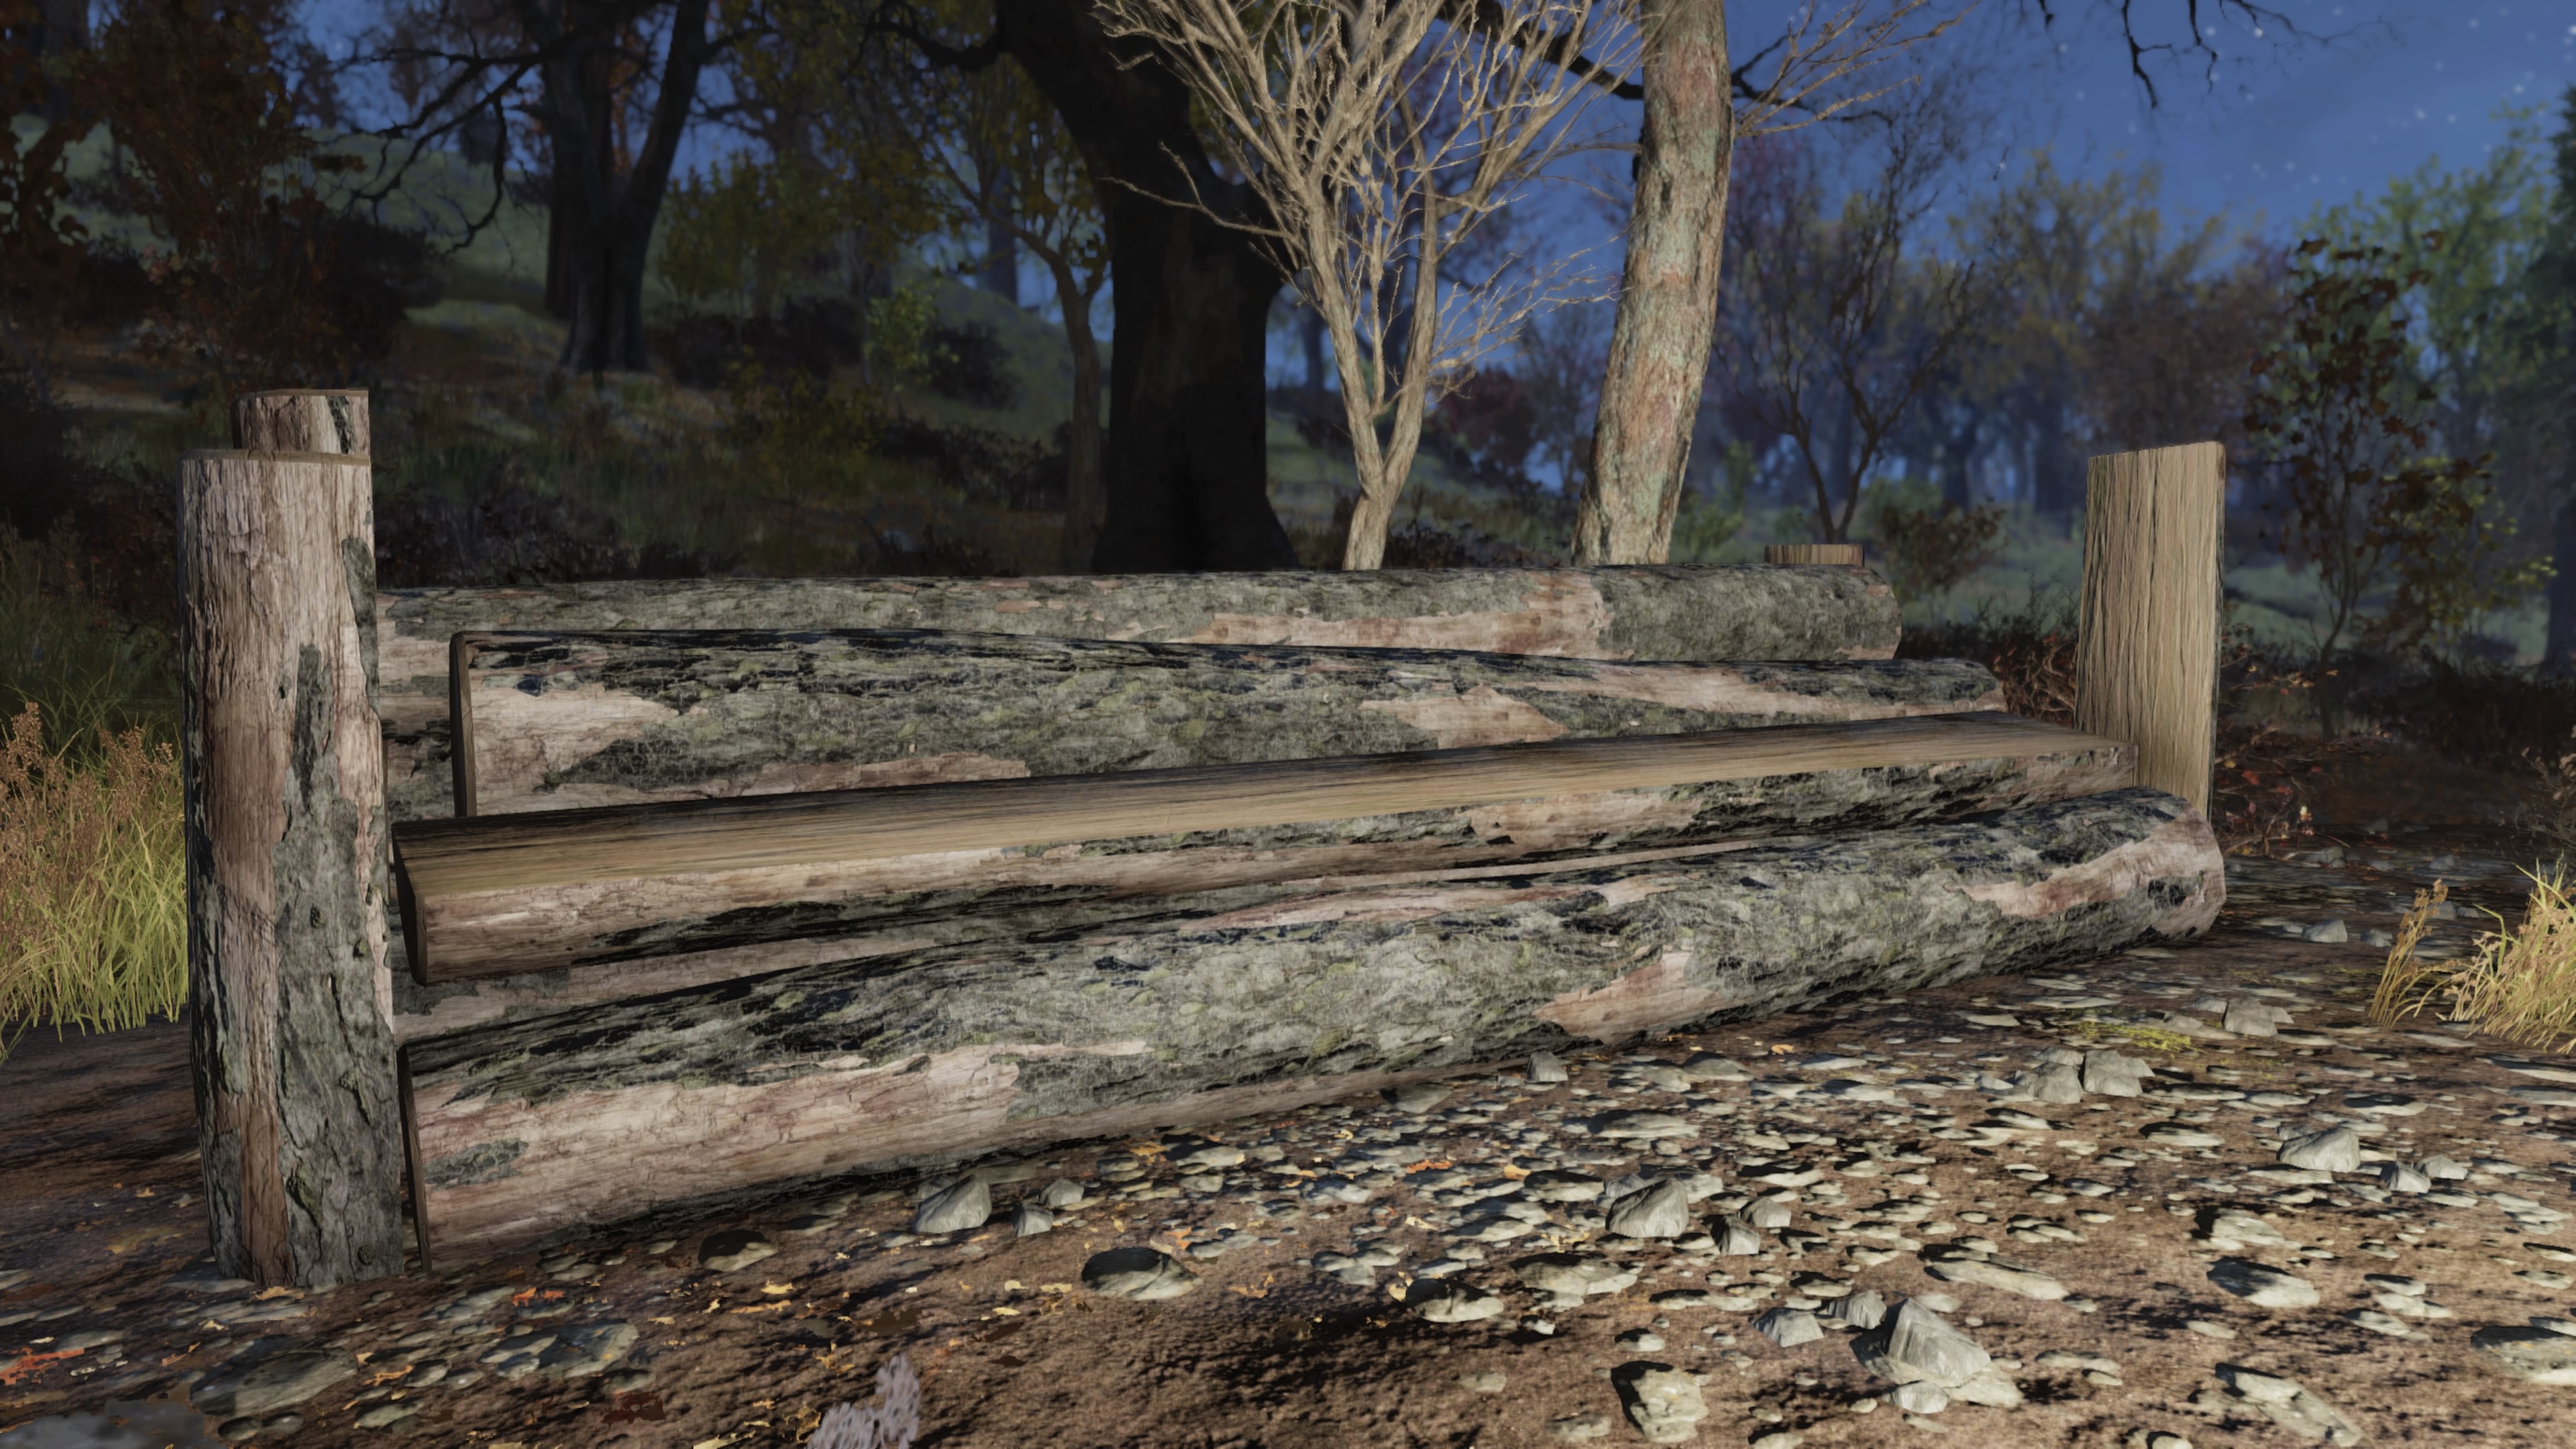
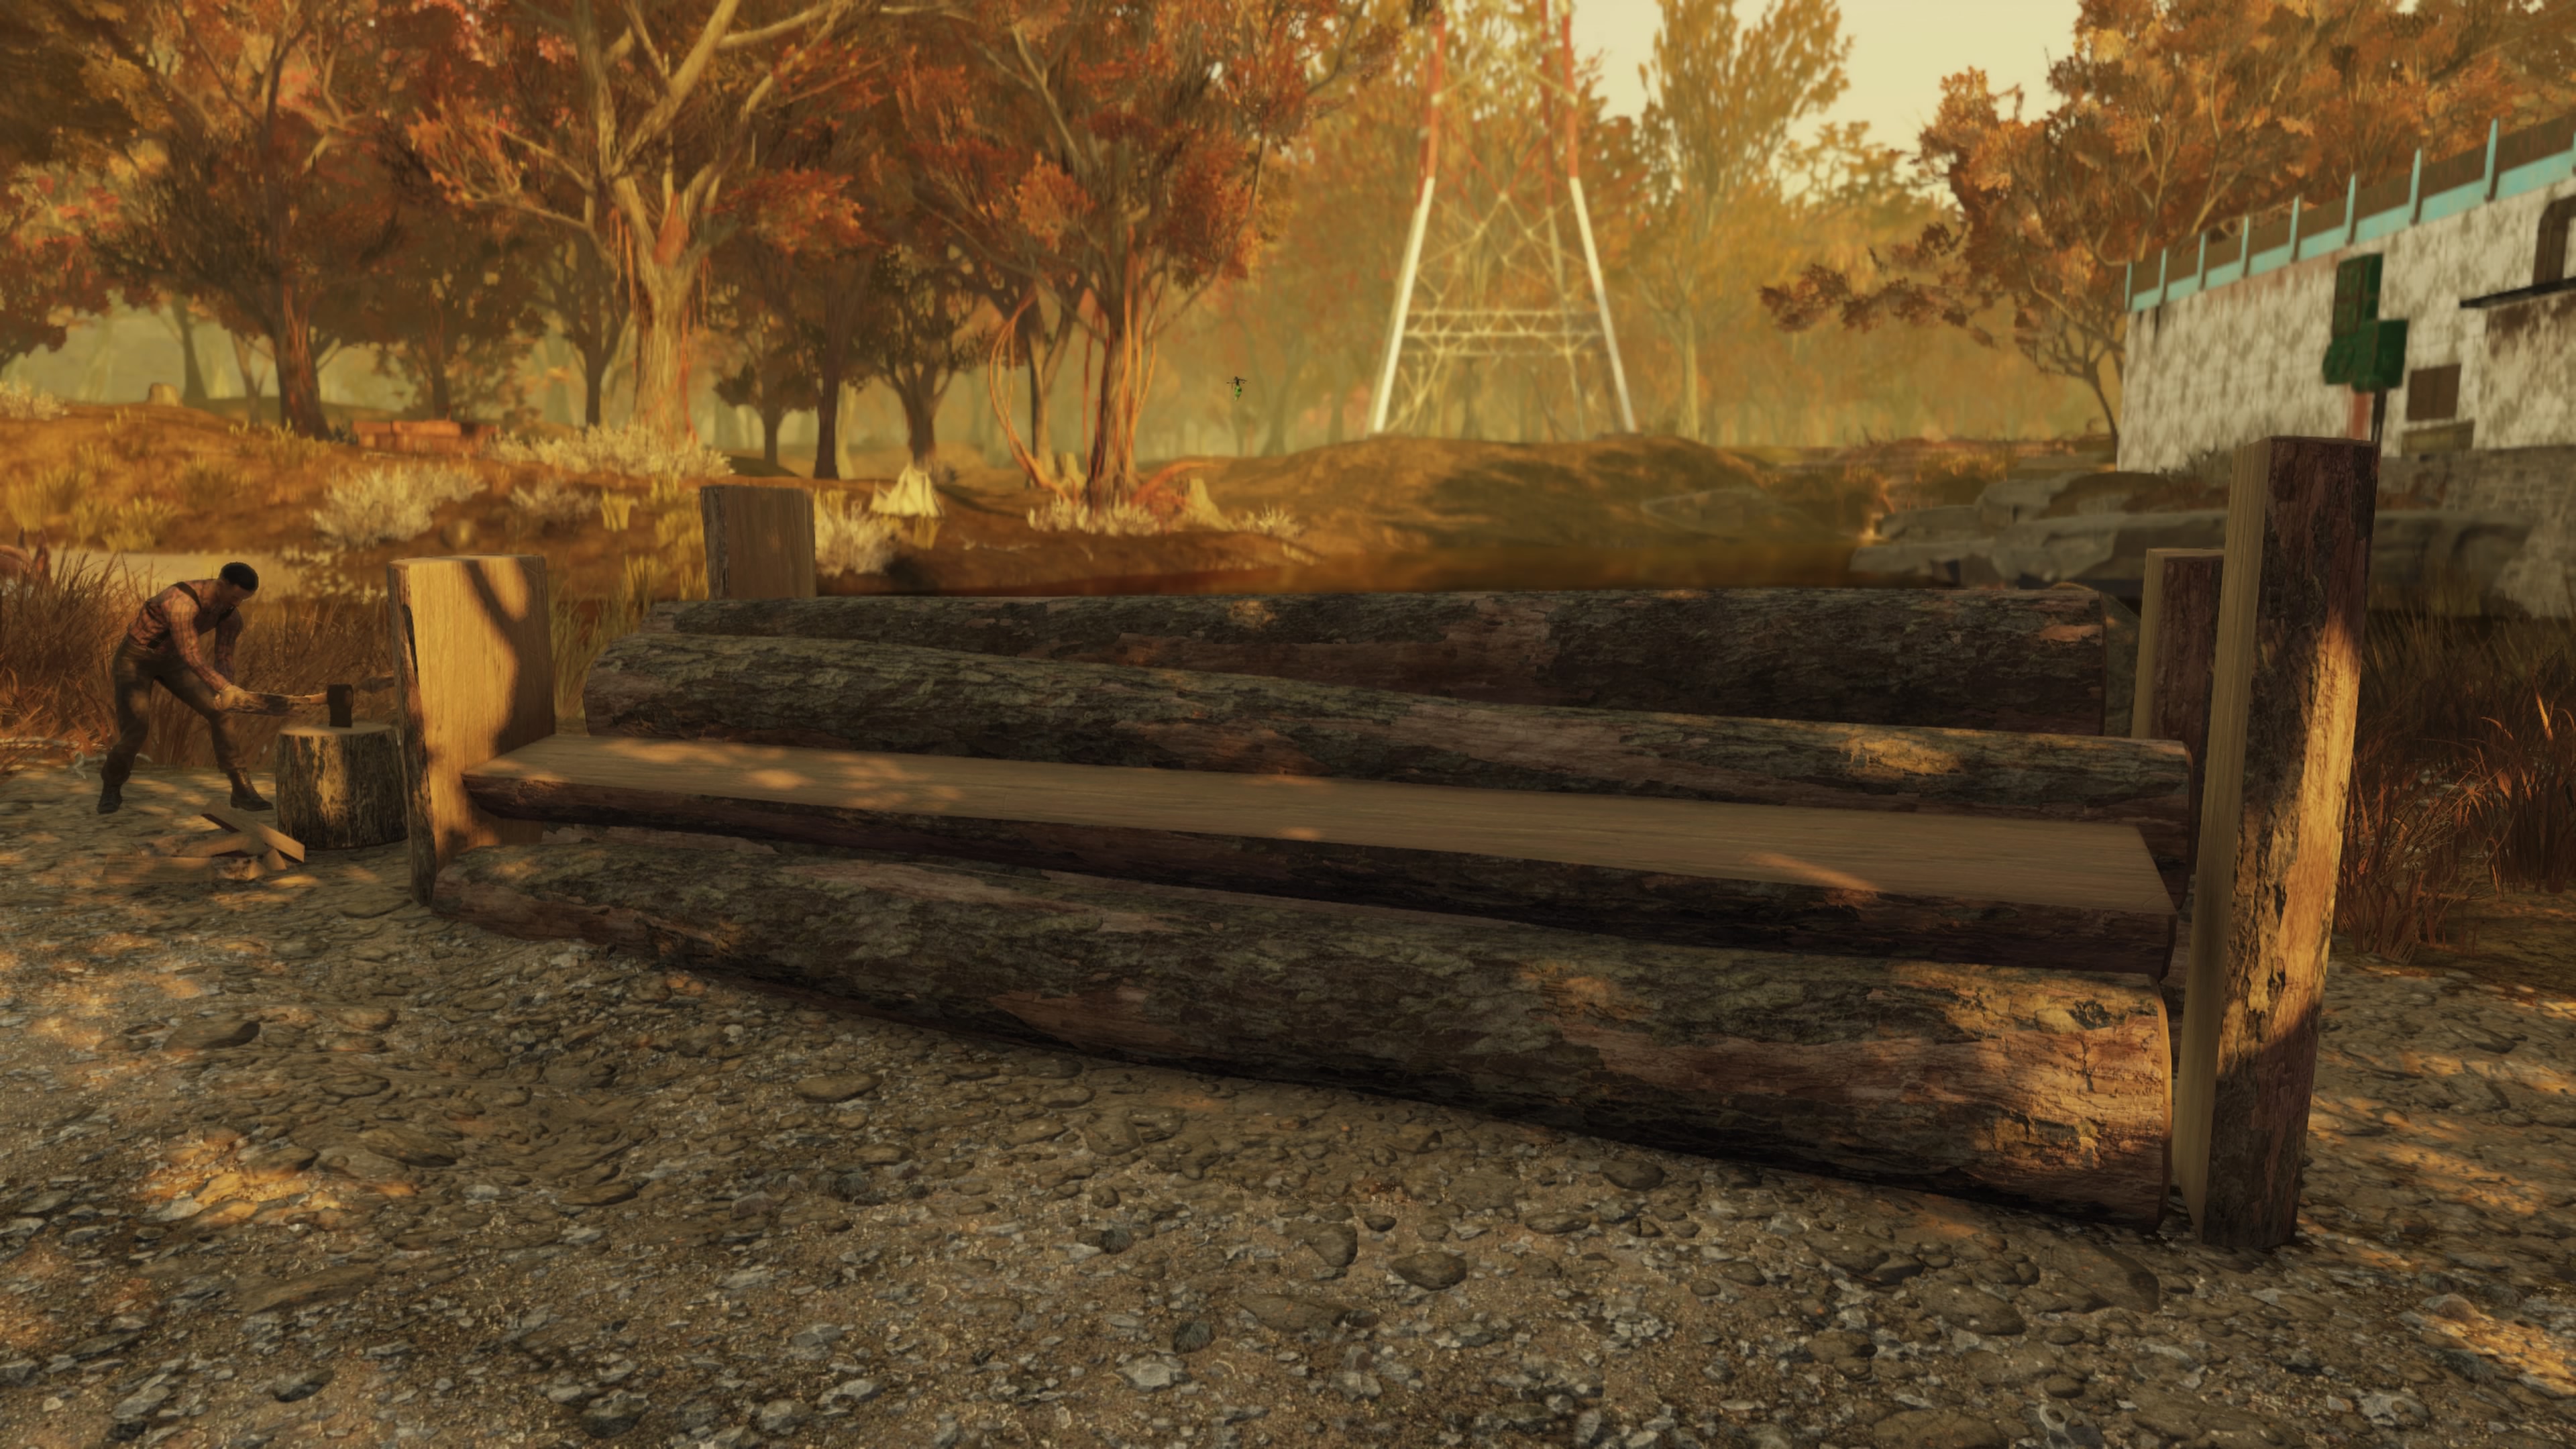
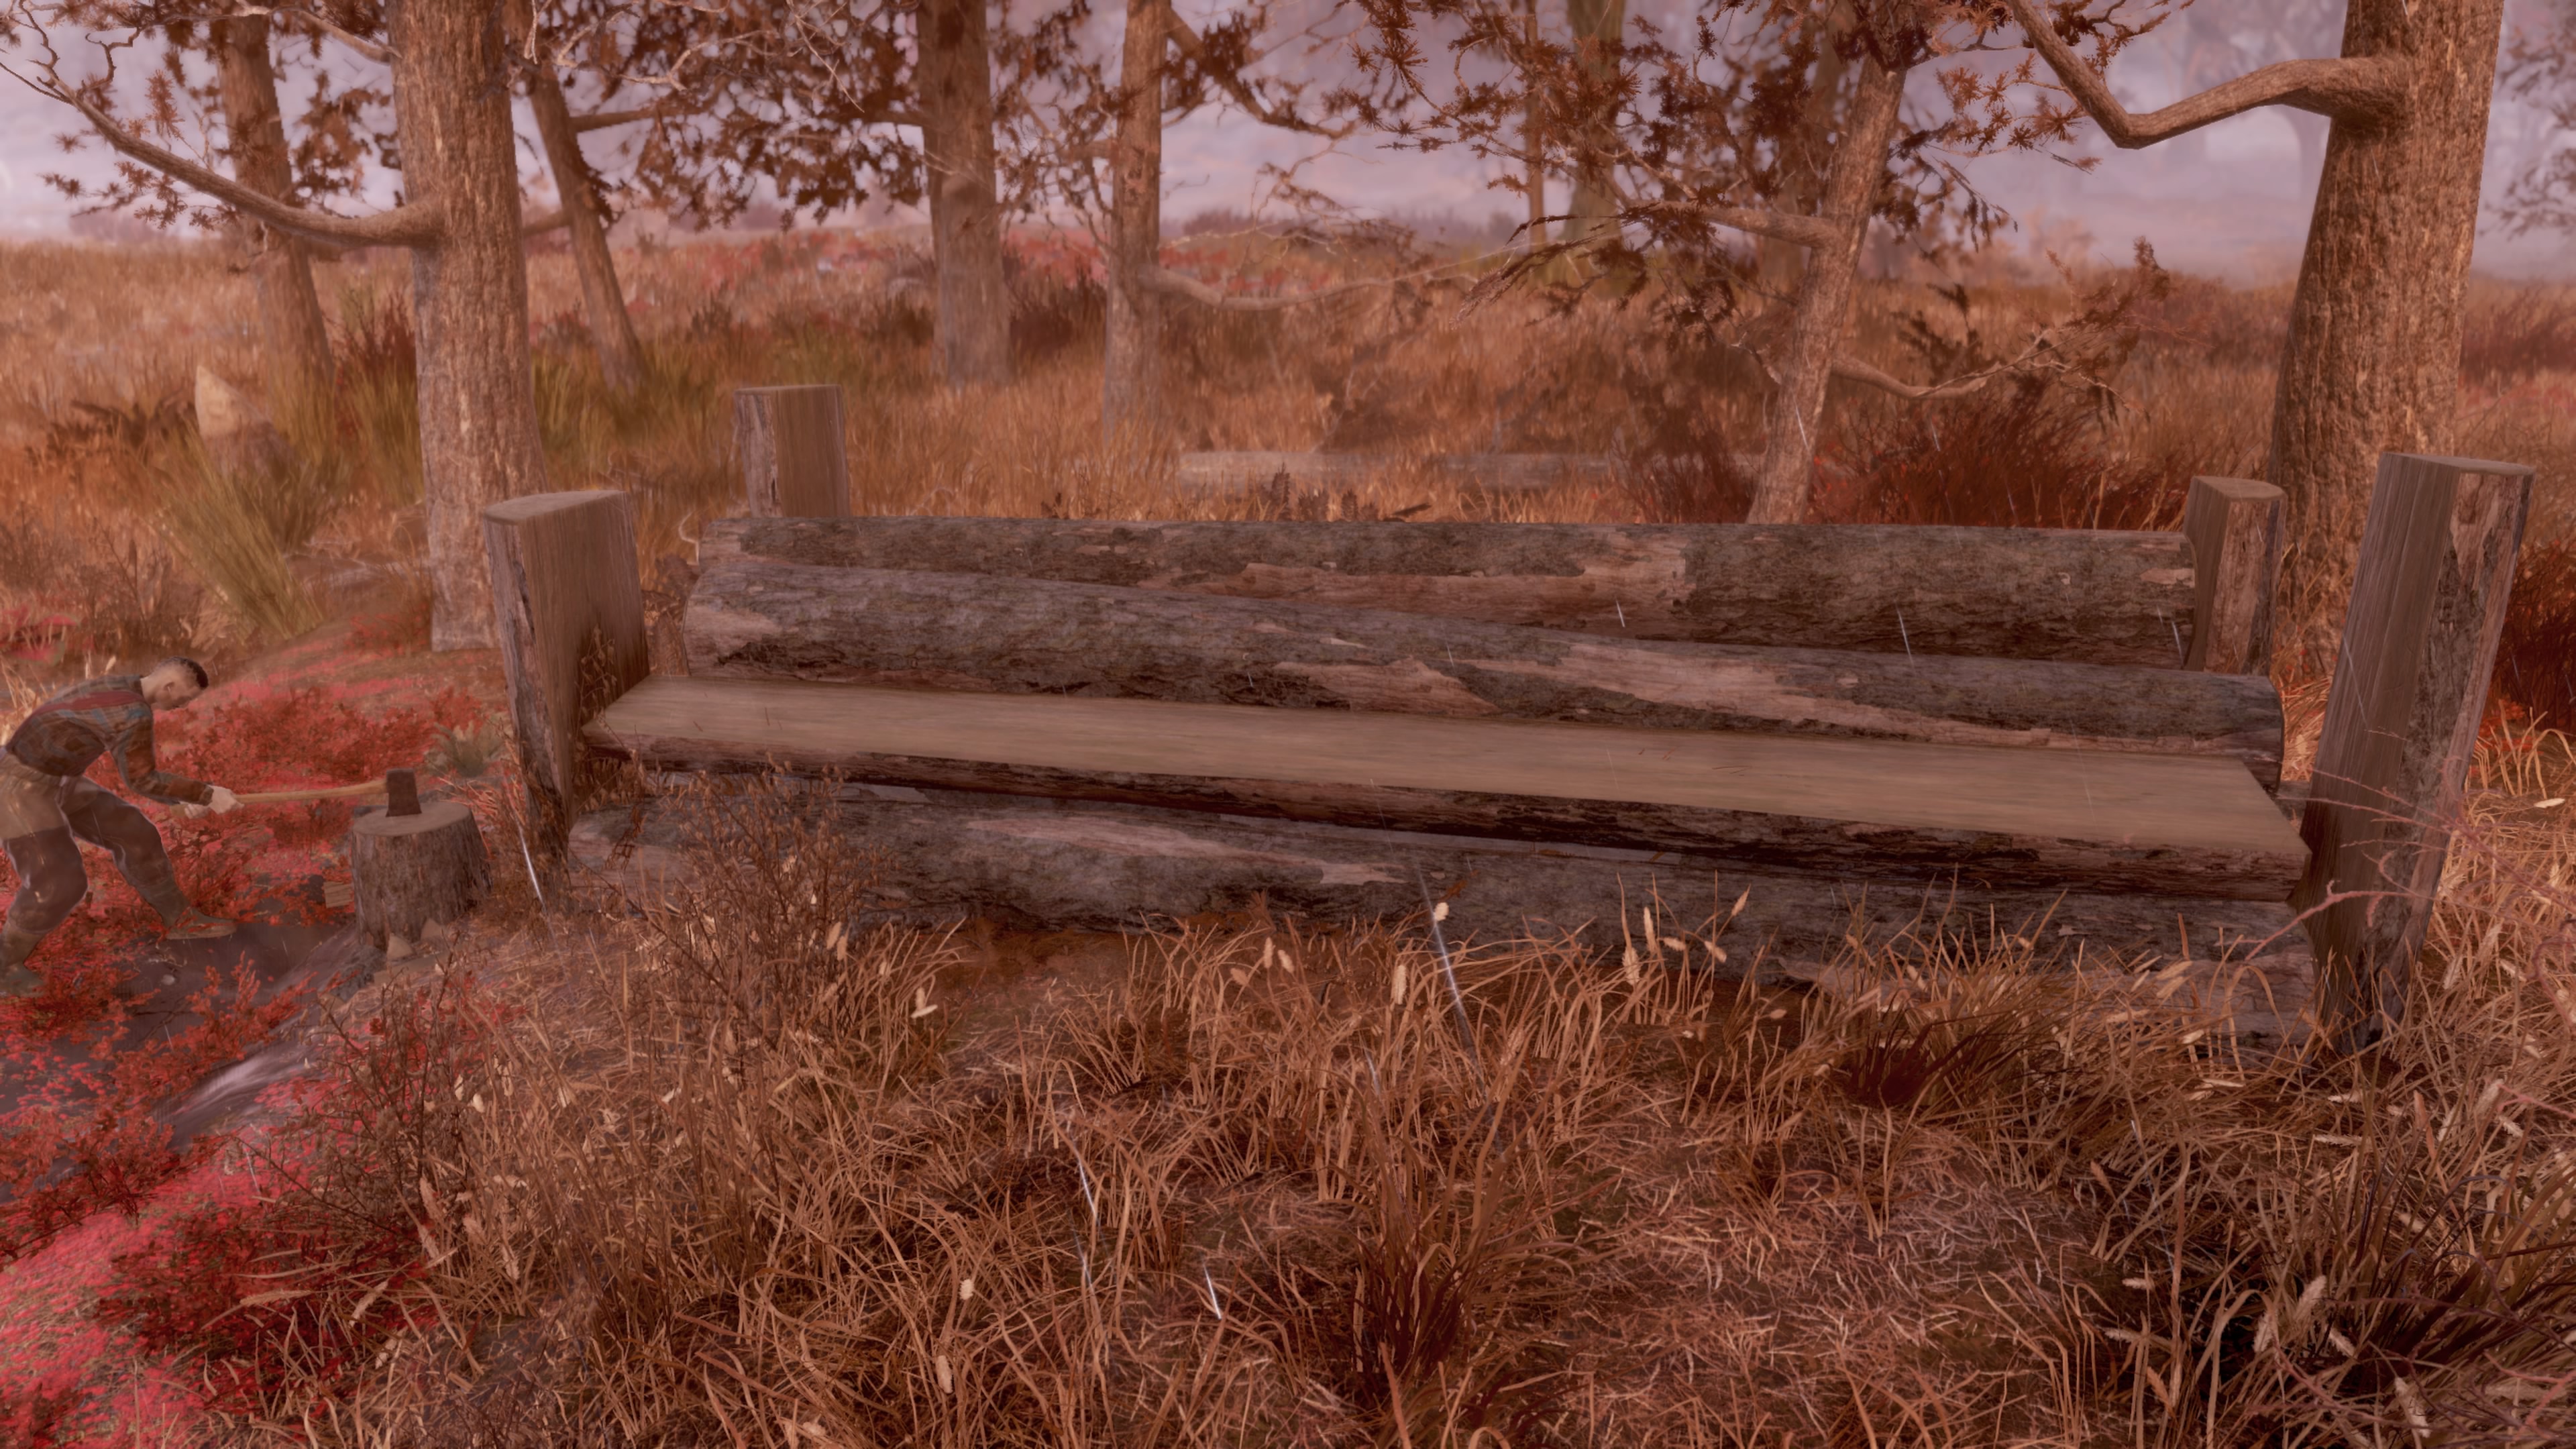
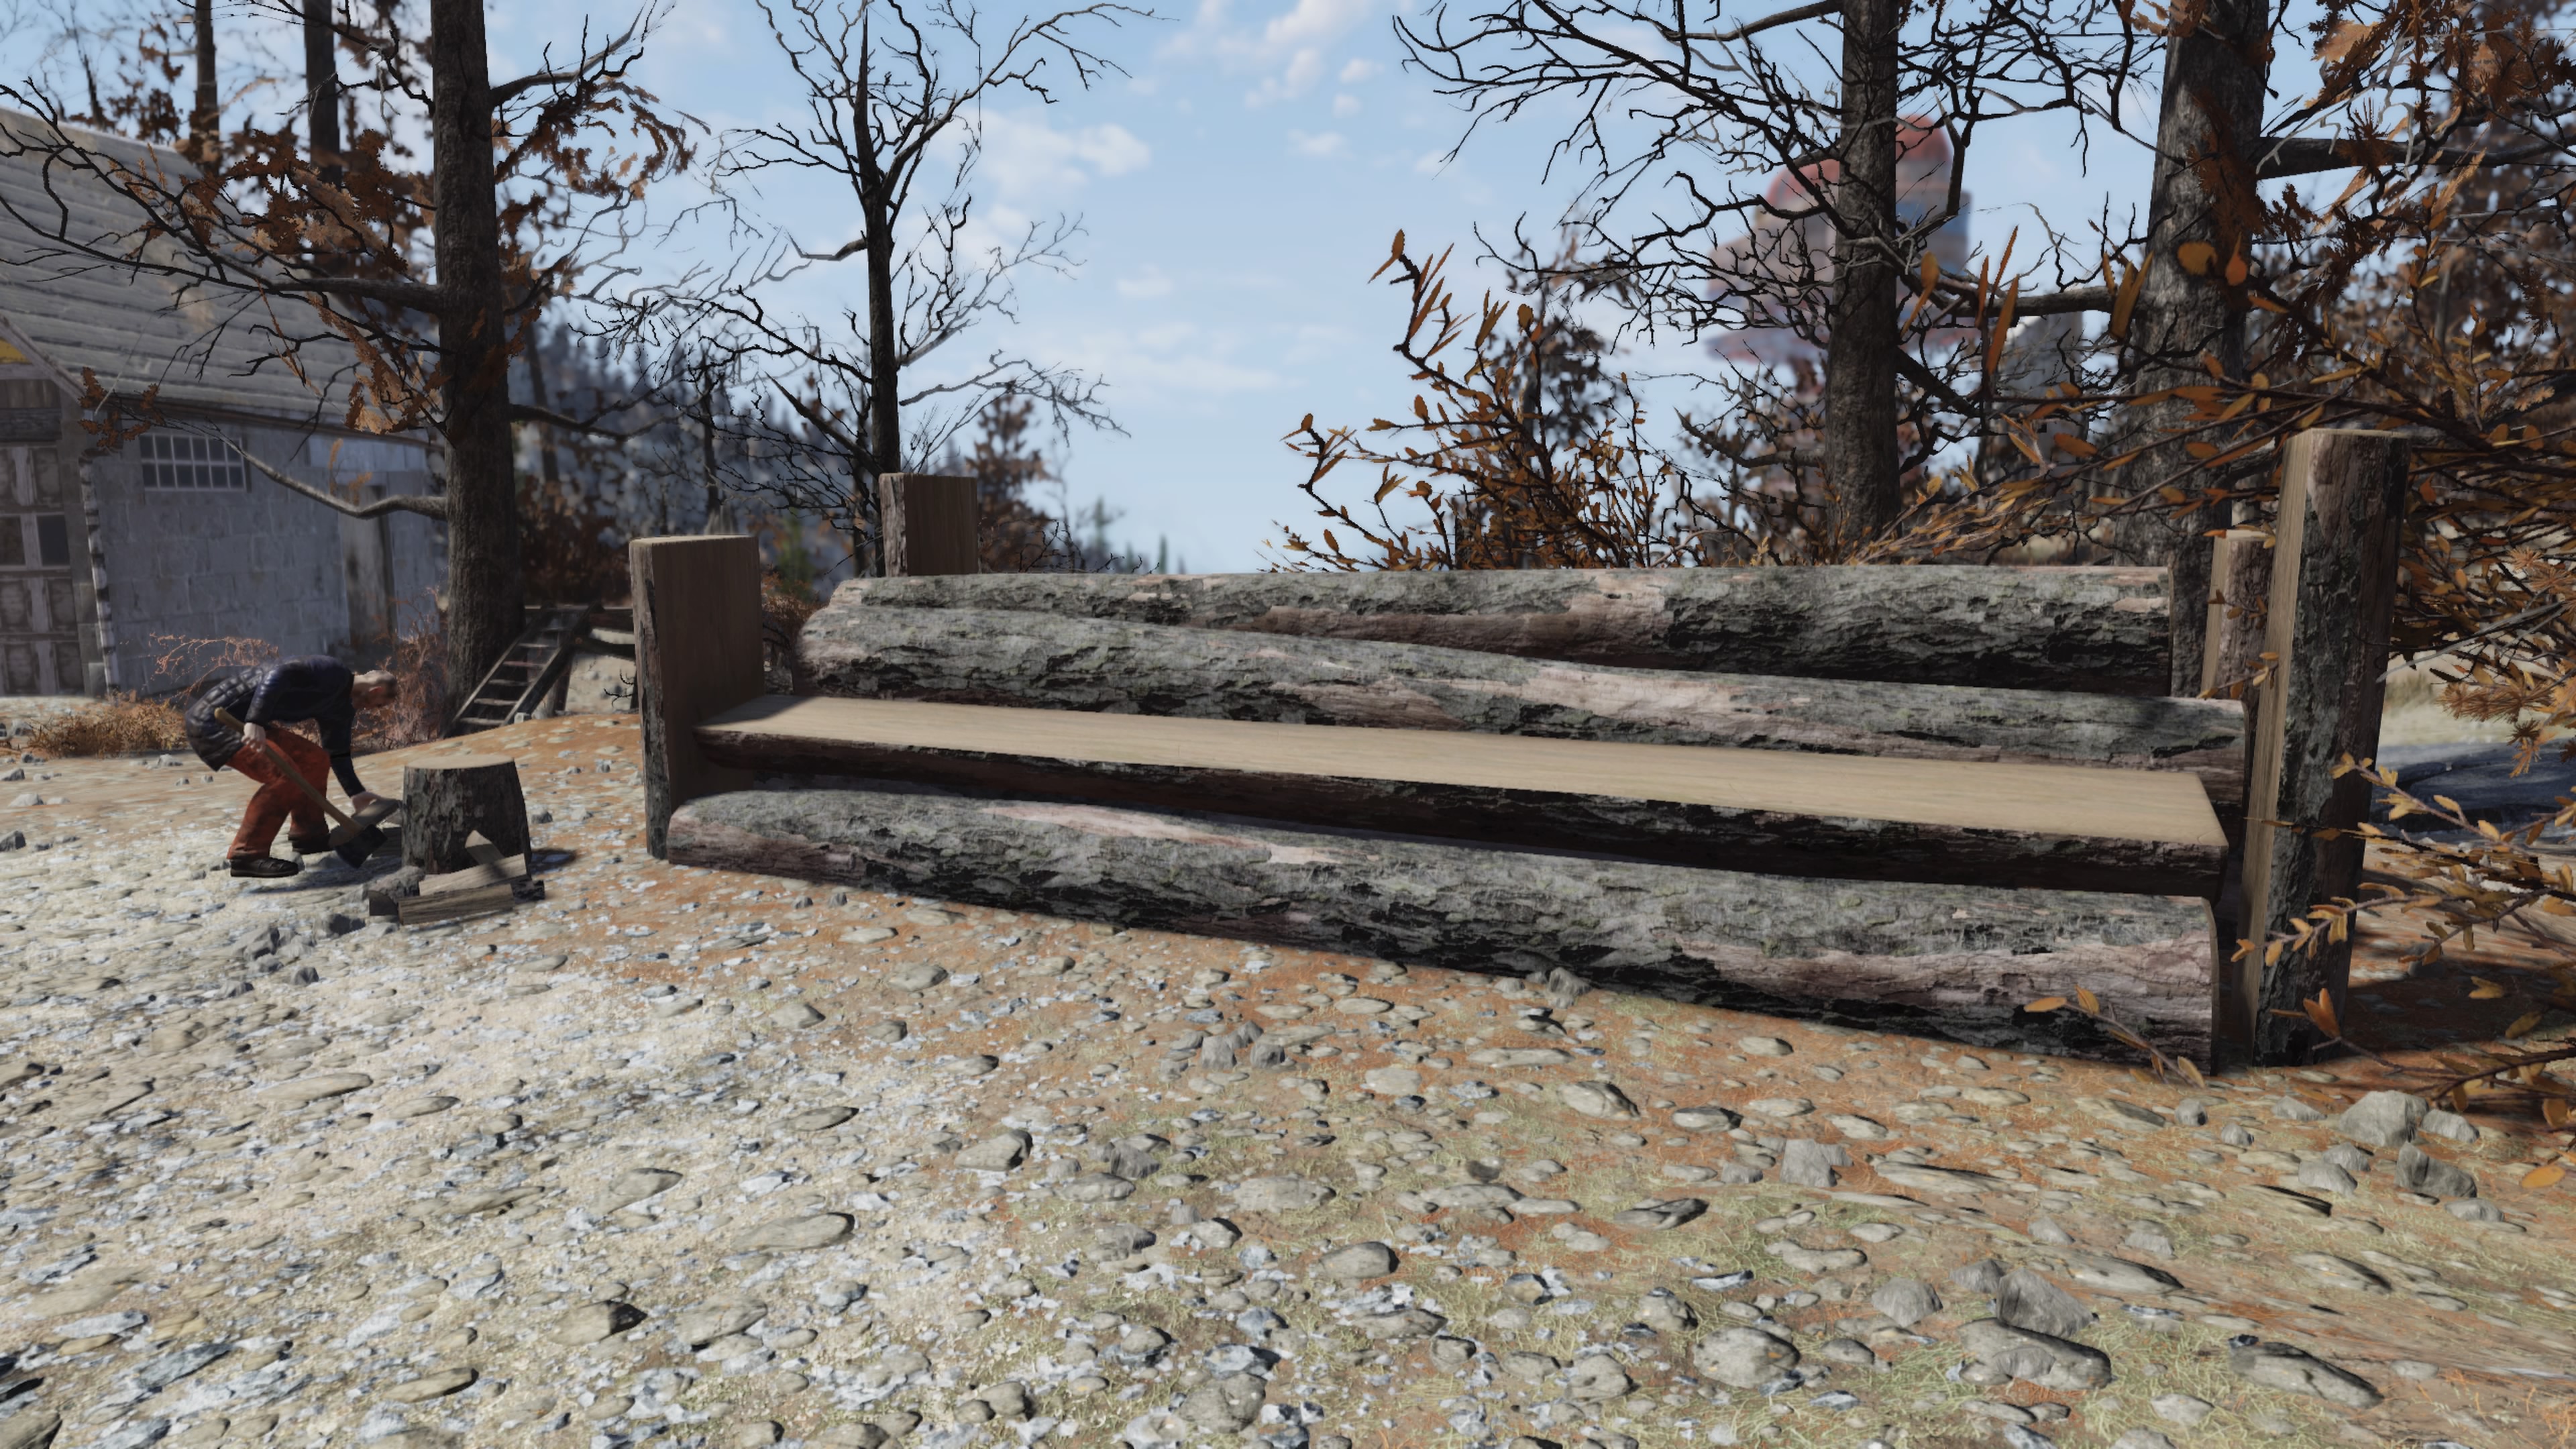
Wood resource piles have a distinctive look and shape from regular logs of wood in the landscape. Here’s an example:

Note that the cones on this pile are only for this specific pile. All other wood piles I’ve found do not have these orange cones. Additionally, note the four posts that constrain the wood pile. These wood resource piles always look like this (with the exception of the cones).

If you see one of these wood piles in the wild AND which is not located in a workshop, you can use it in your camp to extract wood by placing down a wood resource extractor. The extractor will produce wood scraps for you. The above is how a wood pile looks when a resource extractor is placed down. Resource extractors require power to operate, hence the reason for the two solar panels to power it. While you can use any generator of sufficient power, I prefer using two solar panels which can be placed right on top.
Settlers and Wood
Since the introduction of Wastelanders, the game now offers random NPC settlers living in the wasteland. These settlers can sometimes point the way to finding such wood pile resources. For example, if you hear the sound of wood being chopped, there’s a high probability that locating the sound will lead you to a settler and a wood pile. Settlers don’t spawn all of the time, but they do occur the vast majority of the time. This means that some wood piles must be found by stumbling onto them. By following the sound of wood being chopped, it is likely to lead you to a wood pile.
Again, these wood pile deposits are available to use as resources in your camp, just like ground copper, silver or iron deposits.
Wood Resource Deposit Locations
Let’s get right to the heart of this article and the reason why you are here. These are all of the wood pile resources I’ve found. Every single resource I’ve scouted is available for use in a camp, allowing for a wood extractor resource to be placed. The vast majority of these piles are located in The Forest. However, a few do exist in the Cranberry Bog and other locations around the map. As I find more, this article will be updated.
I’ve also tested all of these locations to ensure that a C.A.M.P. device can be placed which will include the wood pile. Though, placement on some may not work if placed directly in front of the pile. These piles may require you to walk around a little to find a suitable location where the device turns green and allows placement while still including the wood pile.
Let’s start with this first set of wood pile locations …
![]()
Location #1 — Gilman Lumber Mill (Forest)
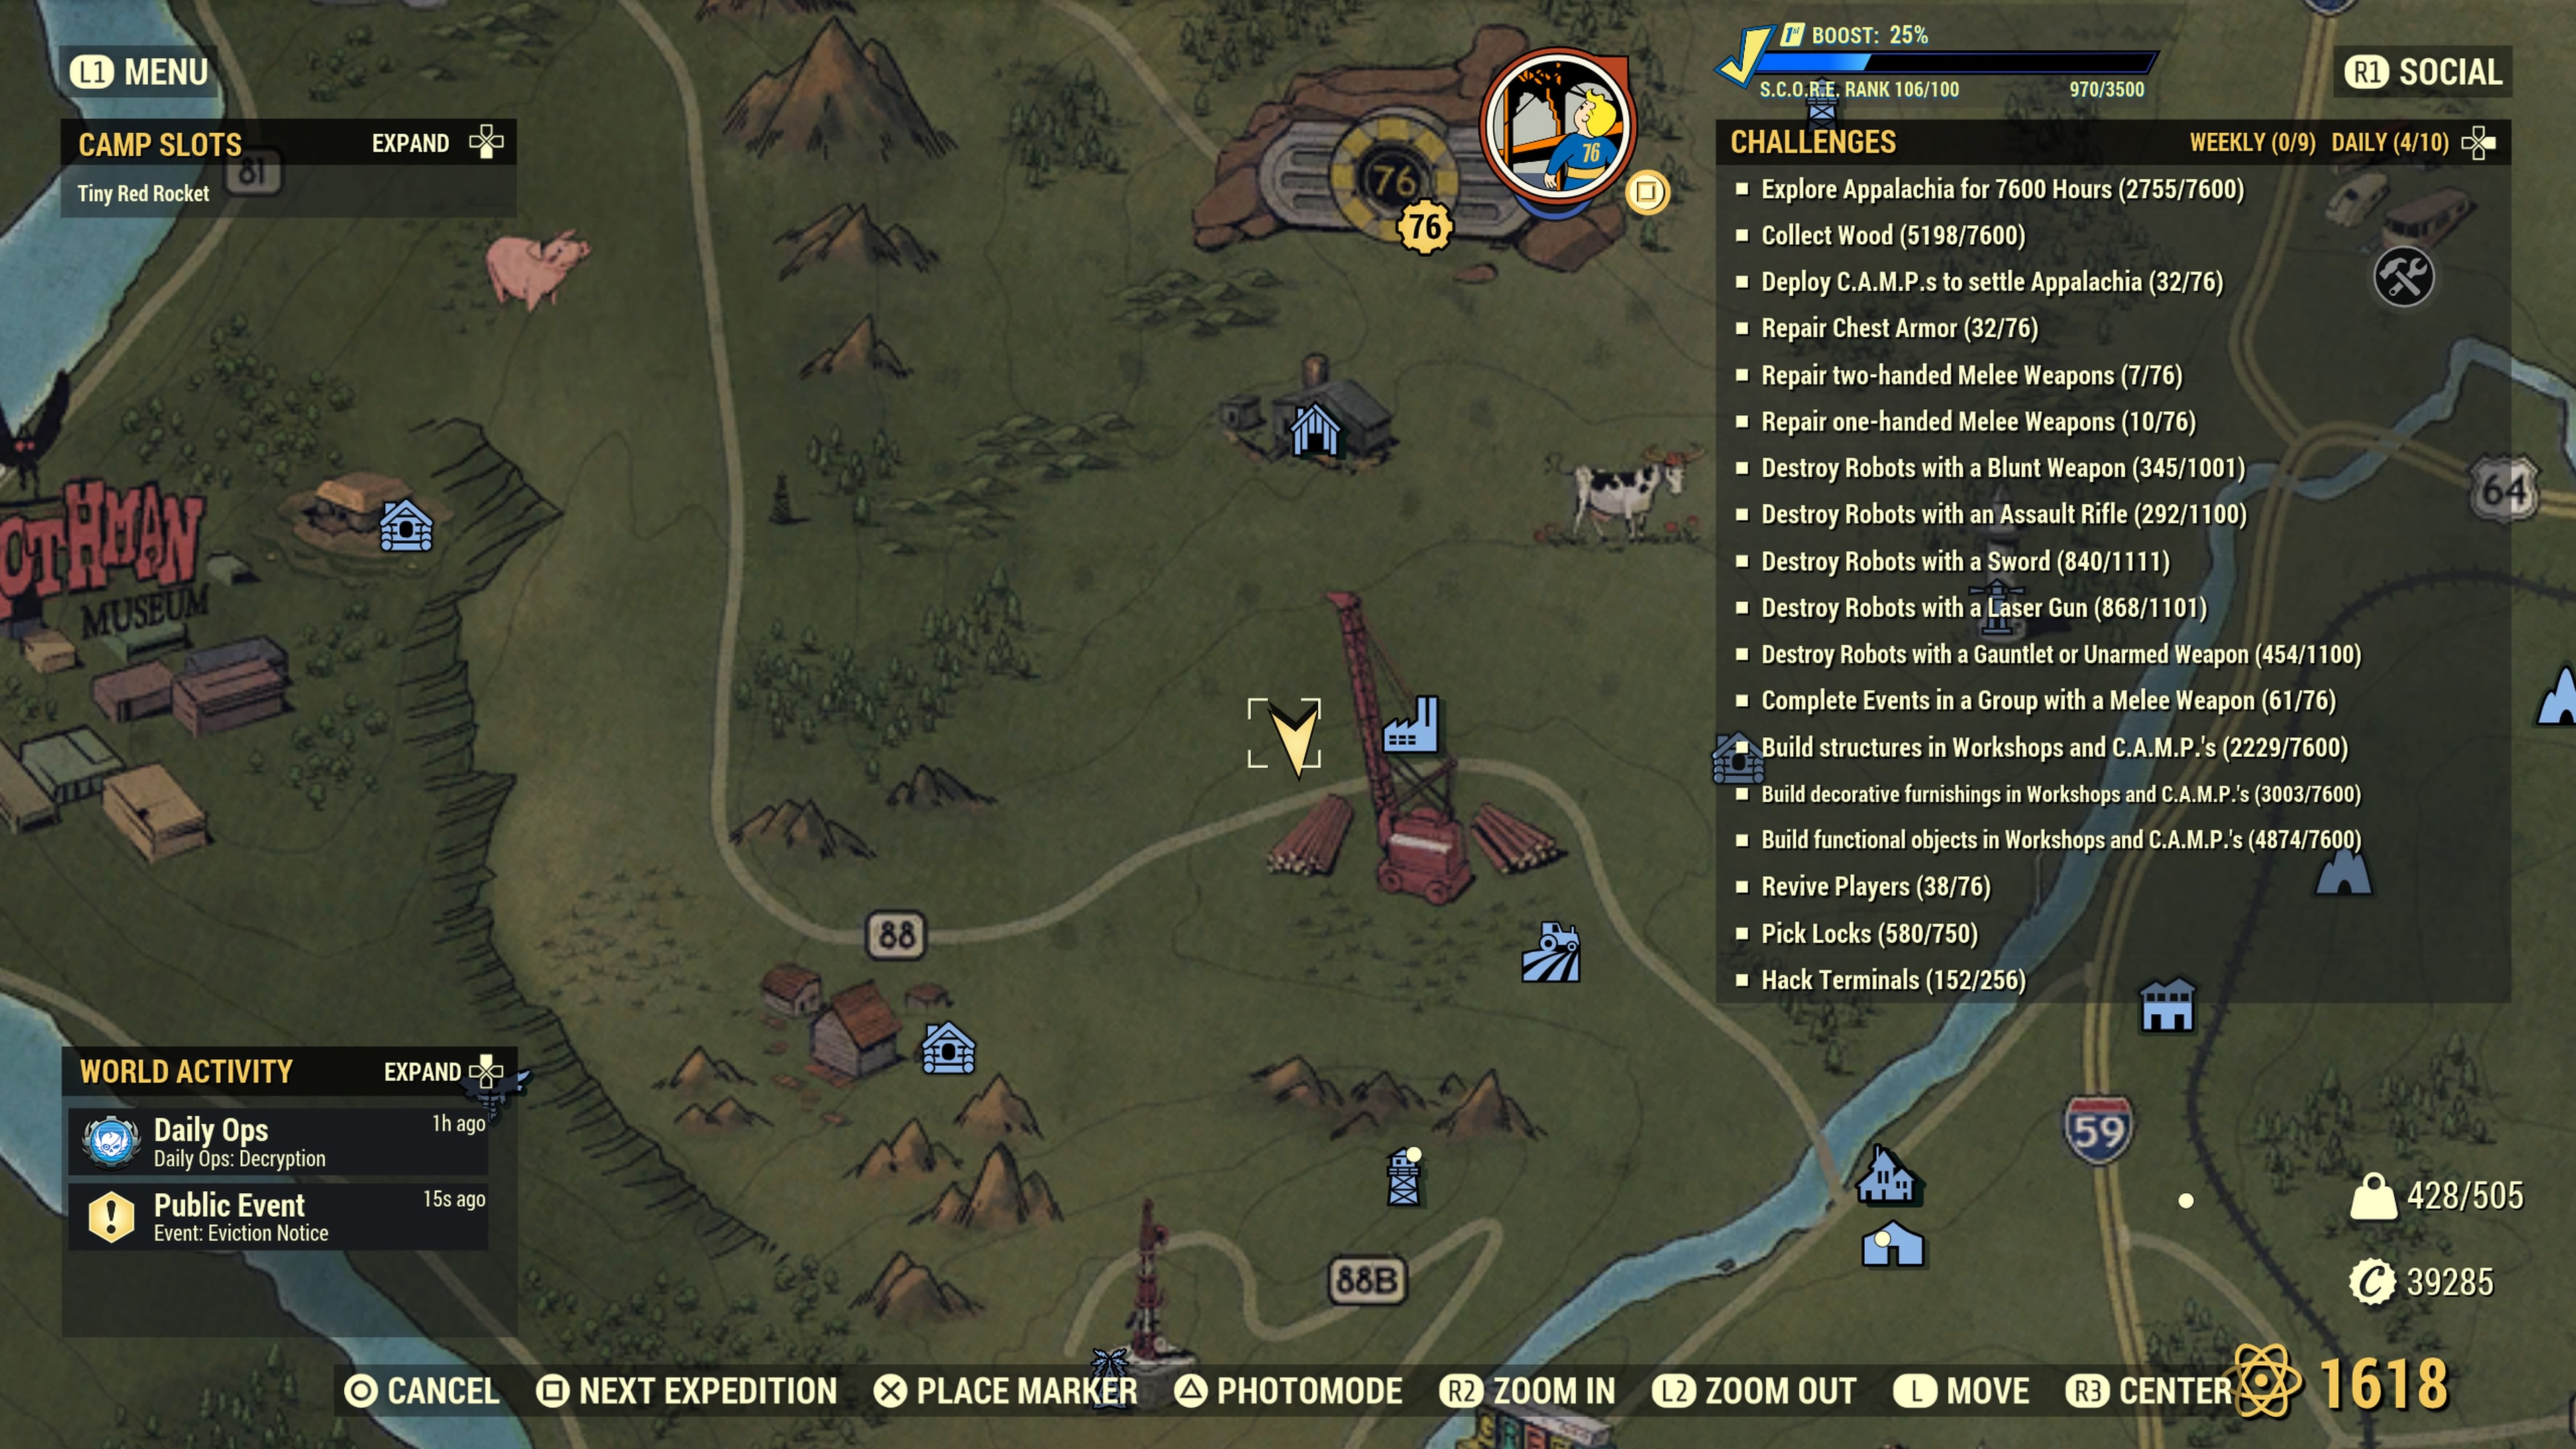
This wood resource deposit is located near the Gilman Lumber Mill just below Vault 76. The arrow marker points to the spot. This location actually contains two wood deposits. Unfortunately, the deposit closest to Gilman (next to a fence) cannot be claimed for use in a camp. This second one which is farther away and not sitting against a fence (see the arrow marker) is usable in your camp. It looks like so…

This wood pile below, unfortunately, is NOT usable in a camp. It is shown to prevent confusion from the above pile, which can be used in a camp. Again, this pile just below placed next to the chain link fence cannot be used as a camp resource, but it can be harvested for wood by your character. Yes, it would be nice to have two wood extractors in the same camp, but alas it’s not to be. Thanks Bethesda.

Location #2 — Back end of Wixon Homestead (Forest)

This wood deposit exists not far from the Wayward, but sits at the very back end of the Wixon Homestead’s farmland, not far off the nearby road leading to the Wayward.

Location #3 — Hunter’s Ridge (Forest)

This wood deposit is near Hunter’s ridge along the road where the marker shows. This pile has two orange cones.
Location #4 — Pylon V13 & Drop Site C2 (Cranberry Bog)
This wood deposit is somewhat near the Abandoned Bog Town workshop, but is not part of it. It’s fairly far off of the road and you can hear a settler chopping wood all the way from the road if they are there.

Location #5 — North of Twin Pines Cabin (Forest)

Near where the road forks into two, you’ll find a wood deposit which is not far from Twin Pines Cabin (the Blood Eagle symbol on the map).
Location #6 — Deathclaw Island (Forest)

Slightly off of and north, just up the road from the spawn point for Deathclaw Island (pine tree marker on the map), here’s another wood resource which can be used at your camp. See the arrow marker. The wood pile looks like this.

Note that the building seen in the background is the small red shed which is part of the Tyler County Dirt Track workshop. However, this wood pile is not part of that workshop and can be used in your camp.
Location #7 — Point Pleasant (Forest)

This wood pile is very close to Point Pleasant. However, the spawn point for Point Pleasant leads you to the south entrance. This pile is near the north entrance of the city with no fast travel point close. You’ll want to fast travel to Black Mountain Ordnance Works and walk down the road towards the north entrance of Point Pleasant. Immediately after you pass a red colored large hauler truck, it’ll be on your left. Careful of a possible Blood Eagle camp nearby.

Location #8 — Silva Homestead (Forest)

This wood pile is located a little bit south of Silva Homestead and is also a little bit off of the road near and sorta behind a red tractor. This location is a little bit tricky to place the C.A.M.P. device. However, if you are creative with your C.A.M.P. device placement, you might be able to include both water and wood as resources in your camp. Note that you only need to cover about half of a ground resource with the green perimeter circle for that resource to be usable. Placement of water resources are a bit more finicky.

Location #9 — Billings Homestead (Forest)

This wood pile is located just up the road a little from the Silva Homestead pile. This pile is close to, but not part of the workshop. Like Silva Homestead, this one also requires creative placement of the C.A.M.P. device to be able to use this pile as a resource.
See the placement of the C.A.M.P. device below. Any closer to the pile and it turns red due to the workshop proximity.

Location #10 — Grafton Steel (Toxic Valley)

This wood pile is near Grafton Steel, but is on the north side. Similar to Point Pleasant, the fast travel point for Grafton Steel is on the south side. You’ll need to trek up the road to the point where the marker is. It’s just a little bit off the road, but you can still see the pile from the road.

Location #11 — Near Black Mountain Ordnance Works (Forest)

From the fast travel point at Black Mountain, travel down the road to the point you see. There’s a small gravel road that leads into an unmarked junkyard which looks like this…

At the back of this makeshift and unmarked junkyard resides a wood pile…

I didn’t scout this area carefully to see if there were any other resources present, such as a junk resource. You’ll need to visit to determine this. It looks like there might be a junk resource available off to the right as shown in the wider picture of this makeshift junkyard.
Location #12 — Alpine River Cabins (Forest)

Just above Alpine River Cabins there’s another wood pile. Seems like there’s a lot of these in the Forest area. Makes sense, though. It looks like this…

![]()
Location #13 — Mosstown (Mire)

Very near Mosstown, but just outside of it is a wood resource pile. This resource pile is usable in your camp even though it’s very close to Mosstown.

![]()
Location #14 — WV Lumber Co. (Forest)

This wood pile is so close to the water line, you can likely claim both water and this wood pile in your camp.

![]()
Location #15 — Groves Family Cabin (Forest)

This one is closer to Groves Family Cabin than Darling Sister’s Lab. The trouble with this map image is that when the Groves marker is selected, the text obscures the arrow. I selected the Darling Sister’s Lab marker to give you a better idea of the map location.
![]()
Location #16 — Miner’s Monument (Forest)

This wood pile is just across from Miner’s Monument.

![]()
Location #17 — Southern Belle Motel (Mire)
Next to the Southern Belle Motel is, you guessed it, a wood pile ripe for claiming in a camp. This one is directly next to water. With this one, you can definitely claim both water and the wood pile in your camp. You can probably even put up a bunch of water purifiers along side your wood extractor.
![]()
New Piles Update #2 — Cranberry Bog
There are apparently a number of wood piles strewn around the Cranberry Bog, but not close to roads. Some of these wood piles reside fairly close to various Firebase sites, but not always. Here are the four newest wood piles I’ve found. Thanks go to a game friend who knew about two of these piles and helped me locate them with markers near the sites. That also spurred me to traipse around the Cranberry Bog looking for the two others included.
This player also told me he was unable to place a wood extractor at the wood pile located near Drop Site V9 when he had his base there. I have tested this location by placing an extractor and have experienced no difficulties (see below). Please let me know in the comments if you experience any problems with any of these sites listed.
Location #18 — The Thorn (Cranberry Bog)

Not far from The Thorn (see marker) is another wood pile. Sometimes a settler is not there.

![]()
Location #19 — Bootlegger’s Shack (Cranberry Bog)

And another near a grove of Sundew Trees.

![]()
Location #20 — Drop Site V9 (Cranberry Bog)

A small trek north of Drop Site V9, you’ll find another wood pile. This one is far enough north that it shouldn’t be inside of a blast zone very often, if ever… unless it’s a newbie player who doesn’t know exactly where to nuke.

This is the wood pile I was told wouldn’t place an extractor by someone who had a camp here previously. I have tested this site and I was able to place down a wood resource extractor without any difficulties, like so…

![]()
Location #21 — Firebase LT (Cranberry Bog)

Halfway between Firebase LT and that fissure site, you’ll find another wood pile. It looks like so…
![]()
Location #22 — Sunrise Field #1 (Cranberry Bog)

This wood pile is the first in three wood piles located near Sunrise Field. You’ll need to take a close look at each marker location and correlate that with each image. Note that one of the locations that would seem natural to have a wood pile instead has a uranium deposit (see below). The third wood pile is farther away and in a different area than one might expect.

![]()
Location #23 — Sunrise Field #2 (Cranberry Bog)

This is the second wood pile located near Sunrise Field. It exists next to this small red shack.

![]()
Location #24 — Sunrise Field #3 (Cranberry Bog)
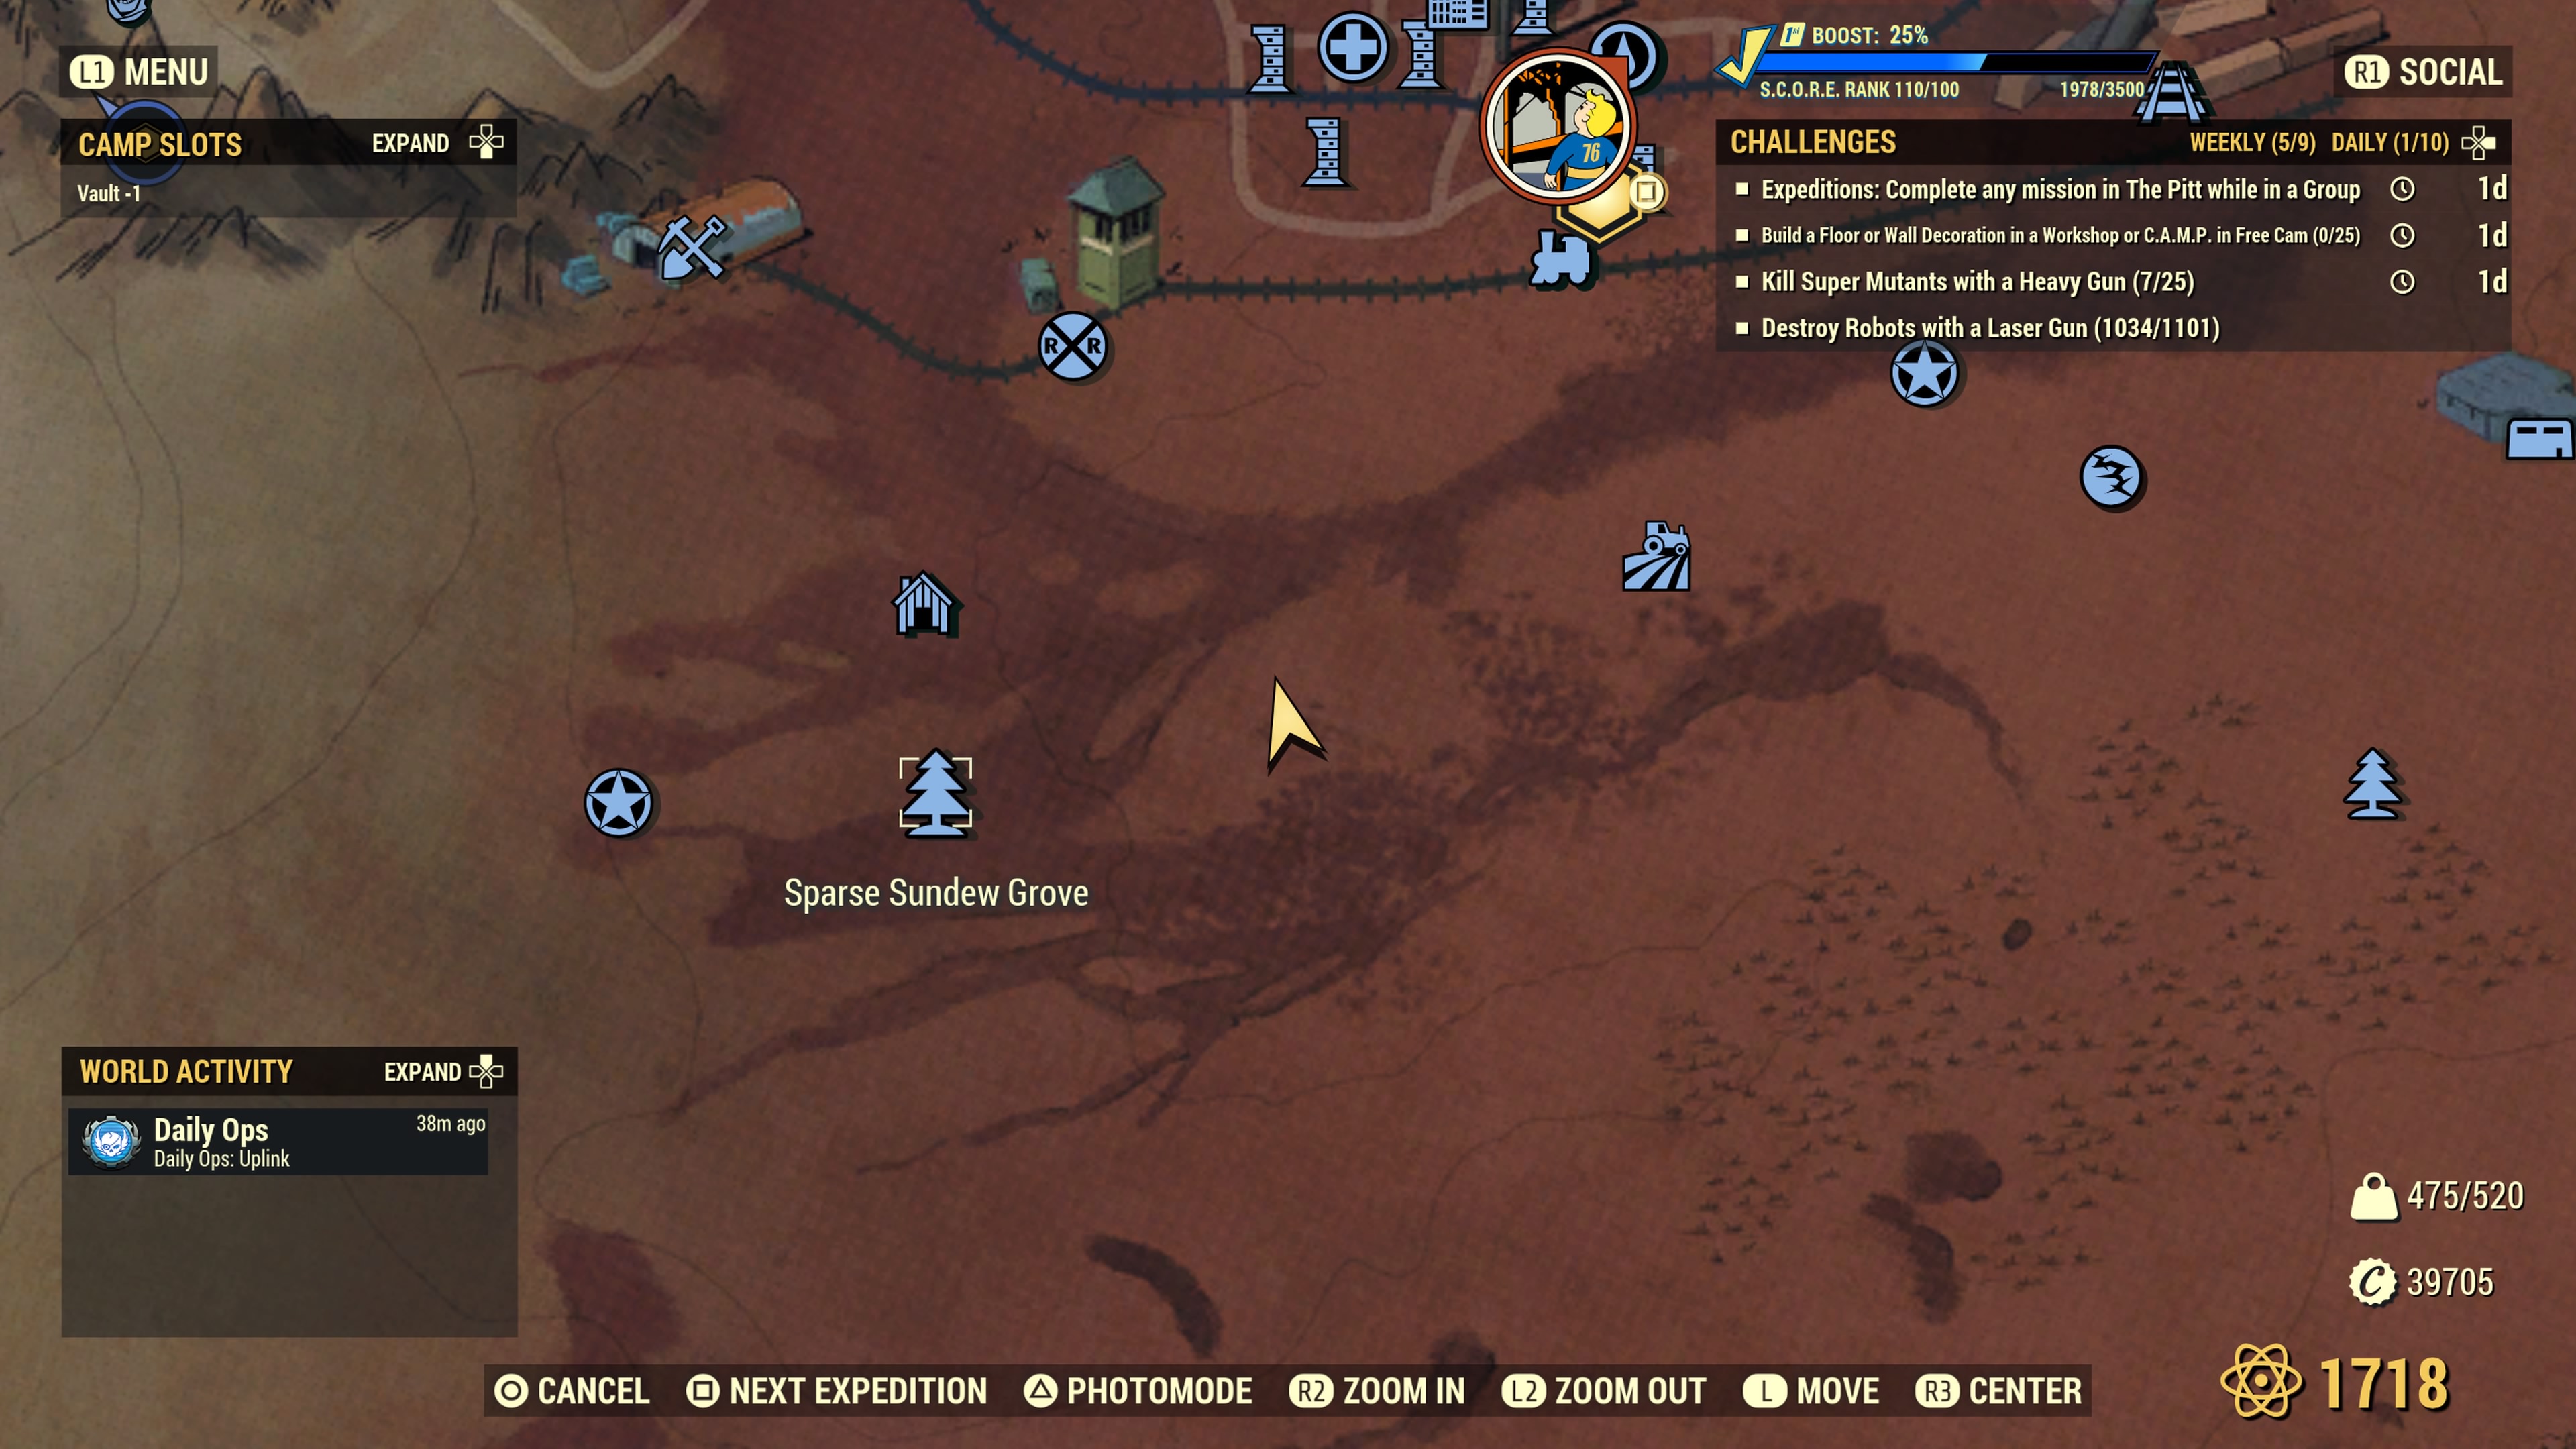
This third wood pile is located halfway between Sunrise Field and Sparse Sundew Grove. I’m connecting this one to Sunrise Field due to its close proximity.

![]()
Sunrise Field — Uranium Deposit (Cranberry Bog)
For completeness, I roamed to an area near Sunrise Field (to the right and below) where I thought another wood pile might be located. Instead of a wood pile, I see a uranium deposit. Here’s the location of this uranium deposit in case you’re curious.

The reason this uranium deposit is included here to keep you from wasting time roaming over to this area thinking there might be another wood pile there. There isn’t. It’s a uranium deposit.

![]()
For this update, I’ve finally found the location that I remember seeing months back and it’s actually in the Savage Divide! I originally thought this wood pile site was much closer to The Whitespring than it is. It’s actually very close to the Garrahan area of the Savage Divide right where it meets the Ash Heap. These wood piles, though, are considered in the Savage Divide.
![]()
Location #25 — Bastion Park (Savage Divide)
From Bastion Park, travel down the road and you’ll find this wood pile just off of the road near a semi truck with logs on the back.

At this location, you’ll see this semi truck with logs on the back right next to the wood pile.

![]()
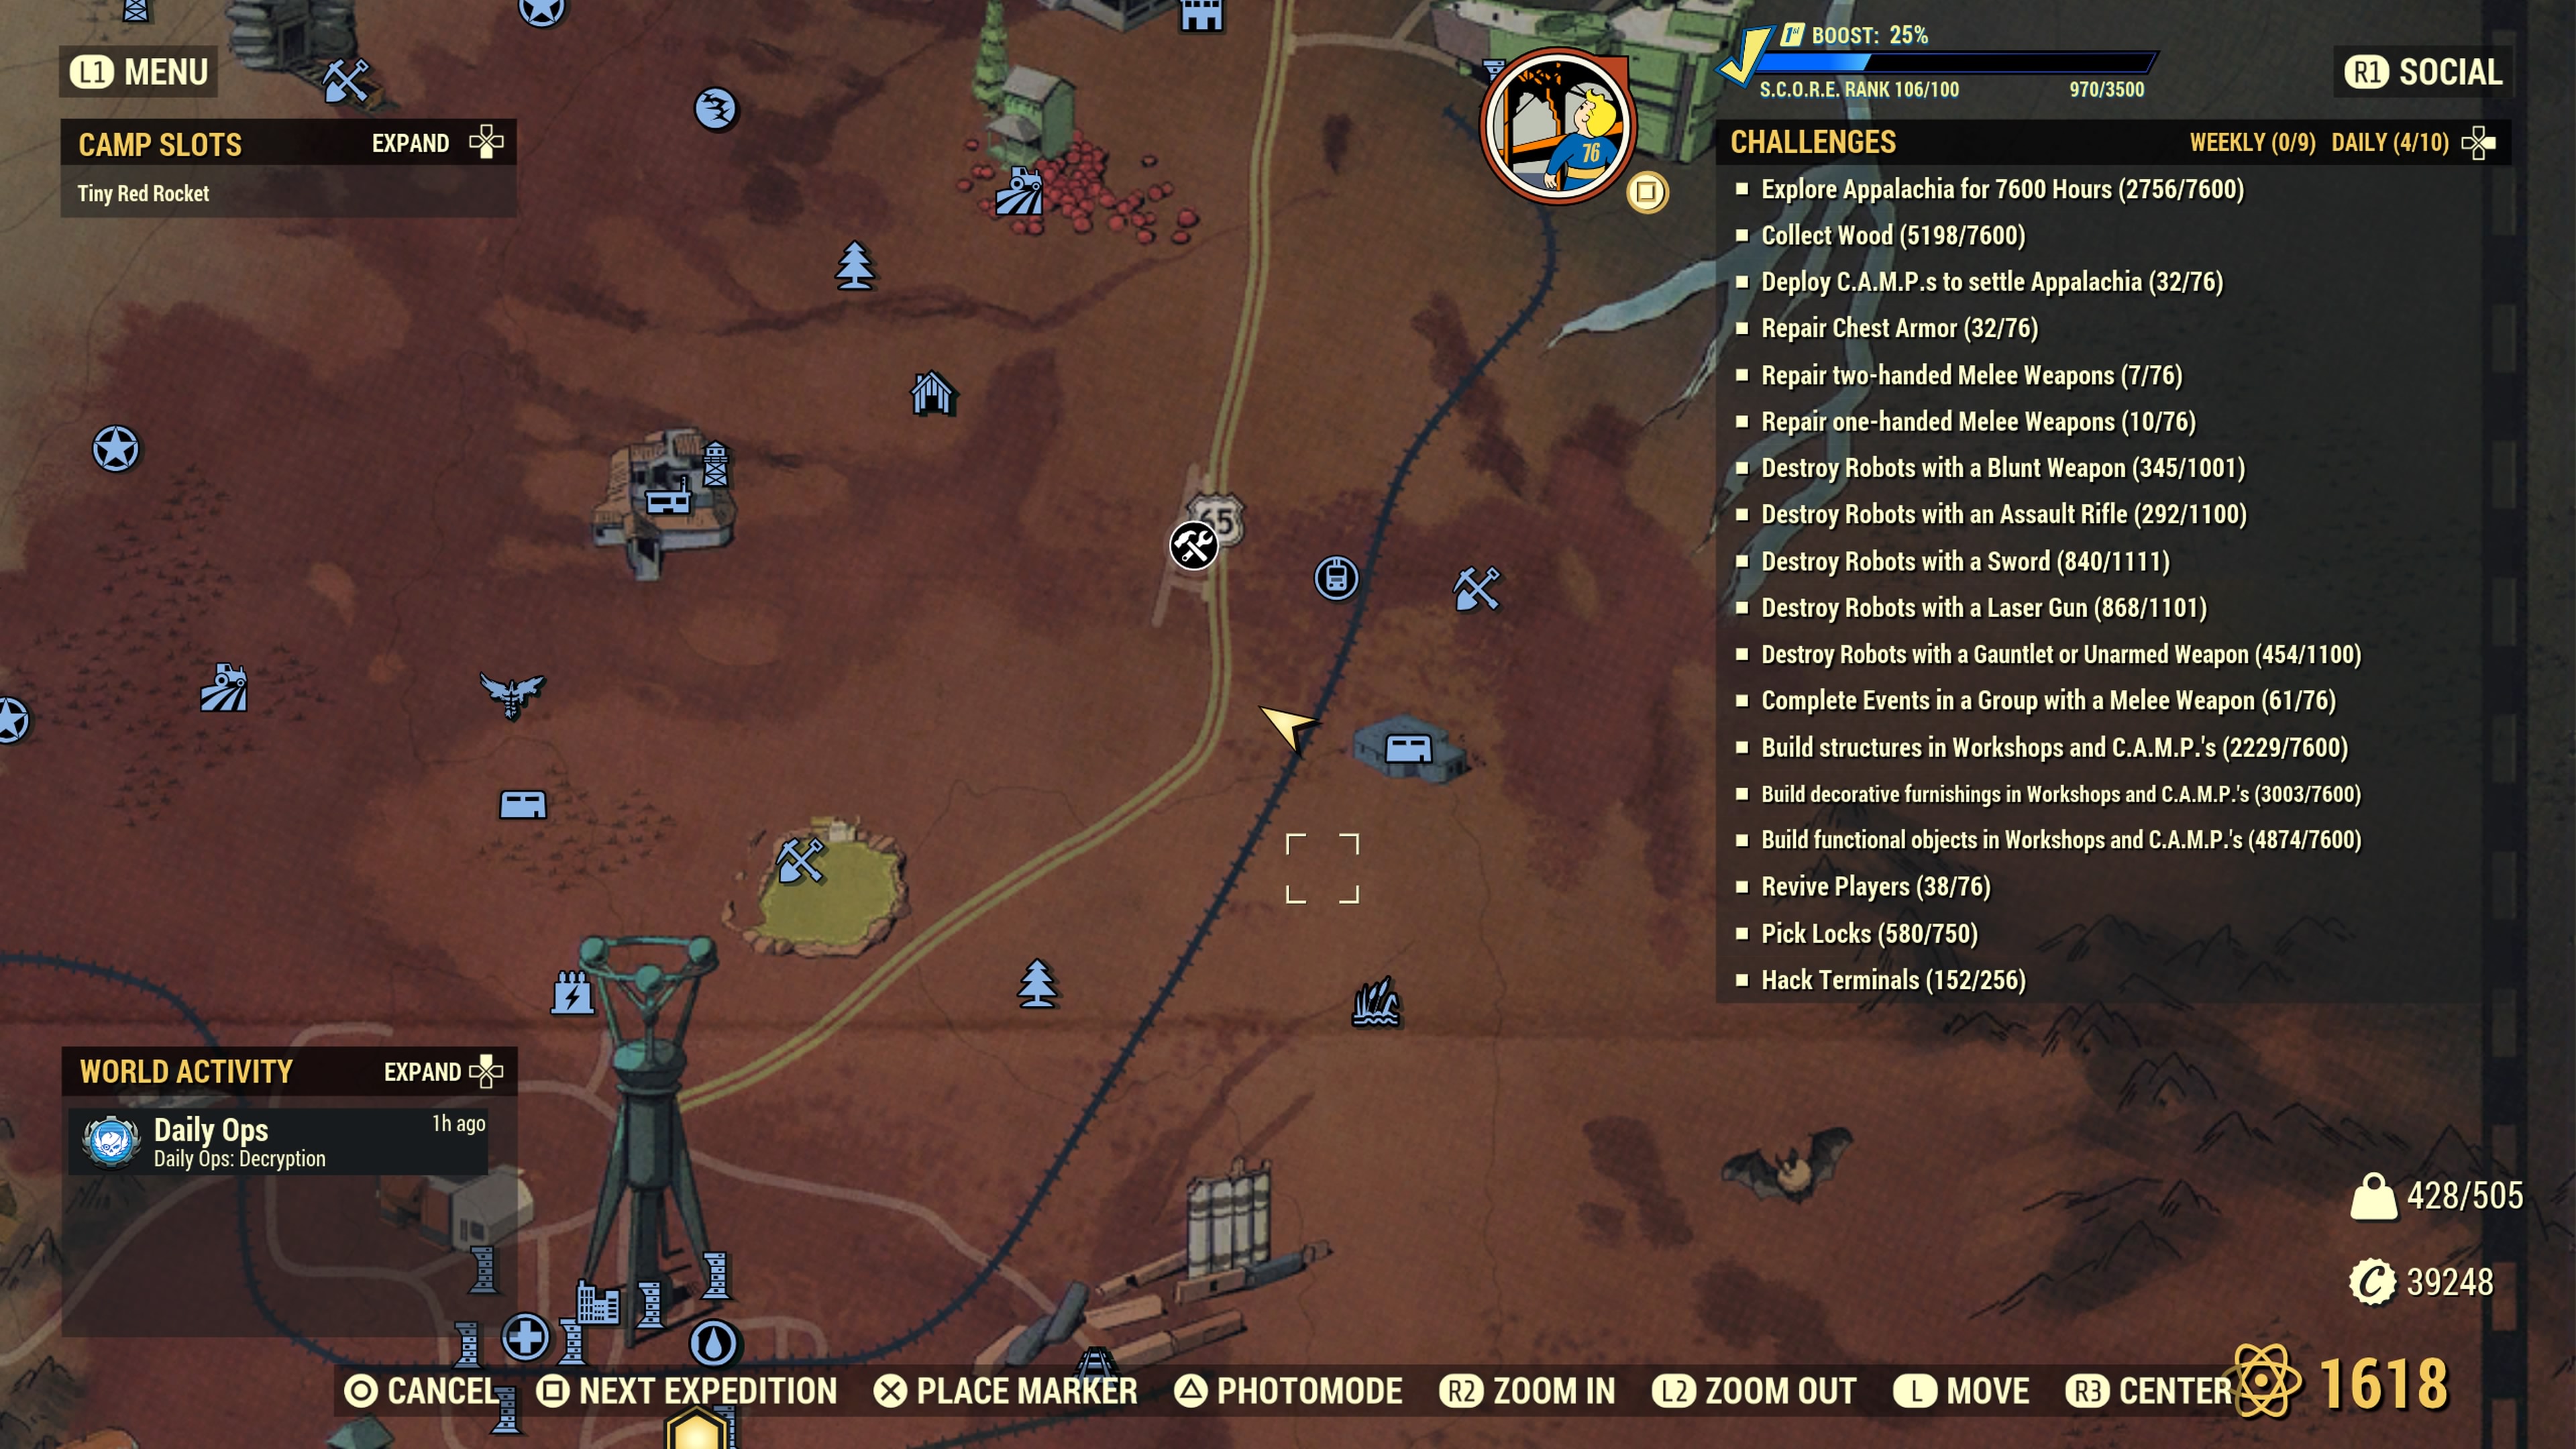
Location #26 — Monongah Power SS MZ-03 (Savage Divide)

From site #25, trek just a little ways down the road and you’ll find this wood pile which is close to the substation fast travel point. This wood pile is the pile I thought was very close to The Whitespring. Instead, it’s much farther down near Monongah Power Substation MZ-03 and not far from the Garrahan Mining HQ. I was also surprised to find that there are actually a number of wood piles in close proximity in this area.

![]()
Location #27 — Garrahan Mining HQ (Savage Divide)

Even further down this same road near the Garrahan Mining Headquarters, you’ll find another wood pile to use. It looks like so…
This wood pile is located near a small unmarked village of houses.
![]()
Location #28 — Braxson’s Quality Medical Supplies (Mire)

This one is in The Mire. From Braxson’s Quality Medical Supplies (the icon looks like a factory), trek to the below location and you’ll find this wood pile…

![]()
Location #29 — Crimson Prospect (Cranberry Bog)

We’re back in the Cranberry Bog for yet another wood pile. Halfway between Crimson Prospect and the Ranger District Office, you’ll find another wood pile ready and waiting for a camp to be placed.

![]()
Legacy Removals and Wood Piles
As a result of Tuesday January 24th’s removal of Legacy weapons (aka Black Tuesday), I have made the decision to no longer search for any more wood piles. There are now 29 Wood Piles in this list, well enough to satisfy anyone who wishes to base their camp around one. While I was unable to find any of these wood piles in the Ash Heap, Toxic Valley or the vast majority of the Savage Divide, you’ll need to search in these areas yourself if you want your camp in a specific area not listed near a wood pile.
If you’re simply wanting a wood pile to base your camp around, there are plenty of sites listed in this article from which to choose. If you’re specifically wanting one in a region where none is listed above, I’ll leave it to you to go find one close.
My reasoning for closing this article at this time is that Fallout 76’s player base is actively under siege by Bethesda, which I further foresee many players leaving this game over the course of the next 30-90 days as a result. Without Legacy weapons, the game is likely to become “boring” and “no longer fun to play” by many. That reduction in players leaves fewer and fewer players playing Fallout 76 on all platforms. That further means that information articles like this one will see fewer and fewer searches from a dwindling set of players who need this information.
With the 29 sites already discovered above in combination with the likely significant reduction in player base, there’s no reason to continue searching. If Bethesda changes their stance on legacies or finds a way to entice a whole lot more players back into the game, then I may revive this article and continue to update it. As of now, this article is officially closed with the 29 sites listed. I am no longer actively searching out any more wood piles.
Ending Notes…
I haven’t tested placing extractors down on each of these wood piles in this list. Some of these locations may or may not allow for placement of an extractor. You’ll need to test this. The only test I have performed is to see whether it’s possible to place a C.A.M.P. device at or near the wood pile. Every wood pile in this list turns green when testing a C.A.M.P. device placement, but that test doesn’t guarantee that a wood extractor will place once a camp is established.
For map reference, the arrow marker not only denotes the location of the wood pile, the arrow’s direction also points directly towards that wood pile.
If you happen to locate a wood pile not listed or find that one of these wood piles above doesn’t work to extract, please leave a comment below. If you find a pile that is missing from this list, please tell me where it is located is in a comment below and I’ll credit you for having found it. Even though this article is closed for updates, I am still actively accepting comments from people who may find a wood pile not in the above list. You will be duly credited for having found any wood pile not in this list.
Enjoy and happy camping!
↩︎
No Man’s Sky: Benefits of Organic Frigates

![]() As a follow-on to Randocity’s How to Get the Living Ship in No Man’s Sky article, you may be wondering what the difference is between an organic frigate and a technology frigate in No Man’s Sky. Yes, it ties into the Living Starship. Let’s explore.
As a follow-on to Randocity’s How to Get the Living Ship in No Man’s Sky article, you may be wondering what the difference is between an organic frigate and a technology frigate in No Man’s Sky. Yes, it ties into the Living Starship. Let’s explore.
How To Get an Organic Frigate
If you haven’t played through the Leviathan community expedition and received The Leviathan frigate, you may be wondering how to get more organic frigates if you’re starting a fresh game. Yes, you can get more organic frigates (and better ones too). To obtain an organic frigate, you’ll need to obtain certain key items:
- Dream Aerial
- Anomaly Detectors
To be complete, we’ll need to step back further. You’re also going to need to grind No Man’s Sky until your character has picked up enough items and unlocks to allow for use of the above items. These additional items and unlocks include:
- Have a ship outfitted with a Hyperdrive (and fuel) and Pulse Drive
- Enough Tritium to refill the Pulse Drive
- Enough Fuel to fill the Hyperdrive (you’ll hyperdrive jump to find each organic frigate)
- Obtain a Freighter
- At least 100-500 million units on hand. The more you have, the better. You need this to buy the organic frigates.
Getting a Freighter
Obtaining a freighter is relatively easy. You’ll simply need to jump into enough systems to find one in distress. After the ensuing space battle is completed by you, the captain will allow you to purchase that freighter. Note, the first freighter you come upon will be free, at least as of this writing.
Meaning, it’s worth waiting until you find at least an A-class or S-class freighter before accepting it. An S-class freighter is well worth waiting for because your frigate expeditions gain a HUGE bonus every time you send your frigates on expeditions. Picking up a free S-class freighter is the best option here. However, any freighter will work with organic frigates.
S-Class Freighters
I’ll be honest here. S-class freighters are relatively rare to find, but if you’re diligent enough by jumping into many different systems, you’ll eventually happen upon one. If you’ve already picked up your free freighter earlier, you’ll be required to buy an S-class freighter… and they’re typically exceedingly costly. Some S-class freighters can cost around 330 million units. Some even more than that. On one of my sessions, I found an S-class freighter that cost 13 million units, but it had very few slots and technology open. That meant I had to grind for many, many Salvaged Frigate Modules and Cargo Bulkheads to unlock everything on that freighter. Though, it was well worth it.
It doesn’t matter the number of slots opened or the amount of technology unlocked on an S-class freighter. It matters that it is simply an S-class freighter. If you find an S-class as cheaply as I found mine, buy it instantly. Don’t hesitate. The frigate expedition bonus is well worth the amount of grinding required to unlock the rest of the freighter. In fact, that bonus will help you do that via your frigate expeditions.
Dream Aerial and Technology Frigates
Circling back around, to get the Dream Aerial you’ll need to buy a number of “standard” technology frigates. In fact, you’ll need to buy enough technology frigates to be able to run 3 star missions from your freighter’s expedition board. Once you can run 3 star missions, there’s a chance a Dream Aerial will be found by your technology frigate expeditions. You can always dismiss frigates later. Once you have the plan to build a Dream Aerial, you can then locate your first organic frigate (or second, if you’ve run the Leviathan expedition), which then unlocks the ability to find more via Anomaly Detectors.
Once you have a Dream Aerial built, activate it, then use the pulse drive to obtain your first (or second) organic frigate. One down, ~29 more to go.
Anomaly Detectors
After you have your first organic frigate from the Dream Aerial, you can delete the Dream Aerial device. The Dream Aerial is only useful once to obtain your first organic frigate. From here, you’ll have to rely on Anomaly Detectors to obtain the rest of your organic frigates for your fleet.
To obtain Anomaly Detectors, you’ll need to perform a bit of grinding in the game. First, find a dense asteroid field. Second, begin destroying the asteroids non-stop, avoiding the random ships also roaming the field. Once you’ve destroyed enough asteroids, the game will award you an Anomaly Detector. Rinse and repeat until you have as many Anomaly Detectors as you need.
You’ll use up one Anomaly Detector to locate each organic frigate you wish to find. If you want all 30 frigates to be organic, then you’ll need 29 Anomaly Detectors if you didn’t play Leviathan, 28 if you did. That means grinding through an asteroid field until you have enough detectors.
How to use Anomaly Detectors
To use Anomaly Detectors, it’s nearly identical to the Dream Aerial. Activate it, then zip into pulse drive and wait. From here, you’ll see many “Rare” deep space objects appear. Ignore them and do not drop out of pulse. Instead, in 15 seconds they’ll timeout and disappear, then another will appear. Eventually, you’ll see a Whalesong. This is the one you want.
Drop out of pulse at the first sign of Whalesong and pick up your organic frigate. Organic frigates come in classes C through S, but most are likely to appear as C-class (the least costly). Typically, a C-class organic frigate might cost ~8 million units. However, an S-class organic frigate might set you back 53 million units. Be sure to have enough units on hand before performing this step. You don’t want to see Whalesong only to find you don’t have enough units on hand to buy the frigate.
Note, you may occasionally find an organic frigate that you’ve bought does not appear back at your freighter. This is a known bug. Ignore that system and don’t try to pick that frigate up again. Some organic frigates are bugged and won’t appear at your freighter even after you’ve paid for them.
One Organic Frigate Per Star System
You can only obtain one organic frigate per star system via Anomaly Detectors. This means you’ll need to hyperdrive jump to an unexplored system and use your Anomaly Detector again there. This means you’ll need a hyperdrive on your starship or freighter so you can jump into various new systems to pick up another organic frigate.
Abandoned systems may not produce organic frigates. I’d suggest caution when attempting to locate an organic frigate in an abandoned system.
30 Slot Limit

No Man’s Sky offers a maximum of 30 frigate slots. Once you reach your 30th frigate, you can’t buy anymore. If you locate an organic frigate, but find the game won’t give you the option to buy it, you have reached the maximum number of frigates you can own. You can check the number of frigate slots consumed on your freighter’s bridge at the fleet management console.
You can also check how many frigates you own by number using the Multi-tool scanner when inside of your freighter. Simply activate the Multi-tool scanner (pointing it at your freighter) and it will quickly show you your fleet number at a glance. This also means you don’t have to visit your management console to manually count your fleet size.
Always make sure that you are under the 30 slot limit and that you have enough units before venturing out with your Anomaly Detectors. Anomaly Detectors are hard enough to find without wasting them because you didn’t have enough frigate slots or units.
Benefits of Organic Frigates
You might be wondering what the difference is between an organic frigate and a technology frigate since they appear to do the same thing. Yes, both are very, very similar in what they do. However, organic frigates offer two very important differences over technology frigates, at least as of this writing:
- Organic frigates don’t break that I’ve found. Meaning, you’ll never have to venture over onto them to repair them (as of Waypoint). I’m assuming an organic could die, but I’ve never had one do that.
- Organic frigates offer benefits that can’t be found with technology frigates. Organic frigates can discover organic items such as Spawning Sacs and Psychonic Eggs. These items are not located by technology frigates! If you own a Living Ship, these extras are very important.
Spawning Sacs and Psychonic Eggs
 These items are quite useful to the Living Ship. Spawning Sacs add inventory slots to the Living Ship in the same way as Storage Augmentations add slots to technology starships. Spawning Sacs are rare to find and can only be found by using S-class organic frigates on frigate expeditions. Psychonic Eggs extract into useful technology additions for the Living Ship, much like buying Starship modules from vendors at space stations.
Psychonic Eggs are not the only way to obtain Living Ship modules. You can also obtain them through random, but occasional pulse drive travels between worlds in a star system. You don’t need to consume anomaly detectors to find these. They’ll randomly appear while in pulse drive. Psychonic Eggs, however, give you the ability to unlock these at will rather than waiting on random encounters.
 Unfortunately, you first need open slots in your Living Ship before Psychonic Eggs can become useful. That requires Spawning Sacs. In rarity, Spawning Sacs are probably the rarest items you’ll encounter, with maybe the exception of the white and gold guppy Exotic ship. Sending out 20-30 frigate missions, you might see 2 Spawning Sacs.
Note that you must send out S-class organic frigates to even have a chance of them finding Spawning Sacs. That means leveling up your organic frigate fleet to S-class before you’ll have any chance at receiving Spawning Sacs.
I didn’t begin seeing Spawning Sacs as a frigate expedition rewards until I began sending out S-class organic frigates. Even then, these Sacs are relatively rare spawn rewards.
Technology Frigates vs Organic Frigates
Because of all of the above, I strongly suggest filling out your frigate fleet with organic frigates. It’s a little more time consuming, but if you have a Living Ship and want to outfit it fully, you’ll need organic frigates to do this. Because organic frigates find all of the same stuff as technology frigates, but even more, it’s worth replacing your technology frigates with organic frigates in the long run.
Feeding Organic Frigates
One additional thing that’s been added is the ability to feed your organic frigates. However, you don’t need to feed them constantly. Instead, this feature adds a feeding slot that allows you to modify the stats of your organic frigate depending on what you “feed” them. By feeding the organic frigate with certain foodstuffs, you can modify the stats of each organic frigate.
This is something that cannot be done at all with technology frigates. Whatever stats a technology frigate has, that’s what it remains. If you want something better, you buy it. With organic frigates, you can spend time crafting unusual foods and feed them to each organic frigate to see how the stats change.
Note that some foods reset stats and some foods boost stats. Because it’s random, you won’t know what a food does what until you feed it to the frigate. After that, you’ll know. Also, what works with one organic frigate won’t work with another. Meaning, if you feed one frigate bread and it gains 20 to exploration, that doesn’t mean all frigates will respond this same way. You’ll need to trial-and-error your way to find the best foodstuffs to see the stats you’re wanting for each individual frigate.
For example, if you want to boost Combat stats on a specific frigate, you’ll need feed it a variety of foods until you find the right combination. I will say, though, that you should limit feeding your organic to basic foods. Don’t go overboard producing the rarest of cakes as it is typically overkill. Simply feeding the frigate Cake Batter might afford the same response as feeding it the cake itself.
I always recommend trying basic food components before spending time building expensive and time consuming cakes and pies. Organic frigates don’t yet have picky palettes and stats can be boosted with simpler crafted food items, like sugar, batter, pie crust and so on.
Leveling Up Organic Frigates
One question that has surfaced is how to level up less than S-Class organic frigates to S-Class. Don’t worry. They do this all on their own. All you need to do is send them out on expeditions. It doesn’t take long to see a fleet of S-Class organic frigates. It takes maybe 10-20 expeditions to see a C-Class level up to S-Class. This leveling up system works with both technology frigates and organic frigates. Admittedly, organic frigates seem to level up at a faster rate than technology frigates.
This ultimately means it will take a little bit of time to get your organics up to S-Class to begin seeing those ever elusive Spawning Sacs. Though, you may see Psychonic Eggs appear as rewards long before your organics reach S-Class.
Subject To Change
Because No Man’s Sky is an ever evolving game, due mostly to Hello Games continual meddling of it, the rules defined in this article may change with a major update in the future. For example, even though organic frigates don’t seem to become damaged or die on missions now, a future update could make this change possible. This might mean that your organic frigates could potentially die or become injured in a future update. Right now, it’s not possible. Please keep this in mind if you’re reading this article a year or two from when this article was written.
Organic Frigate Gallery
To end out this article, here’s a small gallery of images from my fleet:
Oh, and Happy New Year to everyone reading. Please feel free to leave a comment or question below.
↩︎
How to pair your PS5 controller wirelessly
 As a follow-on to Randocity’s original How to Pair your PS4 Controller Wirelessly article, here’s how to do this for your PS5 controller. Yes, it’s still possible to pair a controller wirelessly. Let’s explore.
Intent
This article is intended to allow PS5 owners to pair a PS5 controller to your PS5 console without the need to use that ever elusive USB cable. If you’ve lost or misplaced your cable, no need to fret if you have certain prerequisites available. Unfortunately, if you don’t have any of these requisites, you’ll need to dig up a USB cable.
PS5 Controller
The PS5 Controller is much the same as the PS4 controller in terms of its buttons, with the exception of the controller’s labels. Instead of clearly worded ‘Share’ and ‘Options’ labels, they now have obscure icon labels. If you’re familiar with PS4 button placement, it is identical on PS5 controllers. Left upper button next to the touch pad is Share, right is Options.
To pair your PS5 controller wirelessly, however, you’ll need to have at least one controller active on your PS5. That controller doesn’t necessarily need to be a game controller. If you’ve enabled the HDMI link on your TV, you can likely use your TV’s remote to navigate the PS5’s UI to the proper settings location to pair your controller.
Many people don’t know that your TV’s remote control (via HDMI) can be used to navigate the PS4 and PS5’s menu systems by using the arrow controls on the TV’s remote control. With your TV remote, you can navigate to the settings area needed to pair your controller. Note that the HDMI Link must be enabled on the PS5 and may not work on all TV models. It seems to work correctly on Sony TVs (as expected), but brands other than Sony may or may not work. You’ll want to test your TV for functionality to ensure control with your TV’s remote works via HDMI.
To make the TV’s controller work, however, it must also be the active controller at the time you sign into your PS5 (or PS4). The controller that signs into the PS4/PS5 is the active controller. You can’t switch to the TV’s controller after a PS5 controller signs in. You’ll need to sign out or reboot your PS5 / PS4 to get back to the sign-in screen.
Also note that the TV’s remote control itself will not power on the PS4 or PS5. You’ll need to press the power button on the front of the PS5 unit if you have no PS5 controller handy. Alternatively, your PS5 should power on by switching to the PS5’s HDMI port using the TV’s remote control. If switching to the HDMI port doesn’t work, then you’ll need to press the power button on the PS5.
If you’re new to the PS5 and don’t know where these buttons are, they are on the opposite end from the blue USB port on the front of the unit. The longer button is the power button, the shorter button is the disc eject button. The Digital version might not have a disc eject button.
Pairing the Controller
Here’s the meat of this article. There are two pieces involved:
- The PS5 needs to see and be ready to accept the device once it’s found
- The PS5 controller needs to be placed into pairing mode.
Ensure that you have a controller that functions, such as your TV’s remote control or a second PS5 controller. Once you have this, on the PS5 navigate to Settings -> Accessories -> General -> Bluetooth Accessories. This places your PS5 onto the correct screen to continue the next part of this process.
 Here are the PS5 controller pairing steps:
- For 5-6 seconds or so, press and hold the Share button and the PlayStation (PS) button simultaneously until the controller light begins to flash in rapid succession. Once the lights begin to flash, look at your TV screen to see the controller appear under new Bluetooth accessories.
- The new controller will show up as ‘Wireless Controller’ below all other paired controllers.
- With your TV remote or your currently active controller, navigate down to that “Wireless Controller” and select it with the X button on a PS5 controller. TV remotes may use an OK or ENTER button for selection.
- Once selected, the PS5 will ask, “Do you want to register this Bluetooth Accessory?”
- Choose “Yes”.
- The PS5 will ask you to select an account for that controller. Choose an account.
- That new controller will be paired to your PS5.
- Done.
Your new controller is now paired and ready for use. If you have questions or if this article has helped you, please leave a comment below.
Enjoy.
If you found this article helpful, please click the ‘Follow‘ button on your screen. In a web browser, that will be in the upper right corner. In the WordPress App, press the 3 vertical dots in the upper right, then click ‘Follow site’ on the menu that appears.
↩︎
PS4: How to repair extended storage that won’t repair
 Occasionally, you may find the need to unplug your PS4 because, well, it’s hung. Or maybe, the whole system just crashed hard. It happens. When rebooting from these conditions, it causes all hard drives to need a filesystem repair upon reboot. If you have an extended storage hard drive plugged in via USB, sometimes the PS4 will attempt to repair the extended storage, but then refuse to complete the repair. Fret not. If your hard drive was working fine prior to the crash, it’s likely still working just fine. Let’s explore.
PlayStation 4 (and PS5?)
Note that while this repair tutorial was written to address the PS4’s external storage, it likely also works with the PS5. With that in mind, let’s understand what goes wrong under these circumstances.
After rebooting from a crash, the PS4 system naturally takes a longer amount of time to boot up than is otherwise normal. This is expected. The internal boot drive filesystem needs to be repaired. I’ve never encountered a problem with the system repairing the internal drive unless the internal hard drive has failed. If your system won’t boot after a hang, you’ve got a lot bigger problems than the extended storage hard drive.
Swapping the PS4’s Internal Hard Drive
Here’s another scenario where this HowTo article may apply. If you’ve had to rebuild your PS4 with a new boot drive or you simply wanted to upgrade to a bigger drive, you’ll need to boot into safe mode and reinstall the latest boot system and operating system to get the system bootable once again. Once you’ve done that, you’ve got a whole lot of work ahead before your system will be back to the same state before replacing that internal drive.
That setup process is not within the scope of this article, however. This article also applies to the situation when your PS4 is fully once again bootable after a reinstall, but your external hard drive refuses to repair.
Extended Hard Drive after PS4 Crash
If you’ve encountered any issue where the PS4 refuses to repair the extended storage media connected via USB, then you’re not alone. It’s a relatively common problem and usually has a very easy fix, one that’s also not obvious.
Note that the operating system on the PS4, under this failure-to-repair scenario, is likely misleading you when that it suggests that the extended hard needs to be reformatted. Don’t listen to this advice. It very likely doesn’t need reformatting. Raise your hand if you enjoy having to download gigs and gigs of games again from the Internet! No one? Alright then, let’s continue.
Because of a crash or a hang, the operating system might have lost some critical data stored on the primary internal hard drive that prevents the repair and misleads you into an action that’s actually not needed.
Licenses
Every game that operates on the PS4 requires a license to operate. If you’ve purchased digital copies from the PlayStation store, these licenses are stored on your console’s internal boot drive. For physical disk copies, the license is the physical disk. This is why the PS4 requires insertion of the media into the drive before it allows the game to operate.
If your PS4 (or PS5) has had a crash or a hang, a hard boot may occasionally corrupt that licensing data, specifically about the game that was operating at the time. It only takes one corrupt license to prevent the external hard drive from repairing properly.
Don’t fret here. Game licenses are easily recovered, but may require two different steps.
Extended Storage and Licenses
Why do corrupt licenses cause this problem? When the operating system needs to repair an external hard drive, it seems to validate every license for every game stored on that extended storage before attempting a repair the external volume. If the licenses are invalid or cannot be found, the PS4’s operating system will refuse to repair the extended storage and suggest reformatting the hard drive… which, in turn, seems to suggest there’s a physical problem with the hard drive itself. Under this condition, there is absolutely nothing wrong with the the external hard drive.
In fact, all of the data is still completely intact. You just need to recover the licenses. So let’s do that now.
License Recovery
To allow your external volume to repair, ‘Restoring Licenses’ is the operation that needs to be performed. This action is done through the PS4’s settings area. This is located under:
Settings => Account Management => Restore Licenses
When you activate this function, the PS4 will clear all old licenses and then download all authorized game licenses anew from the PlayStation store. Then, write those licenses to your PS4’s boot drive. Once this action is complete, the game licenses for all of your digital game versions will be restored.
A second action may also be required called ‘Rebuilding the Database’. This isn’t done from within settings. It is performed from the PS4’s safe mode menu. To get into Safe Mode, you’ll need to use the following:
- Shutdown your PS4 fully (not Rest Mode) until it powers off.
- Press and hold the power button your PS4. You’ll hear one beep upon pressing and ~7 seconds later, you’ll hear a second beep.
- Once you hear the second beep, stop pressing the button.
- The system will boot into Safe Mode and show you a menu of options.
- Choose the option ‘Rebuild Database’ and activate
- Once this function is complete, choose ‘Restart PS4’ to boot the console into normal mode.
Repairing the External Hard Drive
Now that you have restored the licenses and rebuilt the database, your console has been prepped for your external hard drive to be repaired. At this point, plug the drive into a USB port. The system should automatically detect the drive needs to be repaired and prompt you to repair it.
This time, your hard drive should fully repair without any problems. If so, you’re good to go and enjoy your fixed up console.
Failure Continues?
If your external hard drive fails to repair after all of these steps, then clearly there’s something amiss with your hard drive that is likely not related to licensing. From here, you can try to reformat the drive and see if that works. However, if the PS4’s operating system cannot properly format the drive, attempting a reformat may not fix this problem. In fact, this problem may indicate your hard drive has gone bad or is in the process of failing.
Because you’re going to need to reformat the drive, I might suggest connecting the drive to a Windows or Mac system and attempt to have the drive perform a full long format on the drive. This might take several hours. This process allows the operating system to check every sector of the drive and explicitly mark bad sectors while formatting.
Unfortunately, the PS4 doesn’t offer this deep level of formatting. Thankfully, Windows does, but Macs don’t do it easily. As long as you format the drive as exFAT, you will be able to use it on the PS4 later. However, you may not be able to use it as an extended drive on the PS4 as that may require the PS4 to reformat the drive, which may release all of the bad sectors that Windows was able to find and mark as bad. Though, it’s worth a shot to try.
If you convert that drive to an extended drive and find that the PS4 can’t repair the drive again later, then you may want to repurpose that drive strictly for your Windows or Mac use and go buy a new drive for your PS4.
↩︎
CEO Question: Should I sell my business to a Venture Capital group?

This may seem like a question with a simple answer, but there’s lots to consider. The answer also depends on your goals as CEO. If you’re here reading this, then you’re clearly weighing all of your options. Let’s get started.
Selling Anything
A sale is a sale is a sale. Money is money is money. What these cliché statements lack in brilliance is more than made up for in realism. What these statements ultimately mean is, if the entire goal of selling your business is to make you (personally) some quick money, then it honestly doesn’t matter to whom you sell.
Selling your company to your brother, a bank, another corporation or, yes, even a Venture Capitalist group, the end result is the same: a paycheck. If your end goal is that paycheck and little else matters, then you can end your reading here and move forward with your sale. However, if your goal is to keep your hard built business, brand and product alive and allow it to move into the future, I urge you to keep reading to find out the real answer.
Selling your Company
Because you are here reading and you’ve got some level of interest in the answer to the question posed, I assume, then, that you’re here looking for more than the simple “paycheck” answer. With that assumption in place, let’s keep going.
Companies are complex beasts. Not only does a company have its own product parts that makes the company money, companies must also have staffing parts, the people who are hired to support those product parts and maintain those new sales. Basically, there are always two primary aspects of any business: product and staff. As a CEO, it’s on you to gauge the importance levels of each of these aspects to you. After all, your staff looks to you for guidance and they rely on you for continued employment. There’s also your legacy to consider and how you may want to be remembered by the business (and history): positively, negatively or possibly not at all.
Reputation
Let’s understand that in countries like China, reputation or “face” is the #1 most important aspect of doing business. I don’t mean the business’s reputation. I mean the person’s own reputation is at stake. If the person makes a critical misstep in business, that can prevent future opportunities. In the United States, however, “face” (or personal reputation) is almost insignificant in its importance, especially to CEOs. Short of being found guilty of criminal acts (i.e., Elizabeth Holmes), there’s very little a CEO can honestly do to fail their career.
Indeed, I’ve seen many “disgraced” CEOs find, start, and operate many more businesses even after their “disgrace”. It’s even possible Elizabeth Holmes may be able to do this after serving her sentence. As I said, in the United States, someone’s business reputation means very little when being hired. In fact, a hiring business only performs background checks to determine criminal acts, not determine whether the person has a success or failure track record at their previous business ventures.
Why does any of this matter? It matters because no matter what you do as a CEO, the only person you have to look at every day in the mirror is you. If you don’t like what you see, then that’s on you. The rest of the industry won’t care or even know what you’ve done in the past unless you disclose it.
Venture Capitalist Buyouts
At this point, you’re probably asking, what about those Venture Capital Buyouts? Are they good deals? That really all depends on your point of view. If you’ve put “blood, sweat, tears and sleepless nights” into building your business from literally nothing to something to be proud of and you still hold any measure of pride in that fact, then a Venture Capital group buyout is probably not what you want. Let’s understand the differences in the types of buyouts.
- Direct Business Buyouts — These are sales made directly to other businesses like Google, Facebook, Amazon, Apple and the like. These are sales where the buyer sees value in not only maintaining the brand and products under that brand, but building that brand as a sub-product under the bigger buyout company. With these kinds of buyouts, your product will live on under that new company. Additionally, the staff have the option to remain on board and continue to maintain that product for the new company for potentially many years. This kind of buyout helps maintain the product and maintains “face” among staff members. This kind of buyout rarely involves resale and, after the acquisition dust settles, is usually seen as a positive change.
- Venture Capital Buyouts — This kind of buyout is an entirely different beast. Venture Capitalists are in the purchase solely to make money off of their “investment” as a whole. The business itself is the commodity, not the products sold by the company being purchased. No. Venture Capital buyouts are a type of investor who buys a “business commodity” to “fix up” then “flip” to make their investment return. Thus, Venture Capitalists don’t honestly care about the internals of the products or solutions the company offers, only that those products / solutions become marketing fodder for their sales cap. Venture Capitalists do weigh the value in the products prior to the purchase, but beyond that and once the purchase completes, the business is treated not as an ongoing concern, but as a commodity to be leaned out, fixed up and made attractive to a buyer. This kind of buyout always involves resale. This fact means that remaining staff must endure acquisition twice in succession, probably within 1-2 years. This kind of buyout is usually viewed by staff (and the industry) as a negative change.
Thus, the difference between these two types of purchases is quite noticeable, particularly to staff who must endure them.
Undervalued
[Update 2/8/2022] Everything up to this point has only implied what this section actually states. I’ve decided to explicitly state this portion because it may not be obvious, even though I thought this information was quite obvious while writing the initial article.
Bottom Line: If a Venture Capital group is considering a purchase of your business, know that what the VC group is offering is only a fraction of what your business is actually worth. They can’t make money if they pay you, the seller, the company’s full value. Keep in mind that the VCs consider the business a “fixer upper”. That means they will invest “some” money into the business to “dress it up”. How that “dress up” manifests isn’t intended to turn your business around, however. What “dress up” means is investing money to make the business look pretty on paper… or, more specifically, so the books look better. That means they’ll pay an accountant to dress up the numbers, not pay to make your business actually better. Though, they will cut staff and then pull out the whips to make sure everyone sells, sells, sells so the business appears to have better year-over-year profits. When a prospective buyer looks at the books, the buyer will notice improved numbers and, hopefully, be willing to fork over double (or more) what the VCs paid to buy the “company” from you, the original seller.
Even the smartest, brightest, most intelligent CEOs can be taken in by the lure of a Venture Capital Group company purchase offer. Know then that what VCs have offered you isn’t what your company is actually worth.
Ultimately, it also means that you as the seller are being taken for a ride by the VCs. You can dress up your own company and do exactly as the VCs. Then, find a direct buyer willing to pay double what the VCs offered, which will make you twice as much money AND remove the VCs entirely from the picture as an unnecessary profiting middleman.
Acquisition Woes
Being the acquired company in an acquisition is hard on staff. Lots of questions, few answers and during the transition there’s practically silence. It’s a difficult process once the deal closes. It only gets worse. Typically, the then CEO becomes a lesser executive in the new firm. However, most times the CEO changes position not because they want to, but because the buyout contract stipulates a 6-9 month transition period and obviously most companies don’t want two CEOs. Though, I have rarely seen transitions that agree to co-CEOs. It’s an odd arrangement, though.
This means that the newly demoted executive is only on board to complete the transition and receive 100% of their contractually agreed buyout payment. In fact, most buyout contracts stipulate that for the CEO to receive their 100% payout, they must not only remain on board in a specific position for a specified period of time, they may also be required to meet certain key performance indicator (KPI) metrics. So long as all goals are met, the contract is considered satisfied and the former CEO receives 100% payment.
However, if some of the goals are only partially met, then reduction of payment is warranted. Such other metrics may include retaining key staff on board for a minimum of 6 months. If any general staff have ever gone through a buyout and have received a special bonus or incentive package, that’s the reason. The incentive package is to ensure the CEO’s KPI is reached so that the contractually defined buyout payment is paid at or as close to 100% as possible. This is also why these acquired executives can get both grumpy and testy when they realize their KPIs are in jeopardy.
Trust
Let me pause for just a moment to discuss a key issue, “trust”. While contracts stipulate very specific criteria, such as payment terms, not everything in a buyout is covered under the contract. For example, the acquiring company’s executives can find anything they wish wrong with the KPIs to reduce payment. Contracts usually do not contain intent clauses that hold the acquiring company execs accountable if they “make up” flaws in the agreement that don’t exist. It is ultimately the acquiring executives who decide whether the KPIs have been met, not the incoming CEO. If you trust these people to be morally and ethically sound, then you have nothing to worry about. However, because Venture Capitalists aren’t always practical in what they do and are driven by the need to see a return on their investment, they could find faults in the KPIs that don’t exist, solely to reduce payments. Basically, you’ll need to be careful when extending trust. Meaning, you must place full trust in those VCs willing to purchase your company. This means, doing your homework on these people to find out where they’ve been, who they’ve worked with and, if possible, get references. Let’s continue…
Buyouts with Strings
Every buyout has strings attached. No buyer will purchase a company outright for straight up cash without such strings. Such strings ensure the company remains intact, that key staff remain on board and that the product remains functional. These are handled via such stipulated “insurance policy” clauses in the form of KPIs applied to acquired CEO and executive team. These KPIs, when reached, allow the business seller to receive payment for reaching those KPIs. Were key staff to leave and the product have no knowledgeable or trained staff left to operate the product, then the purchase would be useless and the product would fail. For a buyer, requesting such insurance policies in the contract is always a key portion of buyout contracts. Expect them.
Saving Face
Circling back around to Venture Capital group buyouts, it’s important to understand that the point of such a buyout is for those “investors” to return their investment sooner rather than later. The sooner, the better. That means that their point in a company purchase by a Venture Capital group is not to take your business into new and bigger directions by dumping loads of money in and growing it. If they dangle that carrot in front of you, know that that’s absolutely not how these deals work. Don’t be deceived by the dangling of this carrot. This carrot is absolutely to get you to sell, but will almost just as definitely not pan out… unless it’s contractually obligated.
On the contrary. They’ve spent loads of money already simply buying the company. They’re not planning on dumping loads more cash into it. Instead, they plan to lean it out, get rid of stuff that wastes money (typically HR, insurance and such first), then move onto erasing what they deem as “useless” staff and wasteful costly third party services (ticketing systems, email systems, marketing systems, etc).
As for staff cuts, this means asking managers to identify key staff and jettisoning those staff who aren’t “key”. This usually comes down in the form of a mandate that only X people can be kept on board out of Y. For example, 10 people may be employed, only 3 may stay. Who will you pick? That then means jettisoning 7 people from the staff roster.
You won’t know this aspect going into the deal because they won’t have made you privy to these “plan” details. It also likely won’t be in the buyout contract either, unless you requested such a buyout stipulation. It’s guaranteed you’ll find out this plan within 10-20 days after the deal closes. As I said, the Venture Capitalists don’t look at it as an ongoing business to help flourish, they look at it as commodity to lean out, pretty up and hope for a high priced buyer to come along.
Venture Capitalists understand that it does cost some money to make money, but they’re not looking for a money pit. The purchase price is typically where the money pit ends. You shouldn’t expect an infusion of cash as soon as the Venture Capital firm closes the sale, unless such investment has been stipulated in writing in the purchase contract. Of course, you are free to take some of your own sale money and invest it into the business, but I don’t know why you’d do that since you no longer own the company.
What this means and why this section is labeled “Saving Face” is that eventually you’re going to have look into the face of not only the 7 people you had to fire, but the 3 people left and explain what’s going on. These situations are extremely hard on morale and makes it exceedingly difficult for those 3 who stayed on to remain positive. Surviving a huge layoff cut is not a win. In fact, it’s just the opposite. It’s also not simply a perception issue, either. Such a huge layoff places an even bigger burden on those who remain.
The 3 who remain feel as though they’ve lost the lottery. Now those 3 must work at least 10 times harder to make up the work for the 7 who are no longer there. Honestly, it’s a lose-lose situation for the acquired company. For the venture capitalists, it doesn’t matter. They’ve leaned out the company and the books now “appear” way better and the business also “appears” far less costly to operate in the short term. “Short Term” is exactly what the VCs are banking on to sell the company. This makes the “business” look great on paper for a buyer. As I said, the quicker the Venture Capitalists can flip their investment and make their money back, the better. The VCs are more than willing to endure hardship within the acquired company to make the company appear better for a buyer. As the saying goes, “It’s no skin off their noses”.
Technologists vs Venture Capitalists
Being a Venture Capitalist and being a Technologist are two entirely separate and nearly diametrically opposed jobs. It’s difficult to be both at the same time. As a technologist-founder-turned-CEO, the point is to build a business from scratch, allow the business revenues to help grow the business further and expand and build a reputation and customer base. Building a business from scratch is a slow road to a return on investment, which typically takes many, many years. That investment takes years to accrue, but can make an executive a lot of ongoing money. Just look at Jeff Bezos and Amazon. It can and does work.
As a Venture Capitalist group buying companies, the point isn’t to build a business. It’s to buy already built businesses as “commodities”, lean them out, make the books look great, then sell them for at least double the money, usually in months, not years. If the VCs dangle a “five year plan” in front of you, claiming to grow the business, please re-read the above again. To spell it out, there’s no “five year plan”, unless it randomly takes the VCs that long to line up a buyer. That’s more of an accident than a plan. The VCs would prefer to line up a buyer far sooner than 5 years. The “five year plan” rhetoric is just that, rhetoric. It was told to you, the seller, to keep you interested in the buyout; not because it is true.
If the “5 year plan” carrot is dangled in front of you, then you need to have the VCs put up or shut up. What this means is, make them write the “5 year plan” investment explicitly into the purchase contract. If they are legitimately interested in growing the acquired company, they should have no problems adding this language into the buyout contract. This will also be your litmus test. I’d be highly surprised to actually see VCs contractually agree to adding such “5 year plan” language into the purchase contract.
As I said above, these two types of jobs are nearly diametrically opposed.
One method slowly builds the company as a long term investment opportunity, the other uses the existing whole company itself as a commodity to sell quickly as a fast return on an investment. As a CEO, this is what you must understand when considering selling your business to a group of Venture Capitalists.
If you want your business and brand to continue into the future and have a legacy listed in Wikipedia, then you want to keep your business going and growing. Once you sell your business to VCs, the brand, product and, eventually, staff will all disappear. Nothing of what you built will remain. Selling to a Venture Capital group likely ensures that this process happens in less than 1 year.
Selling to a direct business, the brand naming may hang around much longer than 1 year. It’s really all about whether you care about your legacy and your resume. You can’t exactly point to producing a successful business when nothing of it remains. Selling the company makes money, yes, but has a high chance of losing everything you’ve spent loads of time building. Unfortunately, Venture Capital group purchases almost ensure the fastest means to dissolution of the brand and of that time spent building your business. Still, a paycheck is a paycheck and you can’t argue with that in the end.
↩︎
How to poach an egg in the microwave?

There are a number of YouTube videos claiming to poach an egg in a microwave. Almost every one of them is wrong and, worse, exceedingly dangerous. So, how do you poach an egg in a microwave? Let’s explore.
The Art of Egg Poaching
Poaching an egg is a cooking style which “poaches” an egg in hot water. Let’s understand that like oil and water, microwaves and water don’t always mix well, specifically when the water is heated. Microwaves tend to heat water excessively hot, to the point that the water becomes superheated. Superheated water is water that has reached a temperature beyond the boiling point.
Whoa! Wait a minute! Hold on. “Beyond the boiling point”, you say? You ask, “So why doesn’t it boil?” Good question. Microwaves are exceedingly efficient at heating water molecules rapidly. In fact, this is exactly how microwaves work. Microwaves target water molecules and energize them into moving rapidly. Molecules moving rapidly release heat. However, because the speed at which the microwave can heat water, it can get the molecules moving beyond the boiling point, but the water remains entirely still (i.e., no movement).
This is a dangerous and very deceptive condition. It means that the first thing placed into the water will cause the water to instantly explode into a boiling frenzy and spray boiling hot water everywhere, including potentially all over you causing burns. The point is, you never want to submerge an egg (whole or cracked) into water, then attempt to cook / poach it using a microwave. This is not at all a recommended cooking method. It’s also exceedingly dangerous.
Proper Egg Poacher Cookware
As with anything cooked in the microwave, appropriate cookware is required. Not only is each microwave cookware designed for a specific purpose, it ensures the safety of the person using the cookware for that purpose.
 For the microwave, there are a number of different egg poachers that you can find. The most common is a clam shell style cooker with two compartments, into which you can crack two eggs. For example, here’s one type of clamshell style egg poacher at Amazon. If you prefer to buy name brands, here’s a Nordic poacher at Amazon (see inset image). You can sometimes find these style poachers at dollar stores and clearance home shops, like Home Goods.
How to Poach an Egg in a Microwave?
This method assumes you have acquired one of the above microwave cookers. DO NOT use an uncovered bowl instead.
Before I get into the how to portion, let me say that eggs, particularly the yolk, cook exceedingly fast in a microwave regardless of wattage. What this means is that even the best microwave poached egg won’t have a texture like an egg poached in a pan of water over open heat. This further means that if you are set on the texture and style of an actual poached egg, you’ll want to prepare it using a pan of heated water on a stove top, not by a microwave… especially if you like your yolk runny. On the flip side, poaching an egg in a microwave is easy and fast. If speed is important, then this method is the preferred choice.
With that said, to poach in a microwave egg poacher, the instructions are as follows:
- Crack one or two eggs into the compartment(s)
- Place one teaspoon of water on top of each egg
- Close and lock the lid over the egg(s)
- Place the cooker into the microwave, being careful to keep the unit level to avoid spilling
- Cook the eggs in the microwave for 1 minute
- Open the lid and check for doneness (careful, as steam may release which will be hot)
- If the egg is still not done, close and heat again in 20-30 second increments until done, checking after each 20-30 seconds.
Note that when poaching, the yolk will likely cook completely. It’s almost impossible to prevent this in the microwave. Once done, the egg whites will have a similar texture to poached. Unfortunately, the yolk is likely to be fully cooked and have that crumbly fully cooked texture.
This is a super fast way to cook an egg, but it may not provide the exact “poached” texture you’re looking for in the stove top method. However, this method, when used in the recommended microwave cookware, has very little chance of causing scalding hot water burns.
Also, be cautious when piercing the yolk with a fork immediately after coming out of the microwave. The yolk has a tendency to build up steam pressure inside and explode upon being pierced. You’ll want to wait for the egg(s) to cool for a few minutes before piercing. Alternatively, cover the egg with a paper towel and gently pierce it with a fork underneath, keeping your hands clear or covered with an oven mitt. If it explodes, the paper towel will catch it.
Be Safe and Happy Cooking!
↩︎
Fallout 76: Best location to farm XP?
 Many people playing Fallout 76 are asking this specific question, specifically because nerfing has become so commonplace not just with weapons, but also spawning creatures and the reduction of XP received from creatures. Let’s explore.
The Whitespring
One of the staples for farming Experience Points (XP) in Fallout 76 has always been the Ghoul Run at The Whitespring (and the larger events like the Scorchbeast Queen). The plus with the Ghoul Run is that you’ll get a fair amount of XP out of the deal. The minus is that once you run it, it takes ages for the ghouls to respawn on the same server. This means you cannot continue to farm XP indefinitely. This slow respawn rate was intentionally changed to prevent players from farming this area constantly. However, you can mostly avoid this issue by server hopping. The other downside is that Bethesda has consistently and continually nerfed the XP received from killing high level ghouls. The amount of XP that can be had at The Whitespring Ghoul Run isn’t slouchy, but it’s nowhere near the levels that were formerly available when the game was new. You might have been able to level up once fully by a single Ghoul Run the first year the game was around. Today, it would take probably 10 runs to get the same amount of XP to level up.
This is why the Ghoul Run is still a decent run to do, but you can’t rely on it to take your character up to the next level quickly. Instead, there are other locations more suitable for high XP farming.
West Tek Research Center
With the addition of Steel Reign (part of the Steel Dawn series), a new location was opened at West Tek Research Center. This area is available via an elevator in the research wing of the facility. The area is named ‘FEV Production Facility’. Here’s the magic of this location. With the add on of this sublevel area, the interior of the entirety of West Tek Research Center is now farmable for XP infinitely.
Not only are the Super Mutants spawning at level 100 (mostly), they offer at least 300+ XP with every kill (as a base). The XP only goes up from here. This is at least twice the amount of XP you’ll receive from killing a high level ghoul at the Whitespring.
The important thing here is that once you’ve cleared out the upper level area of West Tek Research Center, you can then visit the FEV Production area and kill all the Supermutants down there. Be careful, though. The FEV area also spawns Supermutant Suiciders. Once you’ve cleared that area out, return to the upper floors and all of the Supermutants will have respawned yet again and you can clear the upper area out all over again.
Then, rinse and repeat. You can move between the lower FEV area and the upper research area then back. Every time you do this, each interior respawns all of the Supermutants again.
Better, each time I’ve done this, at least one Supermutant and/or Hound is a 2 or 3 star legendary. It’s not a lot of Legendary enemies, but they’re high level and multi-star. What this also means there’s no cooldown on the area at all. Just move back and forth between each of the areas and keep the kills going for as long as you want.
Effectively, West Tek Research center is the new XP run. You can farm XP here indefinitely when moving between these two interior spaces. This allows you to grind, grind, grind your way to leveling up quickly. This also quite useful when you’re wanting to complete the ‘Level Up’ challenges to gain S.C.O.R.E. points.
Increasing the XP bonus?
While 300 XP per kill isn’t too bad, you can really do much, much better at WestTek Research Center per Super Mutant kill. In fact, I’ve been able to achieve just over 1900 XP per kill for each level 100 Super Mutant! Because this area is instantly farmable non-stop, you can level up even your highest level character(s) around every 30-45 minutes. You’ll need a one or two shot per kill weapon, though, to achieve this level up speed. That’s a crap ton of XP in one or two shots. To achieve that ~1900, you’ll need to stack several XP boosters, combined with a Double XP weekend.
Basically, the XP bonus stack goes as follows:
Adding all of this up, that’s 2 + 5 + 5 + 5 + 10 + 15 + 100 + 100 ~= +242% XP. Unfortunately, this stacking math and Bethesda stacking math don’t always align in Fallout 76. Bethesda always math stacks to offer the least amount of bonus possible. Meaning, the stacking math I describe here might not be exactly what Bethesda uses to calculate the perk stack. Knowing Bethesda, it probably doesn’t work out perfectly like the math above. Regardless, this XP bonus stack shown above raises those base 300 XP Super Mutants to greater than 1900 XP per kill.
Without a Double XP Weekend, this halves the XP amount to around ~960 XP per kill. That’s still an excellent amount of XP per kill and can level almost any character up reasonably quickly, not to mention adding up all of those 100 extra S.C.O.R.E. points quickly.
Note that these are not the only foodstuffs in the game that offer bonus XP, but these above are the ones that offer the best bonus XP. This is the XP stack you’ll want to setup. Other foodstuffs offering bonus XP include Canned Meat Stew (+5% XP) and Cranberry Cobbler (+5% XP). Unfortunately, these only offer 5% bonus, so it’s better to craft Cranberry Relish or Tasty Squirrel Stew for the 10% XP it offers instead.
Fasnacht
When Fasnacht is active, there are lots of squirrels around. Take advantage of all of the extra squirrels and create Tasty Squirrel Stew for that 10% extra boost. Just remember, though, Tasty Squirrel Stew requires salt. You’ll need to hit up many diners, restaurants and kitchens to locate the amount of salt needed to craft all of that Tasty Squirrel Stew. In general, it’s a lot easier to source ingredients for crafting Cranberry Relish than it is for Tasty Squirrel Stew.
Cranberry Relish, for example, uses sugar. It’s very easy to craft sugar by picking a bunch of Snaptail Reed. Unfortunately, neither salt nor pepper cannot be crafted in Fallout 76. To find salt and pepper, this means lots and lots of scavenging places like the Whitespring Golf Club, all of the diners throughout Appalachia, every house with a kitchen, The General’s Steakhouse and even kitchens inside of bunkers, within the Enclave bunker, within the missile silo lunch rooms and even on picnic tables at Foundation. There are lots of kitchen locations all over the map where both salt and pepper spawn. Specifically, you want the salt and pepper shakers that are white and black, respectively. You don’t want the green salt and pepper shakers that are classed as “junk” and which can only be scrapped.
Additionally, salt and pepper containers only spawn once per 24 IRL hours. Once you’ve picked up salt and pepper containers at a location, you must wait a full 24 hours before the containers respawn.
Teams and Stacking
Keep in mind that Inspirational relies being on a public team and may or may not require 4 team members. It doesn’t matter which kind of team you create. You simply need to be on a public or private team.
Team Bonuses: There is an XP boost by joining any type of public team and establishing 4 bonds. Public team XP bonuses apply separately from the team goal. By joining a public team, such as a Casual team, in addition to the Intelligence boost, you’ll also receive an up to ~+2% XP boost for establishing 4 bonds. As I said above, this XP boost is separate from the team’s defined perk bonus such as Intelligence (Casual), Charisma (Roleplay) or XP boosts from Legendary Kills (Hunting). It’s definitely worthwhile joining public teams to gain this continuous small boost to your XP bonus. Note that this XP boost isn’t documented well and the amount of total bonus isn’t large, but a bonus is a bonus and every little bit adds up.
Also while you’re on a public team, take advantage of the Magazine and Bobblehead team bonuses. Stacking of shared Inspirational cards by multiple players while on a team may or may not work.
A note about foodstuffs. Only one foodstuff can be stacked at a time. If you eat Cranberry Relish, for example, you can’t add more XP by eating more foods, like Cranberry Cobbler (+5%) or Canned Meat Stew (+5% from Feed the People event). Eating any other foodstuff will replace the previous bonus with that new bonus. For example, if you eat Cranberry Relish and gain 10% XP, then eat Cranberry Cobbler, that 10% bonus will be replaced with a 5% bonus.
Yet, different classes of XP bonus items CAN be stacked like Bobbleheads can be stacked with Magazines, can be stacked with Foods and can be stacked with Lunchboxes. As long as each bonus item is of a different class, you can stack the XP up for a lot of bonus XP. Simply look at your character’s EFFECTS area to see how the stacking works.
With Magazines and Bobbleheads, you can extend the duration of these bonuses by using the Curator card. This perk card doubles the duration. If a Magazine normally lasts 1 hour, it will last for 2 hours with the Curator card. Unfortunately, there are no perk cards that increase the duration of Lunchboxes, Kindred Spirit or Food and Drink bonuses.
Finally, keep in mind that environmentally gained bonuses from sleeping, the bench press, the slot machine, the fortune teller, the punching bag or similar all disappear from your character should your character be forced to respawn. You’ll have to spend time reacquiring these environmental bonuses each time you respawn. This highly annoying issue is similar in frustration to dropped loot. Bethesda seems intent on making this game as frustrating as possible.
Dropped Loot
A caution is in order for this area. If one of the Super Mutants kills your character and you respawn, be sure to pick up your dropped loot instantly. If you fail to do this and transition to the other area using the elevator, the previous interior will be wiped and reset, which includes wiping and losing your dropped loot. Don’t expect your dropped loot to hang around after an interior resets.
Intelligence + Chems Debate
Some sites have debated that having higher intelligence offers better XP returned from killed creatures. I’ve personally not found this to be the case. I wear a full set of Unyielding armor which raises intelligence by +15 points and yet there’s no difference in XP on a kill with or without the armor.
Some have claimed that consuming Berry Mentats or other Intelligence boosting chems may offer better XP returned from kills. I’ve not tested using chems for this purpose, but it may be possible that the use of chems does offer some kind of random bonus to XP as either a bug or a misfeature in these game substances. Your mileage with using chems to boost XP may vary.
The Clock’s Ticking
Bethesda is very skittish when it comes to information like this. Therefore, the clock is ticking on the relevance of this information dated as of Oct 2021. Use this information while you can. Bethesda will ‘fix’ this area in a future update to prevent the above farming situation. As I said, use and enjoy the West Tek Research Center to farm loads of XP while you can. It won’t last.
In answer to the above question, if you’re looking for a reasonable place to continually farm high level enemies, legendaries and a decently high amount of XP per kill, West Tek Research Center is the place.
Good Luck
↩︎


1 comment