Flickr flustr: When design doesn’t meet function
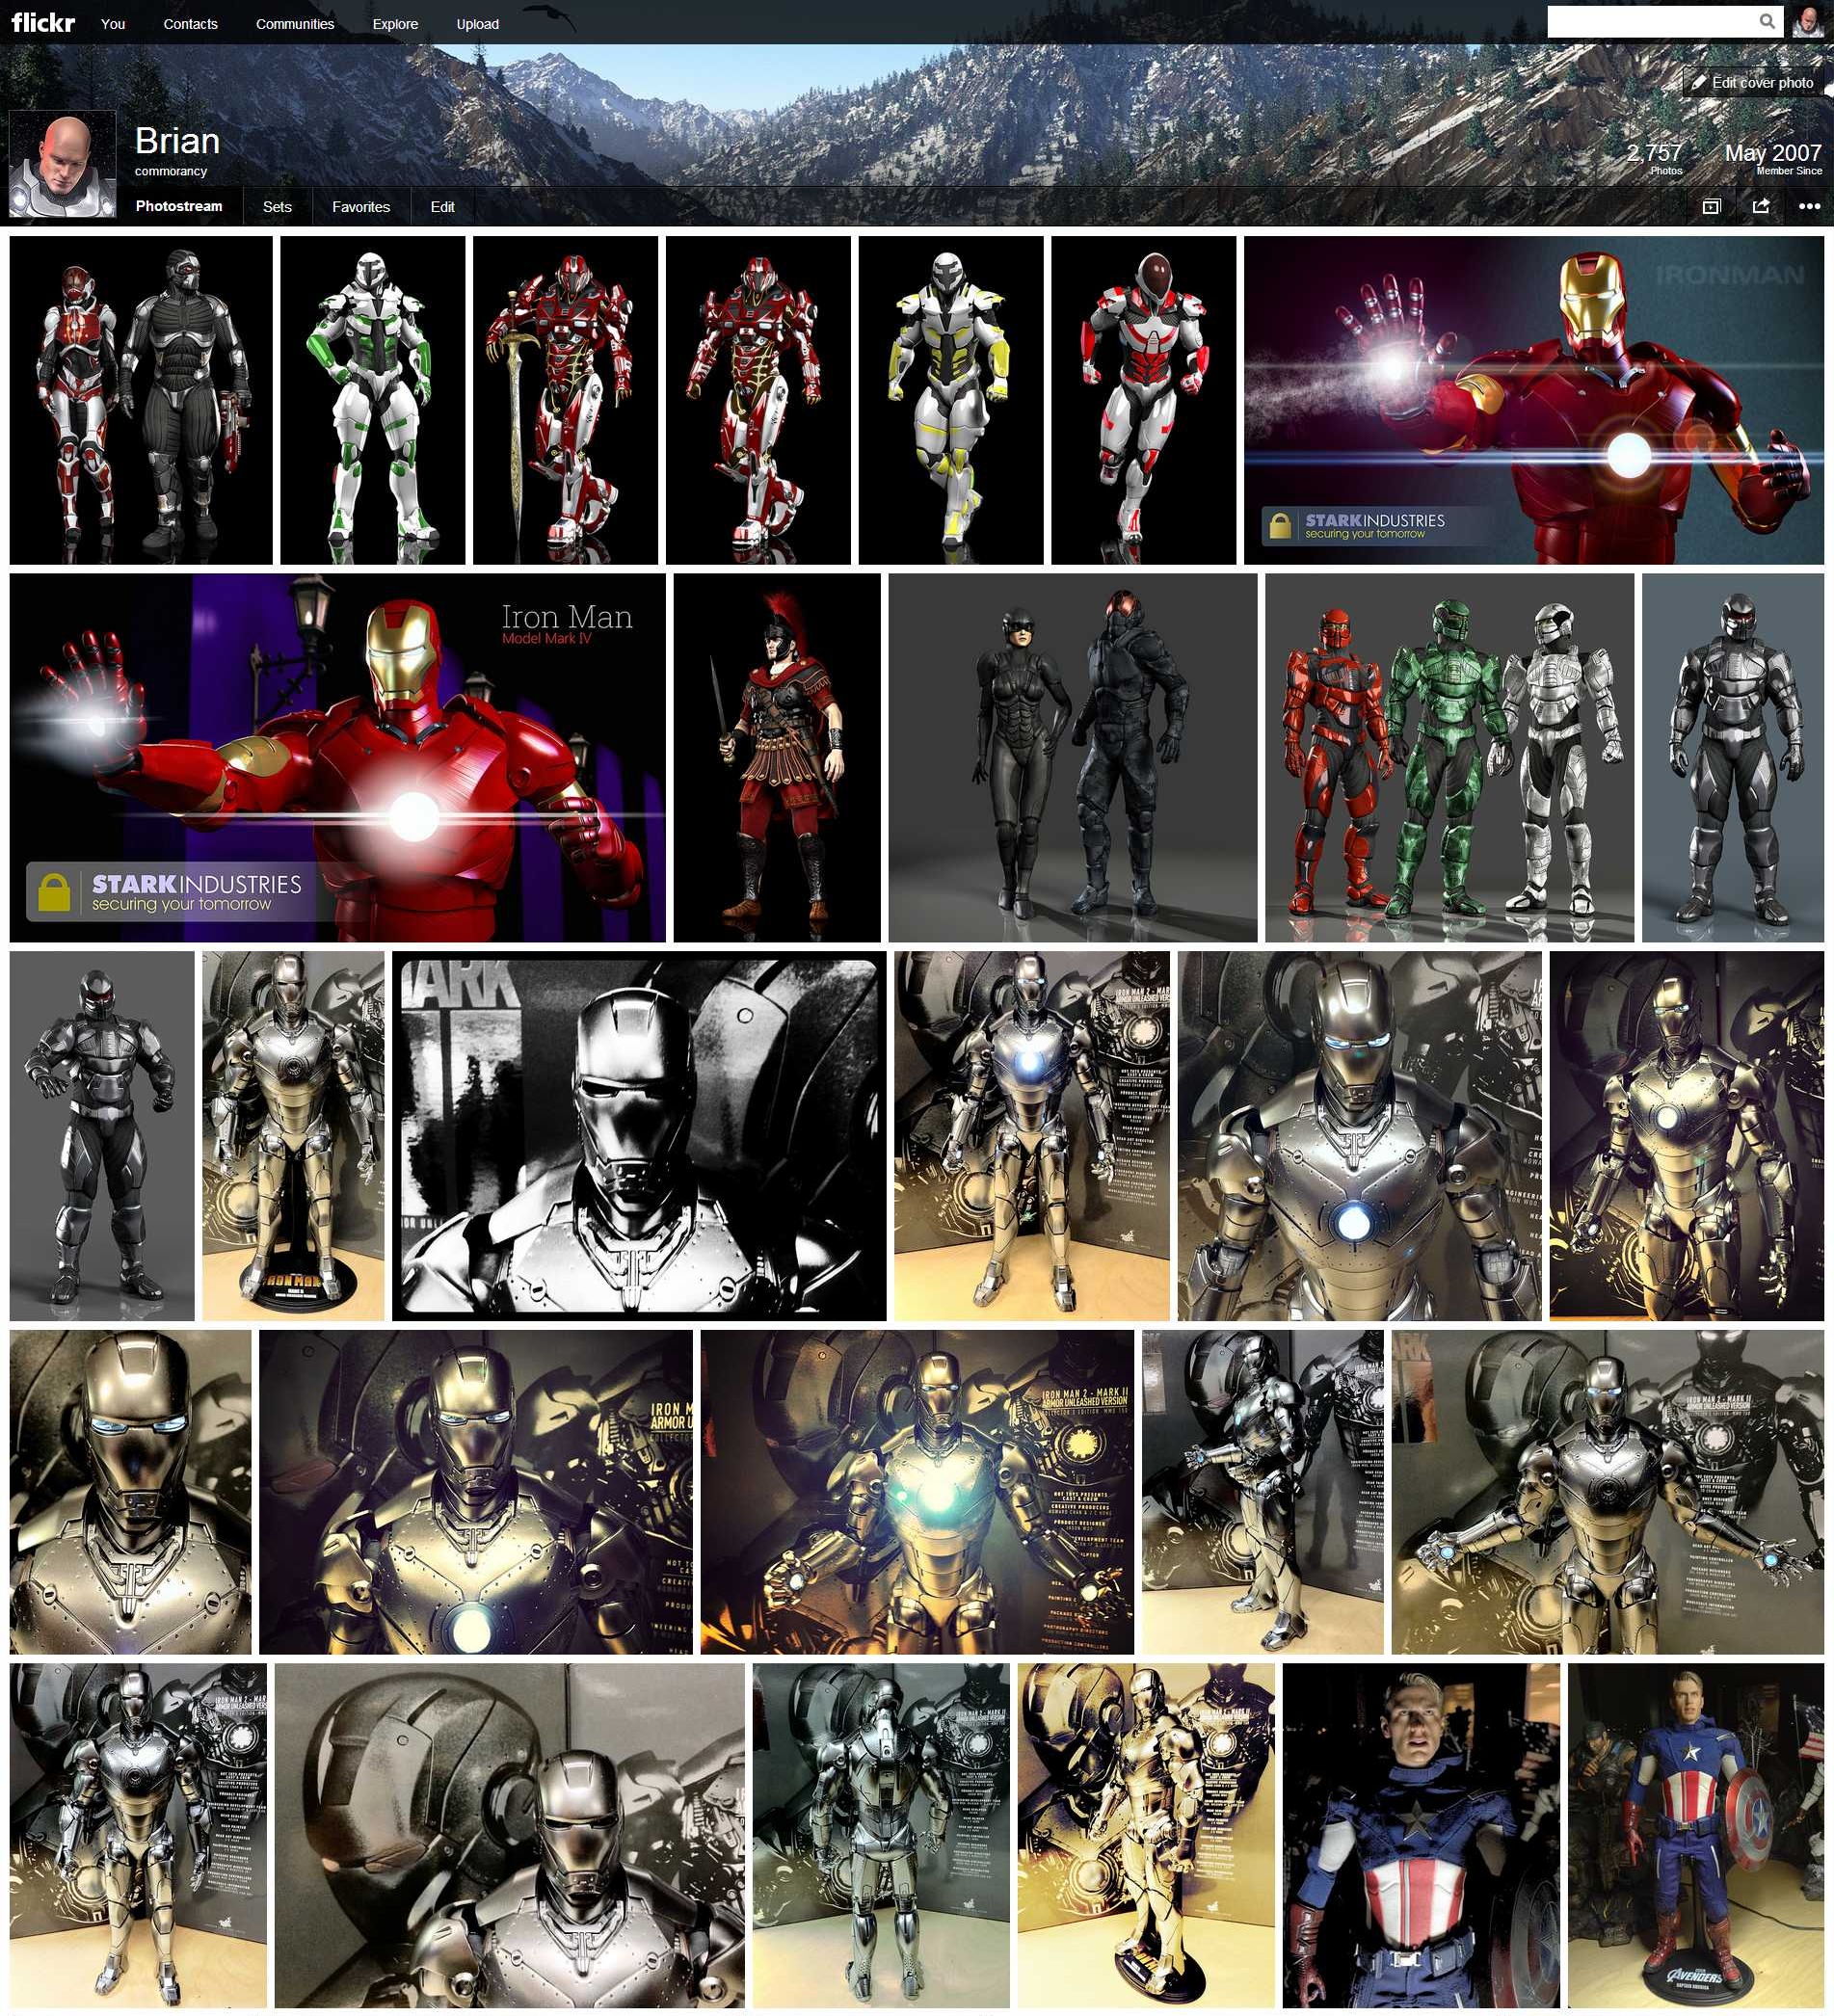
 It’s not often I write multiple articles involving the same topic, but in this case I’m making an exception. I think it’s important to explore and understand the reasons why I believe this new Flickr interface change is such a failure. As a visual artist, I look at the new Flickr interface and wonder what the designers were thinking? See the image to the left. It’s clear the designers were not aware of the many ways that users use Flickr. Let’s explore.
Original Flickr Interface
The original Flickr design was compelling (if not dated) for many reasons and was also useful for many different purposes. The reason the original interface held up so well and for so long is because the original designer’s vision still held true even today, dated as it may seem. “Why has it held up?”, you ask. Let’s examine.
The images were spaced just far enough apart that the images, colors and shapes didn’t clash with one another. Image thumbnails were generally of the same size whether portrait or landscape. The page was centered leaving white borders on the sides giving well enough space for the eye to rest. There were limited numbers of photos per page keeping down the clutter. There was just enough information below each image to give the necessary details about the image (like a placard in a Gallery). From a management perspective, there was also just enough information to show how popular an image is and whether or not it has comments.
Basically, this original interface, while somewhat antiquated and dated, was still very functional on many levels. Both amateur and professionals alike could use and reference this interface for their own purposes. Amateurs could use it to store their snaps. Professionals could direct paying clients to their portfolio without image clashing or the interface being too busy. It was well designed from the beginning for many purposes and uses.
With this original interface, Flickr even began offering limited customization of the page layout such as images alone or images with sets on the left or other similar layouts. Yes, it was always limited customization and I had always hoped for more customization features to come.
New Flickr Interface
The new ’tile’ interface (which incidentally looks too much like Windows 8 Metro) removes nearly every pixel of white space and fills the entire page (edge to edge) with images. It unfairly penalizes portrait image thumbnail sizes over much larger thumbnails for landscape aspect images. So, you have huge landscape sized thumbnails immediately beside tiny sized portrait thumbnails. More than that, because it removes all white space from the page and fills the entire screen with images, there is no place for the eye to rest. It becomes one big jumbled mess of a screen that’s hard to view and even harder to concentrate on a single image. While the original interface design kept the images spaced far enough apart to let you focus on a single image, the new interface doesn’t. Instead, it forces your eye to constantly jump around to find something else to view. This makes the page too busy and way too cluttered.
Worse, when your eyes get tired of focusing on the images, they begin to focus on the white borders between the images. Because the white borders are of odd shapes and sizes, it begins to take on the motif of a badly copied Mondrian painting. In other words, the entire interface is one big cluttered busy mess. It’s not pleasant to view for any period of time. So, instead of taking time to visit a Flickr site in a relaxing way, many people will likely get eye fatigue fast and browse away from the entire Flickr site. The new site makes you want to look at something less tiring and less stressful. Art should be about the images, not the layout making you queasy.
Worse, in no way does this new interface say ‘professional’.
Polar Opposite Reactions
I hear a lot of people say they like the interface. My first initial reaction was also positive. But, that only lasted for a few moments until I realized the problems. I initially liked it because it was something new and a change, but I quickly realized that it wasn’t ‘better’. I hear many people saying that it’s the worst thing they’ve ever seen. That it’s horrible. So, why does this interface generate such polar opposite reactions from so many people? It’s because Flickr went from a general purpose interface appealing to a wide array of people to an interface that appeals to only a small subset of those people.
For a casual photographer who takes photos of their dog or baby or kids, it gives a really great at-a-glance image set to know what you have. This especially works well when the images are mostly the same or a series of similar shots. Also, for those people who like coffee table books of images, this is the next best thing to that. You can bring it up at home on your screen and show people your photo album at a glance. It’s much easier to see all your images at once with this interface. For casual use, these are the people I’d expect to like the new interface. It makes seeing the images easy and they’re accessible. In other words, it’s a little like Facebook’s gallery style. But, that doesn’t make it any less cluttered, busy or stressful to view.
For the professional photographer, the exact opposite is true. You do not want your images crammed up on the same page together like this. It’s busy, cramped, the images don’t flow properly, your eye can’t focus and doesn’t allow your clients to focus on each single image easily. It pits too many images against each other vying for attention. This is bad for a professional. Again, it’s just too busy and cluttered. You would never intentionally build a portfolio that looks this way. Why would you ever expect this from a site like Flickr? So, for professionals, this is the absolute worst interface that could have been built to show off professional photographs in a professional way.
The same above for professional photographers also holds true for visual artists. If Flickr were a gallery, it would now be one wall cluttered with hundreds of images. If I were hanging my art in a gallery, I would want them spaced far enough apart that they don’t clash or create the wrong message. I also would be allowed to place my art in the order of my choosing. Yet, at Flickr, the photostream is still limited to the order in which it was uploaded. This is something that should have been fixed long before rolling out this new interface.
The Interface Mistake
Flickr developers have completely lost touch with why the original interface worked for pretty much every use case. It worked because it offered something for every level of photographer, casual through professional including visual artists. It was by no means a perfect interface. After all, it needed a lot of improvements. But, it worked and it worked well. It was also on its way to becoming something better especially with the latest round of customization features added.
Because the Flickr developers just didn’t clearly understand the full amount of use cases, they developed this new interface that entices primarily just one use case, casual users. The people who snap their baby, their dog, their house or whatever else they can find around the house. These are those people who want an at-a-glance style interface that’s big, bold, cluttered and in-your-face. A virtual coffee table book, if you will. Or, in other words, the Facebookers.
Professionals and visual artists don’t want this. They don’t need this. It’s not professional. It’s not the way you want your photos represented to a potential client. It’s reminiscent of video game or a mobile device or Facebook. It’s not representative of a gallery exhibit or of a portfolio. This is where the Flickr developers have lost touch.
Flickr is a Gallery
The designers need to firmly understand that Flickr is a gallery. We are creative people supplying creative images to this gallery. It’s not a video game. It’s not a mobile device. It’s not Facebook. It is an image gallery. We want to showcase our images, not show them off like some kind of video game or toy or social network. Treat the images with respect, not as toys.
Because it is a gallery, customization is in order. The tile interface is fine as one theme among many display themes, but not as the sole theme for Flickr. Flickr needs to take a page from the WordPress book and offer multiple themes and styles. Let us choose how our images are showcased to our visitors. Yes, customization could easily become haphazard and random, but that’s the nature of customization. It has to. I don’t necessarily recommend allowing CSS level editing, but I do recommend that gallery themes become available. The time has long come for this Flickr feature. This feature is what Flickr developers should have been working on. The tiles theme, again, should have been one in among many different themes available to choose.
Don’t lock me into one single theme that doesn’t allow for customization. If I don’t like it, there’s nothing I can do except move my images elsewhere. Offer me choice. Let me choose my theme and my presentation to visitors. Flickr could have chosen this theme as the default theme, but then let us go into a theme selector and choose among 10-20 different gallery themes. Choice is the answer, not busy unprofessional Facebooky tiles.
Separate Management Interface
Because I’m the manager over my images, I don’t necessarily want to see the same interface that my visitors do when managing my images. I want a separate management interface that allows me to see and manage my images at a glance. I want easy, fast access to my comments, sets, collections, view stats and everything surrounding my images. I don’t need to fumble through the visitor experience only to expend extra time attempting to manage my images through a cluttered and busy interface. I want a clean concise management interface that users don’t see. It doesn’t really matter how pretty the management interface is as long as it’s functional for image management. Functionality is the key to image management.
The Fiasco
There were a number of mistakes made here. The developers did not do enough homework to understand why the original interface worked so well for so many use cases before rolling out the new interface. They refused to see just how narrow of a use case is the new interface. It really only appeals to one of many use cases. Additionally, Yahoo offered no preview. In other words, there was no beta test for users to give feedback before rolling it out site wide. Offering a preview window would have saved Flickr a lot of grief and is probably the single biggest mistake Flickr made in this whole update.
Developmentally, the mistakes they made included not offering customization. Users have been clamoring for such features as rearranging the image order of their stream. I agree, I would love to have this feature and have been waiting for it for a very long time. I would like to see other features regarding things like frames and virtual lighting. I’d like to have seen more Ajax features (easy drag and arrange). Users want more customization, not less. Instead, they locked every single user into a single interface experience that not only alienates most professional use cases, it also offers no customization to change things about the interface. In other words, Flickr has take a huge step backwards. The interface may appear more slick, but the lack of customization takes us back to a time well before Yahoo ever bought Flickr.
Then it comes to bugs. Instead of actually correcting existing bugs and misfeatures, they worked on changing the style of the main page leaving all of the existing bugs and misfeatures out there. Seriously, the most important thing is to make the landing page ‘pretty’? What about all of the features that were not complete or the bugs that were not fixed, or the features that were never added?
The final mistake, the treatment of Pro account holders. With the increase to 1TB of space and upload limits well increased, the need to purchase Pro is really no longer necessary. Those who recently purchased a Pro account this year feel cheated out of their money. And, rightly so. Yahoo didn’t live up to their side of the deal with the money given to Flickr for Pro accounts. Instead, Yahoo basically thumbed its collective noses at the Pro account users not only from the monetary perspective, but also from interface perspective. Basically, Yahoo just completely tromped all over the Professional photographers who bought into the interface for that use, but also those who paid into the Pro accounts that gave bigger limits needed to be a Professional user. Yahoo hasn’t even addressed this issue at all.
Yahoo has a lot of work to do to repair Flickr Pro user relationships. Unfortunately, it’s probably too late. Many Professional photographers are already migrating their imagery away from Flickr to alternative services that are, hopefully, more reliable and offer more professional interfaces and support.
Lacking Support
Through this whole ordeal, Flickr support has remained amazingly silent. They asked for comments and have said nothing about it. They did state they were ‘listening’ for whatever that’s worth. But, we all know that listening and doing are two entirely separate things. There should have been a lot more help and support coming from the Flickr staff after such an amazingly huge change. Yet, it appears that the Flickr team has rolled the interface out in a fire-and-forget approach. Basically, with a ‘this is it’ attitude given off by those who have been able to get hold of a support person.
Clearly, if this is the level of support that Yahoo / Flickr is providing to users for this type of service, it’s probably worth moving on to a service where your money will get you real support when you need it. Where the support people actually do care about making a difference and keeping the customer happy.
By the time Flickr realizes the problem and manages to correct it, it will probably be too late. It’s probably already too late.
Flickr’s new interface review: Is it time to leave Flickr?
 Yahoo’s Flickr has just introduced their new ’tile’ interface (not unlike Windows Metro tiles) as the new user interface experience. Unfortunately, it appears that Yahoo introduced this site without any kind of preview, beta test or user feedback. Let’s explore.
Tile User Experience
The tiles interface at first may appear enticing. But, you quickly realize just how busy, cluttered, cumbersome and ugly this new interface is when you actually try to navigate and use it. The interface is very distracting and, again, overly busy. Note, it’s not just the tiles that are the problem. When you click an image from the tile sheet, it takes you to this huge black background with the image on top. Then you have to scroll and scroll to get to the comments. No, not exactly how I want my images showcased. Anyway, let me start by saying that I’m not a fan of these odd shaped square tile interfaces (that look like a bad copycat of a Mondrian painting). The interface has been common on the Xbox 360 for quite some time and is now standard for Windows Metro interface. While I’ll tolerate it on the Xbox as a UI, it’s not an enticing user experience. It’s frustrating and, more than that, it’s ugly. So, why exactly Yahoo decided on this user interface as their core experience, I am completely at a loss…. unless this is some bid to bring back the Microsoft deal they tossed out several years back. I digress.
Visitor experience
While I’m okay with the tiles being the primary visitor experience, I don’t want this interface as my primary account owner experience. Instead, there should be two separate and distinct interfaces. An experience for visitors and an experience for the account owner. The tile experience is fine for visitors, but keep in mind that this is a photo and art sharing site. So, I should be able to display my images in the way I want my users to see them. If I want them framed in black, let me do that. If I want them framed in white, let me do that. Don’t force me into a one-size-fits-all mold with no customization. That’s where we are right now.
Account owner experience
As a Flickr account owner, I want an experience that helps me manage my images, my sets, my collections and most of all, the comments and statistics about my images. The tile experience gives me none of this. It may seem ‘pretty’ (ahem, pretty ugly), but it’s not at all conducive to managing the images. Yes, I can hear the argument that there is the ‘organizr’ that you can use. Yes, but that’s of limited functionality. I preferred the view where I can see view numbers at a glance, if someone’s favorited a photo, if there are any comments, etc. I don’t want to have to dig down into each photo to go find this information, I want this part at a glance. Hence, the need for an account owner interface experience that’s separate from what visitors see.
Customization
This is a photo sharing site. These are my photos. Let me design my user interface experience to match the way I want my photos to be viewed. It is a gallery after all. If I were to show my work at a gallery, I would be able to choose the frames, the wall placement, the lighting and all other aspects about how my work is shown. Why not Flickr? This is what Flickr needs to provide. Don’t force us into a one-size-fits-all mold of something that is not only hideous to view, it’s slow to load and impossible to easily navigate. No, give me a site where I can frame my work on the site. Give me a site where I can design a virtual lighting concept. Give me a site where I can add virtual frames. Let me customize each and every image’s experience that best shows off my work.
Don’t corner me into a single user experience where I have no control over look and feel. If I don’t like the tile experience, let me choose from other options. This is what Flickr should have been designing.
No Beta Test?
Any site that rolls out a change as substantial as what Flickr has just pushed usually offers a preview window. A period of time where users can preview the new interface and give feedback. This does two things:
- Gives users a way to see what’s coming.
- Gives the site owner a way to tweak the experience based on feedback before rolling it out.
Flickr didn’t do this. It is huge mistake to think that users will just silently accept any interface some random designer throws out there. The site is as much the users as it is Yahoo’s. It’s a community effort. Yahoo provides us with the tools to present our photos, we provide the photos to enhance their site. Yahoo doesn’t get this concept. Instead, they have become jaded to this and feel that they can do whatever they want and users will ‘have’ to accept it. This is a grave mistake for any web sharing site, least of all Flickr. Flickr, stop, look and listen. Now is the time.
Photo Sharing Sites
In among Flickr, there are many many photo sharing sites on the Internet. Flickr is not the only one. As content providers, we can simply take our photos and move them elsewhere. Yahoo doesn’t get this concept. They think they have some kind of captive audience. Unfortunately, this thinking is why Yahoo’s stock is now at $28 a share and not $280 a share. We can move our photos to a place where there’s a better experience (i.e., Picasa, DeviantArt, Photobucket, 500px, etc). Yahoo needs to wake up and realize they are not the only photo sharing site on the planet.
Old Site Back?
No, I’m not advocating to move back to the old site. I do want a new user experience with Flickr. Just not this one. I want an experience that works for my needs. I want an interface that let’s me showcase my images in the way I want. I want a virtual gallery that lets me customize how my images are viewed and not by using those hideous and slow tiles. Why not take a page from the WordPress handbook and support gallery themes. Let me choose a theme (or design my own) that lets me choose how to best represent my imagery. This is the user experience that I want. This is the user experience I want my visitors to have. These are my images, let me show them in their best light.
Suggestions for @Yahoo/@Flickr
Reimagine. Rethink. Redesign. I’m glad to see that Yahoo is trying new things. But, the designers need to be willing to admit when a new idea is a failure and redesign it until it does work. Don’t stop coming up with new ideas. Don’t think that this is the way it is and there is nothing more. If Yahoo stops at this point with the interface as it is now, the site is dead and very likely with it Yahoo. Yahoo is very nearly on its last legs anyway. Making such a huge blunder with such a well respected (albeit antiquated site) could well be the last thing Yahoo ever does.
Marissa, have your engineers take this back to the drawing board and give us a site that we can actually use and that we actually want to use.
Running / Installing Mac OS X (Snow Leopard) on VirtualBox
Updated 8/2/2011
Lion Update
With the recent release of Lion, there is a push to get a Lion version working on VirtualBox. At present, there is yet no boot loader capable of booting Lion on VirtualBox. So, for now, Snow Leopard is still it for a standalone MacOS on VirtualBox. I will update this article as necessary to address a working installation of Lion as it progresses. Stay Tuned.
Nawcom Mod CD
There is a new CD image from Nawcom (http://blog.nawcom.com/?p=306) that makes installation of MacOS X much easier on VirtualBox (instead of using Prasys’ EFI boot CDs). And yes, I’ve tried it. The Nawcom EFI CD is much faster for installation because it does some very clever things, including installing the boot loader at the end of the install.
So, I am now recommending you to download and use the Nawcom ModCD instead of the Prasys EFI boot CDs listed below. Although, I will leave the information for the Prasys Empire EFI CDs available should the Nawcom CD not work for you. Alternatively, you can try the tonymacx86.com iBoot or iBoot Legacy CDs if all else fails. Even using the Nawcom ModCD, you will still need to follow the instructions on changing the resolution of the screen as documented below as this CD doesn’t change that part of the installation process.
Go!
Let’s start by saying this. Support Apple by legally buying your copy of Mac OS X. Don’t pirate it.
Note also that buying a retail packaged disk from the Apple store prevents a lot of headaches during this process. A Mac OS X Install Disk that comes bundled with any Mac system will only install on the hardware with which it came bundled. For example, if you try to install from a bundled DVD media that was shipped along with a MacBook Pro, it will not install on Virtualbox and you will see the error ‘Mac OS X cannot be installed on this computer’. Save yourself the headache and get a retail disk from the Apple store.
Before getting started, if you are wanting to run Mac OS X on VMWare Player 3 instead, then check out Randosity’s Running Mac OS X on VMWare Player 3 article for details.
Apple’s Stance
Apple wants you to buy and run Mac OS X (desktop edition) on a MacBook Pro or other similar Mac hardware. While I think that’s a grand notion to sell the hardware, the hardware will sell regardless of the operating system. Further, if you are a hardware company, why sell the operating system separately anyway? I mean, if it’s the hardware that matters, how is it that you can buy Mac OS X separately both desktop and server editions. I digress.
Because Apple wants you to buy into their hardware platforms, they would prefer you not run Mac OS X on Virtual Environments. I personally think, however, that this idea is both socially and ecologically irresponsible. For a company that tries to tout itself as Green and Earth-Friendly, by not allowing virtualization of Mac OS X (any desktop version), this prevents people from using the hardware they already have and instead forces us to buy new hardware that will eventually fill landfills. Using existing hardware that may work just fine, although not made by Apple, at least keeps the hardware out of the land fill and they are still making money off selling the operating system.
Supported vs Non-Supported CPUs
Note, these boot CDs support specific types of CPUs. If your CPU is not listed (i.e., Atom processor), you will need to download and use the CDs labeled with the word ‘Legacy’. These CDs may or may not work for your CPU, but these are the only CDs that have a chance of working on non-supported CPU types.
Let’s get started — items required
- A recent PC hardware config (within the last 3 years) installed with 64 bit Windows 7 or Vista or Linux 64 bit
- Note, the faster the PC is, the better that VirtualBox will work.
- A recent processor (Intel core i3, i5, i7, i3m, i5m, i7m, AMD Phenom or similar 64 bit processor)
- Enabled VT-x (for Intel Processors) or AMD-v (for AMD processors) in the PC BIOS
- Retail version of Mac OS X Snow Leopard. (If you try any other version other than the retail package, it probably won’t work!)
As stated above, you will need hardware capable of VT-x / AMD-v (BIOS level virtualization support passthrough). Without this hardware configuration, you will not be able to install Mac OS X. Most recent dual and quad core processors support this technology. Although, you may have to enter the BIOS to enable it. So, check your BIOS for ‘Virtualization’ settings and enable it.
Pick your host operating system. You can run Windows 7, Vista, XP, Linux (Ubuntu, Redhat, etc) or Solaris. Whichever operating system you choose for the host, make sure it’s a 64 bit edition. I recommend Windows 7 64 bit edition as XP 64 bit edition can be somewhat of a bear to work with and Vista isn’t readily available at this point. If you’re looking for the least expensive solution, then I would choose Linux. I personally use Windows because I also need Windows 7 for other tasks as well. If you are currently running a 32 bit OS edition, you will first need to upgrade the host to 64 bit to operate Snow Leopard. Snow Leopard is mostly 64 bit now and, thus, requires a 64 bit host OS to function.
Note that this tutorial was tested using Mac OS X 10.6.3 (Snow Leopard). OS X may install using 10.6.4 or later, but Apple may also make changes that could prevent it from working. If you have an older install disk than 10.6.3, the installation may fail. I recommend using 10.6.3 or later.
What is EFI?
One other thing to note about Macintosh computers and Snow Leopard… Macintosh computers require an EFI BIOS to boot. What is EFI? EFI stands for Extensible Firmware Interface and was developed by Intel for the Itanium platform in the mid-90s. This ‘BIOS’ replacement is designed to allow direct 32 and 64 bit addressing right from the firmware unlike the PC BIOS which only allows 16 bit addressing during boot operations.
Apple integrated EFI into the PowerPC and later the Intel Macintosh line to boot Mac OS X. Because this boot system is not compatible with PC BIOS, it requires the standard PC BIOS to boot an EFI boot system first. Then, the EFI boot system can then boot Mac OS X. So, the boot system goes like this:
- PC BIOS boots EFI
- EFI boots Mac OS X
Yes, VirtualBox has an EFI boot system within, but this EFI system will not boot Mac OS X (probably on purpose). Instead, the Empire EFI boot ISO is necessary to boot Mac OS X (both the Mac OS X install media and the actual operating system once installed).
Focus on Windows
With this post, I will focus on using Windows as the Host and Mac OS X as the guest. You can utilize this guide if you want to use Linux, but you will need to determine how to get certain steps done with Linux (i.e., creating and/or mounting ISO images). So, let’s get going.
Items you’ll need
- VirtualBox, of course.
- MyHack (Chameleon) Boot Loader 1.1 page (download only if you are not using the Nawcom ModCD)
- Nawcom EFI ModCD or
- tonymacX86.com’s iBoot or iBoot Legacy (need to register to download) or
- Empire EFI ISO<– (Only one of these EFI CDs if the Nawcom CD doesn’t work for you)
- Empire EFI v.1085 for Intel P55 Chipset and Intel Core i5 and i7 8xx series , Intel Core 2 series , Intel Core series (Contains both EmpireEFI v1.085 and LegacyEmpireEFI v1.085) <– If unsure, try this one first.
- Empire EFI v1.085 for Intel Atom , Intel Core i7 9xx series , Intel Core 2 series , Intel Core series (contains both Empire EFI v1.085 and LegacyEmpireEFI v1.085) <– Try this one second.
- Empire EFI V.1085 (Experimental for AMD Phenom and Athlon X2 , X3 , X4 and for Intel Core i3/Pentium D/Pentiu m 4 6xx series)
- Empire EFI V.1085 R2 (Experimental Support for AMD Phenom , Athlon and Sempron with SSE3 , and as well as Intel Core i3 , Core i5-M , Core i3-M , Core i7M)
- Empire EFI V1.085 R2 (For Intel laptops with Intel onboard graphics card such as GMA 950 , GMA X3100 and as well as for desktop computers with problematic nvidia graphics card (i.e 2xx series) and ATI graphics card)
- Empire EFI V.1085 (Based upon on Version 1.00) – Meant for Intel Graphics 950 , 965 (X3100 Users) who’ve tried another version which has resulted in kernel panic or white screen.
- Note: You only need one (1) of these ISO images above. So, you will need to pick the ISO image that works for your motherboard. Also note that Empire EFI requires at least 1024MB (1GB) of RAM to work. Also, I can’t guarantee how long these download links will continue to work, but as of 6/30/2010 they are working.
- See: Google’s cached Prasys blog page for important details about these disk images. No, it’s not formatted.
- ImgBurn (to make ISO files)
- AC97 Sound Driver
- Mac OS X Install Disk (Snow Leopard disk works fine) or an ISO of it
Steps to get it working
- Install VirtualBox on Windows
- Open VirtualBox and click ‘New’. This will start a Machine build Wizard
- Name this machine ‘Mac OS X’
- Set the Type to Mac OS X + Mac OS X Server (if it isn’t already) and click Next
- Set memory to 1024 (or whatever you want to give it) and click Next
- Under Boot Hard disk, either create a new HD or select an existing HD file* (at least 20GB), click Next
- If Creating new, continue onward. Otherwise, skip down to ‘Readying VM for First Use’
- In the New HD Panel, choose Dynamic Expanding Storage, Click Next
- Click the Folder icon to choose where this disk is to be stored (C not recommended)
- Set the size to 20GB (type in 20GB), click Next
- Click Finish to exit HD creation and click Finish again to exit VM creation
Readying VM for First Use
Now you have a new VM for Mac OS X set up, it’s not to use ready yet. So, Let’s ready it for use:
- Click to select the Mac OS X machine
- Click the ‘Settings’ button
- Click the System settings icon
- Uncheck ‘Enable EFI’ (we will use EFI, just not VBox’s built-in version**)
- Under Processor tab, leave it at 1 CPU and enable PAE/NX if it isn’t already
- Under Acceleration, Enable VT-x/AMD-v (must be enabled). Without this setting, you can’t run Mac OS X in VBox.***
- Under Display, set the Video Memory to 128 and Enable 3D Acceleration
- Under Storage, IDE controller type must be ICH6
- Also under Storage, click ‘Empty’ cdrom drive and set the Empire EFI disk to this drive using the Folder icon****.
- Audio Driver is Windows Directsound + ICH AC97
- Network should be Bridged Adapter (NAT may work)
- Click ‘OK’ to save these settings
Now you’re ready to start the install process. Click the ‘Start’ button to start the Mac OS X virtual machine. Once the Empire EFI screen has loaded, eject the Empire EFI ISO image by unchecking it from the Devices->CD/DVD Devices Menu and then locate your Mac OS X Install ISO and select this. If you have the original media and want to create an ISO, go to the ‘Creating an ISO image with ImgBurn’ section below. After the Mac OS X install ISO is selected and you’re back at EFI, press the F5 key. The screen should refresh to show the newly inserted Mac OS X install media. Once it shows the install media, press the enter key to begin installation.
Note, if you start this process using the Empire ISO image, then you must use a Mac OS X Install ISO. If you want to use the physical media, then you’ll need to burn the Empire ISO to a CD and boot from the physical media drive in VirtualBox. You can then eject that media and insert the Mac OS X install media. You cannot mix and match ISO to physical media. I was not able to get mixing ISO and physical media to work in Empire EFI.
Installation of Mac OS X
Once you get the Mac OS X Installer going, I’ll leave it up to you to finish the full install process. However, I will say this about the hard drive. The VBox HD is blank. So, you will need to prepare it with ‘Disk Utility’. Once the Mac OS X installer starts and you get to the first screen with a menu bar, choose Utilities-> Disk Utility. It will recognize the Disk is there, but it cannot be used until it is partitioned and formatted. Choose the VBox disk and click the ‘Erase’ tab. Under Erase, choose Mac OS X Extended (Journaled) and then name it ‘Hard Disk’ (or whatever you want to call it) and click the ‘Erase’ button. It will confirm that you want to do this, so click ‘Erase’ again. Exit Disk Utility and continue the installation. It will probably take 30-40 minutes to install Mac OS X depending on various factors.
Mac OS X Installed — What’s Next?
If you’ve installed from the Nawcom ModCD, then skip this part and go directly to Final Steps + Increasing screen resolution. If you’ve installed from tonymacx86.com’s CD, you may still need to install MyHack. If you’ve installed from Prasys’ Empire EFI CD, you will need to install MyHack. So, continue on.
Ok, so now that Mac OS X is installed, the system still won’t boot up without the EFI disk. So, reboot after the install with the Empire EFI ISO in the drive. Choose the new bootable ‘Hard Disk’ in the EFI menu and boot into Mac OS X. Once Mac OS X is loaded, open Preferences and set the ‘Startup Disk’ to your new bootable installation. Now, open Safari and search Google for ‘MyHack’ or locate this Randosity article in Safari and go to this site: MyHack. The download will be a package (.mpkg) file and needs to be downloaded on Mac OS X. Once downloaded, double-click the package to install. Click through the Wizard until you get the screen with the ‘Customize’ button. Click Customize and enable PS2Controller (keyboard and mouse) and disable SleepEnabler (doesn’t work with later OS X versions). Click to finish the installation process.
After MyHack is installed, you can eject the Empire EFI media and your Mac OS X installation will now boot on its own.
Final Steps + Increasing screen resolution
You’ll notice that the resolution is fixed to 1024×768. You can change this resolution, but it has to be done in two files. First on Mac OS X, there’s the /Extra/com.apple.Boot.plist file. This file describes the resolution for the Mac to use. Before you edit this file, install Xcode from the Mac OS X media (insert it into the drive with the Mac running). Open ‘Optional Installs’ folder and double-click ‘Xcode’ and follow the installation instructions. Note, it takes about 2.3GB of space. Plist files are easier to edit when the Property List Editor is installed from Xcode. Otherwise, you will have to hand edit these files with TextEdit.
Also note that the /Extra folder is at the root of the Hard Drive volume. It is not inside your local user profile folder. You will also note that after a default install, Mac OS X doesn’t show hard disk icons on the desktop. To turn this icon on, from the top menu, select ‘Finder->Preferences…’. Then, put a check next to ‘Hard Disks’ under ‘Show these items on the desktop’. Once you open the Hard Disk icon, you should see the Extra folder. If you still don’t see the Extra folder, be sure that you have installed MyHack or used the Nawcom ModCD. If MyHack hasn’t been installed, there won’t be an /Extra folder there. The Extra folder gets installed as a result of installing MyHack.
Also, there can only be one available resolution in Virtualbox and on the Mac at a given time. I wish it supported more resolutions at once, but it doesn’t. Note also that because VirtualBox doesn’t support Mac OS X fully, there are no machine additions. To enable the resolution, on the PC side of VirtualBox (on the VirtualBox host), you will need to run the following command from a command shell (cmd):
VBoxManage setextradata "Mac OS X" "CustomVideoMode1" "1920x1080x32"
The “Mac OS X’ label is the exact machine name in VirtualBox. The “1920x1080x32” setting is customizable to your needs (and video card capabilities). However, both this setting and com.apple.boot.plist (on the Mac) must match for the screen resolution to take effect.
The ‘VBoxManage’ command is located in the Program Files\Oracle\VirtualBox folder or wherever you installed VirtualBox. You can add this location to your PATH variable so you can use this command without typing in the full path each time.
In the com.apple.Boot.plist file, you will need to add the following properties (if not already there):
Graphics Mode - String - 1920x1080x32

GraphicsEnabler - String - y
(The resolution value should match the above VboxManage command). If you want to change resolutions later, you will need to edit both places again and reboot your Mac.
If you reboot and the screen hasn’t changed or has changed to 1280×1024 and not the resolution you expected, double check that both com.apple.boot.plist and the CustomVideoMode1 setting match and are active. Both of these settings must match for the resolution to work.
Updating com.apple.Boot.plist
It’s easiest to edit this file with the Property List Editor tool. So, install Xcode before managing this file. In order to edit this file, you cannot edit it directly. Instead, copy the file and paste it to your desktop. Edit the file on your desktop. Then, once done editing, drop the file on top of the /Extra folder. Click “Replace File” when asked and supply your account password. Once the file is replaced, you can reboot to see if the resolution change has taken effect.
Audio Support
Update: On my HP quad core system, I am unable to get the AC97 sound driver to work on 10.6.4 (as have others). I have uninstalled and reinstalled this kernel extension, but it simply will not activate. I am still working with this setup to see if I can get it working, but so far no luck. I should point out, then, that the AC97 sound driver may not work on all systems and may not work with 10.6.4. So, you may not want to update to 10.6.4 until this issue is resolved if you need sound.
Mac OS X does support audio output with an AC97 audio driver in Snow Leopard up to 10.6.3. It does not appear to support audio input. I will say, however, that the audio driver is, at best, under performing. That means, it breaks up, it doesn’t always work and it generally sounds crappy. That said, if you want to hear the various insundry noises that the Mac can make for bells, you can install the driver. The AC97 driver can be found in this Virtualbox Forum Thread.
Note, if the supplied installer does not properly install the driver, download the .zip file and install the AppleAC97Audio.kext Extension the into /Extra/Extensions folder. Then follow the instructions below on rebuilding the Extensions.mkext file.
Kernel Extensions — Rebuilding .mkext cache files (Kernel Extension Cache)
Mac OS has always been known for its extensions. Well, Mac OS X is no different in this respect. In the original Mac, you simply drop the extension into the Extensions folder and it works. Well, unfortunately, it’s not quite that simple with Mac OS X. If you want to drop in a .kext file (extension), you will need to rebuild the Extensions.mkext database. This database is what helps Mac OS X find and work with installed extensions. To rebuild these cache files, you will need to use the following Terminal.app as root:
# kextcache -v 1 -t -m /Extra/Extensions.mkext /Extra/Extensions/ /System/Library/Extensions/
# kextcache -v 1 -t -m /System/Library/Caches/com.apple.kext.caches/Startup/Extensions.mkext /System/Library/Extensions/
Running these commands will rebuild the cache files necessary to activate newly installed extensions. So, if you need to install any new extensions, you will need to run the above commands to recreate the extension cache files.
Creating an ISO image with ImgBurn
To create an ISO image using ImgBurn, you will first need to download and install it. Once it’s installed, start it up. Now click ‘Create image file from disc’. Insert the Mac OS X CD. The CD will be labeled ‘Boot Camp’. This is fine as this is the only partition that Windows is able to see. As long as it sees the ‘Boot Camp’ partition, the image will be created correctly. Click the CD icon at the bottom of the Window to create your ISO image. Once the image has been created, you can continue at your previous step.
Rebooting the Mac
As a side note about rebooting. With some hardware, rebooting Mac OS X in VirtualBox doesn’t work. Sometimes it seems to hang, sometimes it gives a banner telling you to power off the machine. Basically, there isn’t really a resolution to this issue. Simply use shutdown, then when it appears all disk activity has stopped, close the Vbox window (making sure to power it off). Then click ‘Start’ again to start it up. This is really more of an inconvenience than anything, but it’s manageable.
Updating Mac OS X
As new updates get released by Apple, you may be tempted to install them immediately. While this shouldn’t be a problem on a real Mac, it is possible that a security or full update from Apple could break VirtualBox installations accidentally (or, more likely, intentionally). Since Virtualbox offers snapshot capabilities, I recommend taking advantage of this and do the following:
- Cancel any updates
- Shutdown Mac OS X
- Take a snapshot of your Mac OS X Guest in the Virtualbox console
- Start up Mac OS X
- Update OS X
If the update causes your system to stop booting, stop working or in any way become broken, you can revert to the snapshot and not update. On the other hand, if the update works perfectly, then I recommend you delete the snapshot once you feel comfortable that the update is working as expected. If the update doesn’t work, you may need some updated components such as the Chameleon boot loader or an updated boot disk to handle the new OS update.
Notes
* I suggest using a VMDK HD image as there are more tools for VMDK format files than VDI files. Though, your choice. If you want to use a VMDK file, go to vmcreator.com and have them make you a file to download.
** VirtualBox’s EFI works, but not with Mac OS X. Whether that’s intentional is unknown. Instead, you need to use the Empire EFI ISO disk to boot Mac OS X to install it.
*** You may have to enable VT-x/AMD-v in your machine’s BIOS.
**** Click the ‘Add’ button in the Media Library window to locate your ISO image, then make sure this file is selected and click ‘Select’.


leave a comment