How to fix: controllers won’t pair with PS4
Indemnification Disclaimer: By proceeding, you agree that the information contained herein is provided AS-IS with no warranty expressed or implied. You further agree that the article’s author and site owner are providing this information solely to aid in diagnosis and troubleshooting only. You agree that if you choose to undertake repair of your PS4 console, you assume all risk, liability, void warranty and damage. You agree that you (the reader) is solely responsible for any repair or replacement costs at your expense. The author of this article has made every effort to provide this information as accurately as possible. You agree to indemnify and hold harmless the site owner and article author from all claims due to your attempt(s) to repair your PS4 regardless of where the repair information was obtained or as a result of any article inaccuracies. Attempt repairs on your PS4 at your own risk. If you cannot agree to these terms for any reason, do not continue reading.
As a follow-on to my How to pair your PS4 controller wirelessly article, this one talks about a separate but related issue when a DualShock 4 controller refuses to pair or work wirelessly. Let’s explore.
Controller refuses to pair or work
You’ve walked through the steps in the Randocity article How to pair your PS4 controller wirelessly and this doesn’t work. The trouble may not be with your DS4 controller. Start by testing with a second controller. If the second controller also won’t work or pair, this trouble may not be with your controllers.
Instead, you’ll need to look at the possibility the problem is with your PS4. These symptoms include that any DS4 controller won’t work wirelessly and/or that the controller must be extremely close to the unit. This article covers the case when no DS4 controller pairs or works with your PS4. If you find that one controller works, but another one doesn’t, that isn’t the problem described here.
The Problem
There’s a small wire that leads from the WiFi controller to the WiFi antenna in the PS4’s case. On the antenna, the exposed portion of the end of the wire must bridge a small gap between the antenna sides. This small bridged gap is handled by the wire itself with a small blob of solder. If the unit is bumped, jostled or simply gets hot enough, the wire may come loose between the gap. This can cause the WiFi to work sporadically or not at all.
The Solution
Thankfully, there is a fix for this. The ifixit.com site has a reasonable repair guide to walk you through how to fix it.
Before you begin, if your PS4 is still under warranty or you don’t feel comfortable doing repair work, you should contact Sony about repairing this problem to prevent voiding your warranty or damaging your PS4.
Tools you’re going to need
- Torx TR9 screwdriver
- Phillips Head (PH1) screwdriver
- Soldering Iron which includes:
- Solder
- ESD-Safe Tweezers
- Work area
- Steady hand
- Plenty of lighting
- Tray or cup for screws
- You’ll need to remember which screws came from where to reassemble properly
Steps to Fix the WiFi Antenna
- Open your PS4 console by removing the rear stickers to expose screw(s), then unscrew screws and lift top off
- After top is open, locate screws for the power supply and unscrew them placing the screws aside separately
- Carefully unscrew and lift out the power supply (avoid stress on any cables) to expose the antenna wire connector
- Disconnect the WiFi antenna wire from the board using ESD-safe tweezers by pulling straight up
- Pull the now loose wire free from the chassis, then…
- Follow the wire to locate the WiFi antenna in the corner of the PS4
- Unscrew and take out the WiFi antenna being careful not to pull the wire loose
- Identify the gap between the antenna segments looking for two solder points
- Make sure that the antenna wire is long enough to span the gap
- Pull the wire to bridge the gap between both both solder points
- Solder the wire down on both sides of the gap making sure the antenna wire spans the gap
- Reassemble the PS4 in reverse being sure to thread the WiFi wire back through where it was and reconnecting it
For a follow-along visual reference, visit the ifixit.com guide or download the PDF:
- Repairing PS4’s Bluetooth Antenna from Defect or System may have fallen
- PDF Version: Repair Bluetooth Antenna PS4
The Design Problem
The small gap between the two sides of the antenna is spanned by the wire itself. This wire is fairly fragile and is prone to easily coming loose. The wire may come loose for many reasons. It could be because of an assembly problem. It could be because the solder came loose on its own or from heat buildup. It could be that simply jostling the unit worked it loose. It could be that you dropped the PS4. Whatever the problem, it’s a relatively easy fix.
Notes
The follow-along guide misses a few tools needed for this repair. Please see the above for the full tool reference you will need before beginning. Also, the follow along guide shows pliers being used to pull the antenna loose from the board. Don’t do this! Use ESD-safe tweezers (included with the soldering iron kit listed above or purchase separately) to properly disconnect this wire from the board.
If you don’t feel comfortable opening up your PS4 or performing this procedure, then you should contact Sony to discuss having this repair completed by a Sony repair center. If your PS4 is under warranty, I’d suggest having Sony repair this problem to avoid voiding your warranty by opening the unit.
If you have any questions about this guide, please leave a comment below.
↩︎
How to use your PS4’s DS4 controller on Windows
 In a follow-up to the Randocity article How to pair your PS4 controller wirelessly, this article is an extension to explain how to pair a DualShock 4 controller to Windows via Bluetooth. Since that pairing article shows you how to pair a DS4, this article will show you how to make use of it on Windows.
DS4Windows
You’ll need to download DS4Windows for your system. Note that there are two releases of DS4Windows. One by Jay2Kings which has been abandoned and a newer fork being handled by Ryochan4. You’ll want to get this newer version from Ryochan4. This version is being updated constantly.
- Windows 7 or newer
- Microsoft .NET 4.5.2 or higher (needed to unzip the driver and for macros to work properly)
- SCP Virtual Bus Driver (Downloaded & Installed with DS4Windows)
- Microsoft 360 Driver (link inside DS4Windows, already installed on Windows 7 SP1 and higher or if you’ve used a 360 controller before)
- Sony DualShock 4 (This should be obvious)
- Micro USB cable
- (Optional) Bluetooth 2.1+, via adapter or built in pc (My recommendation) (Toshiba’s bluetooth adapters currently do not work)
Xbox 360 Controller Emulation
This driver works by latching onto the Xbox 360 controller emulation system that’s available as an add-on in Windows 7 or newer. As you’ll note, you’ll need to install the Microsoft 360 Driver if you’ve never used a 360 controller on Windows. If you have previously used a 360 controller or you are using Windows 8 or above, you can skip that installation step.
Downloading DS4Windows
To download the latest version of DS4Windows click through to this link:
Choose the top most release number. As I write this article, that number is version 1.4.119. However, if you’re reading this 6 months from now or later, it will likely have changed. If you’re running 64 bit Windows, download the x64 version. If you’re running 32 bit Windows, choose the x86 version.
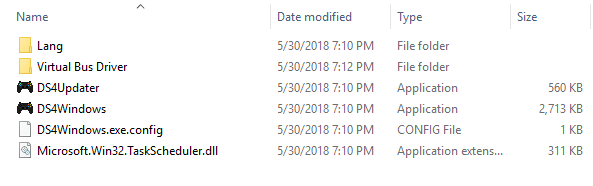
After you download it, you’ll extract out the zip file which contains the following files:
From here, double-click the DS4Windows application icon. Note, Windows may warn you that this application is from an unknown developer, be sure to click ‘Run Anyway’. There’s no way around this issue because this developer has chosen not to code sign this application.
Once you run DS4Windows, you should see a window that looks like this:

Follow these steps:
Step 1: Install the DS4 Driver — Click the Button highlighted in red

Step 2: Install the 360 driver (only needed if Windows 7 or below). Skip this step on Windows 10.

Step 3: Connect your DS4 Controller

From here, you’ll need to choose if you’re going to use this controller via USB cable or via Bluetooth. If you have a USB cable, then follow the instructions at the top of the red box. If you intend to use the controller wirelessly, then follow the (optional) Bluetooth instructions at the bottom of the window above.
If you’ve chosen Bluetooth, then change settings by clicking the ‘Bluetooth Settings’ button and connect the controller to Windows through Windows’s control panel settings. Once you click on Bluetooth Settings, you should see a window appear like:

Make sure Bluetooth is enabled on your computer. Then, click add a new device. From here you should see a window like so:

Click on Bluetooth type devices and make sure the controller is in pairing mode. It should show up as ‘Wireless Controller’. Select it and it will pair. After this, DS4Windows will ensure the proper drivers are loaded for this controller. You’ll see a few notifications pop up regarding installation of various controller drivers for this newly found controller.
Step 4 — Finished

Once that’s all complete, you’ll see the DS4Windows main window now looks like this and contains your new controller:

Your controller’s ID will be different than mine. Note, like the PS4, you can only connect a maximum of 4 controllers using this tool.
Using your new DS4 controller on Windows
After you get your controller set up to this point, you’ll need to select and/or create a profile. A profile maps the controller’s buttons and joysticks to actions on Windows (or a specific game). When you click on the Profiles tab across the top of the window, you can create new profiles or import existing profiles that you’ve downloaded.
I’m still on the lookout for a high quality archive of profiles for specific games. Unfortunately, I’ve not yet found any. For the time being, you’ll need to create your own. Setting up profiles goes beyond the scope of this installation tutorial. However, I will leave you with a few YouTube videos to get you started.
Note, the above video does not have sound.
Jump to 6:53 in the above video to begin the mapping setup tutorial.
Profiles
If I manage to find any preexisting game profiles, I will create a list below of their locations. If you have a specific game that needs a profile, please leave a comment below and I will attempt to locate a profile for you. Note, however, I can’t create any profiles where I don’t have the game installed. The best I can do is look for someone who has already created a profile and point you there.
Request for Profiles Bounty
For all readers, I have a request. If you have any existing DS4Windows profiles that you have successfully used on a game, please contact me. If you’re willing, I’d like to create an archive of your DS4Windows profile(s) here on Randocity. For every profile you upload, I will list your name in credit to the profile.
Now, here’s the challenge. To get this DS4Windows archive started, the first person who uploads 10 functional DS4Windows popular game profiles to this archive will receive a new Sony Dual Shock 4 controller as bounty. This offer is good throughout the world, but void where prohibited. This bounty is valid through December 31, 2018. All entries must be received before January 1, 2019. To submit your entries, leave a comment below or use the Randocity contact form. Be sure to use your contact email address in your WordPress account so I can see it to contact you. Do not leave your email address in the actual comment. Note, this bounty is separate from the 500 million limited edition controller giveaway on a separate article… which means you have the possibility of receiving 2 controllers if you submit 10 functional DS4Windows profiles here in addition to entering that giveaway.
As always, if this article is helpful to you, please leave a comment below. If you like what Randocity offers, please click the Follow button in the upper right corner to receive notification of new Randocity articles.
↩︎


leave a comment