The Manufactured Border Crisis

OR… “How the GOP wastes taxpayer time and money on a fabricated crisis.” Does this crisis really exist and who’s actually responsible for it? Let’s explore.
Watch, But Don’t Listen!
With any politician, it’s more important to watch what they do, not listen to what they say. As has been stated, if a politician’s lips are moving, they must be lying. Nowhere is this true more than now… and more specifically within the ranks of the GOP, but it’s not limited to this party. The GOP has simply taken it to a whole new level. That’s not to say that the Democrats don’t lie; they do. Even Independents lie to get elected.
The difference now is whether they’re lying to you over something they’ve already done or lying to you over something they haven’t yet done. With the GOP, more often than not, they are not only lying to you over something they’ve already done, they’re lying to you over what they plan to do.
As stated, don’t listen to their words, watch their actions. Actions speak louder than words. If you watch what they do, then their lies fall right into place. They can’t lie their way out of their actions… though they may try, but that’s actually called gaslighting.
Border Crisis and Number of Crossings
Let’s begin this discussion with these dhs.gov border crossing statistics up to fiscal year 2013:

These above statistics set the tone of this article with regards to the statistics to come next. These above statistics also go to prove that we have had years under both Democrat and Republican Presidential leadership of higher than expected influx. Both parties are to blame here. Let’s further understand who was President at the time of the above statistics going back to 1989. Presidents prior to 1989 are not needed for the point this article is making. However, if you’re interested in all past Presidents, here’s a link.
In fact, up until 2013, the highest border crossings occurred at 1.8 million per year under Bill Clinton (D). George Bush (R) would get close second to this number at 1.3 million during fiscal year 1993. Here’s the list of presidents going back to 1993:
With the above table in mind, let’s proceed to the most updated DHS statistics for border crossings for 2013 and beyond. Let’s keep in mind that George Bush (R), Bill Clinton (D) and “Shrub” Bush (R) all presided over border crossings well above 1 million per fiscal year. It wouldn’t be until 2009 when border crossings began to subside again, but would then drastically surge during and after the COVID pandemic.
Neither the Democrats nor the Republicans can exclusively say that their border crossing policies have worked to lower immigrant attempted ingress. Here are the border crossing apprehensions from 2013 to the 2024 (YTD):
At this point and with these ever increasing numbers under Joe Biden, you might be wondering what the hell is going on? This is a very good question. Before we get into the REAL answer, let’s discuss what the GOP is saying, but not actually doing.
Republican Lip Service
Clearly, the Republicans are paying a lot of lip service to this ever increasing turn of events around the border, but without pointing fingers at the actual situations and actual politicians who are driving this migrant influx to the southern border states. No, the GOP prefers to point fingers at the Democrats, even though the Democrats aren’t the ones driving the border crisis directly. While Democrats aren’t the party causing this drastic border influx, the Democrats also haven’t done much to arrest it either. This is called complacency, of which the Democrats are fully and entirely guilty. In fact, the Democrats prefer playing on the world’s stage rather than tackling difficult domestic issues. This is fully evident of the Biden administration’s continual meddling in world affairs, like Ukraine and Israel, all while fully ignoring the problems at home… except when such a problem suits their political fancy.
One thing is certain, nothing happens in a bubble. If something is occurring, there’s definitely a driving factor behind it. It also means that someone or something stands to gain from that driving factor. Let’s also understand that what the GOP / Republicans are saying is absolutely not what’s actually driving the influx to the United States southern border.
The Republicans are claiming that it is Joe Biden’s lack of policy around border that is the cause and reason behind this influx. In fact, this could not be further from the truth. Let’s get to that truth right now.
The Truth Behind the GOP’s Manufactured Border Crisis
The reason immigrants are now flocking to the United States southern border is actually due almost solely to Florida’s Ron Desantis (R) and Texas’s Greg Abbott (R) actions. How are these two governors responsible for this influx? It’s quite simple….
When these two nab immigrants from the border, place them onto expensive cushy busses and expensive, but cushy chartered jets… then feed, clothe and subsequently fly or drive them across the the United States… what do you think is going to happen?
Yes, the word is going to get out that now these Governors are now pro-migrant and, more than this, are willing to place you, as a migrant, onto a bus and transport you to a nice new city… FOR FREE. This transportation is literally considered winning the lottery for many migrants. These men are taking migrants and placing them onto a very cushy busses, only to drop them handily off in Chicago or New York or anywhere else other than at the border. They might even get new clothes and food in the process. What migrant would say, “No” to that? In fact, these actions might even drive more migrants to the border… and that’s exactly what’s occurring. Yes, the word does get out.
The millions of recent influx of immigrants is NOT due to lax government policies or even due to policy changes at all, no. The influx is due to these insane trafficking policies performed illegally by irresponsible governors. This fully Texas Governor endorsed and costly trafficking of migrants across America is almost solely and completely responsible for the wild influx to the United States, that and the remnants of COVID. I did write that nothing occurs in a bubble. Right here is where that bubble pops. The GOP would have you believe it is Biden’s policies that are failing… when it’s just the opposite. The policies are failing because it is the GOP who is sabotaging the United States for their own political agenda. They are they ones placing hundreds, if not thousands of illegal migrants onto busses and jets, then transporting them all across the United States.
Yes, this word DOES get out to those seeking asylum here. The GOP realizes this enticement fact and is continuing to do it anyway, yes, on purpose. It is, in fact, the GOP who is attempting to force Joe Biden’s hand. Even then, these policies under Joe Biden are almost identical to the policies that have come before. Yet, we now have double, if not triple the number of migrants to the border? And where is Joe Biden’s administration on this border issue? Twiddling their thumbs.
Texas has spent more than $148 million bussing migrants across the country. Greg Abbott has also bussed more than 102,000 migrants (and counting) to cities around the country. Greg Abbott has even paid to fly at least 120 migrants on jets to Chicago.
Illegal Maneuvers
Let me get this one out of the way right now. What Greg Abbott and Ron Desantis have done by placing migrants onto busses and into jets, then transporting said migrants across the country is actually an illegal Federal Offense under 1907. Title 8, U.S.C. 1324(a):
Subsection 1324(a)(1)(i)-(v) prohibits alien smuggling, domestic transportation of unauthorized aliens, concealing or harboring unauthorized aliens, encouraging or inducing unauthorized aliens to enter the United States, and engaging in a conspiracy or aiding and abetting any of the preceding acts. Subsection 1324(a)(2) prohibits bringing or attempting to bring unauthorized aliens to the United States in any manner whatsoever, even at a designated port of entry. Subsection 1324(a)(3).
and
Domestic Transporting — Subsection 1324(a)(1)(A)(ii) makes it an offense for any person who — knowing or in reckless disregard of the fact that an alien has come to, entered, or remains in the United States in violation of law, transports, or moves or attempts to transport or move such alien within the United States by means of transportation or otherwise, in furtherance of such violation of law.
Clearly, 1907. Title 8, U.S.C. 1324(a) makes it federally illegal to knowingly transport illegal immigrants across the country. Yet, the DOJ has done nothing towards indicting either Greg Abbott or Ron Desantis for their ongoing part in this illegal campaign of transporting illegal aliens across the country. Where is the DOJ on this action? Once again, the DOJ is missing in action.
Homeland Security and ongoing Security Threats
For GOP governors to actually play these illegal shenanigans all for the sake of politics, this says a lot about the United States… and not in a good way. Governors are elected to govern, not to backstab and cause security risks to the United States Federal government. And once again, the Department of Justice and Merrick Garland have done nothing to enforce federal code over this matter. There’s not even been a peep about this, not out of the DOJ and not out of mainstream media. Illegal is still illegal, yet nothing.
Encouraging Illegal Migrants and Manufacturing a Crisis
The point to all of the above for Greg Abbott is to show that the United States border policies are not able to handle migrants at all. This has been Greg Abbott’s ongoing shtick for months. However, when a rogue governor decides to undermine and, indeed, run afoul of the rule of federal law by endangering the United States of America AND becoming a national security threat himself AND by knowingly and willfully using paid transportation to move illegals around the country, this is a serious federal problem. It’s also crime. Worse, his actions only serve to encourage and entice would-be migrants around the world to flock to the United States southern border. More than this, tensions are now rising between the United States and Mexico over Greg Abbott’s actions and the GOP’s wider actions involving the border.
In fact, it is Greg Abbott who is causing the border migrant flood. It is Greg Abbott is who causing the problems that the United States is seeing at the border. It is Greg Abbott’s policies that are indeed undermining the rule of law and the United State of America. It is Greg Abbott who is single-handedly ruining our relationship with Mexico… all for what? To score political brownie points with his Texas base and the GOP? Greg Abbott, just like Donald Trump, is a clear and present danger to America. If he wants to play games with Texas, have at it. When his games endanger the security of the United States as a whole, that’s when his shenanigans must stop.
Since when is it okay for Governors to perform federal illegal actions and get away with it? I guess it’s when Merrick Garland and the DOJ both choose to turn a blind eye to it. When the rule of law doesn’t apply to politicians, then who does it apply to? Clearly, not to anyone else. If politicians aren’t considered to be citizens under the same rule of law as anyone else, then there is no rule of law.
The rule of law must apply to everyone or it applies to no one!
Joe Biden and the Democrats
The Democrats don’t get a pass here. The Democrats are just as much complicit in this situation as is Greg Abbott and the rest of the Republicans. By Joe Biden and the rest of the Democrats staying mum about pushing an indictment onto Greg Abbott over his illegal transport of many, many illegal immigrants, the Democrats instead choose to sit idly by doing nothing at all. That’s also not governing. The point is, if you’re elected to govern, then govern. Sitting around doing nothing is not governing.
Unfortunately, this is what the Democrats are doing. Yes, some Democrats might have extreme liberal agendas, but it doesn’t matter when the Democrats of any type won’t push anything through. Sitting on your hands is not governing any more than bussing migrants across the country.
The State of America: Two Party System
America is under siege, not just by the Republicans, but also by the Democrats. Both parties are actively sabotaging the United States by either intentionally performing illegal actions (Republican politicians) or by sitting around doing nothing (Democrat politicians) allowing others to perform illegal actions. Right now, politicians of any party are running roughshod all over America and its citizens.
It is, in fact, the two party system that is failing America. Neither of the two parties are working towards or for the best interest of America. They both have their own internal agendas which don’t include working for the citizens or in actually solving problems. In fact, both parties seem intent on either doing nothing or in creating problems, rather than solving any.
The reason we elect our representatives is to work on our behalf. Yet, so many of these elected representatives only have personal agendas they wish to push. For whatever reason, these selfish, self-centered, egotistical, ill mannered politicians seem to be continually elected and re-elected. Why? What are they doing for you?
This is the state of America. America is being overrun by elected people who have no interest in fixing America. They only have interest in making bank for themselves and doing nothing else in the process. Lip service doesn’t fix things, only actions do. We need to tell these politicians to shut up and get to work.
Reactive versus Pro-Active
America has always had mostly a reactive system with politicians. Something bad happens, we make a law against it. That’s pretty much how the founders wanted it. That also means that knee jerk reactions tend to rule. What that also means is that when something bad happens, we can’t just ban it in the locale where it happened. No, we have to ban it everywhere.
This is what’s happening with abortion rights. When we thought we had the abortion issue locked down, conservative justices come along only to completely upend what had been in place for years… all to throw it right back into turmoil again.
Once again, knee jerk reactions rule the roost. Let’s not just ban abortion, now we have to ban everything possible involving abortion, including IVF, drugs, stem cell research and eventually, nearly everything that has come out of the technologies involving birth, babies, stem cells and all the rest.
The point now is that these politicians are taking aim at the very medical technologies which have given America incredible quality of life and longevity improvements. Yet, the fundamentalist Christians feel it is their place to take it all away and throw America back into a medical dark age. It’s coming, folks. You had better get prepared… all thanks to the GOP.
Drugs that had been created using these technologies are now under fire for the same reason as abortion. It’s only a matter of time. This is why FEDERAL laws handling fundamental rights must exist. They must exist and they must matter because it puts EVERY citizen on a level playing field no matter where they live. Having states create a haphazard patchwork of laws only serves to put everyone at risk. This is why Federal laws matter. It’s why Federal laws must exist. It’s why Federal laws have to continue to exist. It’s why Congress must act swiftly to craft Federal abortion laws that apply to all states equally. And yet, crickets!
The System is Hopelessly Broken

The Federal government cannot keep twiddling its thumbs doing nothing… thanks Democrats. The Federal government cannot keep throwing out and replacing the Speaker of the House… thanks Republicans. These are wastes of taxpayer time and money. When Government workers are not governing, then what the hell are they doing, other than collecting a paycheck? Why do we keep electing these worthless people? Something has to change. Exactly what that is and when it will happen is unknown.
I’d love to offer up a quick fix solution here. Unfortunately, our political system is so intrinsically and hopelessly broken, the only way fix it is to throw it out completely and start over fresh with a brand new and modern Constitution. We must endeavor to make a new modern Constitution that takes into account MODERN ideologies and technology, that limits the damage any one political party or political actor can do to America and that allows quick, easy and PERMANENT removal of bad actors from the stage. We cannot afford or allow this level of sabotage to remain in the ranks of politicians. Politicians need to work for the betterment of America; they are not elected to sabotage it.
One thing is crystal clear, America cannot stay on its current political trajectory. If anything, the manufactured border crisis proves this sabotage situation out… in spades.
↩︎
10 signs you’re living in an echo chamber

As politics become ever more and more polarizing and divisive amongst individuals, it’s not the politics that are the problem, it’s the echo chambers that feed into misinformation and into false beliefs. Let’s explore.
Background
More and more I find people who profess openness and critical thinking skills, yet I also find it is these very people are actually holed up and living in local echo chambers, chambers that only serve to reinforce their own beliefs; but whose beliefs have no actual basis in reality or what’s actually happening in or to the world around them. It is these echo chambers which are causing the divisive nature of not only politics, but just about any other belief which can be found in the world. It seems that more and more people are choosing their personal beliefs over using their eyes, ears and most importantly, their brains.
With that said, let’s uncover the 10 signs that prove that it is YOU who may be living in an echo chamber. Before we begin, let’s define…
What is an Echo Chamber?
An echo chamber is simply a space where you tend to converse with people who also tend to believe in the same things as you and/or who are feeding you disinformation that seems as though it is genuine and truthful; but that disinformation supports your beliefs, which makes you want to believe in it. An echo chamber is designed to 1) never contest your current belief system and 2) reinforce your beliefs, supporting your way of thinking… even when your way of thinking is completely based on fantasy, not reality. Echo chambers can be filled with friends and family who converse by using a gossip-like information transmission methodology (word of mouth, texting, etc), but may extend onto social media sites like Facebook.
Basically, instead of watching news programs directly and forming your own objective opinions yourself, you, instead, rely on receiving your news mostly by using a gossip grapevine of friends and family. When you do watch the news, you turn it off as soon as anything contests your beliefs. In your mind, you believe that news channel is then biased.
An echo chamber thrives because everyone in it essentially agrees on a very specific skewed view of the world… viewing the world not actually how it is, but how everyone in the echo chamber believes that it is.
In other words, an echo chamber is, yes, a form of brainwashing.
Without further adieu, here are the 10 signs you’re living in an echo chamber…
10. You firmly believe to the point of anger that the world is one way when actual news events prove your beliefs are invalid.
This sign shows us that you have subscribed to a belief system so strongly that you simply cannot allow anyone to disrupt that belief system at all, not under any circumstances. In other words, you are fully unwilling to even entertain the possibility that your belief can be in any way proven false.
You remain so firmly entrenched in that belief, even if it can be proven to be a false belief, shows that you are not only stubborn, but also exceedingly closed-minded. You are absolutely not interested in truth. You’re interested only in others who are willing to coddle and support your beliefs. Being unwilling to entertain any outside information that disagrees with your belief system is a hallmark sign that you have succumbed to the power of an echo chamber.
9. You say that you’re open to all ideas, but you instantly shut down anyone who puts forth an idea that doesn’t support your beliefs.
Here’s a situation where when you have a discussion with someone who doesn’t believe what you believe, you then feel the need to counter their arguments with such phrases as, “Well, I’ve always seen the exact opposite.” However, instead of actually providing concrete examples to support your “exact opposite” belief statement, you delay, avoid and ignore requests to provide any details on how those “exact opposite” beliefs actually became real in your mind. In other words, your beliefs are crafted entirely on faith, not on facts.
What this typically means is that you’re listening to the (false) beliefs of others in your gossip group, instead of forming your own opinions based on witnessing world events yourself and digesting and forming your own opinions from actual world events. Listening to other’s words and trusting that those words are valid reinforces your belief system under an echo chamber.
8. You instantly counter any argument to which you disagree, then attempt to insult the person by claiming you’ve been offended by the other person’s argument.
This is both bad debate form and it also proves you’re living in an echo chamber. This situation manifests when another person (party 2) counters one of your beliefs with actual real world facts showing exactly how your belief is invalid and untrue. Instead of rationalizing and realizing the possibility that that belief is wrong, you instantly take offense to the statement and then claim that party 2 is in the wrong for insinuating that you’ve been brainwashed.
This is a circular argument that only intends to insult the second party solely to reaffirm that your own personal (false) belief is true and valid. This is strictly a manipulation tactic to get the other party to back down. Using any form of manipulation in an attempt to win your argument is not only bad debate form, it is illogical, it shows that you’re closed minded, it shows that you’re unwilling to entertain any outside ideas and it also proves that you’re living in an echo chamber.
7. You only visit social media sites that support your belief systems. More than this, you only friend accounts who also believe like you do.
This one should go without saying. However, many people may not realize that this is exactly what they are doing. When you sign up at or into Facebook or X (formerly known as Twitter) or similar, you find yourself gravitating towards those who believe like you do. This does two things at once: 1) Like minded “friends” make you feel instantly comfortable and 2) by doing this, nothing will ever challenge your beliefs (see point 1).
By not exposing yourself to counter arguments from others, you limit your view of the world to only those people who profess to believe just like you. This is the very definition of an echo chamber.
6. You state that you’re critically open minded and claim to watch all types of news programs, but you prove that you don’t do this when you’re presented with reports that invalidate your beliefs… and then you claim news media bias.
It’s easy to profess equality and critical thinking skills, but it proves more challenging for some people to actually do this. Typically, even if a person does watch many news programs, it’s very easy to discount and invalidate what any news reporter is showing you by simply claiming that news channel is biased. This rationale instantly allows you to shut off that real news spigot claiming it as “fake news” or disinformation, thus keeping your false beliefs fully intact.
Here you’ve just watched a news program that has shown you the reality of the world, yet you’ve instantly decided to completely discredit the news report, and by extension the entire news channel, simply because that news report invalidates your own personal beliefs.
Discounting ALL news reports that are fully documented with videos, clips and interviews using people who are first-hand involved, yet you STILL choose to discredit all of that simply to hold onto a (false) belief indicates you’re living in an echo chamber.
5. Using year’s past examples or potentially old and misleading information to support your beliefs. (Cherry Picking)
It’s easy to call on examples from the past, using potentially misleading or cherry picked quotes that support your beliefs. Instead of researching the full information and context surrounding any given quote or news snippet, you choose to take a quote or snippet entirely out of context or, worse, choose to cite sources of misinformation or disinformation solely to support your beliefs.
Cherry picking tiny bits of (mis or dis)information that supports your beliefs, but where the very real and full context of information doesn’t hold up your beliefs under contextual scrutiny is a sign you’re living in an echo chamber.
4. Your actions prove you’re unwilling to entertain any other points of view.
This one is pretty simple. It’s not what you say. It’s how you respond and act as actions always speak louder than words. Sincerity is easily determined not by your words, but by how you respond to argumentation. A listening party can easily determine you’re not being sincere when you make claims of being fair and open-minded, but prove that you are not by devolving arguments into nonsensical debate tactics solely in an attempt to win your arguments.
Not only does this prove you’re not sincere, it proves you’re only in it solely for the argumentation and most likely only to support your current beliefs. This is entirely a defense mechanism against outside beliefs, but it also proves that you’re living in an echo chamber.
3. Instantly discrediting legitimate news sources and news articles because “they’re biased.”
While definitely linked to number 6, this one is wholly separate. When you cannot win your belief argument because of counter facts brought up using a news article example of how the beliefs are false, you insist on attacking the news source as highly biased, non-credible, illegitimate and “fake news” strictly because they have written an article that runs counter to your beliefs.
I won’t state which person now does this frequently, but suffice it to say that he has taught others to do exactly this and that this behavior is acceptable. It isn’t. Not only does this tactic look insanely stupid, it shows us that you’re close-minded and unwilling to entertain alternative beliefs AND that you must instantly attack anyone or anything that doesn’t fit within your belief system. This one shows us you’re living in an echo chamber.
2. You find news articles on extremist and tiny “news” sites that almost no one has heard of solely to support your beliefs.
When a counter argument to your (false) belief system is given to you by the likes of The New York Times, The New York Post, USA Today or even featured on CNN, MSNBC or Fox News, you counter those articles by claiming “biased reporting”, choosing instead to locate an article on a super tiny “news” site that few have ever heard of and which receives maybe 50 views per day solely to show that your belief is valid and true.
Having to dig down into the bowels of the internet to a teeny-tiny “news” site solely to refute articles published by large news organizations, like those listed above, your actions say you’re not interested in being open minded or fair. Forget that these tiny news sites are likely mini echo chambers themselves by echoing extremist disinformation view points, many of their “news” articles are not even professionally written nor do the “reporters” even have journalism credentials. If they did, they’d be working for CNN or The New York Post.
It also says you’re willing to put your faith into a super tiny “news” site with no notable credentials over actual professional journalistic organizations whose sole goal is to produce professional news segments 24 hours and 7 days a week, employing hundreds if not thousands of degree holding journalism majors. What credentials does your tiny news site offer? Not much. What proves your cited article is even valid? Nothing.
Relying on extremely tiny, boutique news sites that few use or have heard of proves you’re trying way too hard to support your belief system and that you’re living in an echo chamber.
1. You resort to insults and name calling to support your beliefs.
Insulting someone by name calling is not only extremely bad debate form, it’s stupid, inane, insipid and sophomoric. It tells the other party that not only is your point entirely invalid, it shows us that you have no solid way to debate your beliefs using actual real facts. Further, your name calling not only tells other parties that you are NOT open-minded nor do you possess any critical thinking skills, you also don’t even know how to properly argue your stance in any legitimate way.
Because you are unable to win on actual facts, articles and information that support your beliefs, you must resort to name calling and by insulting the other party; which seems to be the modus operondi for such sophomoric behaviors when all else fails. This action is considered such a bad sporting tactic that, if you were playing in an actual professional sporting event, you’d have been suspended and required to leave the field.
By resorting to this kind of amateur action, you have proven that you have no interest in hearing any other points of view or in listening to other belief systems other than your own. Doing this one proves you are 100%, most definitely living in an echo chamber.
Conclusion
While these 10 signs are the most critical, these are not the only signs that indicate you’re living in an echo chamber. Any way that sees you to rationalize and maintain your belief system by potentially hurting others indicates you are living in an echo chamber. If you are doing any of the above, you may not personally want to believe that you’re living in an echo chamber, but you are. You can choose to continue to pull the blinders over your eyes, or you can firmly open them to the world around you.
It’s far easier to live in a world of fantasy than it is to live in a world of reality. Unfortunately, living in that fantasy world does you no favors. For example, if you vote a candidate in based solely on your false beliefs, you may be dooming yourself and, more importantly, your children and grandchildren to something they may not comprehend until years later when it’s way too late. It is on you to choose to wise up and become a responsible adult. Living in an echo chamber may feel nice right now, but it won’t prevent the chaos and decay that will born and consume us from such destructive echo chambers.
If you wish to break free from an echo chamber, it may not be easy and it definitely won’t feel comfortable. You will need to stop the arguments designed to support your beliefs. Instead, you will need to ask questions and find out why the “other side” believes the way that it does, read articles that support other beliefs and understand why those beliefs make sense. Additionally, you will need to use your eyes, ears and brain to comprehend it all. Stop the arguing and begin questioning.
As long as you’re arguing for your stance only, then you’re not open to all information out there. You must be willing to open your eyes, ears and mind to ideas and beliefs beyond your own world view. Until you are willing to do this, you will remain stuck in your comfortable, but destructive echo chamber.
Feedback Is Always Welcome
Here at Randocity, we’re always open to feedback. Please use the comment panel below to tell us what you think. If you like what we do at Randocity, please consider clicking the “Follow” button in the upper right corner when using web browser or if using the Jetpack app, click the follow button at the top of the feed.
↩︎
Andrew Weissmann on Trump’s Legal Woes
 Andrew Weissmann is one of many legal analysts that MSNBC has turned to for legal discussions involving Donald Trump’s legal woes. Let’s explore some of Mr. Weissmann’s misguided analyses.
State Prison Term?
One assertion that Andrew Weissmann puts forth over Donald Trump’s state legal woes is that Donald Trump won’t be able to “get out of” any state convictions. While on its face, this assertion may seem valid, but not if you take into account a second presidency of Donald J. Trump. While a “standard bearer” President wouldn’t be able to get out of it, at least someone who actually respects the Constitution and the rule of law, we already understand that Donald Trump respects nothing but himself.
We already know that Donald Trump intends to retaliate against his political rivals. He’s already stated this. Exactly what that means or how that retribution may come is unclear. However, one thing is crystal clear. If Donald Trump is capable of an insurrection against the United States, complete with inciting his followers into violence, then Trump is absolutely 100% capable of any action against any government authority.
Should Donald Trump be found guilty of any state crimes that require incarceration in a state prison and assuming his guilty sentencing involves such incarceration, you can bet Donald Trump as President won’t serve a day of that state prison sentence. Why? Retribution.
Military Might
The President of the United States is the commander over the United States Military. Trump knows that. We know that. What this means is that instead of simply making calls to heads of state using nebulous language that might or might not sound guilty, Trump’s gloves will come fully off. Donald Trump can and will use the military to retaliate against his foes, including those in state power. He will use the military to stop anyone who attempts to collect him for any state incarceration.
Not only will Trump play the innocent victim card as hard as possible on all media outlets and call out state officials by name so his followers will seek them out, he will also send in the military to collect and then detain and/or jail anyone who tries to bring him in, placing these people into federal prisons. Will these people get trials? No. Why? Because Trump will have unraveled the need to use the judicial system to find anyone guilty. Indeed, he will make himself judge, jury and executioner (such that that term means) over all Federal legal actions. All he will need to do is pen a missive that someone is guilty and off to Federal prison they go without a trial.
You might be thinking that these ideas are all far fetched, that Trump will never be able to assert that type of authority. If Trump gets back into power as President, he will have that authority because the voters who voted him in willed that power to him. This folks is what a dictator looks like. This is how a dictator acts.
It Doesn’t Affect Me!
Yes, absolutely it does. If Trump becomes arbiter over all federal legal matters effectively disbanding the courts, even the tiniest of federal infractions could lead to federal prison time and/or death, all at his or his assign’s whims… yes, for any citizen. Even if you haven’t managed to commit any federal infractions, but you wrote something Trump disliked on social media, this could land you in prison. Think of Alexei Nivalny being placed in prison because of Vladimir Putin didn’t like what Nivalny was saying…. you’ll quickly get the idea of where Donald Trump will take America.
Weissmann’s Delusion
Andrew Weissmann is under the incredible delusion that the judicial system will hold and somehow continue to work as it normally has after Donald Trump regains power as President. Weissman’s rationale and thinking is so incredibly wrong. Donald Trump has already stated he will gut the Constitution and its powers. He will fully take the gloves off and begin systematically dismantling the U.S. Constitution at its core including the Legislative and the Judicial branches of government. Trump will usurp the powers of both the Legislative and Judicial branches and make them his own, probably disbanding all courts and Capitol Hill. Trump will become all three branches in one.
Cabinet
Will Trump’s cabinet allow this? Sure. Trump is filling his little black book with names of those people who are fully willing to do his bidding. In his last term, he failed to find people willing to make these hard choices. If Trump manages another Presidential term, he will most certainly surround himself this time with people fully ready, willing and able to fulfill Trump’s every wish and desire… no matter the cost to America, to the Constitution or to you, the voters.
State Powers
Once the Constitution is gutted, the idea that States have any say under his dictatorship will evaporate. Congressional representatives? Nope. They’re history. Trump will then make it so that if the state authorities don’t immediately bow to his wishes, they won’t remain state authorities. In fact, I fully expect that Trump will immediately remove any state authorities who don’t agree with his Presidency. In fact, I then further expect Trump to reassign his own cronies to operate those same state authorities under federal purview.
That means that once Trump begins running not just the Federal government, but also every State government, he can commute any sentence he likes, including any state sentences that might be pending against him.
State Legislatures
What does this mean for states, state voting and state legislatures? It means they’re gone, history, expunged from existence. Donald Trump absolutely cannot allow states any manner of power that overrides his own authority.
Thus, Weissmann’s analysis of Donald Trump’s state legal woes is incredibly premature and could even be considered incredibly naive. The only way Donald Trump manages to become incarcerated under state law (assuming he is found guilty) is if he is NOT reelected as President in 2024. Only at that point will Donald Trump be forced to surrender to authorities under this current legal and constitutional system. If Donald Trump becomes President again, there will be no Constitution or, indeed, any state law under which to hold Donald J. Trump accountable for anything; not now, not ever.
Vote as if your life depends on it
If you still don’t believe Donald Trump is capable of the above, then you’re even more deluded than Donald Trump. However, if you’re invested in your current way of life, in your family and indeed, the current system, constitution and rule of law, then you need to vote as if your life depends on it; because it does. A vote for Donald J. Trump is a vote to dismantle the United States.
If you want your children to have a future in the same way that you had a future when you were a child, then you need to vote to maintain our current way of life. What that means is NOT voting for Donald J. Trump. Further, you shouldn’t vote for ANY GOP candidates because they are all tainted by Donald Trump’s ideals… and wish the same harm to America that Trump does.
In the 2024 Election, that leaves voting for Independents, Libertarians and Democrats. Whatever you do, DO NOT vote for anyone in the Republican party unless you want to see America, your current way of life, your family and any money that you have saved all end.
↩︎
Is Apple’s Vision Pro worth the money?
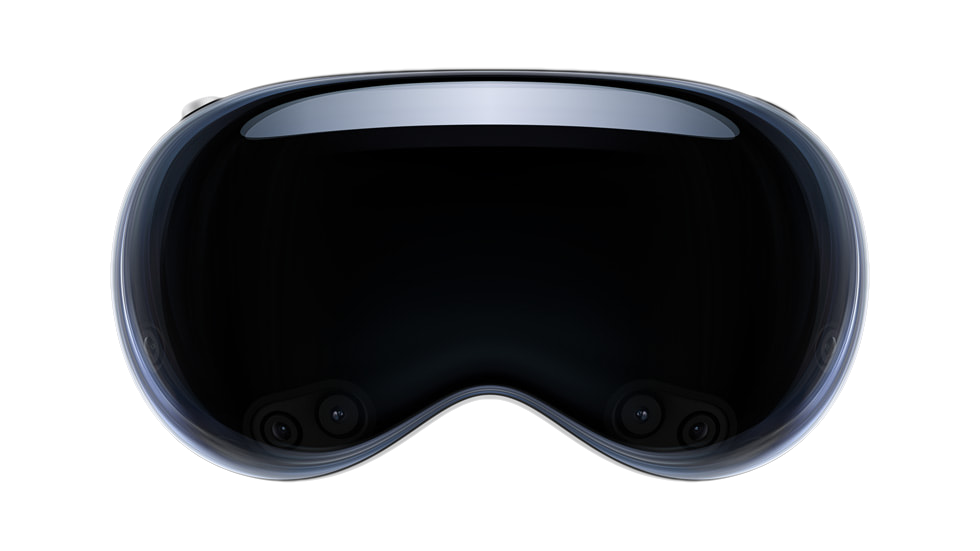 Let me preface this article by saying that this is not intended review the Apple Vision pro. Instead, it is intended as an analysis of Apple’s technology and the design behind the Apple Vision Pro headset. The Vision Pro’s hefty price tag also begins at $3500 and goes up from there depending on selected features. Let’s explore.
Price Tag vs Danger Target
The first elephant in the room to address with this Virtual Reality (VR) headset is its price tag. Because there is presently only one model of this headset, anyone who sees you wearing it knows the value of this headset instantly. This means that if you’re seen out and about in public wearing one, you’ve made yourself a target not simply for theft, but for a possible outright mugging. Thieves are emboldened when they know you’re wearing a $3500 device on your person. Because the Vision Pro is a relatively portable device, it would be easy to scoop up the entire device and all of its accessories in just a few seconds and walk off with it.
Like wearing an expensive diamond necklace or a Rolex watch, these items flaunt wealth. Likewise, so does the Vision Pro. It says that you have disposable income and wouldn’t really mind the loss of your $3500 device. While that previous statement might not be exactly true, it does have grains of truth in it. If you’re so wealthy that you can plop down $3500 for a Vision Pro, you can likely afford to buy another one should it go missing.
However, if you’re considering investing in a Vision Pro VR headset, you’d do well to also invest in a quality insurance policy that covers both loss from theft and damage both intentional and accidental. Unfortunately, a loss policy won’t cover any injuries you might sustain from a mugging. Be careful and remain alert when wearing a Vision Pro in public spaces.
The better choice is not wear the headset in public spaces at all. Don’t use it on trains, in planes, at Starbucks, sitting in the lobby of airports or even in hotel lobbies. For maximum safety, use the Vision Pro device in the privacy and safety of your hotel room OR in the privacy and safety of your own home. Should you don this headset on public transportation to and from work, expect to get not only looks from people around you, expect to attract thieves looking to take it from you, potentially forcibly. With that safety tip out of the way, let’s dive into the design of this VR headset.
What exactly is a VR headset useful for?
While Apple is attempting to redefine what a VR headset is, they’re not really doing a very good job at it, especially for the Vision Pro’s costly price tag. To answer the question that heads up this section, the answer is very simple.
A VR headset is simply a strap on 3D display. That’s it. That’s what it is. That’s how it works. Keep reading much further down for the best use cases of 3D stereoscopic displays. The resolution of the display, the eye tracking, the face tracking, the augmented reality features, these are all bells and whistles that roll out along side of the headset and somewhat drive the price tag. The reality is as stated, a VR headset is simply a strap on video display, like your TV or a computer monitor. The only difference between a TV screen or monitor is that a VR headset offers 3D stereoscopic visuals. Because of the way the lenses are designed on VR headset, the headset can use its each-eye-separate-display feature to project flat screens that appear to float convincingly both at a distance and at a scale that appears realistically large, some even immensely large like an IMAX screen in scale.
These VR flat screens float in the vision like a floating displays featured in many futuristic movies. However, a VR headset is likewise a personal, private experience. Only the wearer can partake in the visuals in the display. Everyone else around you has no idea what you’re seeing, doing or experiencing…. except they will know when using the Vision Pro because of one glaring design flaw involving the audio system (more on this below). Let’s simply keep in mind that all that a VR headset boils down to is a set of goggles containing two built-in displays, one for each eye; displays which produce a stereoscopic image. Think of any VR headset as the technological equivalent of a View Master, that old 1970s toy with paper image discs (reels) and a pull down lever to switches images.
How the video information is fed to those displays is entirely up to each VR headset device.
Feeding the Vision Pro
For the Vision Pro, this device is really no different than any of a myriad of other VR headsets on the market. Apple wants you to think that theirs is “the best” because Apple’s Vision Pro is “brand new” and simply because it’s brand new, this should convince you that it is somehow different. In reality, the Vision Pro doesn’t really stand out. Oh sure, it utilizes some newer features, such as better eye tracking and easier hand gestures, but that’s interface semantics. We’ll get into the hand gesture problems below. For the Vision Pro’s uses, getting easy access to visual data from the Vision Pro is made as simple as owning an iPad. This ease is to the credit of Apple, but this ease also exists because the iPad already exists allowing that iPad ease to be slipped into and then leveraged and utilized by the Vision Pro.
In reality, the Vision Pro OS might as well be an iPad attached to a strap-on headset. That’s really how the Vision Pro has been designed. The interface on the iPad is already touch capable, so it makes perfect sense to take the iPadOS and extract and expand it into what drives the Vision Pro, except using the aforementioned eye tracking, cameras and pinch gesture.
The reason the Vision Pro is capable of all of this is because they’ve effectively married the technology guts of an iPad into the chassis of the Vision Pro. This means that unlike many VR headsets which are dumb displays with very little processing power internally, the Vision Pro crams a whole iPad computer inside of the Vision Pro headset chassis.
That design choice is both good and bad. Let’s start with the good. Because the display is driven by an M2 chip motherboard design, like an iPhone or iPad, it has well enough power to do what’s needed to drive the Vision Pro with a fast refresh rate and with a responsive interface. This means a decent, friendly, familiar and easy to use interface. If you’re familiar with how to use an iPad or an iPhone, then you can drop right into the Vision Pro with little to no learning curve. This is what Apple is banking on, literally. The fact that because it’s so similar to their already existing devices makes it simple to strap one on and be up and running in just a few minutes.
Let’s move onto the bad. Because the processor system is built directly into the headset, that means it will become obsolete the following year of its release. As soon as Apple releases its next M2 chip, the Vision Pro will be obsolete. This is big problem. Expecting people to drop $3500 every 12 months is insane. It’s bad enough with an iPhone that costs $800, but for a device that costs $3500? Yeah, that’s a big no go.
iPhone and Vision Pro
The obvious design choice in a Vision Pro’s design is to marry these two devices together. What I mean by this marriage is that you’re already carrying around a CPU device capable of driving the Vision Pro headset in the palm of your hand. Instead, Apple should have designed their VR headset to be a thin client display device. What this means is that as a thin client, the device’s internal processor doesn’t need to be super fast. It simply needs to be fast enough to drive the display at a speed consistent with the refresh rates needed to be a remote display. In other words, turn the Vision Pro into a mostly dumb remote display device, not unlike a computer monitor, except using a much better wireless protocol. Then, allow all Apple devices to pair with and use the Vision Pro’s headset as a remote display.
This means that instead of carrying around two (or rather three, when you count that battery pack) hefty devices, the Vision Pro can be made much lighter and will run less hot. It also means that the iPhone will be the CPU device that does the hard lifting for the Vision Pro. You’re already carrying around a mobile phone anyway. It might as well be the driving force behind the Vision Pro. Simply connect it and go.
Removing all of that motherboard hardware (save a bit of processor power to drive the display) from inside the Vision Pro does several things at once. It removes the planned obsolescence issue around the Vision Pro and turns the headset into a display device that could last 10 years vs a planned obsolescence device that must be replaced every 12-24 months. Instead of replacing the headset each year, we simply continue replacing our iPhones as we always have. This business model fits right into Apple’s style.
A CPU inside of the headset will still need to be fast enough to read and understand the cameras built into the Vision Pro so that eye tracking and all of the rest of these technologies work well. However, it doesn’t need to include a full fledged computer. Instead, connect up the iPhone, iPad or even MacBook for the heavy CPU lifting.
Vision Pro Battery Pack
The second flaw of the Vision Pro is its hefty and heavy battery pack. The flaw isn’t the battery pack itself. It’s the fact that the battery pack should have been used to house the CPU and motherboard, instead of inside the Vision Pro headset. If the CPU main board lived in the battery pack case, it would be a simple matter to replace the battery pack with an updated main board each year, not needing to replace the headset itself. This would allow updating the M2 chip regularly with something faster to drive the headset.
The display technology used inside the Vision Pro isn’t something that’s likely to change very often. However, the main board and CPU will need to be changed and updated frequently to increase the snap and performance of the headset, year over year. By not taking advantage of the external battery pack case to house the main board along with the battery, which must be carried around anyway, this is a huge design flaw for the Vision Pro.
Perhaps they’ll consider this change with the Vision Pro 2. Better, make a new iPhone that serves to drive both the iPhone itself and the Vision Pro headset with the iPhone’s battery and using the CPU built into the iPhone to drive the Vision Pro device. By marrying the iPhone and the Vision Pro together, you get the best of both worlds and Apple gets two purchases at the same time… an iPhone purchase and a Vision Pro purchase. Even an iPad should be well capable of driving a Vision Pro device, including supplying power to it. Apple will simply need to rethink the battery sizes.
Why carry around that clunky battery thing when you’re already carrying around an iPhone that has enough battery power and enough computing power to drive the Vision Pro?
Clunky Headset
All VR headsets are clunky and heavy and sometimes hot to wear. The worst VR headset I’ve worn is, hands down, the PSVR headset. The long clunky cables in combination with absolutely zero ventilation and its heavy weight makes for an incredibly uncomfortable experience. Even Apple’s Vision Pro suffers from a lot of weight hanging from your cheeks. To offset that, Apple does supply an over-the-head strap that helps distribute the weight a little better. Even still, VR headset wearing fatigue is a real thing. How long do you want to wear a heavy thing resting on your cheekbones and nose that ultimately digs in and leaves red marks? Even the best padding won’t solve this fundamental wearability problem.
The Vision Pro is no different in this regard. The Vision Pro might be lighter than the PSVR, but that doesn’t make it light enough not to be a problem. But, this problem cuts Apple way deeper than this.
Closing Yourself Off
The fundamental problem with any VR headset is the closed in nature of it. When you don a VR headset, you’re closing yourself off from the world around you. The Vision Pro has opted to include the questionable choice of an aimed spatial audio system. Small slits in the side of the headset aim audio into the wearer’s ears. The trouble is, this audio can be heard by others around you, if even faintly. Meaning, this extraneous audio bleed noise could become a problem in public environments, such as on a plane. If you’re watching a particularly loud movie, those around you might be disturbed by the Vision Pro’s audio bleed. To combat this audio bleed problem, you’ll need to buy some Airpods Pro earbuds and use these instead.
The problem is, how many people will actually do this? Not many. The primary design flaw was in offering up an aimed, but noisy audio experience by default instead of including a pair of Airpods Pro earbuds as the default audio experience when using the Vision Pro. How dumb did the designers have to be to not see the problem coming? More than likely, some airline operators might choose to restrict the use of the Vision Pro entirely on commercial flights simply to avoid the passenger conflicts that might ensue because the passenger doesn’t have any Airpods to use with them. It’s easier to tell passengers that the device cannot be used at all instead of trying to fight with the passenger about putting in Airpods that they might or might not have.
It goes deeper than this, though. Once you don a headset, you’ve closed yourself off. Apple has attempted to combat the closed of nature of a VR headset by offering up front facing cameras and detecting when to allow someone to barge into the VR world and have a discussion with the wearer. This is an okay idea so long as enough people understand that this barge-through idea exists. That will take some getting used to, both for the Vision Pro wearer, but also for the person trying to get the wearer’s attention. That assumes that barge-through even works well enough to do that. I suspect that the wearer will simply need to remove the headset to have a conversation and then put it back on to resume whatever they were previously doing.
Better Design Choice
Instead of a clunky closed off VR headset, Apple should have focused on a system like the Google Glass product. Google has since discontinued the production of Google Glass, mostly because it really didn’t work out well, but that’s more because of Google itself and not of the idea behind the product.
Yes, a wearable display system could be very handy, particularly with a floating display in front of the vision of the user. However, the system needs to work in a much more open way, like Google Glass. Because glasses are an obvious solution to this, having a floating display in front of the user hooked up to a pair of glasses makes the most obvious sense. Glasses are light and easy to use. They can be easily put on and taken off. Glasses are easy to store and even easier to carry. Thick, heavy VR headsets are none of these things.
Wearing glasses keeps the person aware of their surroundings, allowing for talking to and seeing someone right in front of you. The Vision Pro, while it can recreate the environment around you with various cameras, still closes off the user from the rest of the world. Only Apple’s barge-through system, depending on its reliability, has a chance to sort-of mitigate this closed off nature. However, it’s pretty much guaranteed that the barge-through system won’t work as well as wearing a technology like Google Glass.
For this reason, Apple should have focused on creating a floating display in front of the user that was attached to a pair of glasses, not to a bulky and clunky headset. Yes, the Vision Pro headset is quite clunky.
Front Facing Cameras
You might be asking, if Google Glass was such a great alternative to a bulky headset, why did Google discontinue it? Simple, privacy concerns over the front facing camera, which led to a backlash. Because Google Glass shipped with a front facing camera enabled, anyone wearing it, particularly when entering a restaurant or bar, could end up recording the patrons in that establishment. Because restaurants and bars are privately owned spaces, all patron privacy needs to be respected. To that end, owners of restaurants and bars ultimately barred anyone wearing Google Glass devices from using them in the establishment space.
Why is this important to mention? Because Apple’s Vision Pro may suffer the same fate. Because the Vision Pro also has front facing cameras, cameras that support the barge-through feature among other potential privacy busting uses, restaurants and bars again face the real possibility of another Google Glass like product interfering with the privacy of their patrons.
I’d expect Apple to fare no better in bar and restaurant situations than Google Glass. In fact, I’d expect those same restaurants and bars that banned Google Glass wearers from using those devices to likewise ban any users who don a Vision Pro in their restaurants or bars.
Because the Vision Pro is so new and because restaurant and bar owners aren’t exactly sure how the Vision Pro works, know that if you’re a restaurant or bar owner, the Vision Pro has front facing cameras that record input all of the time, just like Google Glass. If you’ve previously banned Google Glass use, you’ll probably want to ban the use of Vision Pro headsets in your establishment for the same reasons as the ban on Google Glass. Because you can’t know if a Vision Pro user has or has not enabled a Persona, it’s safer to simply ban all Vision Pro usage than trying to determine if the user has set up a Persona.
 Why does having a Persona matter? Once a Persona is created, this is when the front facing cameras run almost all of the time. If a Persona has not been created, the headset may or may not run the front facing cameras. Once a Persona is created, the front facing LED display creates a 3D virtual representation of the person’s eyes using the 3D Persona (aka. avatar). What you’re seeing in the image of the eyes is effectively a live CGI created image.
The Vision Pro is claimed by Apple not to run the front cameras without a Persona created, but bugs, updates and whatnot may change the reality of that statement from Apple. Worse, though, is that there’s no easy way to determine if the user has created a Persona. That’s also not really a restaurant staff or flight attendant job. If you’re a restaurant or bar owner or even a flight attendant, you must assume that all users have created a Persona and that the front facing cameras are indeed active and recording. There’s no other stance to take on this. If even one user has created a Persona, then the assumption must be that the front facing cameras are active and running on all Vision Pro headsets. Thus, it is wise to ban the use of Apple’s Vision Pro headsets in and around restaurant and bar areas and even on airline flights… lest they be used to surreptitiously record others.
Here’s another design flaw that Apple should have seen coming. It only takes about 5 minutes to read and research Google Glass’s Wikipedia Page and its flaws… and why it’s no longer being sold. If Apple’s engineers had done this research during the design phase of the Vision Pro, they might have decided not to include front facing cameras on the Vision Pro. Even when the cameras are supposedly locked down and unavailable, that doesn’t preclude Apple’s own use of these cameras when someone is out and about used solely for Apple’s own surveillance purposes. Restaurant owners, beware. All of Apple’s assurances mean nothing if a video clip of somebody in your establishment surfaces on a social media site recorded via the Vision Pro’s front cameras.
Better Ideas?
Google Glass represents a better technological and practical design solution; a design that maintains an open visual field so that the user is not closed off and can interact and see the world around them. However, because Google Glass also included a heads up display in the user’s vision, some legislators took offense to the possibility of the user becoming distracted by the heads up display that they could attempt to operate a motor vehicle dangerously while distracted. However, there shouldn’t be a danger of this situation when using a Vision Pro, or at least one would hope not. However, because the Vision Pro is capable of creating a live 3D image representation of what’s presently surrounding the Vision Pro user, inevitably someone will attempt to drive a car while wearing a Vision Pro and all of these legislative arguments will resurface… in among various lawsuits should something happen while wearing it.
Circling Back Around
Let’s circle around to the original question asked by this article. Is the Vision Pro worth the money?
Considering its price tag and its comparative functional sameness to an iPad and to other similar but less expensive VR headsets, not really. Right now, the Vision Pro doesn’t sport a “killer app” that makes anyone need to run out and buy one. If you’re looking for a device with a 3D stereoscopic display that acts like an iPad and that plays nice in the Apple universe, this might suffice… assuming you can swallow the hefty sticker shock that goes with it.
However, Apple more or less overkilled the product by adding the barge-through feature requiring the front facing camera(s) and the front facing mostly decorative lenticular 3D display, solely to support this one feature “outside friendly” feature. Yes, the front facing OLED lenticular display is similar to the Nintendo 3DS’s 3D lenticular display. The lenticular feature means that you probably need to stand in a very specific position for the front facing display to actually work correctly and to display 3D in full, otherwise it will simply look weird. The front facing display is more or less an expensive, but useless display addition to the wearer. It’s simply there as a convenience to anyone who might walk buy. In reality, this front display is a waste of money and design dollars, simply to add convenience to anyone who might happen along someone wearing this headset. Even then, this display remains of almost no use until the user has set up their Persona.
Once the wearer has set up a Persona, the unit will display computer generated 3D eyes on the display at times, similar to the image above. When the eyes actually do appear, they appear to be placed at the correct distance on the face using a 3D lenticular display to make it appear like the real 3D eyes of the user. The 3D lenticular display doesn’t require glasses to appear 3D because of the lenticular technology. However, the virtual Persona created is fairly static and falls rather heavily into the uncanny valley. It’s just realistic enough to elicit interest, but just unrealistic enough to feel creepy and weird. Yes, even the eyes. This is something that Apple usually nails. However, this time it seems Apple got the Persona system wrong… oh so wrong. If Apple had settled on a more or less cartoon-like figure with exaggerated features, the Persona system might have worked better, particularly if it used anime eyes or something fun like that. When it attempts to mimic the real eyes of the user, it simply turns out creepy.
In reality, the front facing display is a costly lenticular OLED addition that offers almost no direct benefits to the Vision Pro user, other than being a costly add-on. However, the internal display system per eye within the Vision Pro sports around 23 million pixels between both eyes and around 11.5 million pixels per eye, which is slightly less than a 5K display per eye, but more than a 4K display per eye. When combined with both eyes, the full resolution allows for the creation of a 4K floating display. However, the Vision Pro would not be able to create an 8K floating display due to its lack of pixel density. The Vision Pro wouldn’t even be able to create a 5K display for this same density reason.
Because many 5K flat and curved LCD displays are now priced under $800 and are likely to drop in price even further, that means you can buy two 5K displays for less than than half the cost of one Vision Pro headset. Keep in mind that these are 5K monitors. They’re not 3D and they’re relatively big in size. They don’t offer floating 3D displays appearing in your vision and there are limits to a flat or curved screen. However, if you’re looking for sheer screen real estate for your computing work, buying two 5K displays would offer a huge amount of screen real estate for managing work over the Vision Pro. By comparison, you’d honestly get way more real estate with real monitors compared to using the Vision Pro. Having two monitors in front of you is easier to navigate than being required to look up, down and left and right and perhaps crane your neck to see all of the real estate that the Vision Pro affords… in addition to getting the hang of pinch controls.
The physical monitor comparison, though, is like comparing apples to oranges when compared with a Vision Pro headset (in many ways). However, this comparison is simply to show you what you can buy for less money. With $3400 you can buy a full computer rig including a mouse, keyboard, headphones and likely both of those 5K monitors for less than the cost of a single Vision Pro headset. You might even be able to throw in a gaming chair. Keeping these buying options in perspective keeps you informed.
The Bad
Because the headset offers a closed and private environment that only the wearer can see, this situation opens the doors to bad situations if using it in a place of business or even if out in public. For example, if an office manager were to buy their employee a Vision Pro instead of a couple of new and big monitors, simply because the Vision Pro is a closed, private environment, there’s no way to know what that worker might be doing with those floating displays. For example, they could be watching porno at the same time as doing work in another window. This is the danger of not being able to see and monitor your staff’s computers, if even by simply walking by. Apple, however, may have added a business friendly drop-in feature to allow managers to monitor what employees are seeing and doing in their headsets.
You can bet that should a VR headset become a replacement for monitors in the workplace, many staff will use the technology to surf the web to inappropriate sites up to and including watching porn. This won’t go over well for either productivity of the employee or the manager who must manage that employee. If an employee approaches you asking for a Vision Pro to perform work, be cautious when considering spending $3500 for this device. There may be some applicable uses for the Vision Pro headset in certain work environments, but it’s also worth remaining cautious for the above reasons when considering such a purchase for any employee.
On the flip side, for personal use, buy whatever tickles your fancy. If you feel justified in spending $3500 or more for an Apple VR headset, go for it. Just know that you’re effectively buying a headset based monitor system.
Keyboard, Eye Tracking and The Pinch
Because the Vision Pro is affixed to your head, Apple had to devise a way to obtain input within the VR environment. To that end, Apple decided on the pinch motion. You pinch your thumb and forefinger together in a sort of tapping motion. Each tapping motion activates whatever you are looking at (eye tracking). Whenever the headset “sees” (using its many cameras) your pinching motion, it activates wherever your eyes are focused. This means that in order to open an application from the iPad-ish icon list, you must be looking directly at the icon to activate it. If your eyes flutter around and you perform the pinch motion the instant your eyes look someplace else, the app will not activate. You might even activate something unintentional.
Keep in mind that this is still considered a beta product, which weird coming from Apple. This is the first time I can recall Apple explicitly releasing a beta product for review.
That said, there are definitely some improvements that could be had with this eye tracking system. For example, the system could detect and count linger time. The longer the eye lingers, the more likely it is that the user wants to activate the thing that the eyes lingered on the longest, even if the eyes are not currently looking at it. This means that even if your eyes dart away at the moment you pinch, the system would still understand that you want to activate the icon that was lingered on the longest. As far as I understand it, the OS doesn’t presently work this way. It only activates the icon or control you are presently looking at. Adding on a fuzzy eye linger system could reduce errors when selecting or activating the wrong things.
If you need to move a window around or expand the size of it, you must be looking directly at the control that performs that action. Once you’re looking at that specific control, the pinch and move will activate the control for as long as the pinch and move continues.
Unfortunately, this system falls down hard when you want to use the on-screen keyboard. This keyboard only works if you poke each key with your forefingers on each hand. This means hunt-and-peck typing. If you’re a touch typist, you’re going to feel horribly out of place being forced into using single finger hunt-and-peck. The Vision Pro will need to make much better improvements around keyboard typing.
On the flip side, it seems that the Vision Pro may want you to use the microphone and voice to input longer strings of text instead of typing. This means that for web searches, you’re likely going to fill in fields using voice dictation. I will say that Apple’s dictation system is fair. It works in many cases, but it also makes many mistakes. For example, most dictation systems can’t understand the difference between its and it’s, preferring to use it’s whenever possible, even though the selected usage is incorrect. Same problem exists with the words there, their and they’re and several similar type words when dictating. Typing is usually the better option over dictating long sentences of text, but it also means you’re going to need to pair a Bluetooth keyboard. Then, type on that keyboard blind because the Vision Pro won’t show you your hands or that keyboard in the VR display when the keyboard is sitting in your lap. Even if the keyboard is sitting on a desk, it might not show the keyboard properly without looking down at the keyboard instead of the window into which you’re typing.
For example, I would never attempt to blog an article this long using a VR headset. Not only would the headset eventually become too uncomfortable on my head, dictating everything by voice would get to be a pain in the butt because of all of the constant corrections. Even Apple’s active correction system leaves a lot to be desired, changing words from what you had actually wanted into something that doesn’t make any sense after you read it back. These problems will immediately be carried into the Vision Pro simply because these systems already exist in Apple’s other operating systems and those existing systems will be pulled into the Vision Pro exactly as they are, warts and all.
What Apple needs to create is a psuedo Augmented Reality (AR) keyboard. A keyboard where the VR system uses AR to pick up and read what you’re typing. Sure, the keyboard could be connected, but the AR system could simply watch the keys you’re pressing and then input those key presses via camera detection rather than via Bluetooth. In this way, the on-screen keyboard can still present and show which key is being typed in your vision, yet give you the option of touch typing on a keyboard.
Pinch Motion
The Apple chosen VR pinch motion seems like a fine choice and might become a sort of standard across the industry for other VR headsets and applications. Many VR headsets have struggled to produce a solid standardized input system. The pinch is a relatively easy, intuitive control and it works well for most use cases in the Vision Pro, but it’s definitely not perfect for all use cases. The cameras around the Vision Pro unit seem sensitive enough that you don’t have to hold your hands directly out in front in an awkward position like many VR headsets require. Instead, you can sit comfortably with your hands in your lap or on a desk and the unit will still pick up your pinch taps. You will need to move your hand(s) around, though, to activate resize and movement controls as well as when typing on the on-screen keyboard.
However, I do think it would be great for Apple to offer a lighted wand or other physical object that can supplement, augment and/or replace the pinch control. For people who don’t have access to fine motor controls with their hands, an alternative control method using an external device could be ideal for accessibility purposes.
VR Motion Sickness
One thing that cannot be easily overcome is VR motion sickness. It doesn’t matter what headset manufacturer it is, this problem cannot be easily overcome by software. Apple has done nothing to address this issue with the Vision Pro. If you have previously encountered VR sickness while wearing a headset, you’re likely to encounter it with the Vision Pro eventually. The transparent effect of showing you your present surroundings might help reduce this problem. If you replace your present surroundings with a forest or beach scene or some other fantasy environment, your body will be at odds with what your eyes are seeing.
VR motion sickness is typically exacerbated by rapid movements, such as riding a VR roller coaster or riding in a high speed car chase in VR. These are situations where the mind sees motion, but the body feels nothing. This disparity between the physical body sensations and the motion the mind is experiencing can easily lead to VR motion sickness.
If you stick to using the Vision Pro strictly for computer purposes, such as an extended monitor or for other productivity or entertainment purposes, you might not experience sickness. If you wish to get into full 3D virtual gaming, the reason most people want to purchase a VR headset, then you’re inviting motion sickness.
Keep in mind that VR motion sickness is not the same as real motion sickness. I can ride on planes, boats and even buffeting roller coasters, all without any sickness or issues. However, the moment I strap on a VR headset and begin riding a VR roller coaster or ride around in a fast VR car, the VR sickness begins to kick in. When it arrives, the only solution is to take off the headset and let it subside. It also means exceedingly short VR sessions. When the VR sickness comes on, it comes on rapidly. Perhaps even as fast as 5 minutes after experiencing a lot of motion on the VR screen.
If you’ve never bought into or tried a VR headset in the past, you should make sure you can return the headset should you experience VR sickness while using it.
Overall
The Vision Pro is a pricey VR headset. While the Vision Pro is not the most expensive VR headset on the market, it’s definitely up there in price. The question remains whether the Vision Pro is a suitable or efficient alternative to using a keyboard, mouse and monitor when computing. This author thinks that the presently clumsy, slow input systems utilized in VR headset systems (yes, that includes the pinch), when compared to a mouse and keyboard input, doesn’t make a VR headset the most efficient product for computing.
The best use cases for 3D stereoscopic VR headsets is for immersive 3D virtual gaming (assuming you can get past the motion sickness) and consuming movies and TV shows. The floating large screens in front of your vision are ideal for presenting flat and 3D movies as well as TV shows which make you feel like you’re watching entertainment in a theater environment. This aspect is actually quite uncanny. However, for consuming music, a VR headset is a fail. You simply need earbuds, such as Apple’s Airpods for that. You don’t need to spend $3400 to listen to music, even if the Vision Pro is capable of layering reverb and echo effects onto the music to make it sound more spatial.
Personally, I want to hear the music as it was crafted by the musician. I don’t want third party added effects that are more likely to detract from and muddy the final music product. If a musical artist as recorded a Dolby Atmos version of their music, then playing that version back exactly in its original recorded spatial form is perfectly fine, but devices shouldn’t layer anything else on top.
Overall, the Vision Pro is a fair addition to the VR headset space. However, it’s no where near perfect and it needs a lot of nuanced tweaking in subsequent models before it can become a real contender. This first released model is both overkill and naive all at the same time, adding bells and whistles that, while interesting, add to the hefty price tag without adding substantial benefit to the final product.
The built-in main board M2 computer ensures that the unit will become obsolete in 1-2 years and need to be replaced, adding yet more computer junk to our already overflowing landfills. Apple needs to firmly grasp and get behind product longevity in this product rather than planned obsolescence every 12 months. Decoupling the main board and placing it into the battery case would go a long way towards longevity AND allow for easy replacement of that battery and main board. This change alone would enable a Vision Pro headset’s display to remain viable for years to come, all while simply replacing an obsolete computer and battery that drives it. This one is a big miss by Apple’s design team.
Rating: 2.5 out of 5 (Apple tried to do too much, but actually did very little to improve VR. Apple’s design increases landfill chances; not a green product.)
Recommendation: Skip and wait for the next iteration
↩︎
Perfect Gravy from the Microwave!

For some reason, a lot of people seem to feel uncomfortable or downright scared to use the microwave for cooking certain foods. The microwave is a very useful appliance for cooking. I’ve written a few past articles including the Microwave Mug Cake and How to Cook Sushi Rice in a Microwave. The microwave is an excellent appliance to cook various foods fast, but you’ll need to know how to properly use it. One thing that a microwave is excellent for is heating liquids rapidly… which is why gravy works great here. Today, let’s explore how to make gravy in a microwave in 5 minutes or less.
Prerequisites (What You Will Need)
- A glass measuring cup or small microwave safe bowl
- A spoon for stirring
- A set of measuring spoons
- All Purpose Flour (bleached or unbleached, NOT self-rising)
- Salt and Pepper (to taste)
- A Food Thermometer (optional, but very helpful)
- Stock / Bone Broth
Gravy starts with Chicken, Turkey, Beef or Pork Stock
Stock is the drippings left over after cooking most juicy meats. You’ll get these drippings from poultry, beef and pork. Even a small chicken leg quarter can produce enough drippings to make gravy. You can extend the amount gravy by adding a little water. After all, when it’s cooking, some of the water will evaporate making the drippings a bit concentrated.
Before making gravy out of your drippings, you’ll want to taste it. Not all stock flavorings will work for standard gravy. For example, if you’re wanting to save stock from your BBQ grilled meats, smokey BBQ flavored stock usually doesn’t work well as gravy. Instead, you might want to save those drippings to craft a BBQ sauce instead. That’s for another recipe, though.
If you’re oven baking your meats, meat drippings will work just fine for making a thick savory gravy.
The Trick to Great Gravy
To begin this recipe, it is recommended to use a microwave safe glass measuring cup with a handle. These cups have pour spouts and a stay-cool handle for when things gets hot. Glass measuring cups are typically microwave safe and are easily handled. It can also double as a gravy pouring dish if you don’t want to mess up more dishes.
The trick to making great gravy is to let the stock cool to 110ºF / 48.9ºC or less. You want the stock to be a tad lukewarm to allow for the next part to work, but not hot enough to activate the thickening. To cool your stock faster, slowly swirl it in the measuring cup, being careful not to swirl it all over yourself or the floor. If you’re not good at swirling things, try using a spoon instead. You can even dip the spoon in an ice water bath before stirring the liquid.
What trick is this?
In your measuring cup with your cooled stock, mix in about 3-4 heaping teaspoons of flour into 1/4 to 1/2 cup of stock. If the temperature is correct, the flour will mix in easily with just a bit of stirring, but not begin thickening. You might need to break up any dry clumps with a spoon, though and make sure they get fully incorporated into the liquid.
The drippings should turn lighter in color and appear opaque and cloudy, but remain watery. This is what you want. If you let the mixture sit too long after stirring, the flour will begin to settle to the bottom. If this happens, you’ll need to stir it again before beginning the microwave part.
Once the mixture is incorporated, fully cloudy and freshly mixed, place it into a microwave.
How to Prepare
To finish the gravy off once in the microwave, start the microwave on high for 30 seconds. The outer portions touching the glass will begin to bubble and appear thick. When the microwave stops, stir the mixture thoroughly for about 1-2 minutes or until the gravy begins to thicken. It should actually be thickening already.
Place the measuring cup back into the microwave for another 30 seconds. Then, remove and stir. At this point, your gravy should be fully thickened and ready. You can now add salt and pepper to taste. Your gravy is done. Serve immediately.
Too Thick? Too Thin?
If your gravy seems too thick and seems almost clumpy, there is an easy fix. Add in a bit of room temperature water to thin it out. Stir as you add the water slowly until you get it to a desired gravy thickness.
If your gravy is still too thin, place it back into the microwave for another 30 seconds and see if that helps. If it doesn’t, you’ll need to wait until the mixture has cooled to around 110ºF / 48.9ºC again and then mix in more flour, perhaps 1 or 2 more heaping teaspoons. Always make sure to incorporate the flour thoroughly. You want gravy, not clumps. Then, follow the steps above once more.
Note that very low wattage microwaves might need a longer time to begin to see bubbling, up to 1 minute. Higher wattage microwaves might need less time, perhaps even as little as 15 seconds per stir.
Should I remove the oil on the top?
No, you should not. Unless you have a medical condition that warrants the removal of the oil for medical purposes, the oil should be left in as it will add flavor and texture to the gravy, making it more savory and giving it a better overall texture, particularly when topped onto mashed potatoes. The oil also aids in the thickening process.
If there’s more oil on top than watery liquid on the bottom, you’ll want to spoon out some oil leaving some on top. Then add more water to bring the overall watery portion to more than the oil. The oil on top should be less than the amount of liquid below it. This oily situation can happen with fattier cuts of meat. I’ve never seen this happen with chicken.
You can even fortify the flavor of the watery drippings portions by adding in bouillon flavoring. Be careful doing this as bouillon tends to add a lot of extra salt.
In about 1 minute, you’ll have excellent thick gravy for mashed potatoes or to top your favorite meats. No need to toss the small drippings out. Instead, turn those drippings into a savory gravy. Even just a quarter to half cup of gravy is enough to cover mashed potatoes for two people and still have a bit left over.
↩︎
Rant Time: Politics isn’t News!
 Seeing as how this is yet another Presidential election year, news channels cannot help themselves. Too bad for all of those poor news channels. They get so deep in the political weeds, they can’t even see the wild animals surrounding them. Let’s explore the tricky problem of incessant political news reporting.
Politics is absolutely not News!
One thing that cable news channels do not really seem to understand is that politics is politics. Political reporting may be considered a form of journalism, but it is absolutely, 100%, unequivocally not news. Politics is politics and will always BE politics. Let’s understand the problems with political reporting. To do that, we need to understand…
What is news?
News is goings on in the world. More specifically, it’s goings on outside of Washington, D.C. Washington, D.C. has always been a microcosm. It is and always will be its own tiny world of problems; political problems to be specific. While Washington, D.C. is a city and has its own city and local problems just as any other city, it is also the home of all things political around the nation. Thus, even though it is a microcosm of all things political, it also represents politics around the nation.
Let’s understand more about what is actual news. News is a pileup on a freeway. News is a mass shooting in a night club. News is the pandemic. News is an earthquake, tidal wave, Tsunami, hurricane or tornado touching down. News is a domestic squabble turned fatal. News is a dog biting and injuring someone. These are events that warrant and justify news reports. Politics is an ongoing, never ending, smorgasbord of mostly nonsensical drivel, punctuated using a lot of rambling so-called “expert” talking-heads; talking-heads who bluntly over-analyze everything, saying nothing at all useful.
When reporting news around the nation, or even around a local area, news is incident driven by what occurred today outside of politics. News reporting needs to ask itself, “Did something occur today [in politics] that warrants 24/7 political coverage?” If that answer is, “No”, then coverage should cease. And no, simply because it’s an election year doesn’t warrant 24/7 political coverage alone. The incident must still pass the criteria as being both news and newsworthy.
“What Is and What Should Never Be”
To borrow an apt phrase from Led Zeppelin’s The Lemon Song, News should almost always be new to the receiving audience. News should inform the audience about something they are unaware or have little to no knowledge. Like, for example, being stuck in a 2 hour traffic jam on the way home and then tuning into a local news station to find out what caused the massive delay. This means some people will have passing knowledge of an event, but they are seeking to become fully informed. This is what News reporting is all about.
In that goal, News reporting should always be something you’ve never heard of or have little to no knowledge. News also discusses what is. It does not and should not ever discuss or attempt to speculate on what might come to pass. What this means is that news is about the happenings of the day, not future speculation of what might come a month or three down the road. Speculation is best left to stock market analysts, futurists and fortune tellers. Speculation is never for news reporters. News reporting is intended to report on factual events that have already occurred. News reporting should never attempt to report on outcomes of possible futures. Future speculation is not news, it’s considered predicting the future. Predicting the future is a magic trick presented in Las Vegas. Prestidigitation is absolutely not now and should never become a news reporter’s job.
The only way someone in the nation might be uninformed about political goings on of the nation would be if they are new to the United States (just moved here) or if they’ve been hiding under a rock for the last couple of years. There is almost no chance that anyone even moderately informed wouldn’t have a fair amount of knowledge of what’s being said on these political segments. Even assuming total lack of knowledge, one day of watching these political ramblings would fully catch you up to 100%.
Obsessive Fixated Coverage
Unfortunately, for the last year or more, news networks have become fixated on reporting politics as their primary means of existence. Worse, they neglect reporting of actual news to fixate on political coverage around the election, around Donald Trump and around all of Donald Trump’s legal woes. They’re even now fixating on the Republican Caucuses as if their lives depended on it. Hint: they don’t.
Just because YOU want to report on all things political doesn’t mean WE want to consume it.
It gets worse. You’re probably thinking, “How so?”
Cable news networks like CNN, MSNBC, Fox News and now even NewsNation have fallen into the near 24/7 100% coverage trap of reporting solely on politics, with a heavy emphasis speculating on the future (see the section immediately above). When you can turn on the news any time of the day or night and hear the words “election”, “Nikki Haley”, “Donald Trump”, “Whitehouse” or “Biden” within the first 2 minutes of tuning in, you’re witnessing political fixation in action.
When that discussion spends a large portion of the segment with talking heads over election polls or of possible legal outcomes for Donald Trump, this is all 100% speculation. This is absolutely, positively, 100% fortune telling. No one can predict the full future to any degree and especially not reporters who have been trained in Journalism, not prestidigitation. This is also something news networks should absolutely NOT be doing simply for the reason that it is not news!
Repetitive
Worse, what can these news networks say that hasn’t already been said at least 1000 times before? Sure, it might be said by a different set of talking heads, but the words are effectively the same.
News is absolutely, 100% not about repetition. It’s about reporting on NEW news events… events that have never been reported previously. The word “new” is actually part of the word “news”.
Reporting on the same things over and over and over is absolutely not news, nor is it considered coverage or new. It’s considered fixation. News is not about fixating. It’s about reporting. It’s surprising to me that respected journalists who work for these organizations tolerate such political fixation and fortune telling. Hint: if you don’t like what your employer is doing, leave and find a new job.
As I said, it gets worse
When you can tune into shows hosted by Ari Melber, Wolf Blitzer, Chris Cuomo, Briana Keiler, Erin Burnett, Laura Ingraham or Hannity, when it turns politics, it’s all fixated speculative tunnel vision. Those things being said might be slanted to the left or to the right politically leaning audience, but they’re fixated, repetitive and completely inane nonetheless. How many times do you need to be told the same things about Donald Trump or Nikki Haley or even Joe Biden?
CNN and MSNBC are probably the two most fixated channels out there, but NewsNation and Fox News are not far behind. What is meant by this is that when it comes to prime time “news” programs, it almost always consists of back-to-back political chat… many times with many of the same talking heads “experts” being held over between each of the hourly segments. Not only will you hear the same discussions again and again and again, you’ll hear the same people saying the same exact things hour after hour after hour. It’s both mind numbing and nauseating. Again, this is absolutely not news.
Eclipsing Real News
What’s worse is that so many of these prime time opinion hours neglect reporting of actual news entirely. Yes, these so-called news hosts actually do neglect the actual goings on in the world to focus solely and completely on Biden or Trump or the Election or something else political. It’s absolutely sickening, maddening and, yes, frustrating. It’s also insane.
Feel Good Pieces
The one place where some news hosts seem to have a soft spot is reporting on various tear jerker segments. However, human interest stories are also NOT news. However, these hosts love to interject these eye rolling “human interest” segments in among their incessant political fixation. These tear jerker segments usually discuss a person who befriended a dog or saved a cat from a tree or some other such trivial nonsense, blown way out of proportion.
Fewer times, it’s a cancer patient were the news host is attempting to use their own celebrity status (and their network audience) to drive traffic to a GoFundMe campaign. That’s a noble goal, at least for the cancer patient, but sending money to the patient won’t help cure them. Only medical science can do this. Your money would be better spent and sent to medical research organizations seeking cures for cancer. These research organizations need this money a whole lot more to help fund their cancer cure research than sending it to a patient who can only use it to help make themselves more comfortable. That’s assuming that the person didn’t dupe the news program into believing a faked up cancer story.
Nothing wrong with tear jerker segments, but they are also absolutely not news… and they’re also produced for the wrong reasons.
News Producer Failure?
One would think that a news producer might want to vary the topics of discussions between news host segments hour over hour, but you’d be wrong. Instead, these news producers and their “programs” double down on the exact same political rhetoric hour after hour.
What you’ll end up seeing is these channels reporting on pretty much the same topic 24/7, but hammering it home incessantly beginning around 5PM and lasting until midnight. These channels love to fixate on repetitive political topics, especially during these hours… to the exclusion of all else. Yes, they actually DO exclude and neglect to report on actual news around the nation. Unless such news is a mass shooting, killing hundreds or there’s an earthquake, a random favorite sports celebrity or a fire that has leveled an entire city, these news outlets have no interest in reporting on it. Instead, they choose to fill their time slots with inane political drivel encompassing mostly future speculation.
In fact, far too much news goes unreported due to these news channel’s neglect and political fixations. This situation actually serves as a major disservice and distraction to the nation. This gratuitous and vomitous political reporting situation actually serves to divide the nation even more rather than bring it together.
For example, when the middle east broke out in “war” yet again, the news outlets temporarily halted their political coverage for about 2-3 weeks to give us a “war” play-by-play. They even went so far as to send their “top reporters” (ahem) to the front lines to report on smell-o-vision. A small, but unnecessary temporary reprieve from their political fixations. Since then, these channels have grown tired of that middle east smell-o-vision play-by-play, just as they grew tired of the Ukraine play-by-play and have moved their camera spigots 100% back onto politics, ignoring all else.
Unfortunately, that’s the state of our so-called cable “news” channels today.
Politics as a News Segment
In the 80s and 90s, politics was limited to a 1 hour segment in among various news reporting. This is actually the proper amount of coverage for politics. That’s also why C-SPAN was created… to report 24/7 on the goings on in D.C. Yes, C-SPAN still exists, now in 3 different channels. That amount of prime time coverage in combination with C-SPAN was perfect and served the nation well to discuss politics.
Unfortunately, the spigot has been slowly moving towards more and more political coverage on so-called mainstream “news” networks with less and less time focused on actual news. Today, political analysis programs make up at least 90-95% of the so-called “breaking news” coverage of CNN, MSNBC, NewsNation and Fox News Network… not that the Fox News Network was ever or has ever been a legitimate news organization. Regardless, these networks have become fixated on political analysis and speculation instead of reporting of legitimate news around the nation.
While news goes unreported, CNN and its ilk focus on Biden, Trump and now, the 2024 Election coverage. They’re even diving deep into the Republican caucuses, as if they even matter in the grand scheme. They might matter to Ms. Haley, but these caucuses don’t deserve 24/7 coverage. Politics doesn’t deserve 24/7 coverage, except on C-SPAN where it belongs.
A Good Example
CNN and the others reported that the Iowa Republican caucuses favored Donald Trump over any other candidate by some “astounding” lead. What they forgot to mention on the air was that only ~14% of Iowa’s entire registered Republican voters turned out to vote in those caucuses. That means the 86% of Iowa’s Republican voters haven’t been represented. That the caucus voter turnout was so low means voter apathy. It also means that the those who did show up were most likely avid Donald Trump fanatics and MAGA extremists, likely making their views not representative of the vast majority of registered Republican voters in Iowa.
Yet, these so-called politically leaning news networks went on with this charade anyway, attempting to sway their viewers that this 14% turnout was somehow indicative that Donald Trump is a clear winner. Sorry to say, 14% of Republican voters turning out won’t win a general election guys.
Cable News Charters
These cable news networks were originally chartered to report on actual news around the nation. At one point, CNN (and the rest) did that. Today, not so much. The same can also be said of pretty much any other cable news network.
At some point in the future, CNN and the rest are going to be bitten hard by this incessant, fixated political coverage. I don’t know how and I don’t know when, but at some point their coverage of politics 24/7 won’t serve these channels well. At some point soon, these channels will need to make a hard choice. Continue this stupidity or begin serving the nation again properly by reporting on actual news, thus putting politics back into an appropriate 1-2 hour segment per day labeled creatively enough “Politics”.
Disguising Politics as News
One thing that these channels seem intent on doing is labeling their political talking head opinion and analyses segments as “breaking news”. This is disingenuous, if not downright considered disinformation. This is tantamount to YouTubers using ClickBait to draw viewers in. This is also why YouTube has laid down the gauntlet on creators who intend to use ClickBait when that ClickBait is not included within the YouTube video.
The same should be said of Cable News. If these channels are trying to (mis)lead you into believing that a talking head political analysis segment is “breaking news”, then these channels are just as guilty of performing ClickBait on you. Unfortunately, there is no overall YouTube / Google company to lay the gauntlet down on these news organizations for perpetrating fraud on its viewers. And yes, ClickBait is a form of fraud.
Fraud is fraud whether perpetrated by an individual YouTube creator or by a large conglomerate news organization. Let’s call it for what it is: Fraud. When news channels insist on reporting on politics, it cannot ever be considered “breaking news” and should never carry this banner. The only exception to this rule is when a political figure dies. Their death may be considered breaking news, but only in the context of their actual death… not in the political goings on the day that the person died. As long as the political figure is living, their personal woes are not subject to “breaking news.”
If news channels won’t report on the personal woes of Hollywood celebrities as “breaking news”, then they shouldn’t report on personal woes of Political representatives. In fact, the primary outlet that actually does report on Hollywood celebrity woes is TMZ. Unfortunately, the primary outlet(s) for all things political has now become CNN, MSNBC, Fox News and NewsNation (formerly WGN). The word “news” is in the name of all four (4) of these cable news networks, yet they primarily seem intent reporting almost solely on politics. That right there should be considered perpetrating fraud on viewing audiences. That, or each of these networks need to change their names.
Politics is Absolutely Not News
If there’s one thing that should now be abundantly clear, it’s why politics and political reporting is absolutely not news. It’s information, yes, but it is not news. Whether repetitive political ramblings is actually useful for most people remains to be seen. Personally, it’s not useful to this author. I find it annoying and mind-numbing. I do not find it enlightening or useful. Because I can’t be the only one who feels this way, please sound off your opinion on this topic in the comment area below. We want to hear your thoughts on this topic.
If you like reading articles like this one from Randocity, please click the follow button in your browser or on your device and please leave a comment below.
↩︎
Happy New Year from Randocity!
We should have been a bit more on the ball for this post, but hey, it’s still January and some of us may still be hung over from all of the festivities! Randocity would like to give thanks to all of its readers and to wish you a very Happy New Year. We’ll try to be a bit more punctual next year 🍾. Welcome to Randocity in 2024. We still have so much yet to explore.
Please consider clicking the follow button to become a member of the Randocity team.

↩︎
GTA Online: Salvage Yard Review
You might be asking, “Is the Salvage Yard worth the money?” in GTA Online. The Salvage Yard is a new property you can own in GTA Online. Some gamers may be asking if this property is worth the money. Let’s explore.
Is the Salvage Yard Worth the Money?
Yusuf is a recurring character in the GTA series. He actually introduces you to one of his kin, Jamal. Jamal is the person who you will interact with if you decide to buy the Salvage Yard. Who actually runs this property is inconsequential, to be honest. It could have been anyone and the outcome of this would be the same.
In answer to the question, let’s explore the kinds of missions you can expect to play from the Salvage Yard.
The primary mission type, which incidentally requires you to become a CEO or VIP (which also costs money to set up separately), requires you access a computer in the Salvage Area. Keep in mind that this is a chop shop. There is no fixing or repairing here. The only thing that happens to cars you bring here is that they get chopped up and/or sold.
When using the computer, you get a choice of 3 car recovery missions. With each of these missions, the ultimate goal is to bring the cars back to the Salvage Yard. Getting that to happen is where these missions are a literal pain in the ass… and I don’t mean just the combat. If it were just combat, I could deal with it.
Mission Board Activities
The computer is how to access the main mission board. These are, like the Auto Shop, structured missions. However, the problem I have with these missions is that they are overkill. You’d think you were preparing for a heist. Instead, you’re literally just jacking a car and driving it back.
For example, one of the missions required 3 separate primary setup objectives, 5 optional objectives and possibly one or two others. The 3 primary objectives of one was 1) scope out the site, 2) recover some vehicle that might or might not be useful during the heist and 3) gather and hide weapons. The 3 primaries on another were 1) scope out the site, 2) destroy gas masks and 3) obtain a large truck.
Optional objectives include obtaining masks, obtaining clothing to wear or obtaining key cards for access.
These mission board activities are, bluntly, useless and pointless. For example, you had to go obtain an 18 wheeler truck, drag it all over Los Santos and then hand it over to Jamal… all for what? To drive it a total of 5 feet, get out of and then enter the Arena? Another objective was to recover a police helicopter. Oh, but instead of being able to grab the police helicopter I’m standing next to on the roof right where I am… nooooo, I have to drive halfway across Los Santos to pick up the exact same model of helicopter, but in a very specific location. *eye roll* All for what? To simply use the helicopter for only a handful of minutes solely to arrive at the site. These fetch quests are highly useless, annoying and exceedingly time consuming.
Intro Missions
The Salvage Yard tricks you into thinking the missions will be free to launch. Nope! Once you’ve completed the intro missions, you’ll find that it costs GTA$20,000 to set up each new mission. Who really knows if Rockstar won’t cause this setup cost to become some random amount between $20k and $100k depending on the rarity of the car in the future. This cost in addition to all of the convoluted prep? It’s stupid.
Tow Truck Missions
Separately from the computer mission board, if you have opted to buy a tow truck (rusty or new), having this vehicle unlocks a second way to make money with the Salvage Yard property. This activity is also what drives how much income shows up in your Salvage Yard safe. Doing more tow truck missions increases the daily take.
You can make two tow truck missions about every 30-48 minutes (I haven’t timed it). Once the two salvage bays are occupied, you must wait until the chop shop finishes chopping up the two cars into parts. You have no control over the speed at which this happens.
The average payout of a single car being chopped up is around GTA$30k plus or minus a little. If you wish to partake in this activity, you must visit the Salvage Yard, hop into the tow truck and start the tow mission. You will exit and then be given a car type and location. You must drive over there, latch onto the car with the tow truck and drag it back to the Salvage Yard. Once you do this, the chop shop activity begins on that car until it finally pays out many IRL minutes later.
Questions and Answers
Can I Keep the Cars I Recover?
No. The long answer is, kinda… but, you can’t do anything with the cars. Once you recover a mission board car, it gets parked in a space in the Salvage Yard. The only interaction you are given with that car is to sell it or scrap it out. You can’t call the Mechanic to drive the car as the Salvage Yard isn’t considered a Garage. There’s no way to use the “prized” cars you’ve spent a lot of time and money retrieving. So, what’s the point here?
Does the Salvage Yard have Garage Space?
No. Even though the Salvage Yard is about obtaining cars, that’s where its usefulness as a garage ends. It has no car storage spaces at all. You can bring one personal car into the Salvage Yard just for kicks, but the car will soon be ejected back outside. Unlike a garage that marks that your car is now living in that location, the Salvage Yard space doesn’t do this.
The Salvage Yard is not an official garage at all and does not show up under the Mechanic properties. Thus, any cars you retrieve for Yusuf and/or Jamal at the Salvage Yard are only good for selling.
If you were hoping for more garage storage spaces, this is not the property to buy. There is zero garage space at the Salvage Yard for personal use.
Are the Salvage Yard Missions Easy?
No. Like Heists and their associated heist excessive prep, this is exactly how the car theft missions are structured. These missions have not only major overkill setup, but most of the required mission objectives don’t serve any purpose in the final carjacking. For example, you might be required to steal an 18 wheeler truck, but the truck won’t be used in the carjacking. Meaning, you’d think you’d load the car onto the truck to drive it back, but no. Instead, you leave that 18 wheeler behind and never see it again. Instead, you’re tasked with driving the actual car back to the Salvage Yard.
More than this, there are many, many stupid and overkill additions to these missions. For example, I was tasked with obtaining an Arena car. When I got into the Arena, not only did I have to kill a major number of combatants, I then had to locate the car with a telescope, sit down and use a drone to disable the car with an EMP, then head down to the arena floor to a whole new set of combatants. Then, go over to the car, jack it and then drive it out of ONLY ONE single very specific exit that was marked.
After that, we come to find that the car is rigged with a bomb setting up a 2 minute timer. Not only is there a huge crew trying to knock you off the road, you have to make it to a quick stop garage to diffuse the bomb (signified by a completely black screen and a bunch of tool sounds dropping on the floor), which then exit back to a driving segment with the combatants back again… only to drop it off at the Salvage Yard.
Convoluted. It’s a friggin’ car.
Rockstar has lost their minds. If GTA had started off with these complex jacking mechanics, that’s one thing. Trying to introduce them now is insane!
Are the Tow Truck missions easy?
Depends. Some might require a light bit of combat, but most don’t. The difficulty is simply dragging the car back to the shop. The tow truck cable is unwieldy and stupid. If the car begins wagging too badly, it will detach and you’ll have to go hook it up again.
It’s not like some of us haven’t already bought the Slamvan flatbed truck which would be ideal for tow truck missions. Nope. They have to give us a crappy chain lift tow truck type for the shop.
Overall
Considering the cost to buy into a Salvage Yard (~GTA$2 million) + about GTA$2 million for the tow truck and other rather useless additions, that totals around GTA$4 million for this property. All for what? To recover a “mission based” car worth about GTA$300k or recover junker chop shop cars that will part out for about GTA$30k.
This is definitely not a property I’d recommend first if you’re wanting quick cash. If you’ve already invested in most other properties like the Nightclub, Arcade, Executive Office, Auto Shop (which is incidentally broken in this update), Facility, Bunker, Casino and various Motorcycle Club businesses, then the Salvage Yard might be worth it. If you’re just starting out in GTA Online, this is not the business to start with first.
Rating: 1.5 out of 5 (Rockstar overthinks everything)
↩︎
Is Earth time speeding up?

In recent years, I’ve had the distinct impression that Earth’s time passage is speeding up. Today, I’m going to introduce a theory as to why this may be happening. Let’s explore.
Universe Expansion
It has been documented that the Universe is expanding at a specific rate. (via Space.com)
Scientists utilize telescopes to gather information to formulate hypotheses about the Universe. Keep in mind that any light received via telescopes emanated from those systems perhaps many thousands of years earlier (perhaps more). Meaning, scientists who formulate hypotheses based on light received by stars or galaxies are doing so based in exceedingly old data, perhaps dating back hundreds of thousands of years. Any expansion rate they formulate based on old starlight data is already years outdated. We need newer data.
One thing that hasn’t been postulated around this expansion is how this affects not only the rest of the universe, but how this rate of expansion affects the Earth itself.
As the Universe (and everything in it) expands, everything moves farther away from one another. Some postulate that gravitational bound celestial bodies do not expand away from one another or expand themselves. That presumptive stance might not be accurate depending on how and why the universe is expanding.
How does the Universe Expanding impact Earth?
Good question. Let’s dive right into the meat of this. As the Universe expands, so too do the galaxies themselves. While the galaxies get farther apart from one another, each galaxy and everything inside of may also be getting farther apart. This expansion may very well include everything inside of the Sol solar system (ours) also moving apart at specific rate, but perhaps infinitesimally small.
Time Dilation
What is time dilation? Time dilation is when two clocks measure time differently in two different locations. In one location, 5 minutes might pass. In a second location, 1 minute might pass. Time dilation illustrates the theory of relativity. Time passes relative to where you are. If you’re in the 5 minute location, you’ll feel 5 minutes pass. If you’re in the 1 minute location, you’ll feel only 1 minute has passed. One can only know that the time has passed differently between two locations if both locations are in real-time contact to state their own exact time passage to the other party.
What this dilation further means is that “something” is altering the passage of time between these two locations. Meaning, in the location where 1 minute has passed, time is running slower (viewed from the 5 minute side). In the location where 5 minutes has passed (viewed from the 1 minute side), time is running faster on the 5 minute side. This concept is known as relativism.
What we don’t know is whether that “something” is specifically affecting the 1 minute location, the 5 minute location or both. What we do know is that the the clocks are running at differing rates. As time progresses, the 5 minute location will get farther and farther ahead leaving the 1 minute location behind.
What this also means is that anyone who is in or around the 5 minute location will age faster than those in the 1 minute location. Once 2 minutes passes in the original 1 minute location, that means 10 minutes has passed in the original 5 minute location. Time will continue to “dilate” farther and farther away from one another between these two locations. For example, once 30 minutes passes in the 1 minute location, that would mean 150 minutes has passed in the 5 minute location. The more time that passes, the wider the dilation gets.
Why is Time Dilation Important?
In a gravitational universe, like the one we inhabit here, gravity directly impacts space and time; specifically time passage. Gravity directly influences how our clocks on Earth work. There are lots of gravitational variables and forces at play including the gravity that Earth imposes, the gravity that Sol imposes, the gravity that all of the rest of the planets impose, but it’s more than that. Every celestial body exerts some amount of gravitational force on each other, however small.
Many physicists believe that gravitational falloff eventually gets to be so small that it’s negligible or nonexistent when the celestial body is too far away. It is firmly believed that the center of the Milky Way is inhabited by a super massive black hole named Sagittarius A *; a black hole that imposes a large amount of gravitational force.
I’m not fully convinced of this gravitational falloff theory, specifically when considering Universe Expansion. A single celestial body might not exhibit much force on Earth, like Sagittarius A * at its distance. When combined with all of the other celestial bodies exerting gravitational force between Sol and Sagittarius A, there might be quite a bit less falloff than we think. In other words, the Earth might be impacted in a much larger way by the gravitational forces of all of the combined celestial bodies all the way to the center of the Milky Way than we think.
How would lesser gravitational forces manifest on Earth?
Because the Universe is constantly expanding and because the Milky Way is likewise expanding with it and because the Sol solar system is expanding along with all of this, the Earth is seeing a reduction in the overall gravitational forces from its affected celestial bodies, not just within Sol, but in the Milky Way and everywhere else, all at the same time.
What does this reduction in gravitational force mean for Earth? Because we know that greater gravitational forces slow down time and because we likewise know that lesser gravitational forces speed time up, this indicates that the Universe Expanding means that time passage here on Earth will continue to increase.
Because time is relative to where we exist, we as humans won’t notice much difference being here on Earth. One (1) minute to us will always appear to be 1 minute. However, someone watching time from the Andromeda Galaxy would note a marked difference in time passage compared to someone watching time on Earth… particularly if they noted Earth’s time passage in the 1970s versus noting it in the 2020s.
The point here is that we as humans can’t see that the speed of time is increasing because we’re “too close” to it. The only way we can really see how fast our time passage is increasing is to place a satellite far enough away that we can have two points of time measurement reference. Then, we can calculate the time dilation differences over 1 year, 5 years and even 10 years or longer. We could then calculate the rate of increase in the dilation to better understand how time dilation impacts Earth and how quickly it’s occurring.
Sol and Earth
Many scientists assume that the Earth will die only after Sol dies. However, because of the ever increasing expansion of the Universe, the Earth could die because time speed increases. The question is, how fast can time passage increase and is there maximum limit? More than this, is the human body designed to handle this time passage increase when it reaches a theoretical maximum?
Human Body
The human body is an amazing piece of design, but it’s clearly not perfect. It is subject to diseases, viruses and sometimes can succumb to such diseases or viruses and fail, thus death. The human brain is, likewise, an amazing piece of design work. However, again, it is also not perfect.
One thing we’re not at all sure of is if the human brain can function when time speed passage reaches beyond a certain threshold. The body takes a certain amount of time to functionally store memories and process input and output. If the human brain is unable to function properly at the speed of time passage around the body, the human brain could fail to work properly. This could mean more and more human problems, such as psychosis, anger issues, memory problems and a myriad of other related human degenerative conditions.
For example, if the body has its own internal body clock to govern its workings, if that clock doesn’t align with time passage outside of the body in a mostly cohesive way, this could pose problems for each human and for humanity. It’s also possible that some humans could adapt to this new time reality, though.
It is and has always been assumed that relative time passage affects the body in a “normal” way. That the human body just “goes along” with whatever time speed is currently passing. That assumption could be incorrect. The human body might not be able to function properly if time passage becomes either too fast or too slow. Like too much radiation causes human sickness, too fast a time passage might disorient the body and brain perhaps leading to illness.
Universe Expansion and Humanity
This is where this article comes together. Because the Universe is expanding at a certain rate (possibly increasing) and because this expansion moves gravitational forces farther apart, this means that Earth’s time passage will only continue to increase (less grav forces = faster time passage). To put this in perspective, time during the 1970s ran slower than time during the 2020s because the universe has expanded some. Yes, Earth time speed has increased. Some have also noticed that the rotational speed of the Earth is also increasing. Some might argue that this increase in rotational speed is due to the Earth itself. However, I’d argue that this increase is due to the reduction in gravitational forces around the Earth, which is likely due to the Universe expanding.
As gravitational forces in the Universe continue to reduce due to the expansion, everything will speed up, including Earth’s rotational speed and time passage on Earth.
Killer Virus or Time Dilation?
Many scientists have been focused on a killer virus that might wipe out humanity. Yes, this scenario is entirely possible. It’s also entirely possible that the reduction in gravitational forces imposed on Earth as the Universe expands could lead to the demise of Earth and Humanity. The question is, which one is likely to happen first? The answer is, there’s no way to know.
If the rate of expansion is becoming exponential (or at least increasing in speed as it goes), then the reduction in gravitational forces could happen at a much, much faster rate than anyone expects. We assume that the universe expansion is slow and steady, but we have no way to know that. We’re one planet sitting in a sea of celestial bodies in this Universe. We have one vantage point from which to view what’s occurring in the universe. Because our single vantage point doesn’t afford us the necessary means to measure reduction in gravitational forces properly, we’re more or less flying blind. In other words, our single vantage point on Earth doesn’t give us the clarity needed to understand if the universe’s expansion is a significant problem in the making.
More than this, as Earth’s time passage increases in speed, we have no idea what the fallout of that will be not only on the human body, but on the plants, animals and other resources that humans require to survive.
This situation is a big picture problem with no big picture answers. I don’t even think any scientists are considering this big picture problem. Many scientists would likely discount that this idea is a problem at all because they personally consider the expansion rate of the universe too infinitesimally small. If that’s true, then why has the Earth’s rotational speed increased in just a few decades? Why does it seem that time passage is now increasing on Earth in actually humanly perceptible ways?
If the universe’s expansion is as slow as has been claimed, then it should take humanity millennia to notice changes on Earth, not decades. Decades implies that “something” is moving way faster than expected. What that something is, we don’t really know. It’s likely that the universe is expanding at a rate we aren’t expecting, simply because there’s no other rational explanation for the reduction in gravitational forces on Earth.
Of course, we can’t rule out a technologically sophisticated extraterrestrial intentionally reducing the gravitational forces being applied to Earth. We also can’t rule out one or more near celestial body/bodies having been “consumed” that has drastically reduced gravitational forces applied to Earth. However, these latter scenarios are way more far fetched than the universe expansion theory. It would take many years of research to uncover any answers involving questions postulated in this article.
↩︎
Abortion: When absolute immunity isn’t?
Kate Cox is a pregnant 31 year old Texas Resident. Her doctor has informed her that her pregnancy is at serious risk. Her fetus has a rare genetic disorder that is very likely to result in a stillbirth outcome. As a result, this stillbirth could ultimately render Kate’s health at serious risk, it could risk potential future fertility issues and it could even be potentially fatal for Kate herself. Let’s explore.
Judicial Review
Kate has sued the state of Texas for a stay to allow her to have an abortion in the State of Texas. A lower Texas court ruled in Kate’s favor by issuing a stay of Texas’s strict anti-abortion law, thus allowing her to have an abortion. However, Ken Paxton quickly intervened and petitioned the Texas Supreme Court to rescind that lower court’s stay.
The Supreme Court has issued a summary judgement against the lower court ruling to prevent Kate from having an abortion in the State of Texas. The ruling cited that Kate’s medical circumstances don’t justify the lower courts ruling and don’t allow for her to have an abortion. Here’s where the problems for these judges (and Ken Paxton) arise.
Suing Court Judges
Court judges are granted absolute immunity when performing their judicial job duties so long as what the judges are doing remains within their jurisdiction. What is jurisdiction? That’s a really good question, one that needs another court to truly decide and clarify in a case like this.
Jurisdiction is, in short, whether the judge’s responsibility of being a judge is actually at play when the judge’s ruling took place. Meaning, as long as the judge exercised his or her judicial responsibilities faithfully both within the jurisdiction of the court (locale) and within the judge’s own specific jurisdiction (handling of judicial responsibilities), then the judge and by extension, all court staff performing court responsibilities enjoy absolute immunity from lawsuits. This means that so long as jurisdiction remains in place, then the judge’s absolute immunity prevents the judge (and staff) from being sued for his or her judicial actions in that court.
Where does jurisdiction end?
Good question. A question that doesn’t really have solid answers. In Kate’s case, jurisdiction should theoretically end once court judges (and legislators) begin dispensing medical advice. Not only is dispensing medical advice a practice limited to licensed doctors and other licensed medical professionals, dispensing medical advice is well outside of a judge’s jurisdiction unless they are also a duly licensed medical professional. Nothing in any court of law should allow or authorize a judge to practice medicine without a license. Not only is a judge not a doctor, dispensing medical advice is not part of ANY judge’s job description.
What does this mean? It means that any judge who chooses to intervene in a medical case and who opines that a person doesn’t fit the medical criteria for any specific medical treatment, THAT is the very definition of dispensing medical advice and, likewise, the illegal practicing of medicine.
Medical Business
If judges wish to get into the business of dispensing medical advice to defendants, then they should be required to not only attend medical school, they must also take on a medical license by passing the medical board exams for their state. Justices are not medical doctors and have no rights to dispense medical advice, not even in their court of law as a judge… which is why any rulings that duly dispense medical advice sit well and truly outside of any judge’s jurisdiction. However, because this is a legal issue, it would require another court to rule if what the judge decided fits within or outside of that judge’s judicial jurisdiction. From where this author sits, dispensing medical advice is not and should never be within a judge’s job role (aka jurisdiction).
Immunity Undone
What does this mean for cases like Kate’s in Texas? It means that Kate and her lawyer should sue each and every judge sitting on the Texas Supreme Court because each and everyone who made that medical advice ruling firmly went outside of their jurisdiction to make that medical advice ruling. Why? Because they are not dispensing justice, they are dispensing medical advice. No one should ever mistake a judge for a doctor or vice versa. When judges get into the medical business, they’re firmly well outside of their judicial jurisdictional boundaries.
When a judge falls outside of their jurisdictional boundaries, their absolute immunity is vacated and they are firmly subject to lawsuits. Specifically in this case, practicing medicine without a license, reckless endangerment, negligent homicide (should Kate die) and perhaps several others.
In Texas, being found guilty of practicing medicine without a license is a third degree felony, punishable by 2 to 10 years in prison and a fine of up to $10,000. Ken Paxton could also be found guilty of practicing medicine without a license depending on what wording was sent over to the Texas Supreme Court to urge them to review this case.
Kate’s Health
If the Texas Supreme Court continues to hold that Kate’s medical case is outside of the boundaries of medical intervention to warrant a Texas stay, then the judges have dispensed medical advice against her actual licensed medical doctor’s own medical advice. Since when have judges become medical doctors? Since when do judges hold medical degrees and medical licenses? Since when do judges orders override a medical professional? They don’t when those orders are considered medical advice. Herein requires a court to make a ruling involving jurisdiction over these judges.
Meaning, Kate Cox needs to request her lawyer to sue each and every Supreme Court Judge (and Ken Paxton) for practicing medicine in the State of Texas without a license on the merit that the judges went outside of their jurisdiction by practicing medicine without a license. Again, practicing medicine without a license is and should be considered outside of a judge’s jurisdiction. No judge should be practicing medicine as part of their judge job duties. Thus, their judicial immunity is trumped by their practicing of medicine illegally.
Whether a lawyer would want to take on such a case to 1) establish if jurisdiction has been breached and if so, 2) if the judges practiced medicine without a license. Let’s let the court establish if these judges violated jurisdiction and, if so, then let Kate’s case against them proceed.
If Texas wants to play novel games with women’s health, then these judges need to have those same novel legal games played against them… and here is, just as Julie Andrews once sang as Maria von Trapp, “a very good place to start.”
Disclaimer: This article is intended strictly for informational purposes only. This article is strictly opinion and not intended to be, nor should be considered nor construed as legal advice in any way. Always consult a licensed attorney for legal advice.
↩︎


leave a comment