Recipe: How to make Sushi Rolls
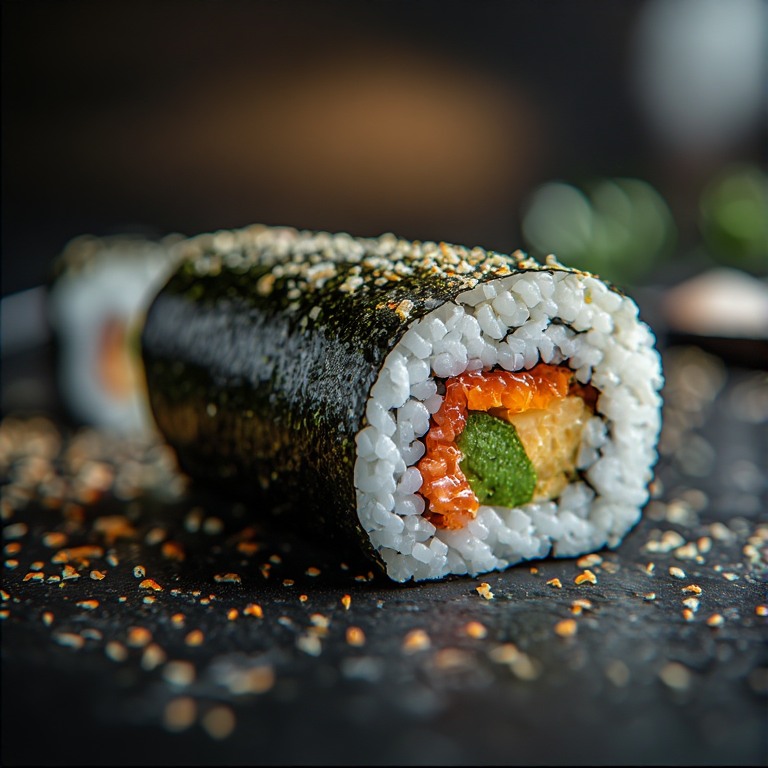 I love Sushi rolls from time to time, but I don’t often eat raw fish. This is a follow-on article from 2019’s Perfect Sushi Rice from the Microwave. This article focuses on how to actually make sushi rolls with the filling of your choice. Remember, you aren’t limited to what a Sushi restaurant offers. Let your imagination run wild and fill your roll with whatever tickles your fancy, sweet or savory. Let’s explore.
Let’s Begin
To make relatively authentic sushi, you’ll need some basic ingredients. Let’s get these food basics out of the way first:
- Nori Sushi Seaweed Sheets
- Short grain sushi rice OR medium grain rice OR Jasmine OR Brown OR Purple / Black Rice (Fan Tuan)
- Seasoned Rice Vinegar (Mitsukan / Mizkan or similar)
- Rice Seasoning (Furikake)
- Kewpie Mayonnaise (or any mayo of your choice)
- Wasabi paste or Wasabi Powder
- Sriracha Hot Sauce (optional)
- Sesame Seed (optional)
- Soy Sauce
- Pickled Ginger (red, pink or beige)
For choices of proteins, it’s really your call. If you want to make raw sushi, you’ll need to head to a Japanese market for sushi grade raw fish. Many Japanese markets cut sushi grade fish into small packages suitable for making sushi or sashimi. If you’re avert to eating raw fish, you can use whatever proteins you like.
For cooked alternatives, I like adding strips of cooked chicken, stripped and cut cooked ground beef, quarter cut hot dogs, cooked fish sticks, breaded and cooked fish, cooked and stripped fried chicken fingers, fake crab legs, etc. You can also make a vegetable roll with cucumber or even various pickles. You can even mix and match.
Yes, you can make protein salads to include inside of a roll like crab leg salad, chicken salad or even ham salad. Salads like these make excellent sushi rolls. Just make sure not to use too much mayonnaise in the salad or it may become too runny. The salad needs to remain thick and spreadable.
I’ve personally made hot dogs rolls complete with a small amount of chili as a topping. I’ve made hamburger rolls with cheese, onion, lettuce, pickle, tomato, mayo with a dollop of relish, mustard or ketchup. Just make sure the ingredients are cut into strips to fit across the roll. Or, alternatively add a small amount as toppings to the top of the roll.
The choices for what goes into your roll is endless. As long as it’s not runny or liquid, you can spread it across the roll and roll it up. Don’t feel constrained to the limited ingredients offered by Sushi Restaurants. Go forth and make new rolls.
Tools Required
You’ll also need some tools:
- Sharp Knife
- Cutting board
- Bamboo Sushi mat (for shaping rolls)
- Rice Cooker with paddle
- Rice Washer strainer and bowl combo (Daiso)
- Vegetable Peeler (optional, for cucumbers)
- A small water spray bottle
Which Rice Cooker?
A quality rice cooker is a must to make any sushi. You can buy an electric one, use a stovetop pan or cook Sushi rice in a microwave. I personally prefer using the Microwave method because it’s set-it-and-forget-it AND you’ll get every last grain of rice out of it (zero waste). When cooked properly, there is no difference between the cooked rice quality using any of these cooking methods.
Unfortunately, cooking rice on the stovetop and, to a slightly lesser degree, an electric rice cooker, is likely to yield some rice loss due to sticking. Because the rice needs to retain a sticky quality, heating element based cookers will lose a small percentage of rice to some of it getting crusted onto the sides while cooking.
The microwave method doesn’t have this waste issue. A proper microwave rice cooker will yield 100% rice out with no sticky baked on mess. If you’re paying to buy expensive Sushi rice, why waste any of it?
If your rice cooker doesn’t come with a plastic or wooden rice paddle, you’ll need to locate one. If you’re concerned over microplastics, then a bamboo paddle might be your best choice. Keep in mind that microwave rice cookers will be plastic. So, again, if you’re concerned over microplastics, you might want to opt for cooking your rice on a stovetop or in an electric rice cooker using metal components.
Rice Types and Rinsing
Many sushi chefs swear by using only short grain Sushi rice. I’ve used all sorts of rices to make sushi and while Sushi rice generally works well, it has a very soft chew, is not aromatic and is also very glutinous (making it quite sticky). Sushi rice needs to be washed until the water runs clear, about 3-5 rinses before cooking. Sushi rice cooks in the same time and in the same proportions as any other rice. When cooked, it’ll be more sticky than medium grain rice.
Medium grain white rice can be used to make Sushi rice. This type of rice is firmer than sushi rice once cooked. It has definitive bite that can be felt. While short grain Sushi rice doesn’t have this bite, medium grain white rice does. And no, do not overcook medium grain rice thinking you can make it has a similar texture to sushi rice. The only thing that overcooking does is make the rice bad.
Basmati, Jasmine and other longer grain rices can be used to make sushi, but these are aromatic rices and impart an odor onto the roll. You may like the aromatic nature of these rices, but that odor may or may not work with the ingredients you wish to add to your roll. Additionally, longer grain rices offer less glutinous features, making the rice more dry and less sticky.
When using less glutinous rices (medium grain, Basmati, Jasmine) for Sushi, you must rinse the rice exactly one time. Rinse the rice to remove any unnecessary extras once. Rinsing only once allows much of the loose rice starch to remain. You need this loose rice starch powder to allow the rice to hold together when placed into a Nori sheet or if you want to make Nigiri and form the rice into small balls. Rinsing more than once will rinse all of these starch away causing the rice to become fluffy, but not sticky. For sushi, you don’t want fluffy rice, you need sticky rice.
Brown rice is an odd beast. It takes longer to cook and has less overall loose starch. You can use it to make sushi, but you should rinse it as little as possible. You may still find it doesn’t clump or stick together as white rices, though. If you have trouble keeping your brown rice together, you might need to include some extra rice flour (quarter teaspoon rice flour per cup of rice) to add some stickiness back into the rice. You won’t know you need the extra starch until after the rice has been cooked, though. I’m not a big fan of brown rice sushi, but if you like it, go for it.
Parboiled Rice or Instant Rice?
This addition is being added after the original article’s release to head off any questions about these “quick cook” types of rice. Parboiled rice is a type of rice that has been previously PARtially BOILED, hence the name. This type of rice is not useful for Sushi. Avoid using all varieties of parboiled rice for sushi. Because of it having been previously boiled, too much of the outer starch has already been boiled away, making it not at all sticky. You need a stickier type rice to use as Sushi rice because sticky rice sticks together on itself. This stickiness is what holds the sushi rolls together. Without this stickiness, the rolls will fall apart. Often, you can visually tell parboiled rice by its yellowish color. You should also read the package which should state if the rice is parboiled.
Instant rice, like parboiled rice, is likewise previously cooked. Unlike parboiled rice which is only partially boiled, instant rice is fully cooked, then dehydrated. This dehydration process allows the rice to hydrate in just a few minutes, but at the cost of removing a ton of starch. While both parboiled and instant rices are great in certain quick culinary uses, neither are useful for making Sushi. Instant rice is not a yellow color like parboiled. If you have dry regular rice and instant rice side by side, they sort of appear similar, except that dry instant rice can be easily crunched by chewing on a single grain. Regular rice cannot be easily chewed when dry and remains rock hard until cooked.
Avoid these two types of “quick cook” rice when purchasing rice for Sushi!
Nori Sheets
Nori seaweed sheets are important for making any sushi. These sheets are made and used in Japan, South Korea and China. In Japan, it’s called Nori. In Korea, it’s called Gim. In China, it’s called Haitai or . Various similar kinds of rolls are made in all three countries.
In Japan, the rolls are called Makizushi or simply just Maki. In Korea, it’s called Gimbap or Kimbap. In China (specifically Taiwan), it’s called Fan Tuan or Ci Fan Tuan. However, Fan Tuan often uses purple or black glutinous rice instead of white rice. Most often, Fan Tuan is consumed as a breakfast food in China.
What this all means is that you have a number of choices in which to locate sheets of Nori. You can get these sheets in Chinese, Japanese or even Korean markets. I have typically found sheets sold in Korean or Chinese markets to be lower priced than those sold in Japanese markets. However, there are some quality differences in various sheets. What this means is that you will need to try various brands until you find a brand you can both rely on for quality and for availability.
Personally, I’ve found that the Yamamotoyama (Japanese) brand always offers consistent sheet quality. Unfortunately, this Japanese brand is not the lowest cost brand of Nori. However, I have also found some Gim sheets in various Korean markets that also work quite well and are much lower in price. By quality, I mean that the sheets hold up to the stresses and strains of being rolled. They do not rip and tear. However, some sheets made are of a lower quality and can and do rip and tear, both when wet and when dry. Again, you’ll need to shop the brands and find one that works for you.
Oh, and while you can buy 5 or 10 sheets at places like Walmart or your local grocery store, these are exceedingly costly per sheet. It’s better to invest in a large package of 20-50 sheets from your local Asian market to get your best price per sheet. You can order Nori from Amazon and from eBay also.
I might suggest the first time buying a small package of Yamamotoyama brand sheets so you can see what good quality sheets look like. Then branch into lesser brands and see how far you get with those.
Prepping
Preparing your ingredients and placing them onto plates in advance is strongly recommended. I recommend doing this while waiting for your rice to cook in about 18 minutes. When it comes time to assemble your rolls, it’s a simple matter of grabbing your ingredients, placing them on top, seasoning them and rolling it all up. If you’re having to prep in the middle of making a roll, your rice will cool down and the Nori wrapper will start to get flimsy. You need to work fast once you apply the rice to the Nori.
If you’re wanting to make cucumber rolls, for example, you will need to peel your cucumber, then slice it into small wedges. Cut the cucumber in half, then cut the half in half again. When I say “cut in half”, I mean long ways. You need your cucumber slices to be long and thin, longer than the length of the roll preferably. Then slice each quarter into two or possibly three wedges. You want the wedges long enough to span the entire roll length and thin enough not to make the roll be too thick, especially when using multiple ingredients. If not long enough, then place two pieces edge to edge to make it long enough.
Additionally, ensure you have your wasabi prepared and bloomed, your Kewpie mayo out and ready, your seasonings at hand, your rice paddle and spray bottle with water ready.
Seasoning the Rice
Once you have your rice properly cooked and with your Seasoned Rice Vinegar in hand, you will need to season your rice. Make sure that you’ve purchased Seasoned Rice Vinegar and not Natural Rice Vinegar. Seasoned Rice Vinegar is sweetened. Natural Rice Vinegar isn’t seasoned.
If you are watching your sugar intake, you can make your own Seasoned Rice Vinegar using Natural Rice Vinegar and low sugar sweeteners like Saccharin, Stevia and Splenda. Don’t use Equal / Aspartame because it will be applied to the rice while hot. Heating Aspartame above 86ºF / 30ºC begins breaking down Aspartame into constituent components, such as formic acid, aspartic acid / phenylalanine and formaldehyde. Only use Aspartame to sweeten cold drinks, never to sweeten hot foods or hot beverages. Keep in mind that rice is high in carbs and sugars, so reducing the amount of sugar in the Seasoned Rice Vinegar might not do much to reduce the sugar load in Sushi with rice.
Do not use unseasoned rice in a sushi roll! To season your rice and while still in your rice cooker, add in about a tablespoon and a half of seasoned rice vinegar and begin to mix (per 1 cup dry-now-cooked rice). Do this while the rice is still hot. Taste. If you can’t taste the vinegar, add a splash more to the rice, mix again and taste. You should be able to taste the vinegar, but it should not overwhelm.
Adding rice vinegar pulls some of the rice starches out of the rice and allows it to become sticky while mixing the vinegar in. This step is what helps out less glutinous rices, like medium grain white rice, to make them be useful in Sushi rolls. Absolutely do not skip this step if you’re using medium grain white rice! Remember, you don’t want fluffy rice, you want stickier rice.
Once your rice is seasoned, set it aside and let it cool a little bit more.
Rolling up your Sushi Roll
I do this next part on a paper towel because it makes for easier cleanup and offers an easy way to pick up the edge of a sheet to begin rolling it up. The Nori does not stick to the paper towel. You could use wax paper or parchment paper if you prefer.
1 cup of dry sushi rice yields enough cooked sushi rice to produce 3 full-sized Nori sheet rolls. If you want to make hand rolls, half rolls or any thing smaller than a using a full sheet of Nori, you’ll have to figure out the proportions of rice to seaweed. This article is focused on making 3 large “regular” Maki rolls using 1 cup dry cooked rice as a basic starting point.
You’ll want to use the rice paddle to divide the rice into thirds for easier visual reference and to make 3 rolls easier. Place your dry Nori sheet onto the paper towel and drop ⅓ of the cooked rice onto that Nori sheet. Using the rice paddle, begin pressing and spreading the rice to the edge of the Nori on 3 sides. When spreading, use pressure to flatten the rice onto the Nori. Use the paddle to evenly spread the rice out to 3 of the edges. On the fourth side, leave a 1 inch gap between the rice and the top of the sheet. Because the Nori sheet is rectangular, the rice will effectively make a square below the 1 inch gap.
Once you have the rice fully spread and pressed out onto the sheet, grab your Furikake and give the rice a light dusting. Now, with your clean finger or a knife, grab a dollop of wasabi and spread a small amount across the rice just below the middle. It should spread evenly all the way across. Make sure to use enough. If you have tube wasabi, you can simply use the tube nozzle itself to spread it across.
From here, grab your main protein or vegetable ingredient and place it across and centered, but running horizontally across the rice, making sure it covers all the way across. It should sit horizontally edge to edge in the middle of the rice. It’s perfectly okay for some of the protein to hang over the edge of the rice. The two cut end pieces will actually look better with a small amount hanging over. For reference, you can place two or maybe 3 different ingredients in the middle stacked neatly horizontally across the rice. Anymore than this and the roll is likely to end up too big.
On top of your ingredients, squirt a squiggly line of Kewpie mayonnaise horizontally across the ingredients. You can top the mayo with a bead of sriracha sauce, powdered cayenne pepper, pepper flakes or even chili oil if you want to make it spicy.
At this point, your roll is complete, but not yet rolled. Grab the bottom edge (opposite side of the 1 inch gap side), lift the Nori and rice carefully, then place that rice edge just over and in front of the ingredients to begin the rolling part. Push the edge under the ingredients somewhat tightly as best you can and then begin to roll towards the 1 inch gap. Leaving the empty Nori edge unrolled, grab your water spray bottle and spray the gap seaweed to wet it. Wait a moment, then slowly finish rolling over the gap edge, pausing and allowing the Nori to begin sticking to itself while the roll sits.
From here, lift the roll up and flip it over or roll it over if you’re uncomfortable lifting it. The gap edge may not yet be fully sealed to itself. Grab the spray bottle again and wet the outside of that loose gap edge to wet it fully and smooth it down. Now, set the roll down onto a plate gap edge down. The weight of the roll will seal the roll closed while you make more.
Grab the Sushi mat, place the roll into the mat, lightly squeeze and roll the mat to make the sushi more round. Note, you can skip this process if you don’t really care how your Sushi roll is shaped.
Repeat this process for the remaining two rolls. After doing this a few times, you’ll get the hang of the rolling fairly quickly and will understand the nuances of exactly how to roll it tightly. You’ll want to roll each roll somewhat tightly so that the roll holds itself together. If it’s too loosely rolled, the roll will fall apart.
Cutting the Rolls
Once all three rolls are complete, grab the first roll made, a very sharp knife and a wet towel or wet paper towel. A roll cuts into about 8 pieces. Six full pieces and two edge pieces. At this point, I’d suggest using the knife to lightly indent the Nori to make 8 potential cut marks. Just indent on the seaweed, but don’t cut it. Indenting the roll gives you a reference point to make your most even cuts, while allowing you to adjust the indents to give you the thickness you prefer. Remember, a piece needs to fit in the mouth comfortably. Eventually, you won’t need to make indents on the roll, but when learning, indenting on the roll makes it easy to create even thickness roll pieces.
Once indented, begin cutting on the indent marks with a light sawing motion. The knife should cut through the roll easily. If it doesn’t, your knife is too dull. Use a sharper knife. Use the wet towel to wipe the knife occasionally when it becomes dirty. This cleaning prevents smearing ingredients on the outside of the roll.
Place the cut rolls onto a plate in whatever arrangement looks best. It’s your plate. Present them as you prefer. If your roll is falling apart when cut, you either didn’t roll it tightly enough and/or the rice isn’t sticky enough to hold the roll together. Rinse the rice less next time, add more vinegar when seasoning and/or press the roll more tightly when rolling. You want your roll to be relatively tightly rolled, but not so tight as to rip the Nori.
From here, top your plated rolls with sesame seeds, a small dollop of Sriracha, a sprinkle of cayenne or any other topping you might think goes with your roll type. When I make hot dog rolls, I top with a tiny dollop of mustard, ketchup and relish.
Enjoying your Rolls
Once you’ve got your rolls cut and plated, to the plate you’ll want to add a ball of Wasabi, a pinch of pickled Ginger and have a small bowl of Soy Sauce handy for dipping. If you like eating with Chopsticks, then you’ll need to get a pair. You still want your sushi to be lukewarm, but not hot. The rice should still have a some warmth when consuming the roll. A little warmness makes the roll taste so much better. Don’t let them get cold before serving.
You can turn this into a full meal by adding a bowl of Miso Soup and/or steamed Edamame. You’ll need to pick these additions up and prepare them separately.
Yes, you can and should refrigerate leftovers. If you want to eat refrigerated leftovers, you might want to microwave them for about 15 seconds to slightly warm them. For safety, don’t let them sit around and warm up on the counter as they contain mayonnaise. Eat leftovers within a few days.
Final Notes
This Maki recipe above does not produce “inside out” rolls. The rolls produced here are rolls with seaweed on the outside and rice on the inside. These rolls are easier to make when just learning to make Sushi rolls.
If you wish to make “inside out” rolls, you will need to wrap your Sushi mat in plastic wrap to keep the rice from sticking to to it. Then follow the above instructions. But, after you have paddled and packed the rice onto the Nori (use a thinner layer of rice), cover in sesame seeds, turn the sheet over, add a smaller amount of rice onto the Nori to “wrap” your ingredients, then add your ingredients on top of this rice. Then roll up so that sesame seed rice is on the outside with some rice and filling on the inside with your ingredients. You may need to make a bit of extra rice for “inside out” rolls if you still want 3 total rolls.
“Inside out” rolls are often topped with Masago (tiny reddish orange roe fish eggs) and sometimes black sesame seeds.
↩︎
Perfect Gravy from the Microwave!
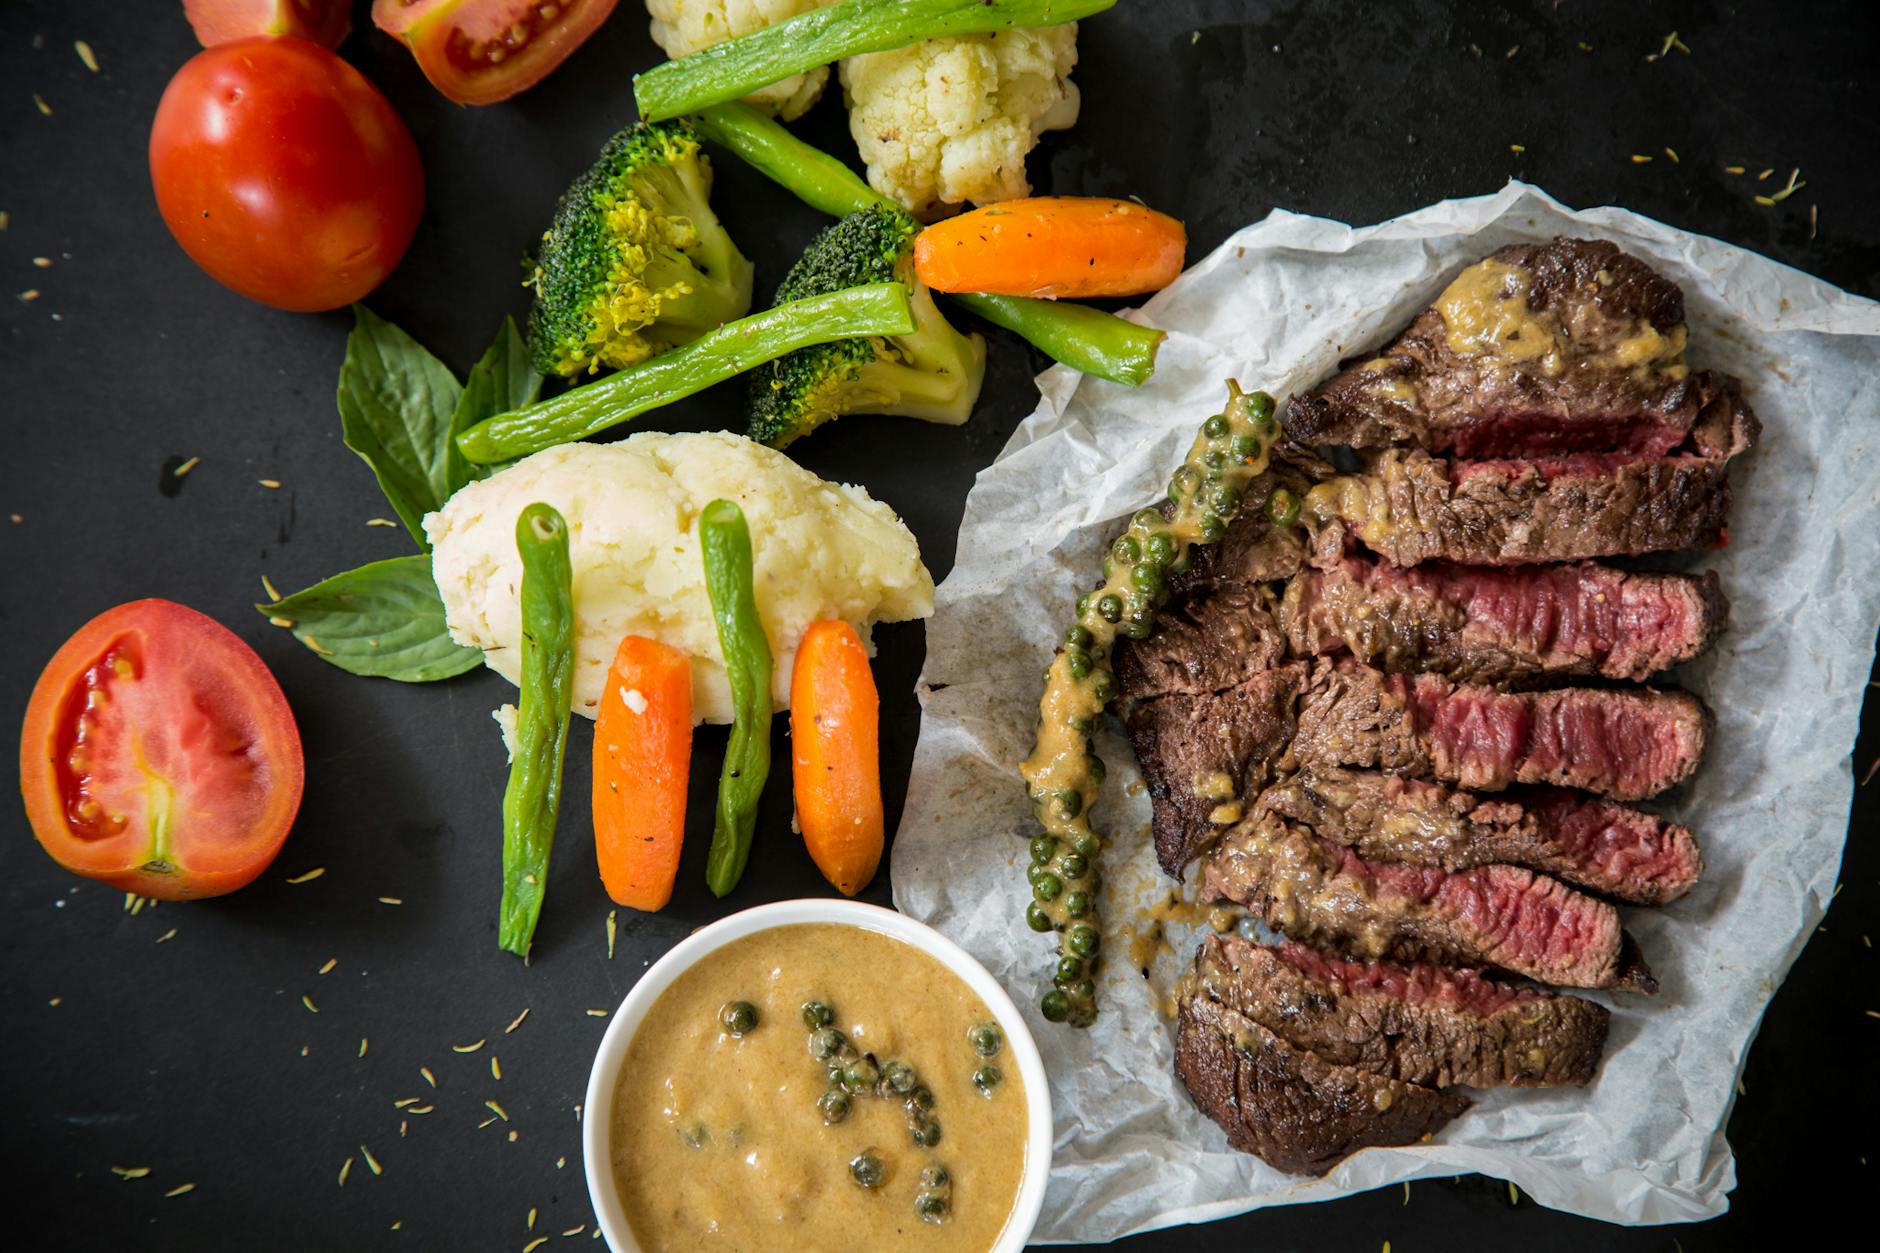
For some reason, a lot of people seem to feel uncomfortable or downright scared to use the microwave for cooking certain foods. The microwave is a very useful appliance for cooking. I’ve written a few past articles including the Microwave Mug Cake and How to Cook Sushi Rice in a Microwave. The microwave is an excellent appliance to cook various foods fast, but you’ll need to know how to properly use it. One thing that a microwave is excellent for is heating liquids rapidly… which is why gravy works great here. Today, let’s explore how to make gravy in a microwave in 5 minutes or less.
Prerequisites (What You Will Need)
- A glass measuring cup or small microwave safe bowl
- A spoon for stirring
- A set of measuring spoons
- All Purpose Flour (bleached or unbleached, NOT self-rising)
- Salt and Pepper (to taste)
- A Food Thermometer (optional, but very helpful)
- Stock / Bone Broth
Gravy starts with Chicken, Turkey, Beef or Pork Stock
Stock is the drippings left over after cooking most juicy meats. You’ll get these drippings from poultry, beef and pork. Even a small chicken leg quarter can produce enough drippings to make gravy. You can extend the amount gravy by adding a little water. After all, when it’s cooking, some of the water will evaporate making the drippings a bit concentrated.
Before making gravy out of your drippings, you’ll want to taste it. Not all stock flavorings will work for standard gravy. For example, if you’re wanting to save stock from your BBQ grilled meats, smokey BBQ flavored stock usually doesn’t work well as gravy. Instead, you might want to save those drippings to craft a BBQ sauce instead. That’s for another recipe, though.
If you’re oven baking your meats, meat drippings will work just fine for making a thick savory gravy.
The Trick to Great Gravy
To begin this recipe, it is recommended to use a microwave safe glass measuring cup with a handle. These cups have pour spouts and a stay-cool handle for when things gets hot. Glass measuring cups are typically microwave safe and are easily handled. It can also double as a gravy pouring dish if you don’t want to mess up more dishes.
The trick to making great gravy is to let the stock cool to 110ºF / 48.9ºC or less. You want the stock to be a tad lukewarm to allow for the next part to work, but not hot enough to activate the thickening. To cool your stock faster, slowly swirl it in the measuring cup, being careful not to swirl it all over yourself or the floor. If you’re not good at swirling things, try using a spoon instead. You can even dip the spoon in an ice water bath before stirring the liquid.
What trick is this?
In your measuring cup with your cooled stock, mix in about 3-4 heaping teaspoons of flour into 1/4 to 1/2 cup of stock. If the temperature is correct, the flour will mix in easily with just a bit of stirring, but not begin thickening. You might need to break up any dry clumps with a spoon, though and make sure they get fully incorporated into the liquid.
The drippings should turn lighter in color and appear opaque and cloudy, but remain watery. This is what you want. If you let the mixture sit too long after stirring, the flour will begin to settle to the bottom. If this happens, you’ll need to stir it again before beginning the microwave part.
Once the mixture is incorporated, fully cloudy and freshly mixed, place it into a microwave.
How to Prepare
To finish the gravy off once in the microwave, start the microwave on high for 30 seconds. The outer portions touching the glass will begin to bubble and appear thick. When the microwave stops, stir the mixture thoroughly for about 1-2 minutes or until the gravy begins to thicken. It should actually be thickening already.
Place the measuring cup back into the microwave for another 30 seconds. Then, remove and stir. At this point, your gravy should be fully thickened and ready. You can now add salt and pepper to taste. Your gravy is done. Serve immediately.
Too Thick? Too Thin?
If your gravy seems too thick and seems almost clumpy, there is an easy fix. Add in a bit of room temperature water to thin it out. Stir as you add the water slowly until you get it to a desired gravy thickness.
If your gravy is still too thin, place it back into the microwave for another 30 seconds and see if that helps. If it doesn’t, you’ll need to wait until the mixture has cooled to around 110ºF / 48.9ºC again and then mix in more flour, perhaps 1 or 2 more heaping teaspoons. Always make sure to incorporate the flour thoroughly. You want gravy, not clumps. Then, follow the steps above once more.
Note that very low wattage microwaves might need a longer time to begin to see bubbling, up to 1 minute. Higher wattage microwaves might need less time, perhaps even as little as 15 seconds per stir.
Should I remove the oil on the top?
No, you should not. Unless you have a medical condition that warrants the removal of the oil for medical purposes, the oil should be left in as it will add flavor and texture to the gravy, making it more savory and giving it a better overall texture, particularly when topped onto mashed potatoes. The oil also aids in the thickening process.
If there’s more oil on top than watery liquid on the bottom, you’ll want to spoon out some oil leaving some on top. Then add more water to bring the overall watery portion to more than the oil. The oil on top should be less than the amount of liquid below it. This oily situation can happen with fattier cuts of meat. I’ve never seen this happen with chicken.
You can even fortify the flavor of the watery drippings portions by adding in bouillon flavoring. Be careful doing this as bouillon tends to add a lot of extra salt.
In about 1 minute, you’ll have excellent thick gravy for mashed potatoes or to top your favorite meats. No need to toss the small drippings out. Instead, turn those drippings into a savory gravy. Even just a quarter to half cup of gravy is enough to cover mashed potatoes for two people and still have a bit left over.
↩︎
Recipe: Mug Cake

Every once in a while, I have a hankering for some cake. Yet, I don’t want to whip out a full complement of kitchen gadgets, bowls and utensils, then spend time mixing it all and then waiting for it to bake in an oven simply to satisfy an immediate craving. This recipe explores the fascinating world of the Microwave Mug Cake, which takes perhaps 10 minutes from start to finish. The most amount of time is spent assembling the ingredients. The image depicted is for illustration purposes only and does not reflect the final cake. Let’s explore.
Mug Cake Batter
This cake batter base below is a great base to begin adding flavor to your Mug Cake, such as vanilla, spices, chocolate, strawberry, sprinkles, apples, etc. This recipe is designed for a 12 ounce sized mug. You may need to reduce the portions if your mug is smaller than 12 ounces. A 12 ounce mug provides an excellent portion size.
This cake recipe comes out light and airy with an excellent cake crumb texture. The cake rises just below the top of the mug, so you’ll have a full mug of cake. Many recipes provide half mug sizes which are okay, but I want my cake to reach the top of the mug to enjoy a full mug of cake.
Self-rising flour is used below because it has baking powder already mixed in. No need to add any baking powder. If you don’t have self-rising flour on hand, substitute regular flour and add 1 teaspoon of baking powder.
All ingredients should be measured level, not heaping. This shouldn’t need to be said, but DO NOT EAT RAW CAKE BATTER!
Cake Batter Base
2 Tablespoons Unsalted Butter
4 Tablespoons Sugar
1 Tablespoon Non-fat Dry Milk
2 Tablespoons Water (more if the batter is still too dry)
1 Egg Yolk (separated)
1 Teaspoon Egg White
1 Packet Sweet-N-Low
1 Dash Salt
1 Dash Stevia
6 Tablespoons Self-Rising Flour
Other Items Needed
1 set of Measuring Spoons
1 12 oz sized Mug
1 Fork for mixing (clean or use a different fork to consume the cake)
1 Spatula for mixing
1 Microwave (for cooking)
1 Egg Separator (if you don’t want to use your hands)
Substititions
Sweeteners
I add the Stevia and Sweet-N-Low to boost the sweetness without extra calories. You can add more or less sugar as you prefer. The list of ingredients above is in the order in which you add them to the mug. The above is the basic batter in which you can add other ingredients to flavor the cake.
Milk
If you only have fresh milk on hand, replace both the non-fat dry milk AND water in the recipe for 2 tablespoons of fresh milk. I prefer to use milk for baking reasons only, never to drink. Dry milk stores much, much longer on the shelf than fresh milk. Fresh milk lasts for a week or two max in the fridge. Dry milk stores for months. Having dry milk on hand also allows you to make fresh milk any time you need it. You can also mix your milk at whatever flavor concentration you like, something you can’t easily get with fresh milk. For consuming dry milk reconstituted, it is recommended to allow the milk to fully hydrate in the fridge overnight to eliminate the ‘dry milk’ flavor. When baking, you won’t ever taste this.
Ingredient Suggestions
If you want carrot cake, you’ll need to mince up some carrots in two tablespoons. If you want spice cake, you’ll want to add a Cake Spice mixture like Nutmeg, Cinnamon, Coriander, Ginger, Allspice, Mace or Clove.
Dry / semi-dry flavorings should be added at 2 tablespoons per flavoring. Liquid flavorings, such as Vanilla Extract, should be added at 1-2 teaspoons.
Butter
Melt the unsalted butter in the mug prior to beginning and let the butter cool somewhat before adding the remaining ingredients. You don’t want to butter temperature to begin cooking the egg once mixed in. Let the butter (and mug) cool sufficiently to lukewarm. Place it into the fridge or freezer for a few minutes if needed. You can substitute a tablespoon of vegetable oil for butter if needed.
Spice Mug Cake
Base Batter +
2 Tablespoons Cake Spice
1 Teaspoon Vanilla Extract
1 Tablespoon Raisins (optional)
Chocolate Mug Cake
Base Batter +
2 Tablespoons Cocoa Powder
1 Teaspoon Vanilla Extract
1 Tablespoon Chocolate Sprinkles or Chocolate Morsels (optional)
Add one (1) more Tablespoon Cocoa Powder if you prefer no morsels or sprinkles.
Vanilla Sprinkles Mug Cake
Base Batter +
1 Teaspoon Vanilla Extract
1 Tablespoon Rainbow Sprinkles
Other Flavors
You get the idea of how to flavor the base batter. However, be sure that if you add purees or other liquid flavorings, you may need to reduce the amount of water to compensate. You don’t want the batter to become overly runny.
Batter Consistency
Once you add all of the ingredients, stir with a fork until thoroughly mixed. Stirring may take 2-3 minutes of hand mixing. You may need to spatula down the sides and bottom to ensure all of the dry ingredients have been thoroughly incorporated. Once mixed, the batter should be somewhat stiff, but still liquid looking when you stop stirring. If you pick up, then drop batter onto itself, it should reincorporate slowly. This is the correct thickness. You don’t want the batter runny.
Resist the urge of throwing in the remaining egg white. You don’t want to do this. Egg whites reduce the crumb of the cake, making the texture come out rubbery, like Angel Food cake, rather than having a standard crumbly cake texture. Save the remaining egg whites for other purposes.
Cooking Instructions
To “bake” this cake, you’ll want to use 50% power in a microwave for 2 minutes and 30 seconds. However, you may need to stop the microwave at around 2 minutes to check and make sure it’s not overcooking. If it seems still too wet at 2 minutes, place it back into the microwave for 30 seconds at a time until done.
When done, the top of the cake should have a springy cake texture and appear like a standard cake.
Icing
If you’re really a fan of icing on the top, then you can make your own if you so choose, but I’d suggest store bought varieties. They’re cheap and easy enough to use. However, because this cake will be hot, applying icing to the top can be tricky and difficult. If you can resist the urge of eating it right away, you can wait for the cake to cool and the icing will go on much easier.
If you can’t resist or wish to eat it hot, then spoon a dollop of icing on the hot cake and wait for it to melt and warm up a little. You can then spread it on a bit easier.
Top with sprinkles or whatever toppings you like. In about 10-15 minutes, you have a tasty Mug Cake.
Dig in and Enjoy!
↩︎
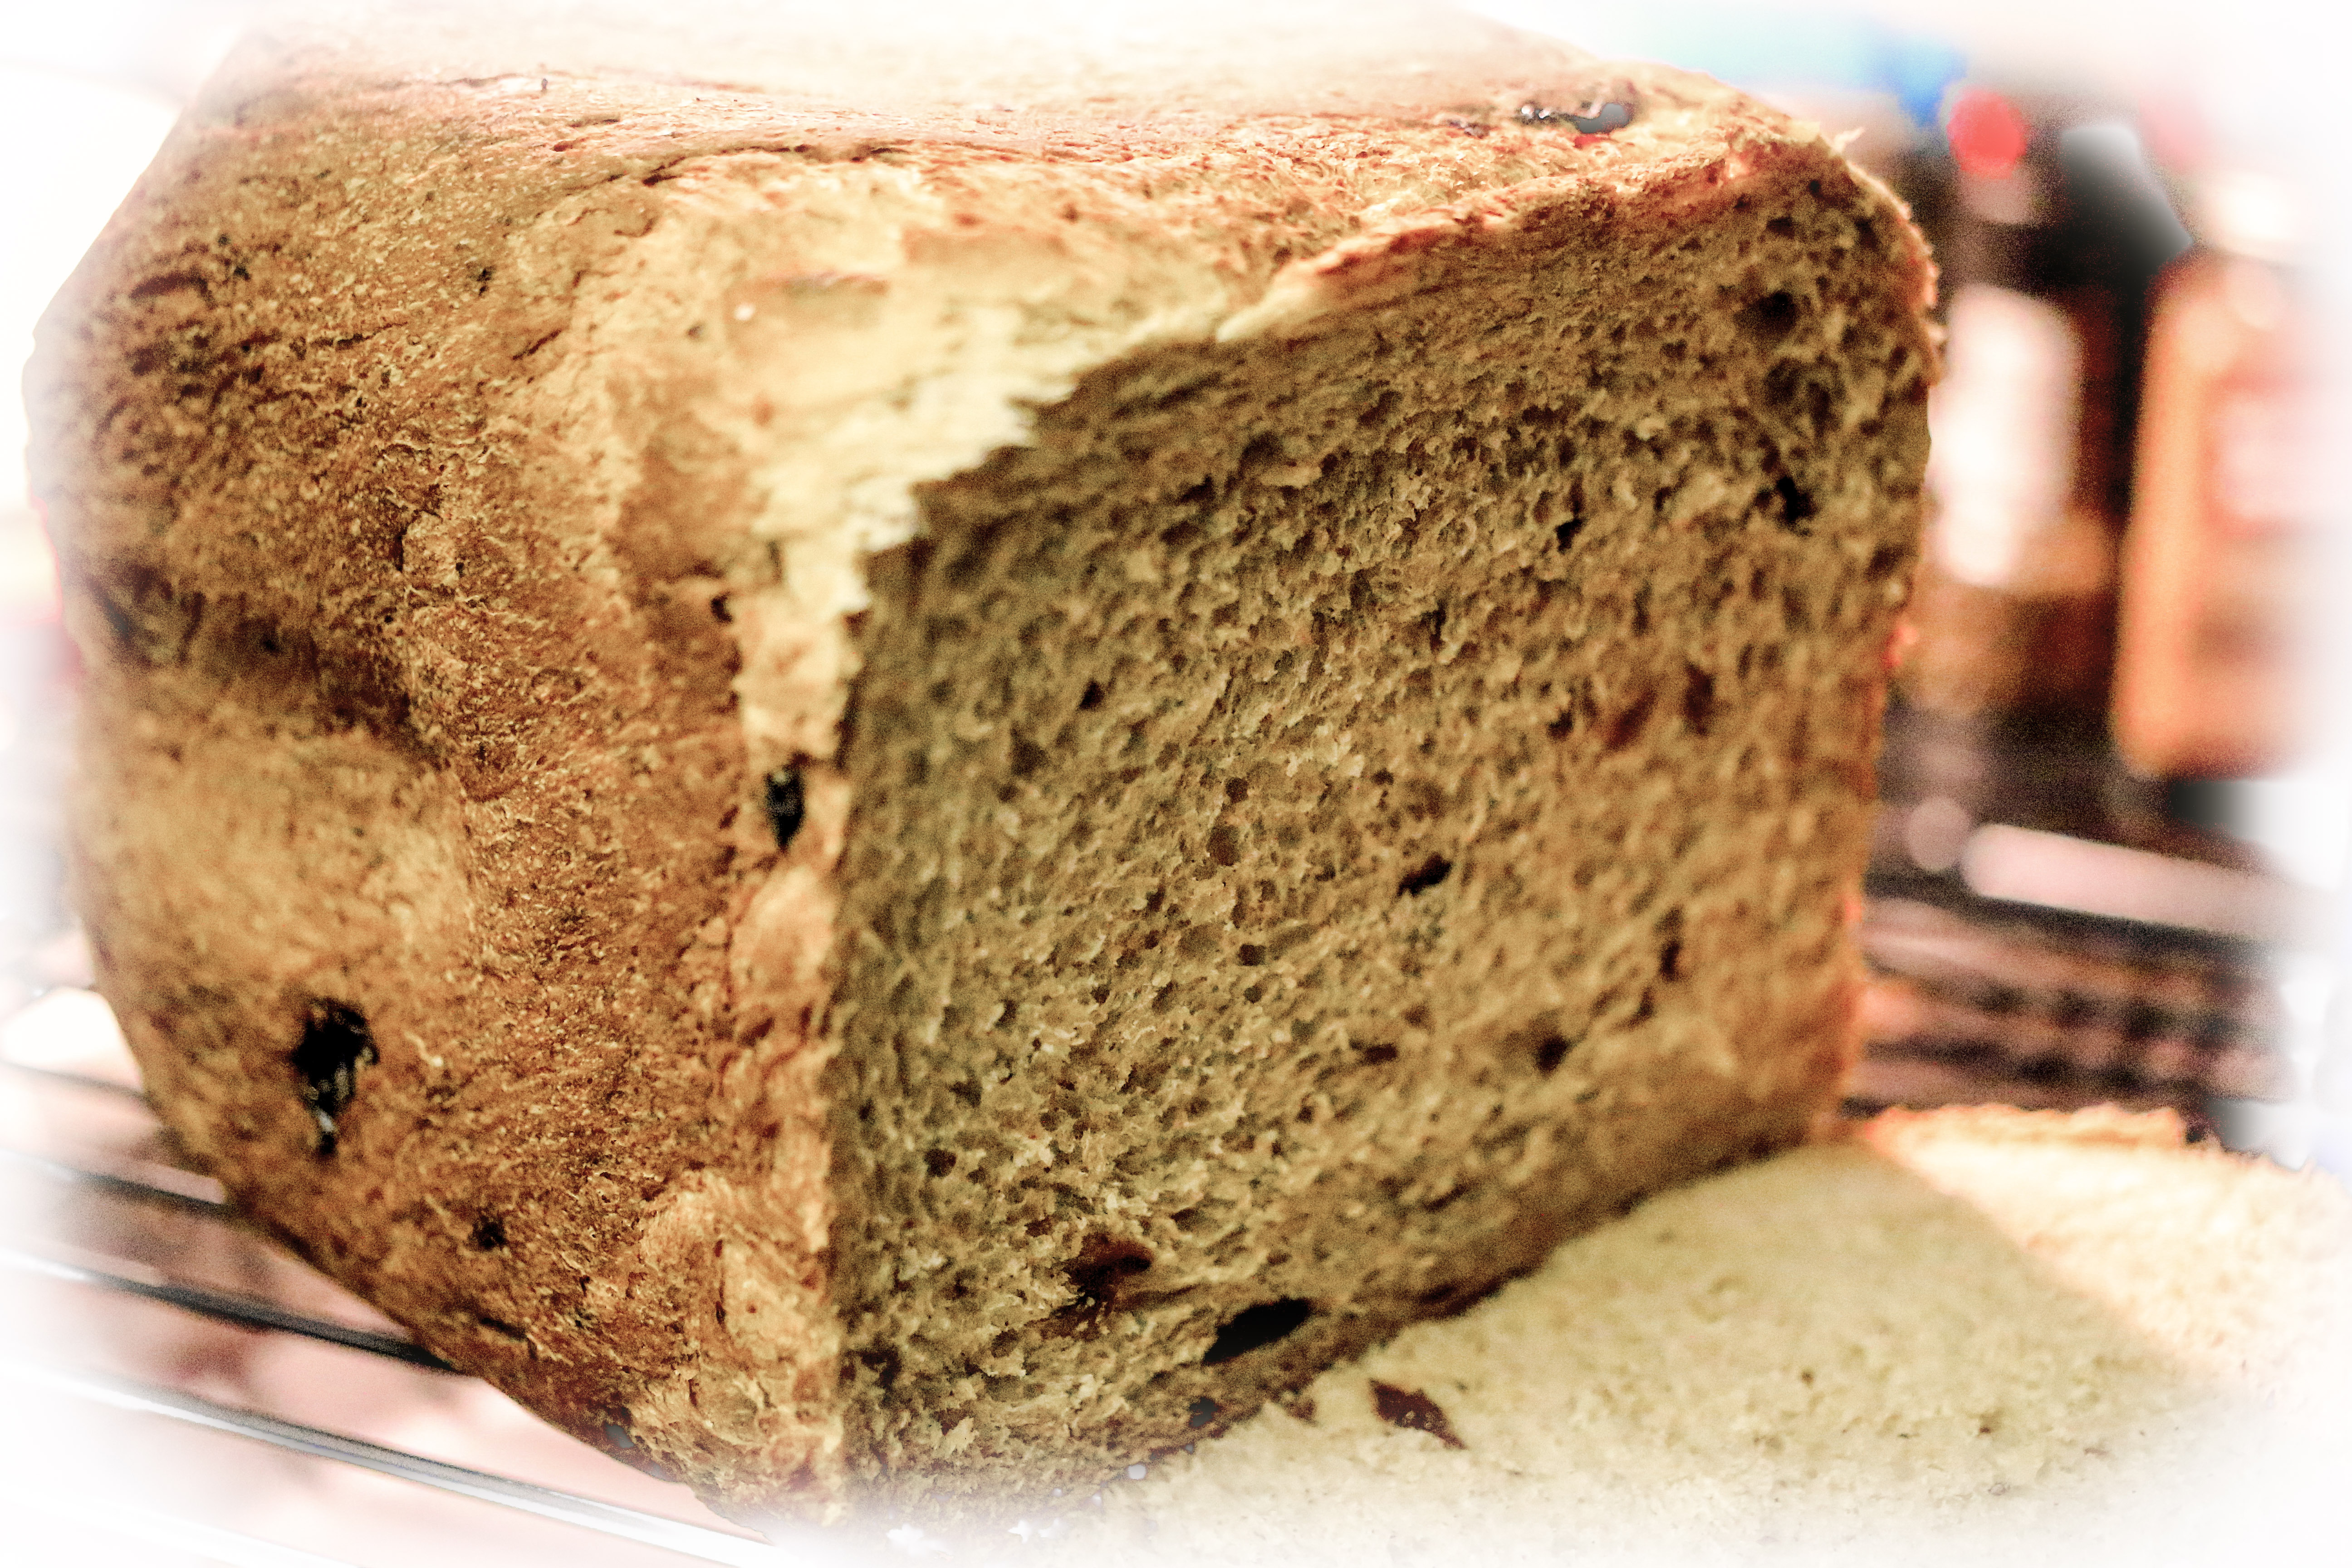
Recipe: Cinnamon Raisin Bread
 I don’t often discuss baking, but in this case, who wants to pay $6-9 for a loaf of cinnamon raisin bread? Anyone? To make this loaf, you can either do it by hand or in a bread machine. I prefer using a bread machine. Skip to the recipe. This recipe makes use of butter, if you want a healthier fat, skip to oil replacement and read before getting started. Let’s explore.
Prices and Specialty Loaves
While commercially baked white bread can offer some of the lowest prices at $1-2 a loaf, the specialty flavored breads can have some of the highest prices… with cinnamon raisin breads fetching between $6-9 a loaf at the store! Wow, that’s a big costly difference.
Cinnamon raisin bread is one of my favorite breads, by far. But, I’m not paying $6 for a loaf of it. I also like straight up cinnamon bread as well… just leave out the raisins. This recipe is quite yummy and no fuss. It’s nearly as simple as making plain white bread. It just takes some time. With a bread machine, this does all the work. You spend maybe 15 minutes or less prepping the ingredients.
Many cinnamon breads require you to roll the dough flat, then sprinkle cinnamon on one side and roll up the dough into a log. This gives that stripy swirled appearance. You can do that with this recipe if you like, but I’m not explaining how to do that here. With this recipe, the cinnamon is fully incorporated into the dough like all other ingredients, which gives the loaf an attractive uniform brown color.
Making your own cinnamon bread can save you a lot of money… and this recipe turns out a very tasty single cinnamon raisin loaf.
Time to Completion
You’ll want to make sure you understand that bread baking is somewhat time consuming. The timing of fresh baked bread is limited by the yeasty critters. All told, start to finish, it’ll take about 3 hours to complete a loaf of bread.
With rises, the colder the temp, the longer the rise takes. You can rise bread in the refrigerator, but it could take 6 hours in a fridge. Many bakers like the rise to take a long time because it adds to the flavor of the bread. If you’re time crunched and need your bread fast (relatively speaking), rising your dough in a warm environment is perfectly fine.
The timing breaks out like so:
- Ingredient prep: 10 minutes
- Mixing / Kneading: 8-10 minutes
- First Rise: 1 hour (or until dough has doubled in size at 100-120ºF temp)
- Punch down & Knead: 2 minutes
- Second Rise: 30 minutes (or until dough has doubled in size at 100-120ºF temp)
- Baking: 20-30 minutes (or until done)
- Cooling: 30 minutes
Total Time: ~3 hours
Bread Machine
This bread is by far easiest baked in a bread machine, particularly if you don’t want to spend time kneading and waiting for the bread to rise. I have an older Breadman bread machine. It’s functional and works well, but it’s not new. The newer Breadman machines now have fold down paddles to prevent that annoying hole in the bread after baking. Of course, you can avoid that hole if you use your bread machine to create dough, then transfer the dough into a bread pan and bake it in a conventional oven.
Personally, I prefer the convenience of having the bread machine do all of the work including the baking. I’m willing to live with that hole. While this recipe does require yeast, it is a no-proof recipe. This means you don’t need to foam up the yeast. If you have old yeast lying around, you’ll want to proof a small amount to make sure it’s still good or go buy some fresh yeast.
The ingredients are listed in the order you will pour them into the bread machine pan.
Ingredients
1 ¼ Cups lukewarm water (120ºF/48.9ºC is a good temp)
3 Tablespoons Butter minced up
¼ Teaspoon Salt
½ Cup Rolled Oats
¼ Cup Brown Sugar
3 Cups of Unbleached Flour (do not use self-rising)
3 Tablespoons Non-Dairy Dry Creamer or Low Fat Dry Milk
1 Tablespoon Ground Cinnamon (less or more as you prefer)
2 ¼ Teaspoons Rapid Rise or Bread Machine Yeast (i.e., Fleishmann’s)
½ Cup Raisins
Directions
- Bread Machine Baking Directions
- Bread Machine Dough + Oven Baking Directions
- By-Hand + Oven Directions
Notes
- Cold Oven Baking
- Hot Oven Baking
- Water Temperature
- Cinnamon and Creamer
- Oil Replacement
- Bread Machine Differences
➡ Directions for Bread Machine Baking
Pour in water, butter, salt, oats, brown sugar, flour and creamer into the bread machine pan, in this order. Next, pour a ring of cinnamon around the outside of the flour leaving the center without cinnamon. Make a shallow indent in the center of the flour and pour the yeast into this small indent. You’ll add the raisins a bit later.
To bake this recipe in the bread machine, set the bread machine to 1.5 Pound Rapid and press Start. Let the bread machine work until the dough is a solid ball. My Breadman has an ingredient notification timer. The machine will stop and beep. This is the time to drop in additional ingredients like nuts, raisins, dates or any other solid type ingredients.
In reality, you can drop the raisins in as soon as the bread machine has incorporated all of the ingredients into a solid ball of dough. No need to wait on an ingredient notification beep.
Because my bread machine isn’t always perfect at paddling the dough, I grab a plastic rice spoon (so the dough doesn’t stick) and press it on top of the dough lightly so the paddle works a bit more effectively to incorporate the raisins more quickly and evenly. After the raisins have incorporated, I close the lid and let the machine finish the cycle on its own.
The 1.5 Pound Rapid cycle on my machine takes about 2 hours and 20 minutes to complete, including baking. You can also run it on the 2 Pound Rapid cycle if you prefer. I prefer the way the bread comes out with the 1.5 Pound Rapid cycle.
➡ Bread Machine Kneading / Rising + Baking in an Oven
For this preparation method, follow the same instructions as the bread machine baking instructions above. Select the Dough or Bread Dough cycle on your bread machine. This cycle will knead the dough and rise it only, no baking. After the cycle is complete, you’ll punch the dough down removing the air, shape it into whatever your pan shape is and leave it for a final rise of about 20-30 minutes. You only need to punch the dough down to remove the air bubbles from the first rise, maybe 2-6 minutes at most. You’ll want to grease, butter or oil your pan before placing the dough into it, unless you’re using a high heat silicone baking mold.
Bake using the cold oven or hot oven method, your choice.
Because a bread machine also acts as a proof box by running the heating element at a low temperature during the rise cycle, this allows for consistent rising of the dough no matter the ambient temperature of your room. If you have a bread machine, this is the best way rise the dough consistently. It’s also hands off in that the machine does all of the kneading so you don’t have to. This is particularly useful if you have arthritis or carpal tunnel in your hands, thus making this kind of hand activity problematic.
➡ Kneading By Hand + Baking in the Oven
For this method, add the ingredients into a bowl all except for the raisins. Mix until you have a solid dough ball. You can do this with your hands or with a mixer. Once you have a solid dough ball, remove the dough from the bowl and begin kneading the dough on a flat and lightly floured work surface and incorporating the raisins while you knead. You’ll continue to knead the dough for about 10-12 minutes or until it has a solid and stretchy consistency. It’s more important that the dough has created solid glutenous bonds and has the proper elastic consistency. This is what will give the bread its proper spongy texture and preventing the slices from crumbling apart. Work the dough until the dough has this consistency. This part might take some practice to spot.
At this point, place the dough into a lightly oiled bowl to keep the dough from sticking and let it begin its first rise. This first rise will take about an hour or until the dough has doubled in size. Make sure the bowl is big enough to handle the dough double its size. You can do this rise in a proofing cabinet if you have one or you can let it sit out on the counter (covered with a towel) if you don’t. If the room is cool, it may take quite a bit longer. If the room is extra warm, it might be faster. You’ll need to watch and determine when the dough has doubled in size.
Once the dough has doubled, take it out of the bowl and knead it down again to remove the air pockets. You’ll only knead the dough for as long as it takes to remove the air pockets from the first rise, maybe 2-6 minutes at most. Form the dough into a log shape that will fit into your baking pan. Grease, butter or oil your pan. Next, place the log into the pan and let it begin the second rise. This rise takes about 30 minutes.
Bake using the cold oven or hot oven method, your preference.
Cold Oven Baking
If you start from a cold oven, the warming of the oven to the proper baking temperature will allow the dough to perform its final rise right before it begins baking. To bake, set the oven temperature to 350ºF/177ºC and turn it on. Then, put the pan into the oven with the oven still cold. Let it remain in the oven for about 45 minutes or until the bottom of the loaf thumps hollow and is golden brown. You can begin checking the loaf at around 25 minutes in. You’ll need to use oven mitts to handle the loaf and test for hollowness.
Hot Oven Baking
If you start from a preheated 350ºF/177ºC hot oven, you’ll need to rise the dough on the counter covered with a towel for 20-30 minutes before placing it into the oven. Once in the oven, bake for 30-35 minutes or until the bottom of the loaf thumps hollow and is golden brown, along with the sides and top.
Water Temp
I prefer the water temperature at 120ºF/48.9ºC because this is what the yeast package states is best. I use a microwave to heat the water to this temperature. It takes about 1 minute 30 seconds, but you’ll need to use a thermometer to check. Then, pop it in for 30 second intervals to raise it to that temp. If you don’t have a thermometer, just make sure the water is warmer than your skin and this will also work.
I prefer 120ºF/48.9ºC because pouring the water into the bread machine’s pan (or bowl) will cool it down just a bit. You still want the water warm so that yeast will rise the dough properly. I find this starting temperature gives a great rise in combination with the bread machine. It’s also the temperature recommended on Fleischmann’s yeast packaging. If you use a yeast that lists a different temperature, use the temperature that’s recommended on your yeast package.
Cinnamon Amount and Dry Non-Dairy Creamer
When I first published this article, I forgot to add the creamer to the ingredient list. I’m allergic to cow milk of any type, but I seem to have no allergies with non-dairy creamer. Dry creamer is an excellent substitute for low fat dry milk in this recipe (or really any bread recipe). It adds a richness that you don’t get without using it. You can find non-dairy creamer on the coffee aisle of your local supermarket. I typically buy the house brand as it’s usually the most cost effective. If you have no problems with milk, then feel free to use low fat dry milk instead.
I also prefer my bread very cinnamon flavored. Some recipes similar to this one call for 1 teaspoon. I prefer the flavor with 1 tablespoon. However, not everyone likes lots of cinnamon. I’ll leave it up to you to determine how much you want to add. Anywhere between 1 teaspoon and 1 tablespoon is fine. Be aware that the more cinnamon you add, the slower the bread may rise.
Differences in Bread Machines
Because bread machines are all slightly different, the proportions for this recipe may or may not work in your bread machine as is. If this loaf doesn’t turn out correctly in your bread machine, I suggest locating your bread machine’s recipe manual and change the above same ingredient amounts to match the proportions listed in your manual’s white bread recipe. This should allow the recipe to work properly in your bread machine.
Using Butter as an Oil in Bread
So, you want to use a healthier oil than butter? The difficulty with using butter as an oil in bread is that it hardens at cooler temperatures, but it also imparts a flavor and richness you can’t get any other way. When at room temperature, it can make the bread seem stale to the touch and the bread can seem dry when you cut it. To revive the bread, you’ll need to warm it until the butter is softened again. You can do this in the microwave in 10 second intervals or you can use a toaster, but a toaster will toast the bread. If you have a bread warmer, you can use that. If you’re not looking for toast and you don’t have a warmer, then using a microwave is the answer.
To avoid this hardening problem in baked goods, don’t use shortening, butter, palm or coconut oil in bread. Instead, use oils that remain liquid at all room temperatures. These reasonably available oils include avocado, peanut, vegetable, canola, olive and corn oil. If you use any of these non-hardening oils, you’ll need to cut down the amount of oil in the recipe by at least half or increase the amount of flour until the dough is no longer sticky. If a recipe calls for 3 tablespoons of butter, you’ll want to use about 1 to 1.5 tablespoons of oil. The reason is that butter is about 20-25% oil to 75-80% water. This means that you’ll need to use less oil than you do butter. Oil adds to the moisture content of the dough, so contrary to thinking you might need to add more water, it’s not necessary unless your dough ends up way too dry.
If you use a non-hardening oil, your baked goods will remain softer at room temperatures and won’t require warming. I’ve wrestled with this problem for a while until I realized it was the butter causing the baked good to feel hard (and stale) at room temperatures. This doesn’t mean your bread won’t eventually go stale, but it does mean baked goods made with non-hardening oils won’t feel stale (or taste dry) at room temperature like when using butter.
Happy Baking!
If you enjoy reading Randocity articles, please click the Follow button so you will be notified for new articles. Also, please like, share and comment, particularly if this recipe worked out well for you.
↩︎


leave a comment